Boot process and service control
One, Linux operating system boot process
- Power-on self-test (BIOS) After the
server host is turned on, the CPU, memory, graphics card, keyboard and other devices will be initially tested according to the settings in the motherboard BIOS. After the test is successful, the system control will be transferred according to the preset startup sequence. Most of the time, it will be transferred. Give the local hard disk.
总结:检测出第一个能够引导系统的设备,比如硬盘或者光驱
- MBR booting
When starting the system from the local hard disk, firstly, according to the MBR (Master Boot Record) setting in the first sector of the hard disk, transfer the system control right to the partition containing the operating system boot files; or directly according to the MBR record The boot information in the boot menu (such as GRUB)
总结:运行放在MBR扇区里的启动GRUB引导程序
- GRUB menu
For the Linux operating system, GRUB (Unified Boot Loader) is the most widely used multi-system bootloader program. After the system control is passed to GRUB, the boot menu will be displayed for the user to choose, and the Linux kernel file will be loaded according to the selected option (or the default value), and then the system control will be transferred to the kernel. Centos 7 uses GRUB2 boot loader.
总结: GRUB引导程序通过读取GRUB配置文件/boot/grub2/grub.cfg,来获取内核和镜像文件系统的设置和路径位置
- Load the kernel (kernel) The
Linux kernel is a pre-compiled special binary file, between various hardware resources and system programs, responsible for resource allocation and scheduling. After the kernel takes over the control of the system, the default kernel file in the Centos 7 system is located at "/boot/vmlinuz-3.10.0-514.e17.x86_64".
In Centos 7 system, the default kernel file is located at "/boot/vmlinuz-3.10.0-514.e17.x86 _64".
总结:把内核和镜像文件系统加载到内存中
- Init process initialization
In order to complete the further system boot process, the Linux kernel first loads the “/sbin/init” program in the system into the memory to run (the running program is called a process), the init process is responsible for completing the initialization of the entire system, and finally Wait for the user to log in.
总结:加载硬件驱动程序,内核把init进程加载到内存中运行
2. System initialization process
2.1 init process
- Load and run the /sbin/init program by the Linux kernel
- The oinit process is the first process in the system and the parent process of all processes
- The PID (Process ID) number of the init process is always 1
2.2 Systemd
- Systemd is an init software of Linux operating system
- CentOS7 uses a new Systemd startup method to replace the traditional SysVinit
- The first init process running in CentOS7 is /lib/systemd/systemd
传统SyaVinit依赖于串行执行Shell 脚本启动服务,导致效率低下,系统启动速度较慢
systend能够将更多的服务进程并行启动。井且具有揭供按需启动服务的能力。使得启动更少进程。从而提高系统启动速度。
2.2.1 Systemd unit type
| Unit type | extension name | Description |
|---|---|---|
| Service | .Service | Describe a system service |
| Socket | .socket | Describe a socket for inter-process communication |
| Device | .device | Describe a device file recognized by the kernel |
| Mount | .mount | Describe the mount point of a file system |
| Automount | .automount | Describe the automatic mount point of a file system |
| Swap | .swap | Describe a memory swap device or swap file |
| Path | .path | Describe a file or directory in a file system |
| Timer | .timer | Description-a timer (used to implement cron-like scheduling tasks) |
| Snapshot | .snapshot | Used to save the state of a systemd |
| Scope | .scope | Describe the process of the management system that resides in the Cgroup-the group is organized through the hierarchy |
| Slice | .slice | Describe the process of the management system that resides in the Cgroup-the group is organized through the hierarchy |
| Target | .target | Describe a set of systemd units |
2.2.2 Systemd target corresponding to the run level
| Run level | Systemd的target | Description |
|---|---|---|
| 0 | target | Shutdown state, the host will be shut down when using this level |
| 1 | rescue.target | Single user mode, you can log in to the system without password verification, mostly used for system maintenance |
| 2 | multi-user.target | User-defined/domain specific run level. The default is equivalent to 3 |
| 3 | multi-user.targett | Full multi-user mode with character interface, most server hosts run at this level |
| 4 | multi-user.target | User-defined/domain specific run level. The default is equivalent to 3 |
| 5 | graphical.target | The multi-user mode of the graphical interface provides a graphical desktop operating environment |
| 6 | reboot.target | Restart, the host will be restarted when using this level |
3. Repair MBR sector failure
3.1 Causes of failure
- Damage caused by viruses, Trojan horses, etc.
- Incorrect partition operation, disk read and write errors
3.2 Failure phenomenon
- Cannot find the boot program, start interrupted
- Unable to load operating system, black screen after boot
3.3 Solutions
- Backup files should be made in advance
- Boot into emergency mode with installation CD
- Restore from backup file
3.4 MBR sector fault simulation
- First add a new hard drive
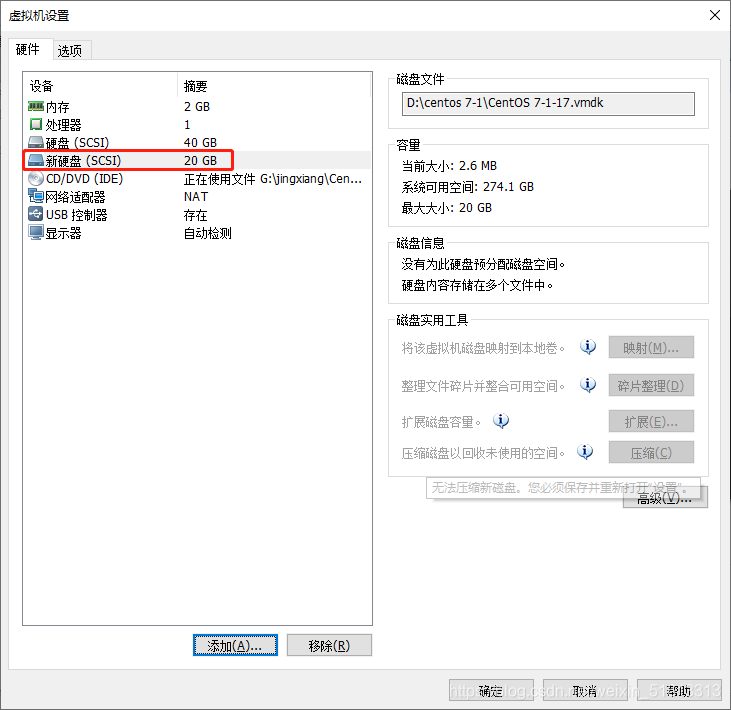
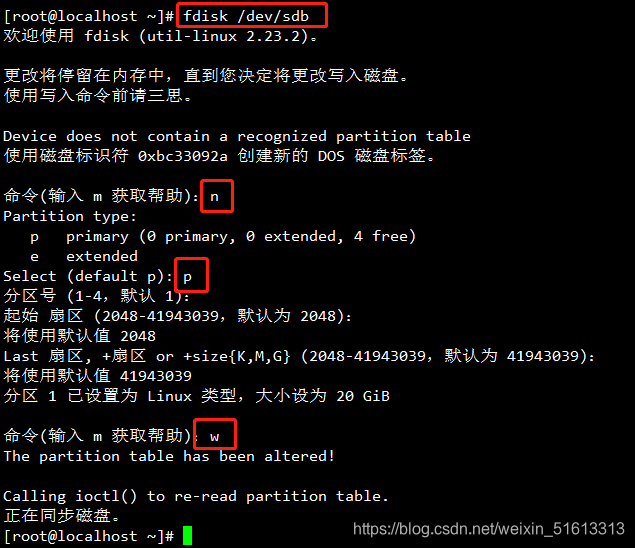
- New partition
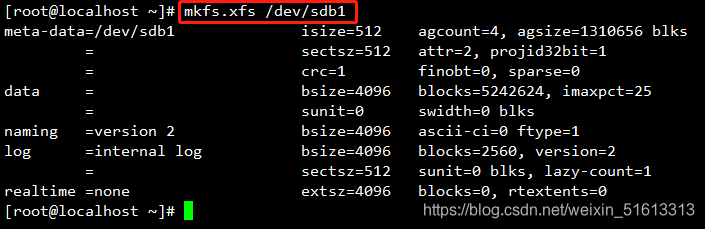
- format
- Mount
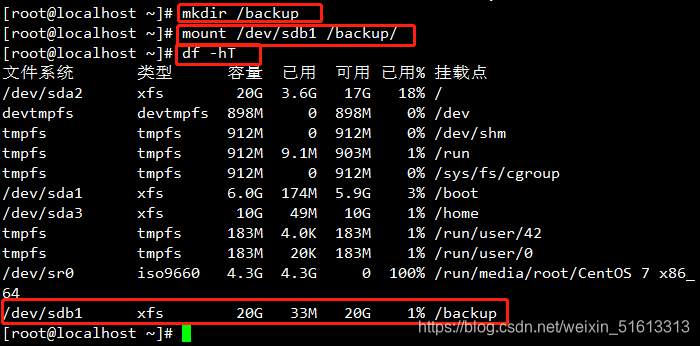
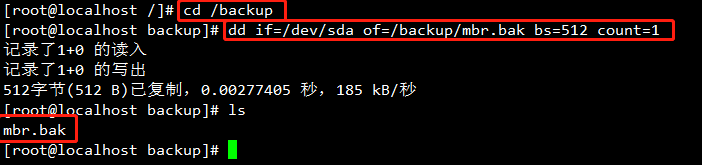
- Backup
- Enter "dd if=/dev/sda of=/backup/mbr.bak bs=512 count=1" command to back up the mbr data of the first sector in sda to the newly created backup directory
- Use "dd if=/dev/zero of=/dev/sda bs=512 count=1" command to simulate destruction of sda
- Restart using the init 6 command

- At this time, we found that we could not enter the system normally, but came to the installation interface
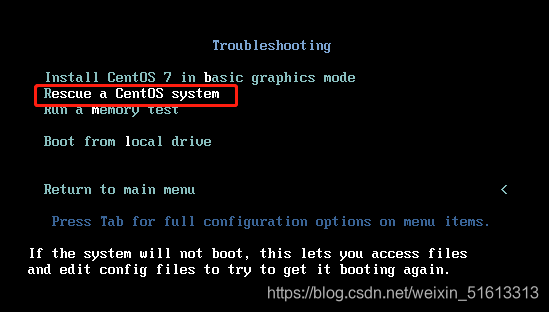
- Here we choose "Troubleshooting" to enter the emergency mode

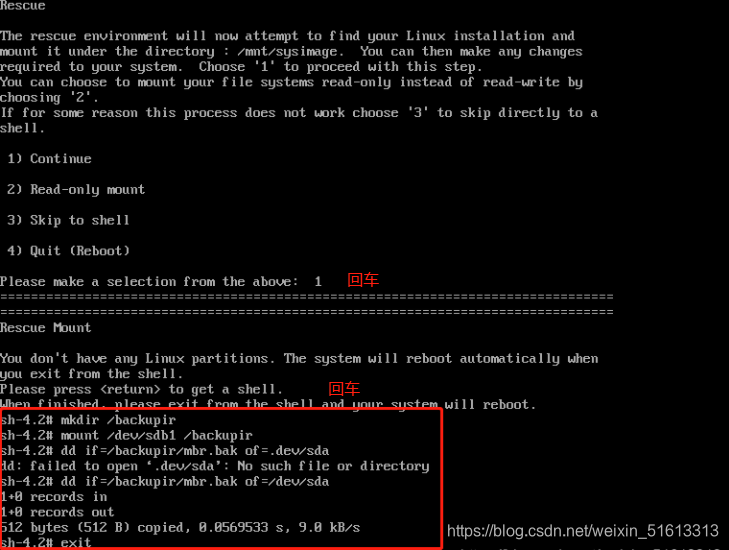
- Enter 1 to select continue and press enter
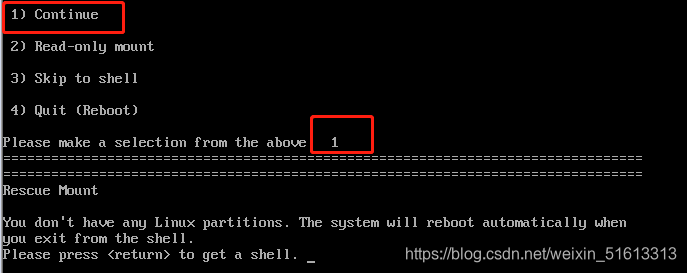
- Press Enter again to enter the Bash Shell environment with "sh-4.2#" prompt
mkdir /backupdir
sh-4.2# mount /dev/sdb1 /backupdir————挂载带有备份文件的分区
sh-4.2# dd if=/backupdir/mbr.bak of=/dev/sda bs=512 count=1————复备份数据
sh-4.2# exit————执行exit命令退出临时Shell环境,系统将会自动重启
- After the system restarts, it is found to be normal, and you can enter the system normally
Four, repair GRUB boot failure
4.1 Cause of failure
- GRUB bow in MBR|Guide program is destroyed
- The grub.conf file is missing, the boot configuration is incorrect
4.2 Failure phenomenon
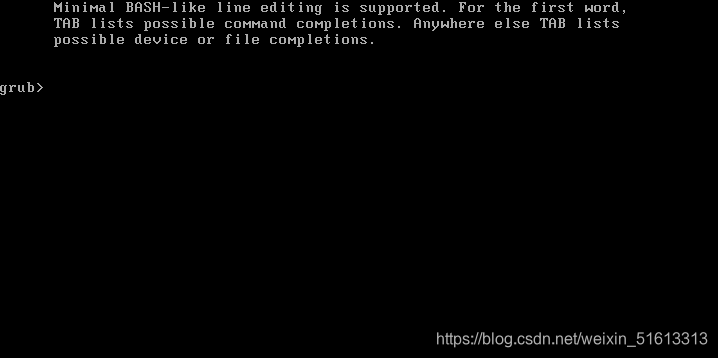
- System booting stalls, displaying "grub>" prompt
4.3 Solutions
- Try to manually enter the boot command
- Enter emergency mode, rewrite or restore grub.conf from backup
- Rebuild the grub program into the MBR sector
4.4 Simulate GRUB boot failure
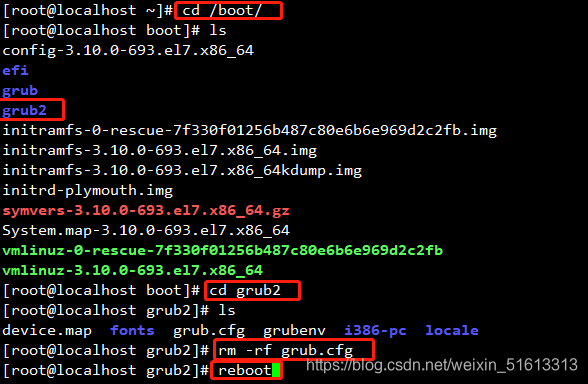
- Enter the /boot directory
- Find grub2, then enter grub2
- Delete the grub.cfg file to simulate the /boot/grub2/grub.cfg file loss and wrong boot configuration in GRUB boot failure
- Use the reboot command to restart.
- After restarting, you will enter this interface
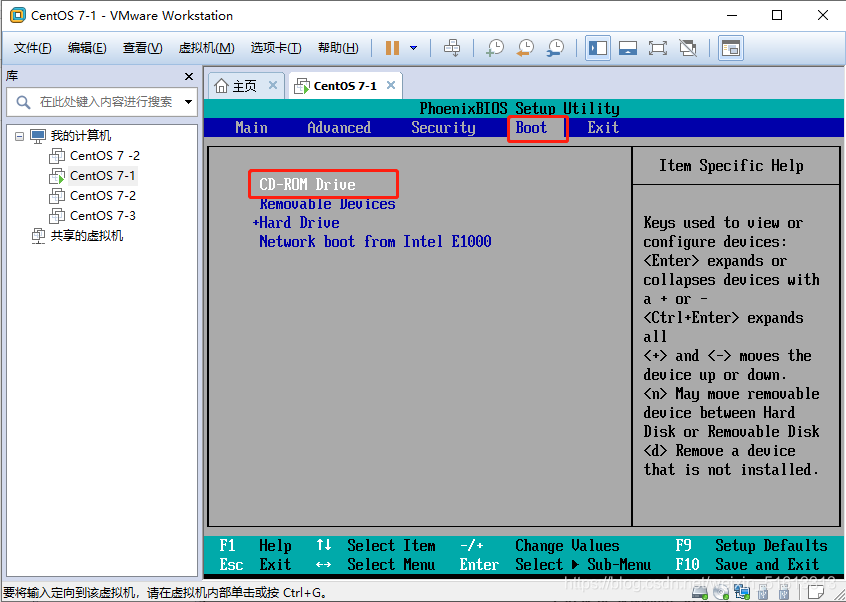
(How to enter the guide interface)
- Right click on the virtual machine
- Choose power
- Select to restart the virtual machine, click "ESC" immediately after restarting (compared to test the hand speed, the hand speed is slow, and you can't enter)
- If you have not been able to enter the boot interface, you can change the startup priority option to CD priority ("+" adjust the position, f10 save and exit)
- Enter the emergency mode and restore the centos system
- The rest of the operation is the same as the first experimental step, except that the commands entered in the Bash Shell environment are different.
- The command is as follows:
chroot /mnt/sysimage ——————切换到系统根环境
grub2-install /dev/sda ——————重新将GRUB引导程序安装到第一块硬盘(/dev/sda)的MRB扇区
grub2-mkconfig -o /boot/grub2/grub.cfg ——————重新构建GRUB菜单的配置文件
exit ——————退出chroot 环境,并重启
reboot ——————重启
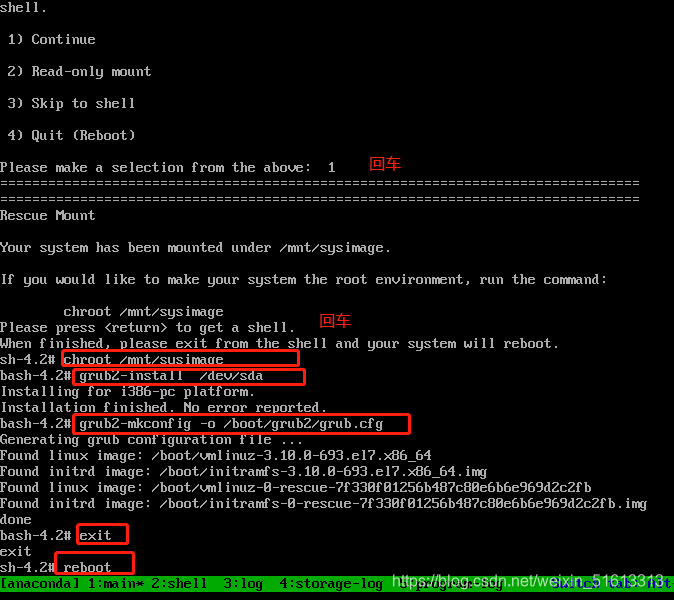
- After the restart is complete, you can enter the system interface
Five, forget the root user password
5.1 Causes of failure
- Forgotten the password of the root user
5.2 Malfunction
- Cannot perform management operations that require root privileges
- If there is no other available account, you will not be able to log in to the system
5.3 Solutions
Enter emergency mode, reset password
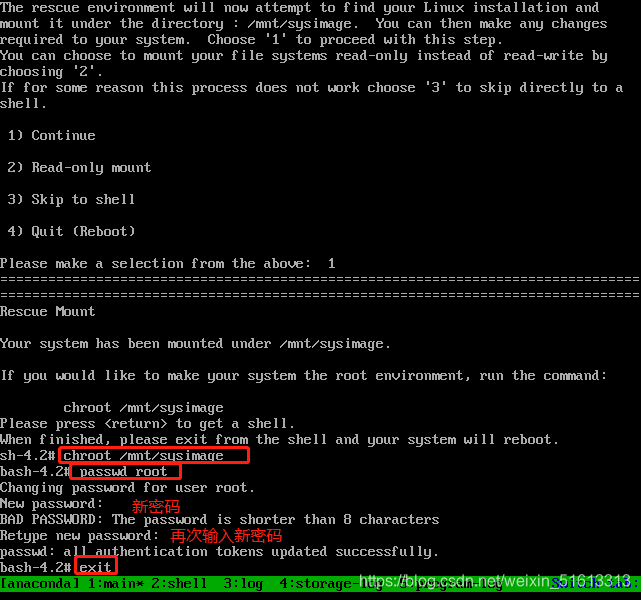
5.4 Simulation of forgotten root user password
After entering the emergency mode, follow the previous operation process and then enter the following command to reset the password
chroot 	/mnt/sysimage	——————切换到系统根环境
passwd root ——————修改管理员账号密码
exit ——————退出
6. System service control
6.1 System service control
systemctl 控制类型 服务名称
6.2 Control type
start: start
stop: stop
restart: restart
reload: reload
status: view service status
Seven, the operating level of the Linux system
7.1 View run level
- runlevel command (you can only view the switch run level and the current run level)
- systemctl tool (systemctl get-default-view the system default run level)
7.2 Temporarily switch run level
init 0   systemctl   isolate   poweroff.target  systemctl   poweroff
init 1   systemctl   isolate   rescue.target
init 3   systemctl   isolate   multi-user.target
init 5   systemctl   isolate   graphical.target
init 6   systemctl   isolate   reboot.target systemctlreboot   reboot
7.3 Set permanent run level
In-sf  /lib/systemd/system/multi-user.target  /etc/systemd/system/default.target
systemctl   set-default   multi-user.target
8. Start and control system services
8.1 View the startup status of system services
systemctl is-enabled 服务名称
8.2 The service name sets the startup status of system services
systemctl enable 服务名称——————开启开机自启动
systemct disable 服务名称——————关闭开机自启动