Take you a deeper understanding of the Linux file system (super detailed!) (Inode number exhaustion troubleshooting, recovery of accidentally deleted files, and analysis of log files)
We have learned before that each file and inode correspond to each other, that is to say, each file will have an inode number, but in this way, it may happen that the inode has been used up, but the hard disk is not full.
Once this happens, we can no longer create new files on the hard disk. In order to make everyone understand more intuitively, here is a case to simulate the failure of the number of files in the Linux file system.
1. Preparation
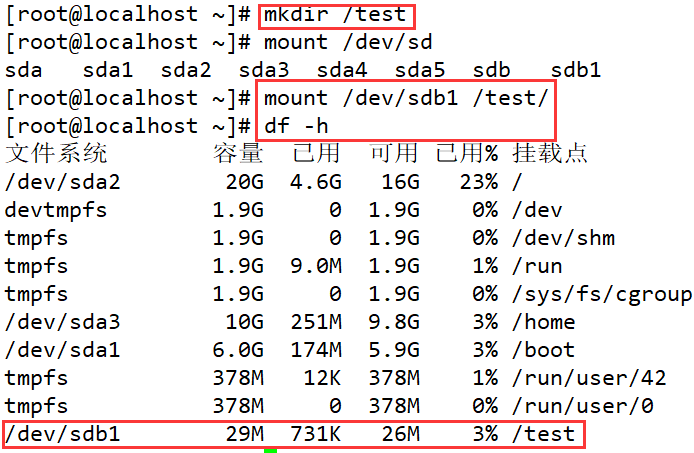
Create a new hard disk, create partition /dev/sdb1, partition size +30M (not too big, here is just a simulation experiment, otherwise there will be too many inode numbers)
Format, ext4 format (xfs also works)
[root@localhost ~]# mkfs.ext4 /dev/sdb1
There may be a situation: after the partition is created and formatted and the disk file is found to be missing, what should I do? At this time, it is recommended to restart the system or execute the "partprobe" command to make the operating system detect the new partition table to prevent formatting the partition Damage the existing data in the hard drive
Create a new directory and mount it
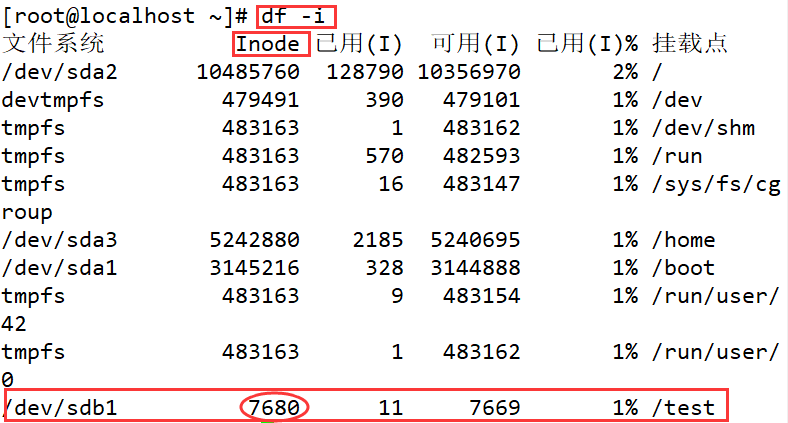
Use the df command with the "-i" option to confirm the usage of the i-node in the file system, it can be seen that there are 7680 inodes
2. Simulate i-node exhaustion failure
Write a script to simulate exhausting all available i-nodes in /dev/sdb1 (7680)
For detailed learning about the script program later, just understand it here
At this time, check the available inodes of the partition again, and find that it is full, and then create a new file can not succeed, but through the df command to view the partition, only "4%", there is a lot of free space; from this, you can get: Disk The number of files created is limited by the size of the disk and the number of inode numbers
We understand the origin of the fault, then the problem can be solved better, you can "ls -a" to view all files (including hidden files)
Then find out the small files that occupy a large number of i-nodes in the partition, and transfer or delete them.
For file systems shared by many users, it is recommended to set disk quotas for related users (including the number of files and disk space)
2. Recover files deleted by mistake
When many of our ordinary users delete a file, they don’t actually know the inode node and block data, they just find the file (name) and delete it.
In fact, Linux controls file deletion by the number of links. Only when there is no link in a file, the file will be completely deleted.
For the EXT file system under the Linux system, you can use the extundelete recovery tool to recover files. It is an open source Linux data recovery tool that supports ext3 and ext4 file systems (ext4 can only be recovered in the CentOS6 version)
1. Preparation (compile and install extundelete)
You can continue with the newly created partition just now, but first unmount it, then reformat it to "ext3" and then mount it
[root@localhost test]# cd
[root@localhost ~]# umount /test/
[root@localhost ~]# mkfs.ext3 /dev/sdb1
...略
[root@localhost ~]# mount /dev/sdb1 /test/
Before compiling and installing extundelete, you need to install two dependency packages (first pay attention to whether you have mounted a mirror)
[root@localhost test]# ls
extundelete-0.2.4.tar.bz2  lost+found
[root@localhost test]# tar jxvf extundelete-0.2.4.tar.bz2        ##解压
...略
[root@localhost test]# ls
extundelete-0.2.4  extundelete-0.2.4.tar.bz2  lost+found
[root@localhost test]# cd extundelete-0.2.4/
[root@localhost extundelete-0.2.4]# ls
acinclude.m4  config.h.in   depcomp     Makefile.am  README
aclocal.m4    configure     install-sh  Makefile.in  src
autogen.sh    configure.ac  LICENSE     missing
[root@localhost extundelete-0.2.4]# ./configure --prefix=/usr/local/extundelete        ##进行配置,指定软件安装(工作)目录
Configuring extundelete 0.2.4
Writing generated files to disk
[root@localhost extundelete-0.2.4]# make && make install        ##编译完成后进行安装
...略
[root@localhost extundelete-0.2.4]# cd /usr/local/extundelet
[root@localhost extundelet]# ls
bin
[root@localhost extundelet]# cd bin/
[root@localhost bin]# ls
extundelete
[root@localhost bin]# ln -s /usr/local/extundelet/bin/extundelete /usr/bin/        ##创建软链接,把前者文件放入/usr/bin目录中,让系统能识别extundelete的所有命令
2. Simulate delete
Go back to the /test/ directory and create a new file in this directory ("echo" means output, which is equivalent to creating four files with the content of a)
[root@localhost bin]# cd /test/
[root@localhost test]# echo a>a
[root@localhost test]# echo a>b
[root@localhost test]# echo a>c
[root@localhost test]# echo a>d
[root@localhost test]# cat a
a
[root@localhost test]# cat b
a
[root@localhost test]# cat c
a
[root@localhost test]# cat d
a
[root@localhost test]# ls
a  c  extundelete-0.2.4          lost+found
b  d  extundelete-0.2.4.tar.bz2
Check which files exist in the file system /dev/sdb1, the i-node starts from 2, and 2 means that the file is the first directory of the system
[root@localhost test]# extundelete /dev/sdb1 --inode 2
...略
Would you like to continue? (y/n)
y        ##你想继续吗,输入y继续
...略
File name                                       | Inode number | Deleted status
.                                                 2
..                                                2
lost+found                                        11
extundelete-0.2.4.tar.bz2                         12
extundelete-0.2.4                                 1921
a                                                 13
b                                                 14
c                                                 15
d                                                 16
##只列出关键内容,这里可以看到a、b、c、d的inode号都有了
After we delete file a and file b, "ls" will find that there are no files a and b, and when we enter the "extundelete /dev/sdb1 --inode 2" command, we will find that files a and b are in the Deleted state.
[root@localhost test]# rm -rf a b
[root@localhost test]# ls
c  extundelete-0.2.4          lost+found
d  extundelete-0.2.4.tar.bz2
[root@localhost test]# extundelete /dev/sdb1 --inode 2
...略
3. Perform recovery operations
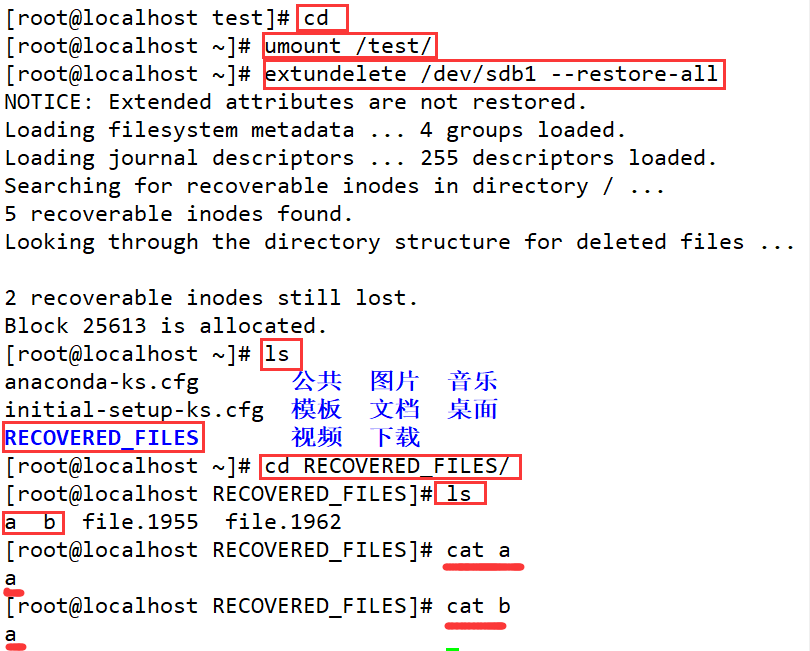
First go back to the home directory, unmount /test/, and then use to restore all the contents under the /dev/sdb1 file system. After executing this command, a new directory will appear in the current directory, which saves the restored files
There are many more uses of extundelete, interested students can check more detailed usage through help
After the file is deleted by mistake, if the inode number is overwritten (the directory is filled or formatted), it cannot be retrieved and restored.
Three, xfs type file backup and recovery
1 Overview
Note: It is another type, not directly delete and restore, but backup and restore
CentOS7 uses xfs type files by default, and xfs type files can be backed up and restored with xfsdump and xfsrestore tools
There are two backup levels for xfsdump: 0 means full backup: 1-9 means incremental backup
Incremental backup: After the backup is completed, if there is new content on the disk, it will only back up the new content, instead of performing a full backup again
The default backup level of xfsdump is 0.
2. Command format
xfsdump -f 指定备份存放位置 要备份的路径或设备文件
3. Common options
-f: Specify the backup file directory
-L: Specify the session label (if not specified, we will be prompted to enter it directly)
-M: Specify the device label
-s: backup a single file (the path cannot be followed directly)
4. Use restrictions
Only the mounted file system can be backed up
Must use root authority to operate
Only XFS file system can be backed up
The data after the backup can only be parsed by xfsrestore
5. Operation steps
Create a new partition /dev/sdb2 with a size of +10G (optional), format it as xfs, and mount it into the newly created /data/ directory
Simulate data loss and restore files using the "xfsrestore" command
[root@localhost opt]# cd -
/data
[root@localhost data]# ls
passwd  xcf
[root@localhost data]# rm -rf *
[root@localhost data]# ls
[root@localhost data]# xfsrestore -f /opt/dump_sdb2 ./
...略
[root@localhost data]# ls
passwd  xcf        ##检查一下是否成功恢复
[root@localhost data]# cd xcf/
[root@localhost xcf]# ls
xcf.txt        ##OK~
Fourth, analyze log files
1. Log function
The log file is a file used to record various operating information in the Linux system, which is equivalent to a "diary"
Different log files record different types of information, such as user login time, program error, etc.
By reading the log, it is helpful to diagnose and solve system failures (documented)
In addition, when the host is attacked by hackers, the log file can also help to find traces left by the hacker (such as brute force cracking multiple attempts to log in to the password)
2. Classification of logs
In the Linux system, log data mainly includes the following three types:
Kernel and system logs:
Unified management by the system service rsyslog, according to its main configuration file /etc/rsyslog.conf settings to determine where to log kernel messages and various system program messages
Quite a few programs in the system will hand over their log files to rsyslog log management, so these formats are basically the same
User log:
Record system user login and logout information
Including user name, login terminal, login time, source host, process being used, etc.
Program log:
Used to record various event information during the running of this program
Log files independently managed by various applications, the record format is not uniform
The log files of the Linux operating system itself and most server programs are placed in the directory /var/log by default
3. Common log files
For the log files in the Linux system, it is necessary to understand their respective uses, so that the problem can be found faster and more accurately when needed, and various failures can be solved in time. Here are some common log files
Log file
Introduction
Kernel and public message log: /var/1og/messages
Record Linux kernel messages and public log information of various applications, including startup, IO errors, network errors, program failures, etc.
Scheduled task log: /var/log/cron
Record event information generated by crond scheduled task
System boot log: /var/1og/dmesg
Record various event information of the Linux system during the boot process
#Mail system log:/var/ log/maillog
Log email activity entering or sending out the system
User login log: /var/1og/secure
Record security event information related to user authentication
/ var / log / lastlog
Record the recent login events of each user; binary format
/ var / log / wtmp
Record each user login, logout and system startup and shutdown events; binary format (you can’t read it anyway)
/ var / run / btmp
Log failed and incorrect login attempts and verification events; binary format
Enter the directory, "vim target" to view the log
4. Log file analysis
After getting familiar with the main log files in the system, let’s introduce the analysis methods for log files
The purpose of analyzing the log file is to browse the log to find key information, to debug the server, and to determine the cause of the failure, etc.
For most log files in text format (such as kernel and system logs, most program logs), you can view the log content by using text processing tools such as tail, more, less, cat, etc.
For some log files in binary format (such as user logs), you need to use characteristic query commands
5. Kernel and system logs
Unified management by the system service rsyslog
Package: rsyslog-7.4.7-16.el7.x86_ 64
Configuration file: /etc/rsyslog.conf
Main program: /sbin/rsyslogd
Enter "vim /etc/rsyslog.conf" to enter and view the configuration file
"*.info" means that all information of info level and above are written to the corresponding log file
"Mail.none" means that information about something is not written to the log file
Priority level of Linux system kernel log messages (the smaller the number level, the higher the priority, the more important the message):
Priority
Description
0
EMERG (emergency): a situation that will cause the host system to be unavailable
1
ALERT: problems that must be resolved immediately
2
CRIT (serious): a more serious situation
3
ERR (error): an error occurred during operation
4
WARNING: Important events that may affect system functions and need to remind users
5
NOTICE (Note): will not affect the normal function, but need to pay attention to the event
6
INFO: general information
7
DEBUG (debugging): program or system debugging information, etc.
Generally, in actual use, it can record up to the ERR (3, error) level. It is impossible to record all the information in the log. For efficiency, only record the important (that is, either the ordinary log or the error log, and more It is the error log, see what happened to the failure)
6. General format of log records
The kernel and most system messages are recorded in the public log file /var/log/messages, while other program messages are recorded in their own independent log files. In addition, log messages can also be recorded to a specific storage device, or Send directly to the specified user
View the contents of the /var/log/messages file as follows ... Omitted
Each line represents a log message, and each message includes four fields
Time label: the date and time the message was sent
Host name: The name of the computer that generated the message
Subsystem name: The name of the application that issued the message
Message: the specific content of the message
In some cases, you can set rsyslog to send the log information to the printer for printing while recording the log file to the file, so that no matter how the network intruder modifies the log, the trace of the intrusion cannot be cleared.
rsyslog is a prominent target that is often attacked. If it is destroyed, it will be difficult for administrators to find intrusions and traces of intrusions. Therefore, pay special attention to monitoring its daemon and configuration files.
7. User log analysis
Save the user login, logout and other related information
/varl/log/lastlog: recent user login events
/var/log/wtmp: user login, logout and system startup and shutdown events
/var/run/utmp: detailed information of each user currently logged in
/var/log/secure: security events related to user authentication
These files are binary data files. You cannot directly use text viewing tools such as tail and less to browse. You need to use user query commands such as users, who, w, last, and lastb to obtain log information.
The user command instructs to simply output the name of the currently logged in user, and each displayed user name corresponds to a login session; if a user has more than one login session, then his user name will be displayed the same number of times.
The who command is used to report the information of each user currently logged into the system; using this command, the system administrator can view which illegal users exist in the current system to audit and process them (the default output of who includes user name, Terminal type, login date and remote host)
The w command is used to display information about each user in the current system and the process they are running, and the output content will be richer
The last command is used to query the user records that have successfully logged in to the system. The latest login status will be displayed at the top; if an unauthorized user has logged in, you can know that it has been invaded
The lastb command is used to query the user records of failed logins. You can pay attention to whether someone is brute force cracking your password; you can also get related information in the security log /var/log/secure (tail /var/log/secure)
8. Program log analysis
In the Linux system, quite a few applications do not use the rsylog service to manage logs, but the program maintains log records.
httpd website service program (Web service): /var/log/httpd/
Record through the following two log files
access_ log //Record customer access events
error_ log //Record error events
Proxy service (equivalent to a cache server mechanism for users to access again, reducing the concurrent load of the server): /var/log/squid/
access.log、cache.log
Because the log record format of different programs is quite different, and there is no strict regulation of a unified format, so I will not introduce it in detail here.
The log file will be dynamically written, and you are constantly writing when you are watching it. The log will continue to grow larger, which will affect our viewing. At this time, you need some professional log analysis tools to view (interested Students can learn more about it)
9. Log management strategy (summary)
In general, as a professional system administrator, you should always be vigilant, pay attention to all kinds of suspicious situations, check various system log files regularly, and make timely backups and archives.
When checking these logs, once unreasonable places are found, make a record immediately
Extend the log storage time (convenient for viewing by yourself or for others?), through operations such as backup
Control log access rights (such as some sensitive information, such as account numbers, passwords and passwords, etc.)
Centralized management of logs
Send the server's log file to the unified log file server (for us to find it)
This facilitates the unified collection, sorting and analysis of log information
Effectively prevent accidental loss, malicious tampering or deletion of log information
In addition, sometimes the logs are not completely reliable. Old and highly skilled hackers will clean the scene perfectly after the invasion.
So in summary, we need to be able to apply the above system commands proficiently and flexibly, and conduct comprehensive and comprehensive review and testing, and remember to take out of context