Written in the front: The Java back-end advanced interview questions necessary for the interview in 2020. A review guide is summarized on Github. The content is detailed, with pictures and texts. Friends who need to learn can star!
GitHub address: https://github.com/abel-max/Java-Study-Note/tree/master
The main function of Binlog log is data recovery and master-slave replication. It is a log file in binary format, and network transmission does not require protocol conversion. The MySQL cluster's high availability, load balancing, read-write separation and other functions are all based on Binlog.
MySQL master-slave replication mainstream architecture model
Based on Binlog, we can replicate one MySQL server or multiple, depending on what functions we want to implement. The mainstream system architecture has the following methods:
1. One master, one slave / one master, multiple slaves
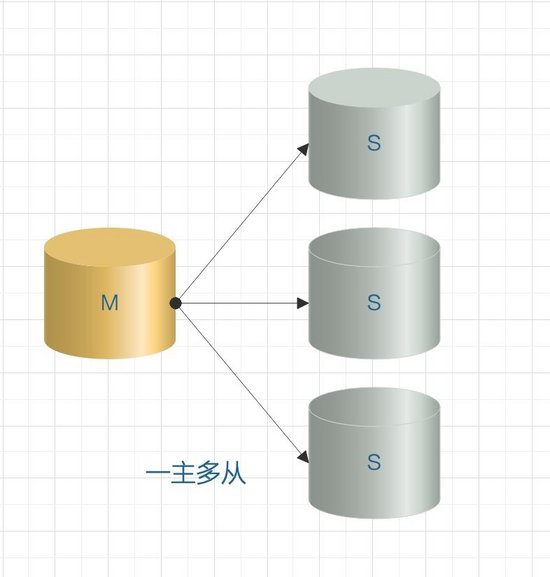
One-master-one-slave and one-master-multi-slave are the most common master-slave architectures. Generally, this architecture can be used to achieve master-slave configuration or read-write separation.
If it is a one-master-multi-slave mode, when the number of slaves increases to a certain number, the load of the slave on the master and the network bandwidth will become a serious problem.
2. Multiple masters and one slave

MySQL 5.7 began to support a multi-master-one-slave mode, backing up data from multiple databases to one database for storage.
3. Dual master replication
Theoretically, it is the same as the master-slave, but the two MySQL servers act as each other's slaves, and any changes on either side will copy each other's data to its own database. Dual-master is suitable for business scenarios where the writing pressure is relatively high, or where the DBA needs to switch between master and slave for maintenance. The dual-master architecture avoids the trouble of repeatedly building slave libraries. (The process of the master-slave mutual authorization connection, reading the other party's binlog log and updating to the local database; as long as the other party's data changes, you will change accordingly)
4. Cascade replication
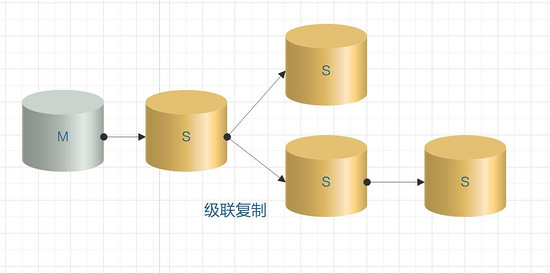
In the cascade mode, because there are many slave nodes involved, if they are all connected to the master, the pressure on the master server is definitely not small. Therefore, some slave nodes are connected to the slave nodes of the upper level. This relieves the pressure on the main server.
Cascading replication solves the pressure of multiple slave library replication on the master library in the one-master multi-slave scenario. The drawback is that the data synchronization delay is relatively large.
MySQL master-slave replication principle
MySQL master-slave replication involves three threads:
A thread on the master node: log dump thread
Two threads will be generated from the library: one I/O thread and one SQL thread
As shown below:
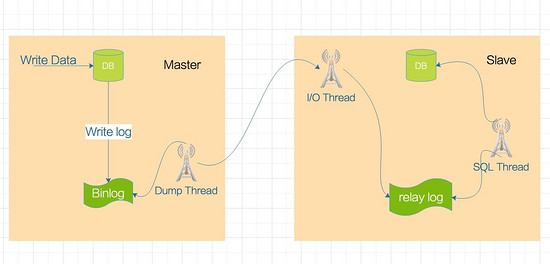
The main library will generate a log dump thread to transfer Binlog data to the slave library I/O thread.
The I/O thread of the slave library will request the Binlog of the main library and write the obtained Binlog to the local relay log (relay log) file.
The SQL thread will read the log in the relay log file and parse it into SQL statements to execute one by one.
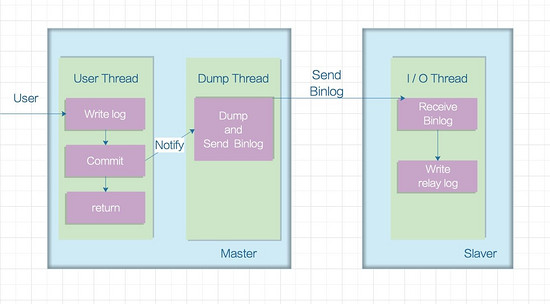
Main node log dump thread
When the slave node connects to the master node, the master node will create a log dump thread for it to send and read the contents of Binlog. When reading the operation in the Binlog, the log dump thread will lock the Binlog on the master node; the lock will be released before the read is completed and sent to the slave node. The master node will create a log dump thread for each of its slave nodes .
Slave node I/O thread
When executed from the node start slaveafter the command, the node creates an I / O thread is used to connect the master node, the request Binlog updated master repository. After the I/O thread receives the update sent by the log dump process of the master node, it saves it in the local relay-log (relay log).
relay log
Here is a new log concept. When MySQL performs master-master replication or master-slave replication, a corresponding relay log will be generated under the server to be replicated.
How is the relay log generated?
The slave server I/O thread reads the Binlog log of the master server, parses the various Events and records it to the local file of the slave server. This file is called the relay log. Then the SQL thread will read the contents of the relay log and apply it to the slave server, so that the data of the slave server and the master server are consistent. The relay log acts as a buffer so that the master does not have to wait for the completion of the slave execution before sending the next event.
Relay log related parameter query:
mysql>  show variables like '%relay%';
+---------------------------+------------------------------------------------------------+
| Variable_name             | Value                                                      |
+---------------------------+------------------------------------------------------------+
| max_relay_log_size        | 0                                                          |
| relay_log                 | yangyuedeMacBook-Pro-relay-bin                             |
| relay_log_basename        | /usr/local/mysql/data/yangyuedeMacBook-Pro-relay-bin       |
| relay_log_index           | /usr/local/mysql/data/yangyuedeMacBook-Pro-relay-bin.index |
| relay_log_info_file       | relay-log.info                                             |
| relay_log_info_repository | TABLE                                                      |
| relay_log_purge           | ON                                                         |
| relay_log_recovery        | OFF                                                        |
| relay_log_space_limit     | 0                                                          |
| sync_relay_log            | 10000                                                      |
| sync_relay_log_info       | 10000                                                      |
+---------------------------+------------------------------------------------------------+
11 rows in set (0.03 sec)</pre>
max_relay_log_size
Mark the maximum allowable relay log. If the value is 0, the default value is max_binlog_size(1G); if it is not 0, then max_relay_log_size is the maximum relay_log file size.
relay_log_purge
Whether to automatically clear the relay log when no longer needed. The default value is 1 (enabled).
relay_log_recovery
When the slave goes down from the library, if the relay log is damaged, causing part of the relay log to not be processed, all unexecuted relay logs are automatically discarded, and the log is re-obtained from the master, thus ensuring the integrity of the relay log. This function is turned off by default. When the value of relay_log_recovery is set to 1, the function can be turned on on the slave library. It is recommended to turn it on.
relay_log_space_limit
To prevent relay logs from filling up the disk, set the maximum limit of relay logs here. However, this setting has the situation that the main library crashes and the relay log of the slave library is incomplete. It is not a last resort and is not recommended.
sync_relay_log
This parameter and Binlog the sync_binlogsame effect. When set to 1, each time the slave's I/O thread receives the Binlog log sent by the master, it must be written into the system buffer, and then flushed into the relay log relay log. This is the safest way, because in the crash At this time, you will lose at most one transaction, but it will cause a lot of disk I/O.
When set to 0, it is not immediately flushed to the relay log, but the operating system decides when to write. Although the security is reduced, it reduces a lot of disk I/O operations. This value is 0 by default and can be modified dynamically. It is recommended to use the default value.
sync_relay_log_info
When set to 1, each time the slave's I/O thread receives the Binlog log sent by the master, it must be written into the system buffer and then flushed to relay-log.info. This is the safest way because it is crashing. At this time, you will lose at most one transaction, but it will cause a lot of disk I/O. When set to 0, it is not immediately flashed into relay-log.info, but the operating system decides when to write. Although the security is reduced, it reduces a lot of disk I/O operations. This value is 0 by default and can be modified dynamically. It is recommended to use the default value.
Slave node SQL thread
The SQL thread is responsible for reading the content in the relay log, analyzing it into specific operations and executing them, and ultimately ensuring the consistency of the master-slave data.
For each master-slave connection, these three processes are required to complete. When the master node has multiple slave nodes, the master node will build a log dump process for each currently connected slave node, and each slave node has its own I/O process, SQL process.
The slave node uses two threads to pull updates and execute them from the main library into independent tasks, so that the performance of read operations will not be reduced when performing data synchronization tasks. For example, if the slave node is not running, the I/O process can quickly get updates from the master node, even though the SQL process has not yet executed. If the slave node service is stopped before the SQL process is executed, at least the I/O process has pulled the latest changes from the master node and saved it in the local relay log. When the service is up again, the data synchronization can be completed.
To implement replication, you must first enable the Binlog function on the Master side, otherwise it will not be possible.
Because the entire replication process is actually that the Slave obtains the log from the Master and then executes the various operations recorded in the log in complete order on itself. As shown below:

The basic process of copying
sart slave
master-info
relay log.info
MySQL is based on Binlog master-slave replication mode introduction
MySQL master-slave replication is the default asynchronous mode . MySQL add, delete and modify operations will all be recorded in Binlog. When the slave node connects to the master, it will take the initiative to obtain the latest Binlog file from the master. And store the Binlog in the local relay log, and then execute the updated content of the relay log.
Asynchronous mode (async-mode)
The asynchronous mode is shown below:
In this mode, the master node will not actively push data to the slave nodes. The master library will immediately return the results to the client after executing the transaction submitted by the client, and it does not care whether the slave library has received and processed it. There will be a problem. If the master node crashes, the transactions that have been committed on the master node may not be transmitted to the slave node. If at this time, the forcible upgrade will be the master, which may cause the data on the new master node to be lost. complete.
Semi-sync mode (semi-sync)
Between asynchronous replication and fully synchronous replication, the main library does not return to the client immediately after executing the transaction submitted by the client, but waits for at least one slave library to receive and write to the relay log before returning a success message to the client (It can only ensure that the Binlog of the main library is transmitted to at least one slave node), otherwise you need to wait until the timeout period and then switch to asynchronous mode before submitting.
[Image upload failed...(image-d63820-1603346152190)]
Compared with asynchronous replication, semi-synchronous replication improves the security of data and ensures that the data can be successfully backed up to the slave database to a certain extent. At the same time, it also causes a certain degree of delay, but it is lower than the full synchronous mode and has the least delay. It is a TCP/IP round trip time. Therefore, semi-synchronous replication is best used in low-latency networks.
The semi-synchronous mode is not built in MySQL. Starting from MySQL 5.5, the master and slave need to install plug-ins to enable the semi-synchronous mode.
Full synchronization mode
Refers to when the main library has completed a transaction, and then all the slave libraries have copied the transaction and successfully executed it before returning a success message to the client. Because you need to wait for all slaves to complete the transaction before returning a success message, the performance of full synchronous replication will inevitably be severely affected.
Binlog replication combat
Configure my.cnf
[mysqld]
log-bin
server-id
gtid_mode=off #禁掉 gtid
Add master-slave replication users:
grant replication slave on *.* to 'repl'@'%' identified by 'gtidUser';
flush privileges;
Then we add a slave library.
Then we use the command line to load the Binlog of the main library to the slave library, where you can set the specified binlog file and displacement value. Execute the following commands in the slave library:
mysql>change master to
master_host='192.168.199.117',
master_user='slave',
master_port=7000,
master_password='slavepass',
master_log_file='mysql-bin.000008',
master_log_pos=0;

mysql>start slave;
mysql>show slave status\G;
If a code error occurs during the copying process, the individual determines whether to skip the error and continue execution according to the error log:
mysql>stop slave;
mysql>set global sql_slave_skip_counter=1;
Problems that may arise in master-slave replication
Slave synchronization delay
Because the Slave side implements data parsing and storage through I/O thread single thread; and the Binlog on the Master side writes in order because it is highly efficient. When the TPS of the main library is very high, the writing efficiency of the Master side must be higher than that of the Slave side. Read efficiency, at this time there is a problem of synchronization delay.
The synchronization of I/O Thread is library-based, that is, synchronizing several libraries will open several I/O Threads.
By show slave statuscommand to see Seconds_Behind_Masterwhether there is synchronization delay value point of view, this value represents the master-slave synchronization of time delay, the greater the value the more serious delays. A value of 0 is normal. A positive value indicates that a delay has occurred. The larger the number, the more the slave library lags behind the master library.
The Binlog-based replication method must have this problem. The MySQL official also realized that single thread is not as strong as multithreading, so in MySQL version 5.7, parallel replication based on group submission (officially called Enhanced Multi-threaded Slaves, or MTS) was introduced. ,Setting parameters:
slave_parallel_workers>0Yes, and global.slave_parallel_type=‘LOGICAL_CLOCK’,
It can support a schema (library), slave_parallel_workersa worker thread concurrently executes the transaction submitted by the main library in the relay log.
Its core idea:
All transactions submitted by a group can be played back in parallel (with binary log group commit);
The same last_committed transaction (different sequence_num) in the relay log of the slave machine can be executed concurrently. Where the variable slave-parallel-typecan have two values:
- DATABASE default value, parallel copy based on library
- LOGICAL_CLOCK, parallel replication based on group submission
It is very simple to enable MTS in MySQL 5.7. You only need to configure the following in the my.cnf file of the Slave database:
# slave
 slave-parallel-type=LOGICAL_CLOCK
 slave-parallel-workers=8        #一般建议设置4-8,太多的线程会增加线程之间的同步开销
 master_info_repository=TABLE
 relay_log_info_repository=TABLE
 relay_log_recovery=ON
Of course, the parallel replication solution brought by multithreading also has many implementation difficulties. For example, transactions are executed in an orderly manner. If parallel playback is performed, there will be problems with execution data disorder. These issues are not explained in this section, and everyone who is interested can continue to study them.
A new generation of master-slave replication mode-GTID replication mode
In the conventional copying which, when a fault occurs, needs to switch over the primary , and the need to find Binlog site information, after completion of the recovery data to the new primary site. In MySQL 5.6, a new data recovery idea is provided. You only need to know the IP, port, and account password of the master node. Because the replication is automatic, MySQL will automatically find a synchronization point through the internal mechanism GTID .
GTID-based replication is a new replication method added after MySQL 5.6.5.
GTID (global transaction identifier) is the global transaction ID. A transaction corresponds to a GTID, which ensures that each transaction submitted on the main library has a unique ID in the cluster.
GTID replication principle
In the original log-based replication, the slave database needs to inform the master database from which offset to perform incremental synchronization. If the specified error is specified, the data will be missed and the data will be inconsistent.
In GTID-based replication, the slave library will inform the master library of the GTID value of the transaction that has been executed, and then the master library will return the list of GTIDs of all unexecuted transactions to the slave library, and it can ensure that the same transaction is only specified The slave library is executed once, and the method of determining the transaction to be executed by the slave library through the global transaction ID replaces the previous method of using Binlog and location to determine the transaction to be executed from the library.
The GTID-based replication process is as follows:
gitd_next变量
GTID composition
GTID = source_id:transaction_id
source_idThat is normally server_uuidgenerated (function when you first start generate_server_uuid), and persisted to the DATADIR/auto.cnffile.
transaction_idYes 顺序化的序列号(sequence number), which is a self-increasing sequence starting from 1 on each MySQL server, and is the unique identifier of the transaction.
GTID generation
GTID generated by the gtid_nextcontrol.
On the Master, it gtid_nextis the default AUTOMATIC, that is , the GTID is automatically generated every time a transaction is committed. It finds an unused minimum value greater than 0 from the currently executed GTID set (ie gtid_executed) as the next transaction GTID. Write the GTID to Binlog before the actual update transaction record.
On Slave, the GTID of the main library is first read from Binlog (ie set gtid_next record), and then the transaction executed uses this GTID.
Benefits of GTID
master_auto_position=1
GTID mode replication limitations
-
Mixed use of engines in a transaction, such as Innodb (support transactions), MyISAM (not support transactions), resulting in errors associated with multiple GTIDs and the same transaction.
-
CREATE TABLE…..SELECTCannot be used, the two events generated by this statement. In a certain situation, the same GTID will be used (the same GTID can only be used once in the slave):- event one: create table statement create table
- event two: insert data statement insert
-
CREATE TEMPORARY TABLE and DROP TEMPORARY TABLECan not be used within a transaction (enabled–enforce-gtid-consistencyparameter). -
Use GTID copy from the library skip the error, does not support the
sql_slave_skip_countersyntax parameters.
GTID master-slave replication combat
1. Operations on the Master main database
Configure GTID master-slave replication in the my.cnf file
[root@mysql-master ~]# cp /etc/my.cnf /etc/my.cnf.bak
[root@mysql-master ~]# >/etc/my.cnf
[root@mysql-master ~]# cat /etc/my.cnf
[mysqld]
datadir = /var/lib/mysql
socket = /var/lib/mysql/mysql.sock

symbolic-links = 0

log-error = /var/log/mysqld.log
pid-file = /var/run/mysqld/mysqld.pid

#GTID:
server_id = 1
gtid_mode = on
enforce_gtid_consistency = on

#binlog
log_bin = mysql-bin
log-slave-updates = 1
binlog_format = row
sync-master-info = 1
sync_binlog = 1

#relay log
skip_slave_start = 1
After configuration, restart the MySQL service:
[root@mysql-master ~]# systemctl restart mysqld
Log in to MySQL and check the status of the Master. There is one more item Executed_Gtid_Set:
mysql> show master status;
+-------------------+----------+--------------+------------------+-------------------+
| File              | Position | Binlog_Do_DB | Binlog_Ignore_DB | Executed_Gtid_Set |
+-------------------+----------+--------------+------------------+-------------------+
| mysql-bin.000001 |      154 |              |                  |                   |
+-------------------+----------+--------------+------------------+-------------------+
1 row in set (0.00 sec)

mysql> show global variables like '%uuid%';
+---------------+--------------------------------------+
| Variable_name | Value                                |
+---------------+--------------------------------------+
| server_uuid   | 317e2aad-1565-11e9-9c2e-005056ac6820 |
+---------------+--------------------------------------+
1 row in set (0.00 sec)
Check that the GTID function is turned on:
mysql> show global variables like '%gtid%';
+----------------------------------+-------+
| Variable_name                    | Value |
+----------------------------------+-------+
| binlog_gtid_simple_recovery      | ON    |
| enforce_gtid_consistency         | ON    |
| gtid_executed                    |       |
| gtid_executed_compression_period | 1000  |
| gtid_mode                        | ON    |
| gtid_owned                       |       |
| gtid_purged                      |       |
| session_track_gtids              | OFF   |
+----------------------------------+-------+
8 rows in set (0.00 sec)
Check that the Binlog log function is turned on:
mysql> show variables like 'log_bin';
+---------------+-------+
| Variable_name | Value |
+---------------+-------+
| log_bin       | ON    |
+---------------+-------+
1 row in set (0.00 sec)
Authorize slave to copy users and refresh permissions:
mysql> flush privileges;
Query OK, 0 rows affected (0.04 sec)

mysql> show grants for slave@'172.23.3.66';
+-------------------------------------------------------------------------------+
| Grants for [email protected]                                                |
+-------------------------------------------------------------------------------+
| GRANT REPLICATION SLAVE, REPLICATION CLIENT ON *.* TO 'slave'@'172.23.3.66' |
+-------------------------------------------------------------------------------+
1 row in set (0.00 sec)
Check the master status again:
mysql> show master status;
+-------------------+----------+--------------+------------------+------------------------------------------+
| File              | Position | Binlog_Do_DB | Binlog_Ignore_DB | Executed_Gtid_Set                        |
+-------------------+----------+--------------+------------------+------------------------------------------+
| mysql-bin.000001 |      622 |              |                  | 317e2aad-1565-11e9-9c2e-005056ac6820:1-2 |
+-------------------+----------+--------------+------------------+------------------------------------------+
1 row in set (0.00 sec)
Note here:
Before starting the configuration, the slave server also needs to be initialized. The method of initializing the slave server is basically the same as based on the log point, except that after the GTID mode is started, what is recorded in the backup is not the binary log file name and offset during the backup, but the backup. The last GTID value at the time.
You need to back up the target database on the main database machine first, assuming that the target database is slave_test:
mysql> CREATE DATABASE slave_test CHARACTER SET utf8 COLLATE utf8_general_ci;
Query OK, 1 row affected (0.02 sec)

mysql> use slave_test;
Database changed
mysql> create table user (id int(10) PRIMARY KEY AUTO_INCREMENT,name varchar(50) NOT NULL);
Query OK, 0 rows affected (0.27 sec)

mysql> insert into slave_test.user values(1,"xiaoming"),(2,"xiaohong"),(3,"xiaolv");
Query OK, 3 rows affected (0.06 sec)
Records: 3  Duplicates: 0  Warnings: 0

mysql> select * from slave_test.user;
+----+----------+
| id | name     |
+----+----------+
|  1 | xiaoming |
|  2 | xiaohong |
|  3 | xiaolv   |
+----+----------+
3 rows in set (0.00 sec)
Back up the slave_test library:
[root@mysql-master ~]# mysqldump --single-transaction --master-data=2 --triggers --routines --databases slave_test -uroot -p123456 > /root/user.sql
Here is a version problem:
MySQL 5.6 use mysqldumpduring backup, the backup designated specific libraries to use --database.
MySQL 5.7 use mysqldumpduring backup, the backup designated specific libraries, use--databases。
Then the backup /root/user.sqlcopy of the file to the slave server from the database.
[root@mysql-master ~]# rsync -e "ssh -p20" -avpgolr /root/user.sql
At this point, the operation of the main library is over, the backup data containing GTID has been copied to the slave library, and the operation of the slave library is performed below.
2. Operation from the library
Configure GTID master-slave replication in the my.cnf file
The configuration of the master server is roughly the same. In addition to the inconsistency of server_id, the slave server can also be added in the configuration file read_only=on, so that the slave server can only perform read operations. This parameter is invalid for the super user and will not affect the replication of the slave server.
[root@mysql-slave1 ~]# >/etc/my.cnf
[root@mysql-slave1 ~]# vim /etc/my.cnf
[mysqld]
datadir = /var/lib/mysql
socket = /var/lib/mysql/mysql.sock

symbolic-links = 0

log-error = /var/log/mysqld.log
pid-file = /var/run/mysqld/mysqld.pid

#GTID:
server_id = 2
gtid_mode = on
enforce_gtid_consistency = on

#binlog
log_bin = mysql-bin
log-slave-updates = 1
binlog_format = row
sync-master-info = 1
sync_binlog = 1

#relay log
skip_slave_start = 1
read_only = on
After the configuration is complete, restart the mysql service.
[root@mysql-slave1 ~]# systemctl restart mysql
Next, the backup data of the primary target library database user.sqlinto the database.
[root@mysql-slave1 ~]# ls /root/user.sql
/root/user.sql
[root@mysql-slave1 ~]# mysql -p123456
.........
mysql> show databases;
+--------------------+
| Database           |
+--------------------+
| information_schema |
| mysql              |
| performance_schema |
| sys                |
+--------------------+
4 rows in set (0.00 sec)

mysql> source /root/user.sql;

mysql> select * from slave.test;
+----+----------+
| id | name     |
+----+----------+
|  1 | xiaoming |
|  2 | xiaohong |
|  3 | xiaolv   |
+----+----------+
3 rows in set (0.00 sec)
In the database, using change masterthe master replication configuration:
mysql> stop slave;
Query OK, 0 rows affected, 1 warning (0.00 sec)

mysql> change master to master_host='172.23.3.66',master_user='slave1',master_password='123456',master_auto_position=1;
Query OK, 0 rows affected, 2 warnings (0.26 sec)

mysql> start slave;
Query OK, 0 rows affected (0.02 sec)

mysql> show slave status \G;
*************************** 1. row ***************************
 Slave_IO_State: Waiting for master to send event
 Master_Host: 172.23.3.66
 Master_User: slave1
 Master_Port: 3306
 Connect_Retry: 60
 Master_Log_File: mysql-bin.000001
 Read_Master_Log_Pos: 1357
 Relay_Log_File: mysql-slave1-relay-bin.000002
 Relay_Log_Pos: 417
 Relay_Master_Log_File: mysql-bin.000001
 Slave_IO_Running: Yes
 Slave_SQL_Running: Yes
................
................
 Executed_Gtid_Set: 317e2aad-1565-11e9-9c2e-005056ac6820:1-5
 Auto_Position: 1
Therefore, the master and slave nodes have been configured with a master-slave synchronization relationship. Next, you can insert a piece of data in the master library to observe whether the slave library is synchronized.
There are two ways to add a slave library using GTID
Directly synchronize all GTIDs of the main library
If GTID is enabled in the main library from the beginning, all GTIDs of the main library can be directly obtained to synchronize to the slave library. But if there are too many Binlog logs in the main library, the corresponding synchronization time will also become longer. This method is suitable for synchronization of small data volumes.
Use this method to synchronize the corresponding commands:
mysql>change master to master_host='xxxxxxx',master_user='xxxxxx',master_password='xxxxx',MASTER_AUTO_POSITION=1;
mysql> start slave;
mysql> stop slave io_thread; #重启 io 线程,刷新状态
mysql> start slave io_thread;
When MASTER_AUTO_POSITIONthe time parameters MASTER_LOG_FILE, MASTER_LOG_POSthe parameters can not be used.
If you want GTID 配置回 posto follow, execute this statement again, but set MASTER_AUTO_POSITION to 0.
Synchronize by setting range
GTID by specifying a range, then the slave is provided @@GLOBAL.GTID_PURGEDso as to skip the backup GTID included.
This solution is suitable for data whose data volume is relatively large and one synchronization takes a huge amount of time. But at the same time, there is also the problem of complicated operations, which requires you to remember the scope of each synchronization.
The corresponding commands to synchronize in this way are:
mysql>change master to master_host='xxxxxxx',master_user='xxxxxx',master_password='xxxxx',MASTER_LOG_POS='xxxx';
mysql> start slave;
mysql> stop slave io_thread; #重启 io 线程,刷新状态
mysql> start slave io_thread;
Note here that our parameters have been changed:, MASTER_LOG_POSthis parameter represents the starting value of the GTID transaction that currently needs to be synchronized.
to sum up
This article introduces two forms of master-slave replication: the traditional replication method based on Binlog and site information; and the new replication method based on Binlog and GTID. Many companies may still use MySQL 5.6 version, so GTID may not be available.
This article is long, so you can briefly review the principle.