Swagger introduction
1. What is Swagger
As a back-end program development, we have written several back-end interface projects more or less, whether it is writing a mobile phone interface or the current hot front-end separation project, the front-end and back-end are developed by different engineers, then this The communication between them is connected through interface documents. However, there are often many problems. Back-end programmers think that it takes too much time and energy to write interface documents and maintenance, and the front-end thinks that interface document changes and updates are not timely, which leads to problems in calling and traveling between programs. Can it simplify the writing of interface documents and directly generate them automatically? Of course! This is how Swagger, an online automatic generation tool for interface documents, was born.
Swagger is a standardized and complete framework for generating, describing, invoking and visualizing RESTful style Web services. The overall goal is to make the client and file system update at the same speed as the server. File methods, parameters and models are tightly integrated into the server-side code, allowing the API to always stay in sync. Swagger has never been easier to deploy, manage and use powerful APIs.
2.Swagger advantages
The code changes, the documentation changes. With only a small amount of annotations, Swagger can automatically generate API documentation based on the code, which ensures the timeliness of the documentation.
Cross language, support more than 40 languages.
What Swagger UI presents is an interactive API document. We can try the API call directly on the document page, eliminating the need to prepare complex call parameters.
You can also import document specifications into related tools (such as Postman, SoapUI), and these tools will automatically create automated tests for us.
Integrate Swagger in SpringBoot
1. Basic environment construction
First build a basic SpringBoot project and import the following Swagger starter
<dependency>
    <groupId>io.springfox</groupId>
    <artifactId>springfox-boot-starter<artifactId>
    <version>3.0.0</version>
</dependency>
Write a controller for testing
// java源码大全www.fhadmin.org
@RestController
public class HelloController {

    @PostMapping(value = "/hello")
    public String hello(){
        return "hello";
    }
}
Write Swagger configuration class
@Configuration
@EnableOpenApi
public class SwaggerConfig {
}
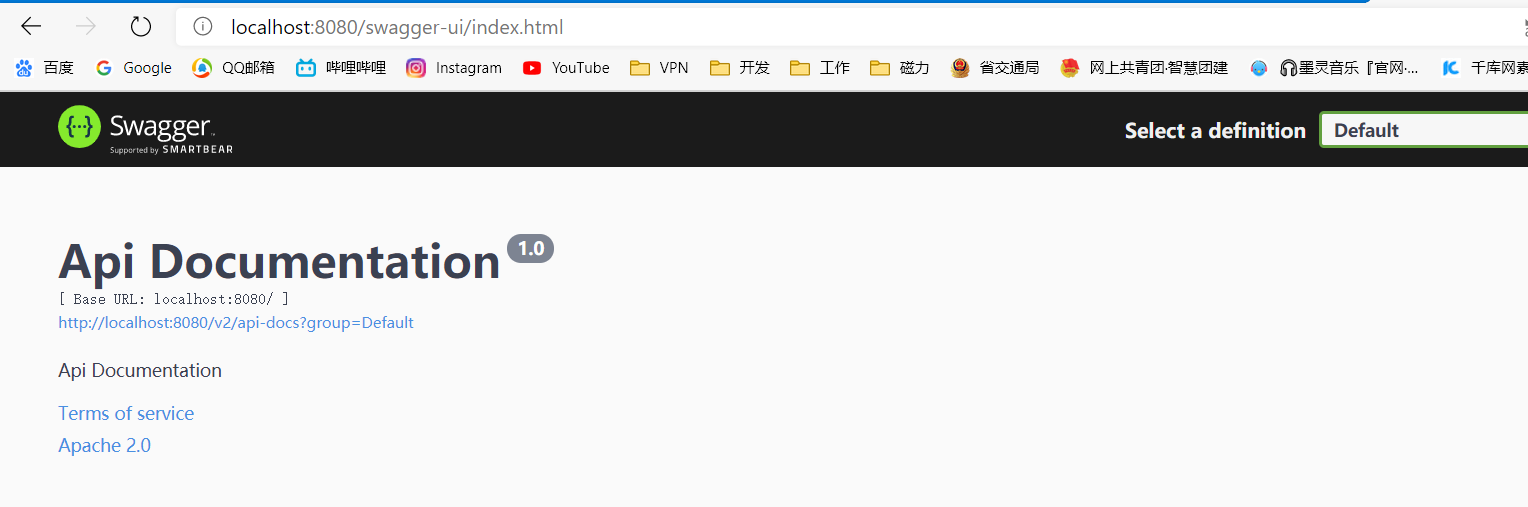
Run start input address: http://localhost:8080/swagger-ui/index.html
You can see the Swagger interface documentation page, indicating that the basic configuration environment is successful!
Note:
The address of Swagger3.0 version is http://localhost:8088/swagger-ui/index.html, and the address accessed in version 2.x is http://localhost:8088/swagger-ui.html
2. Configure Swagger
To configure Swagger, you first need to build its Bean instance Docketobject, SwaggerConfig and create a Docket in the configuration class you just created
// java源码大全 www.fhadmin.org
@Bean
public Docket docket(){
    return new Docket(DocumentationType.OAS_30)
            .apiInfo(apiInfo());
}
Docket(DocumentationType.OAS_30) ,The parameter we choose here is DocumentationType.OAS_30that this is the interface document version of a Swagger instance. We are 3.0 here, so we choose to use it OAS_30. Other types are as follows, corresponding to the historical version of Swagger.
 public static final DocumentationType SWAGGER_12 = new DocumentationType("swagger", "1.2");
    public static final DocumentationType SWAGGER_2 = new DocumentationType("swagger", "2.0");
    public static final DocumentationType OAS_30 = new DocumentationType("openApi", "3.0");
Building Docket requires creating an ApiInfo instance
// Complete java source code www.fhadmin.org
private ApiInfo apiInfo(){
// Author information
Contact contact = new Contact("TIOXY", "https://www.cnblogs.com/tioxy/", "1369773052@qq. com");
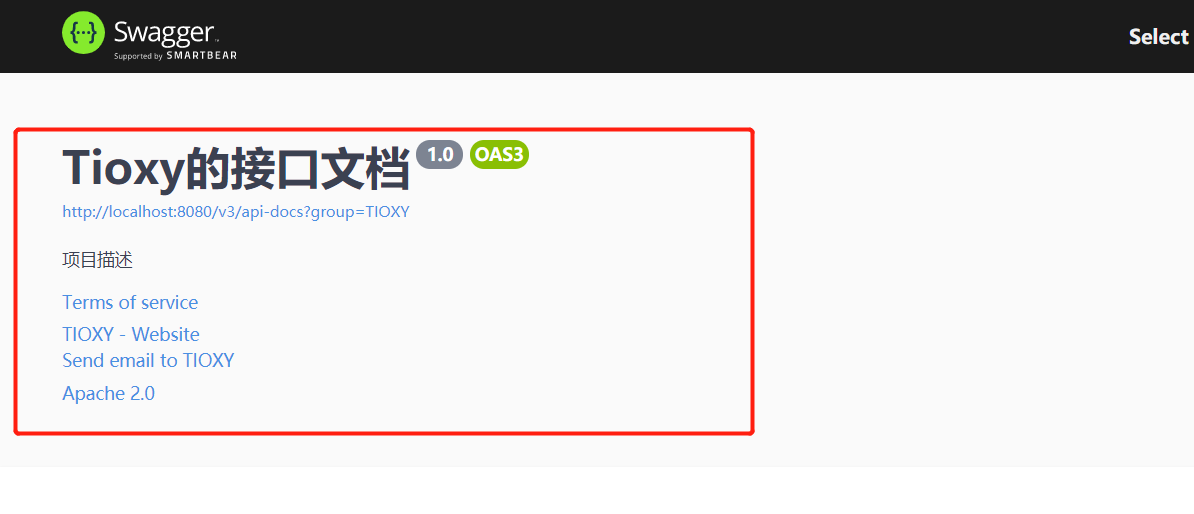
return new ApiInfo(
"Tioxy's interface document",
"Project description",
"1.0",
"https://www.cnblogs.com/tioxy/",
contact,
"Apache 2.0",
"http:/ /www.apache.org/licenses/LICENSE-2.0",
new ArrayList());
}
ApiInfo The main function is to construct the basic information displayed on the page of our interface document, shown in the following position
3. Configure scan interface and switch
When building Docket, select() configure the scanning interface through methods. The complete code of Docket is as follows:
// Complete java source code www.fhadmin.org
@Bean
public Docket docket(Environment environment){
    // Set the displayed Swagger environment
    Profiles dev = Profiles.of("dev");
    // Get the project environment
    boolean flag = environment.acceptsProfiles (dev);

    return new Docket(DocumentationType.OAS_30)
            .apiInfo(apiInfo())
            // Configure Api document grouping.
            groupName("TIOXY")
            // enable() whether to enable Swagger, the default is true
            .enable(flag)
            . select()
            // RequestHandlerSelectors, configure the way to scan the interface
            // basePackage specifies the package to be scanned
            // any() scans all, all interfaces in the project will be scanned
            // none() does not scan
            // withClassAnnotation() scans the annotations on the class
            // withMethodAnnotation() scans the annotations on the
            method.apis(RequestHandlerSelectors.basePackage("com.tioxy.controller"))
            // paths() filters a
            path.paths(PathSelectors.any())
            .build();
}
groupName("TIOXY"): Represents the name of this Docket instance, that is, the instance name selected in the upper right corner of the interface document page. In actual development, we are developing by multiple people, corresponding to multiple Docket instancesenable(flag):enable()Whether to enable Swagger, the default is true
What we use here is the dynamic configuration of whether to enable Swagger, through Environment to get the name of the project environment running at this time, if it is dev, define a flag to dynamically set whether to enable
4. Entity class configuration
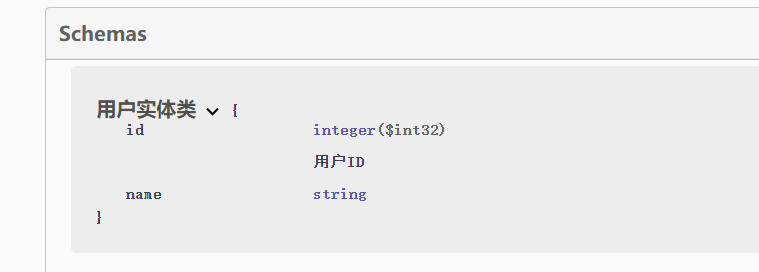
Create a new User entity class
@ApiModel("User entity")
public class User {
   @ApiModelProperty("Username")
   public String username;
   @ApiModelProperty("Password")
   public String password;
}
As long as this entity is in the return value of the request interface (even if it is a generic), it can be mapped to the entity item:
@RequestMapping("/getUser")
public User getUser(){
   return new User();
}
5. Common notes
We can also add notes to the interface, so that we can explain the information of the interface in the interface document, such as the function of the interface, parameter description, etc., for the convenience of the caller
| Swagger annotation | Brief description |
|---|---|
| @Api(tags = "xxx module description") | Act on the module class |
| @ApiOperation("xxx interface description") | Act on interface methods |
| @ApiModel("xxxPOJO description") | Act on the model class: such as VO, BO |
| @ApiModelProperty(value = "xxx property description", hidden = true) | Act on class methods and properties, hidden is set to true to hide the property |
| @ApiParam("xxx parameter description") | Act on parameters, methods and fields, similar to @ApiModelProperty |