Points to note for this tutorial:
- Applicable to the development of H5 micro-applications by third-party companies , non-enterprise internal development, non-nail recommended "small program";
- The message push mode is HTTP callback , and does not use the "RDS nail cloud push data source" mode of nail charges;
Preparation before development:
- Regarding the server, it is best to have a public network server, if not, an intranet penetration tool is required;
- When debugging, since the H5 micro application debugging can only be "real machine" debugging, it is extremely disgusting, so it is highly recommended to use intranet penetration tools when debugging ;
- Regarding the domain name or not, does it matter, follow the destiny;
Some other things to understand:
- You need to prepare a nail company (you can create one if you don't have one). The test application does not matter whether it is certified or not. Please refer to the documentation for the relevant restrictions when publishing.
- The front-end webpage of the H5 micro application to obtain the corpId of the current enterprise needs to use the $ CORPID $ placeholder in the URL of the homepage , and then parse the url parameter in the page to obtain the corpId
- The homepage address can be changed after the homepage address. It does not matter when it is created. The callback address needs to build our own server, and then you need to verify the validity when filling in. You can refer to cn.lnexin.dingtalk.controller.SuiteCallbackController :: callback (in the server-example args ...)
-
Before our own server callback interface is built, we cannot fill in the callback address;
-
Before the callback address is configured, enterprise authorization cannot be performed;
- The activation of the current enterprise in the callback is considered a successful authorization;
-
Before being authorized, the mobile phone side and the PC side must not see our application in the actual application;
In addition, this tutorial focuses on explaining the free registration process of the nail micro application, so the front end part uses native, the simplest js , for reference only;
table of Contents
1. Create H5 Micro Application
Second, build a micro application server (service point git sample code address: https://gitee.com/lne/ding-server )
3. Confirm that your server program runs successfully, and fill in the callback address;
Fourth, implement authorization> activation process, add micro-applications to the application list of the enterprise client;
Fifth, write a simple micro application homepage (html page) for testing;
6. Access from the Android and PC segments, and confirm that there is no problem with the login process;
1. Create H5 Micro Application
After creation:
This program is not visible on the client and PC side. If you want to see this program, you need the authorization> activation process; and authorization> activation depends on our server;
The effective callback address is added so that Dingding can send us a message;
And the correct process can be completed by processing the correct business in the callback address program of our server ; only after the authorization is completed> activate the enterprise application, the micro application can be seen on the client;
Without a valid callback address, do not handle the authorization> activation process in your own server, then you will never see this program on the client;
Step 1: Fill in the basic information

Step 2. Configure the development information. After configuring, click Create Application.
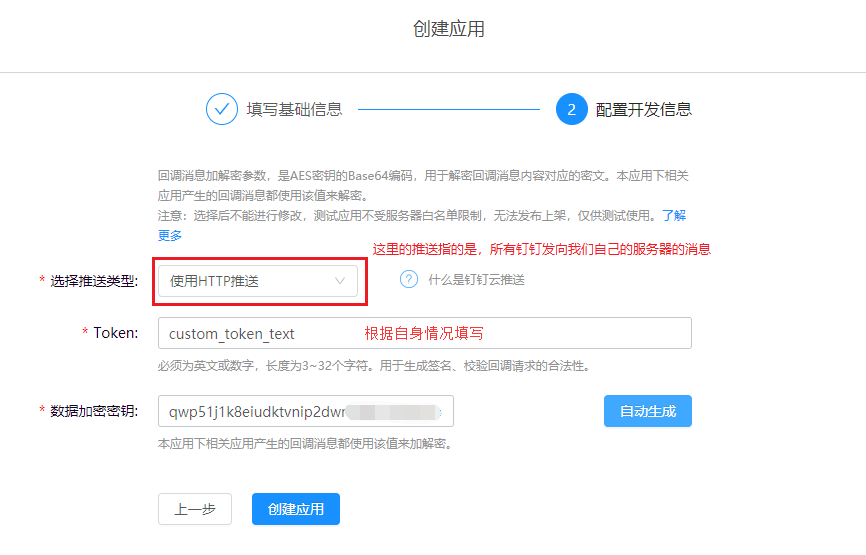
After the configuration is complete, the information is as follows:
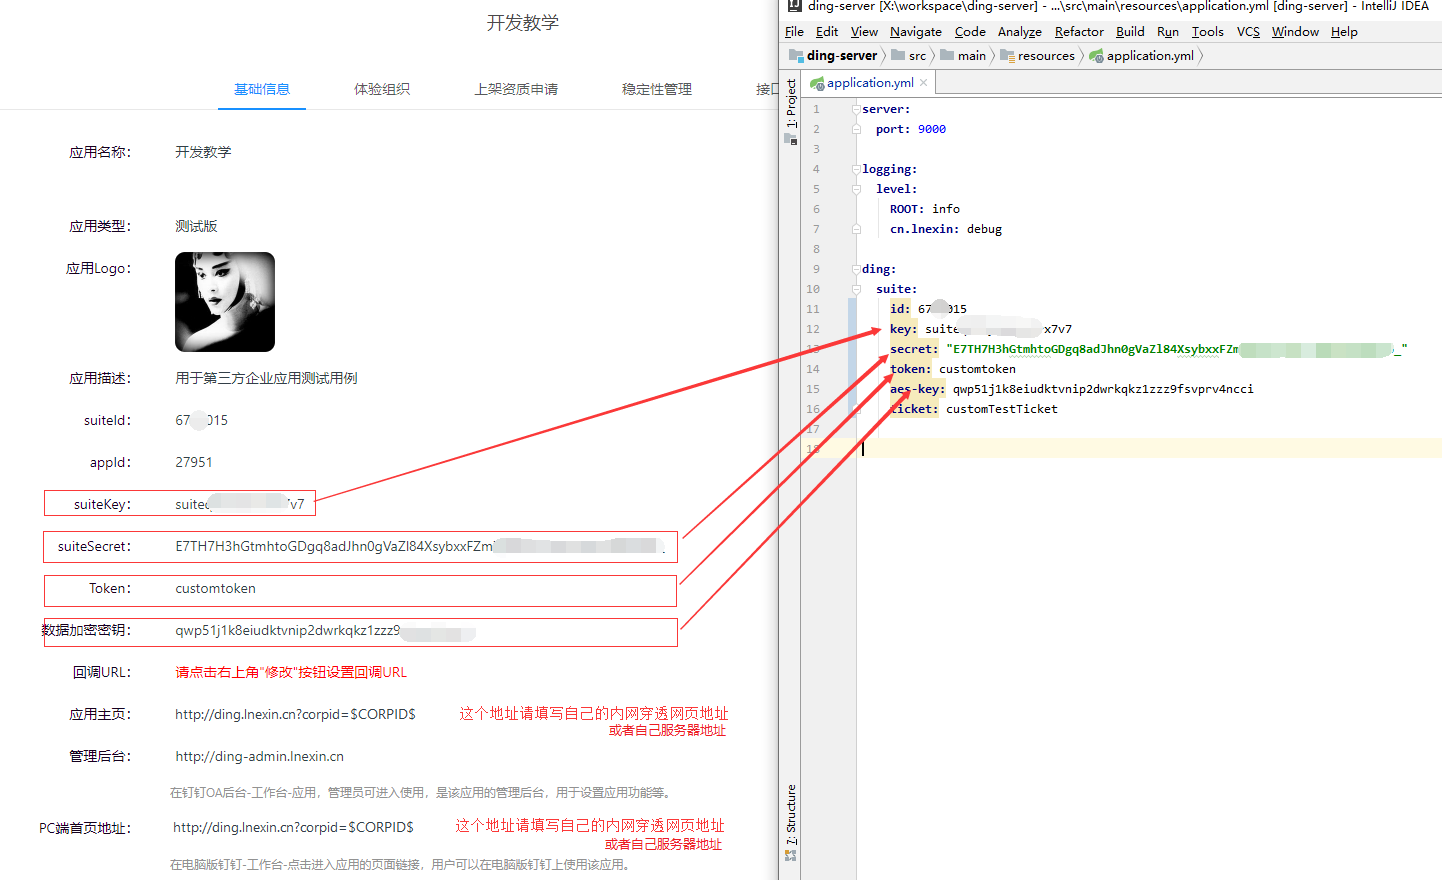
After adding it in the developer background, it is probably like this, other information: such as the callback URL (fill in after the server is completed), the home page address, etc., which can be modified later.
2. Build micro application server
Refer to the server program ( server-example )

1. Relevant configuration parameters can refer to the above application basic information for a one-to-one correspondence.
2. All the key information is stored on the server, such as our suiteKey / suiteSecret / suiteTicket / aesKey / token;
3. So and nail Related data interactions are done on the server side and in the background, except for obtaining the login-free authorization code;
4. During the interaction between our front end and our server, the corpId is obtained by the front end and passed to us;
5. The server and the nail The accessToken used by the nail interaction can be nailed and retrieved each time, but it is more recommended to obtain it once during the validity period, and then store it in the front end. Each data interaction will transfer the token to the back end;
6. Send a request to our server, which is the callback address in the nail application;
7. All the messages of the nail are notified to us through the callback, and the structure of the message is consistent;
Here are some key codes: (For the complete project code, please refer to the example address above )
1. Receiving spike request
package cn.lnexin.dingtalk.controller;

import cn.lnexin.dingtalk.service.IDingAuthService;
import cn.lnexin.dingtalk.service.ISuiteCallbackService;
import cn.lnexin.dingtalk.utils.JsonTool;
import cn.lnexin.dingtalk.utils.Strings;
import com.fasterxml.jackson.databind.JsonNode;
import org.slf4j.Logger;
import org.slf4j.LoggerFactory;
import org.springframework.beans.factory.annotation.Autowired;
import org.springframework.web.bind.annotation.*;

import java.util.LinkedHashMap;
import java.util.Map;
import static cn.lnexin.dingtalk.constant.CallbackConstant.*;
/ **
* [ Ning Ding]-Ding Ding callback interface, including activation, authorization, activation, deactivation, order placing, etc.
*
* @author [email protected]
** /
public class SuiteCallbackController {
    static Logger logger = LoggerFactory.getLogger (SuiteCallbackController.class);

    / **
     * Data format sent from Dingding :
     * <p>
     * http: // IP deployed by your server: your port / callback ? Signature = 111108bb8e6dbce3c9671d6fdb69d15066227608 & timestamp = 1783610513 & the nonce = 380 320 111
     JSON data * included as:
     * {
     * "the encrypt": "1ojQf0NSvw2WPvW7LijxS8UvISr8pdDP + rXpPbcLGOmIBNbWetRg7IP0vdhVgkVwSoZBJeQwY2zhROsJq / HJ + q6tp1qhl9L1 + ccC9ZjKs1wV5bmA9NoAWQiZ + 7MpzQVq + j74rJQljdVyBdI / dGOvsnBSCxCVW0ISWX0vn9lYTuuHSoaxwCGylH9xRhYHL9bRDskBc7bO0FseHQQasdfghjkl"
     *}
     * /

    @Autowired
    ISuiteCallbackService suiteCallbackService;

    / **
     * The address of the push message sent by the Dingding server
     *
     * @param signature
     * @param timestamp
     * @param nonce
     * @param encryptNode
     * @return
     */
    @PostMapping(value = "/callback")
    public Map<String, String> tempAuthCodeCallback(@RequestParam String signature,
                                                    @RequestParam String timestamp,
                                                    @RequestParam String nonce,
                                                    @RequestBody JsonNode encryptNode) {
        String encryptMsg = encryptNode.get("encrypt").textValue();
        String plainText = suiteCallbackService.decryptText(signature, timestamp, nonce, encryptMsg);
        JsonNode plainNode = JsonTool.getNode (plainText);

        // Enter the callback event branch and select
        Map <String, String> resultMap = caseProcess (plainNode);
        return resultMap;
    }

    / **
     * Do different business processing according to the callback data type
     *
     * @ param plainNode
     * @return
     * /
    private Map <String, String> caseProcess (JsonNode plainNode) {
        Map <String, String> resultMap = new LinkedHashMap <> ();
        String eventType = plainNode.get ("EventType"). textValue () ;
        switch (eventType) {
            case SUITE_TICKET_CALLBACK_URL_VALIDATE:
                logger.info ("[callback] verify the valid nature of the callback address: {}", plainNode);
                resultMap = suiteCallbackService.encryptText (CALLBACK_RETURN_SUCCESS);
                logger.info ("[callback] in developer Modify the callback address in the background: "+ plainNode);
                break;
            case TEMP_AUTH_CODE_ACTIVE:
                logger.info ("[callback] Enterprise activation authorization: {}", plainNode);
                Boolean active = suiteActive (plainNode);
                resultMap = suiteCallbackService.encryptText (active? CALLBACK_RETURN_SUCCESS: ACTIVE_RETURN_FAILURE);
                break;
            case SUITE_RELIEVE:
                logger.info ("[callback] Enterprise deauthorization: {}", plainNode);
          // Handle
            deauthorization logic break; case CHECK_UPDATE_SUITE_URL:
                break;
            case CHECK_CREATE_SUITE_URL:
                resultMap = suiteCallbackService.encryptText (CALLBACK_RETURN_SUCCESS);
                break;
                logger.info ("[callback] Check whether the post to the callback URL after decrypting the POST data is successful:" + plainNode);
                resultMap = suiteCallbackService.encryptText (CALLBACK_RETURN_SUCCESS);
                break;
            case CONTACT_CHANGE_AUTH:
                logger.info ("[callback] address book Authorization scope change event: "+ plainNode);
                break;
            case ORG_MICRO_APP_STOP:
                logger.info (" [callback] disable application: "+ plainNode);
                break;
            case ORG_MICRO_APP_RESTORE:
                logger.info (" [callback] enable application: "+ plainNode);
            case MARKET_BUY:
                logger.info ("[callback] user order purchase event:" + plainNode);
                // Deal with the specific logic of other companies placing orders to purchase our application
                break;
            default:
                logger.info ("[callback] unknown event: {}, content: {}", eventType, plainNode);
                resultMap = suiteCallbackService.encryptText ("event type is not defined, please contact the application provider!" + eventType );
                break;
        }
        return resultMap;
    }

    / **
     * Activate application authorization
     * tmp_auth_code
     * /
    private Boolean suiteActive (JsonNode activeNode) {
        Boolean isActive = false;
        String corpId = activeNode.get (" AuthCorpId "). textValue ( );
        String tempAuthCode = activeNode.get ("AuthCode"). TextValue ();

        String suiteToken = suiteCallbackService.getSuiteToken ();
        String permanentCode = suiteCallbackService.getPermanentCode (suiteToken , tempAuthCode);
        if (! Strings.isNullOrEmpty (permanentCode)) {
            isActive = suiteCallbackService.activateSuite (suiteToken, corpId, permanentCode);
        } else {
            logger.error ("Error obtaining permanent authorization code");
        }
        return isActive;
    }
Tool implementation:
 SuiteCallbackServiceImpl.java
Build a publishing program and publish it to your own server. If you use an intranet penetration tool, please ignore it;
3. Confirm that your server program runs successfully, and fill in the callback address
According to the above instructions, you can place the server on your own public network server, or use the relevant intranet penetration tool (solve it yourself)
In short, there must be a public address that can access our server-side projects
Make sure that your own server can be accessed using a public network address and successfully return data;
Also make sure:
- There must be a callback address excuse for receiving messages sent by Dingding; (example address of this article: / ding / callback)
- There must be an interface that receives the login-free authorization code and enterprise corpId to return user information; (example address of this article: / ding / login)
For example, my own test example is:
// 这里是我自己的测试地址 http://你的公网地址/ding/config
{
        "suiteId": "6707015",
        "suiteKey": "suiteqflsxxxxxxxx",
        "suiteSecret": "E7TH7H3hGtmhtoGDgq8adJhn0xxxxxxxxxxxBf-GQSTWl8NTs6_",
        "suiteToken": "customtoken",
        "encodingAESKey": "qwp51j1k8eiudktvnip2dwrkqxxxxxcci",
        "suiteTicket": "customTestTicket",
        "url_suite_token": "https://oapi.dingtalk.com/service/get_suite_token",
        "url_permanent_code": "https://oapi.dingtalk.com/service/get_permanent_code",
        "url_activate_suite": "https://oapi.dingtalk.com/service/activate_suite",
        "url_get_auth_info": "https://oapi.dingtalk.com/service/get_auth_info",
        "url_get_access_token": "https://oapi.dingtalk.com/service/get_corp_token",
        "url_get_user_id": "https://oapi.dingtalk.com/user/getuserinfo",
        "url_get_user_item": "https://oapi.dingtalk.com/user/get"

}
4. Implement authorization> activation process, add the micro-application to the application list of the enterprise client
Now, after the above steps, the things we have prepared are:
- The address of the server that can be accessed on the public network, receive the message sent to us by the nail (callback address) such as: http://ding.lnexin.cn/server/ding/callback, our own login address, such as: http: / /ding.lnexin.cn/server/ding/login
- Create a configured H5 micro application on the Dingding developer platform;
- Ensure that the server parameters are consistent with the basic information of the micro application;

After completing the above steps, there is still no application entry on the client, such as:

The following needs to be authorized on the developer platform
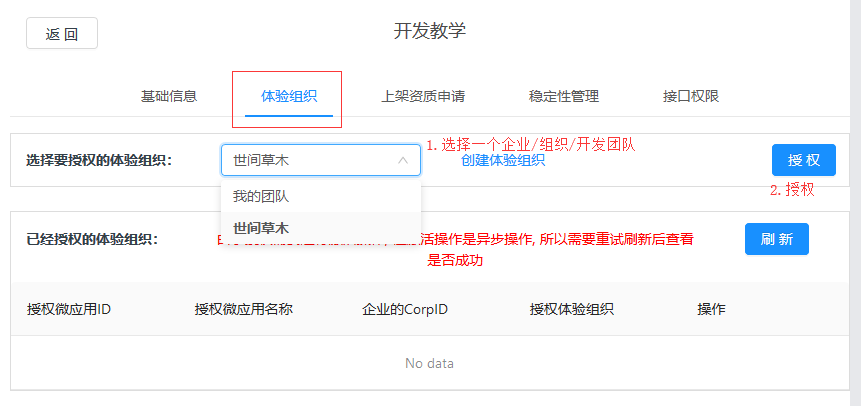
After clicking Authorization, we will receive the message sent to us by Dingding on our server. After a series of processing , our server sends a request to Dingding to activate the enterprise. If the activation is successful, then the authorization is successful;
The message received by the server after clicking authorization :

If the activation is successful, as follows:

At this time, the authorization activation is successful, and the relevant micro application entry is available on the client. Such as:
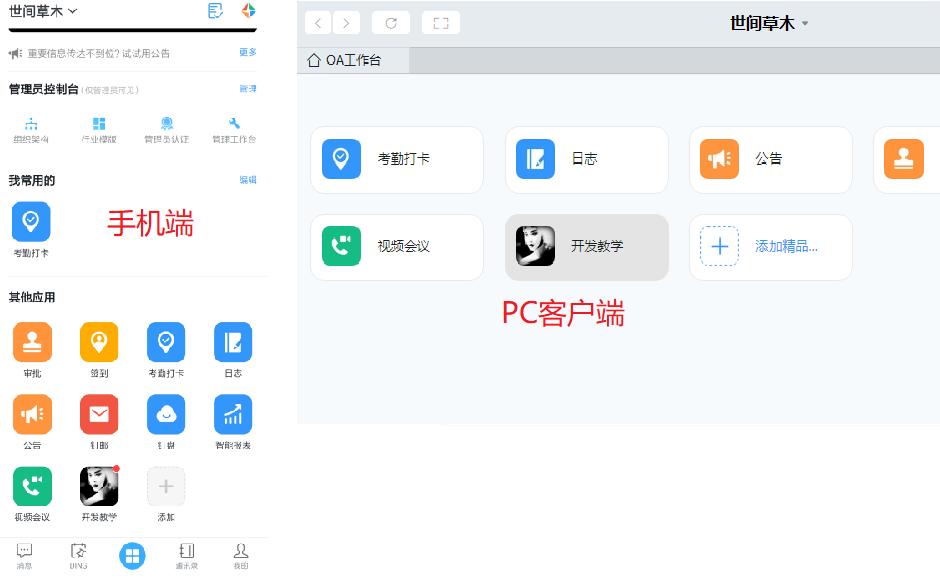
At this point, all the preparatory work has been completed, the following is mainly free to log and page jsapi docking.
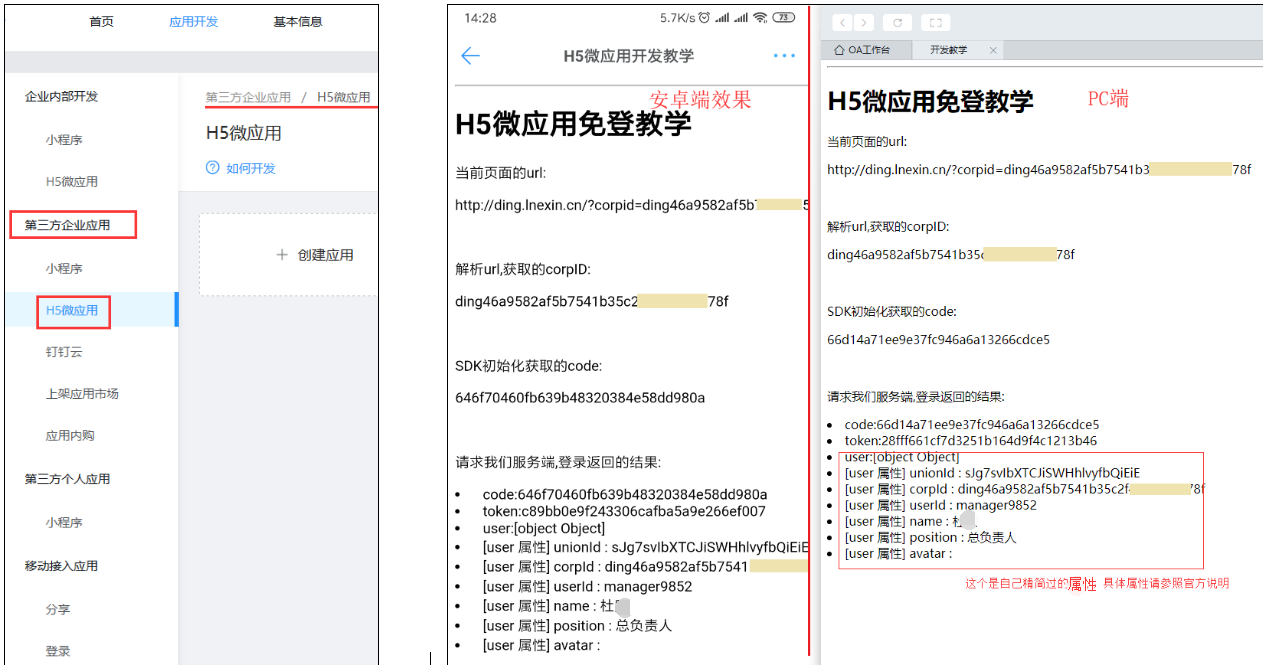
5. Write a simple micro application homepage (html page) for testing
After the previous steps, we can now see the micro-application and have the accessible public network server interface address.
Now you need to prepare a front-end public network address. If you are using springboot, you can ignore it. (I am separated here, everyone needs to decide according to their own situation, example address is like: http://ding.lnexin.cn/)
Below we write a simplest front-end html page:
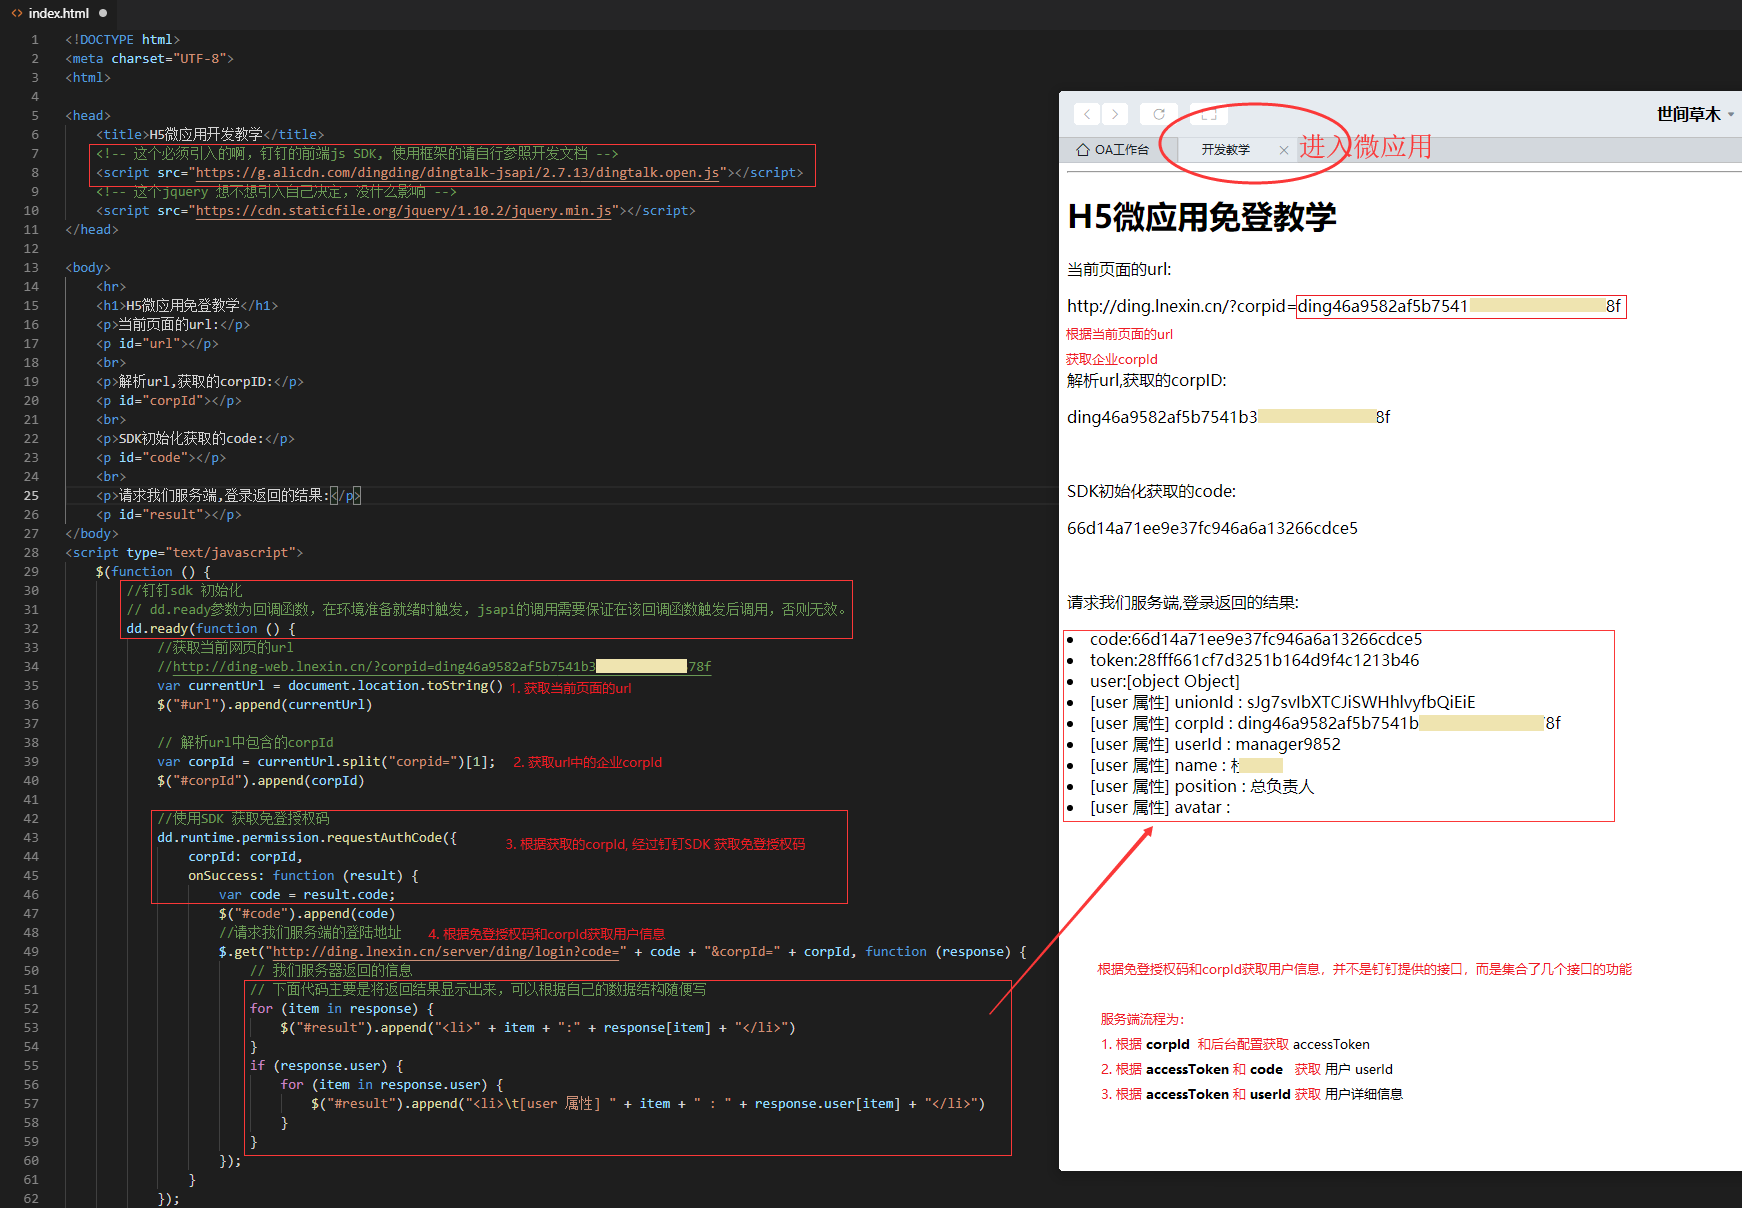
The html front-end sample code is as follows: ( git repository )
index.html
6. Access from the Android side and the PC section, and confirm that there is no problem in the process;
Almost all the free registration and authorization processes developed by third-party companies have been completed, and the rest is the processing of each application's own business logic. This individual will solve it by himself.