如果代码中有什么不清楚请查看以下基础知识
Shader基础知识
unity3d 中 七种坐标知识详解
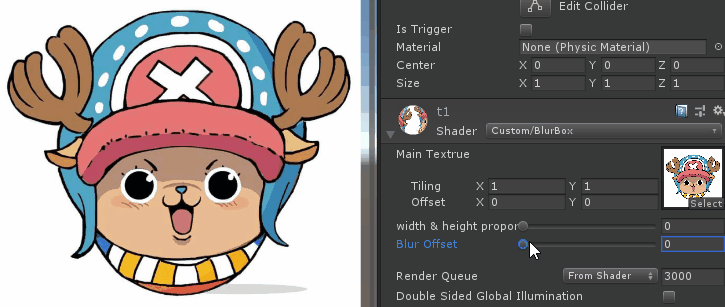
锐化效果
笑狗图
代码
Shader "Custom/BlurBox"
{
    Properties
    {
        //主贴图
        _MainTex ("Main Textrue", 2D) = "white" {}
        //宽高比例
        _BlurRate("width & height proportion", Range(0.00, 1.00)) = 1
        //模糊偏移
        _BlurOffset("Blur Offset", Range(0.000, .300)) = 0.01
    }

    SubShader
    {
        //200可见阈值
        LOD 200
        Tags
        {
            //设置当前shader的渲染顺序
            "Queue" = "Transparent" "IgnoreProjector" = "True" "RenderType" = "Transparent"
        }
        Pass
        {
            //2d世界不受下列影响, 为了性能可以关闭
            //裁剪
            Cull Off
            //灯光
            Lighting Off
            //深度
            ZWrite Off
            //雾
            Fog { Mode Off }

            //透明混合   SrcAplha  要渲染的透明度   OneMinusSrcAlpha   1减去要渲染的透明度
            Blend SrcAlpha OneMinusSrcAlpha
            CGPROGRAM
                //定义顶点和片段着色器
                #pragma vertex vert
                #pragma fragment frag
                #include "UnityCG.cginc"
                //从unity接受的变量
                sampler2D _MainTex;
                fixed _BlurRate;
                fixed _BlurOffset;
                //顶点着色器处理的数据
                struct a2v
                {
                    float4 vertex : POSITION;//顶点坐标
                    float2 uv : TEXCOORD0;//uv纹理
                    fixed4 color : COLOR;//顶点颜色
                };
                //片段着色器处理的数据
                struct v2f
                {
                    float4 vertex : SV_POSITION;//像素坐标
                    half2 uv : TEXCOORD0;//像素纹理
                    fixed4 color : COLOR;//像素颜色
                };
                //顶点着色器
                v2f vert (a2v v)
                {
                    v2f o;
                    //顶点位置 = 模型空间转为裁剪空间(顶点位置)
                    o.vertex = UnityObjectToClipPos(v.vertex);
                    o.uv = v.uv;
                    o.color = v.color;
                    return o;
                }

                //对忒图滤波
                float4 filter(float3x3 filter, sampler2D tex, float2 uv)
                {
                    //要输出的颜色
                    float4 outCol = float4(0,0,0,0);
                    //遍历3*3
                    for (int i = 0; i < 3; i++)
                    {
                        for (int j = 0; j < 3; j++)
                        {
                            //获取以当前像素为中心附近8个像素的坐标  _BlurOffset 是散光的重影距离
                            float current_uv_x = uv.x + (i-1) * _BlurOffset * _BlurRate;
                            float current_uv_y = uv.y + (j-1) * _BlurOffset * (1 - _BlurRate);
                            float2 new_uv = float2(current_uv_x, current_uv_y);
                            //将贴图与像素结合,并分配给过滤器指定的颜色比率   (在这里使用tex2D 获取其他位置的像素)
                            outCol += tex2D(tex, new_uv) * filter[i][j];
                        }
                    }
                    return outCol;
                }
                //片元着色器
                fixed4 frag (v2f o) : COLOR
                {
                    float3x3 sharpenfilter =
                    {
                        -1, -1, -1,
                        -1,  9, -1,
                        -1, -1, -1,
                    };
                    //坐标 = uv * _TexSize
                    fixed4 col = filter(sharpenfilter, _MainTex, o.uv);
                    return col;
                }
            ENDCG
        }
    }
}
