前言
相关arduino 全部分类:
https://blog.csdn.net/freewebsys/category_8799254.html
本文的原文连接是:
https://blog.csdn.net/freewebsys/article/details/104172590
未经博主允许不得转载。
博主地址是:http://blog.csdn.net/freewebsys
1,关于arduino mqtt
使用 docker 搭建一个 mqtt broker ,然后 配置 esp8266 连接到 wifi 当中,再使用 PubSubClient 库。
进行 pub sub 的发布订阅,可以看到消息发送上来了。
2,使用 eclipse-mosquitto 镜像
本地电脑 安装了docker 服务,非常方便的准备一个本地的mqtt 服务。
然后启动,打开端口
docker pull eclipse-mosquitto
docker run -itd -p 1883:1883  eclipse-mosquitto
端口1883 ,作为broker 服务端,因为只是进行测试,所以暂时不用映射 data 文件。直接后台启动就可以。
https://hub.docker.com/_/eclipse-mosquitto
2,使用 PubSubClient
arduino下面安装 lib库非常依赖网络环境,需要多实验几次,直接找到了 相关的github项目地址
https://github.com/knolleary/pubsubclient
直接克隆到 libraries 目录下面,特别方便!!要不然不能使用 PubSubClient.h 库。
参考:
https://github.com/knolleary/pubsubclient/blob/master/examples/mqtt_esp8266/mqtt_esp8266.ino
代码:
/*
 Basic ESP8266 MQTT example
 This sketch demonstrates the capabilities of the pubsub library in combination
 with the ESP8266 board/library.
 It connects to an MQTT server then:
  - publishes "hello world" to the topic "outTopic" every two seconds
  - subscribes to the topic "inTopic", printing out any messages
    it receives. NB - it assumes the received payloads are strings not binary
  - If the first character of the topic "inTopic" is an 1, switch ON the ESP Led,
    else switch it off
 It will reconnect to the server if the connection is lost using a blocking
 reconnect function. See the 'mqtt_reconnect_nonblocking' example for how to
 achieve the same result without blocking the main loop.
 To install the ESP8266 board, (using Arduino 1.6.4+):
  - Add the following 3rd party board manager under "File -> Preferences -> Additional Boards Manager URLs":
       http://arduino.esp8266.com/stable/package_esp8266com_index.json
  - Open the "Tools -> Board -> Board Manager" and click install for the ESP8266"
  - Select your ESP8266 in "Tools -> Board"
*/

#include <ESP8266WiFi.h>
#include <PubSubClient.h>

// Update these with values suitable for your network.

const char* ssid = "ssid";
const char* password = "password";
const char* mqtt_server = "192.168.1.3";

WiFiClient espClient;
PubSubClient client(espClient);

unsigned long lastMsg = 0;
#define MSG_BUFFER_SIZE  (50)
char msg[MSG_BUFFER_SIZE];
int value = 0;

void setup_wifi() {

  Serial.begin(9600);
  delay(10);
  // We start by connecting to a WiFi network
  Serial.println();
  Serial.print("Connecting to ");
  Serial.println(ssid);

  WiFi.begin(ssid, password);

  while (WiFi.status() != WL_CONNECTED) {
    delay(500);
    Serial.print(".");
  }

  randomSeed(micros());

  Serial.println("");
  Serial.println("WiFi connected");
  Serial.println("IP address: ");
  Serial.println(WiFi.localIP());
}

void callback(char* topic, byte* payload, unsigned int length) {
  Serial.print("Message arrived [");
  Serial.print(topic);
  Serial.print("] ");
  for (int i = 0; i < length; i++) {
    Serial.print((char)payload[i]);
  }
  Serial.println();

  // Switch on the LED if an 1 was received as first character
  if ((char)payload[0] == '1') {
    digitalWrite(BUILTIN_LED, LOW);   // Turn the LED on (Note that LOW is the voltage level
    // but actually the LED is on; this is because
    // it is active low on the ESP-01)
  } else {
    digitalWrite(BUILTIN_LED, HIGH);  // Turn the LED off by making the voltage HIGH
  }

}

void reconnect() {
  // Loop until we're reconnected
  while (!client.connected()) {
    Serial.print("Attempting MQTT connection...");
    // Create a random client ID
    String clientId = "ESP8266Client-";
    clientId += String(random(0xffff), HEX);
    // Attempt to connect
    if (client.connect(clientId.c_str())) {
      Serial.println("connected");
      // Once connected, publish an announcement...
      client.publish("outTopic", "hello world");
      // ... and resubscribe
      client.subscribe("inTopic");
    } else {
      Serial.print("failed, rc=");
      Serial.print(client.state());
      Serial.println(" try again in 5 seconds");
      // Wait 5 seconds before retrying
      delay(5000);
    }
  }
}

void setup() {
  pinMode(BUILTIN_LED, OUTPUT);     // Initialize the BUILTIN_LED pin as an output
  Serial.begin(115200);
  setup_wifi();
  client.setServer(mqtt_server, 1883);
  client.setCallback(callback);
}

void loop() {

  if (!client.connected()) {
    reconnect();
  }
  client.loop();

  unsigned long now = millis();
  if (now - lastMsg > 2000) {
    lastMsg = now;
    ++value;
    snprintf (msg, MSG_BUFFER_SIZE, "hello world #%ld", value);
    Serial.print("Publish message: ");
    Serial.println(msg);
    client.publish("outTopic", msg);
  }
}
非常的方便。 client.publish(“outTopic”, msg); 就可以push 消息了。然后 订阅 client.subscribe(“inTopic”); 通过 回调函数接 client.setCallback(callback); 接受消息。
可以通过 mosquitto 看到 日志:
1580813186: New connection from 192.168.1.8 on port 1883.
1580813186: New client connected from 192.168.1.8 as ESP8266Client-9c58 (p2, c1, k15).
可以看到设备发送消息到 mqtt 服务器。发送成功。
在使用客户端工具:
http://workswithweb.com/html/mqttbox/downloads.html
在linux 上面缺少lib库。
sudo apt -y install libgconf2-4
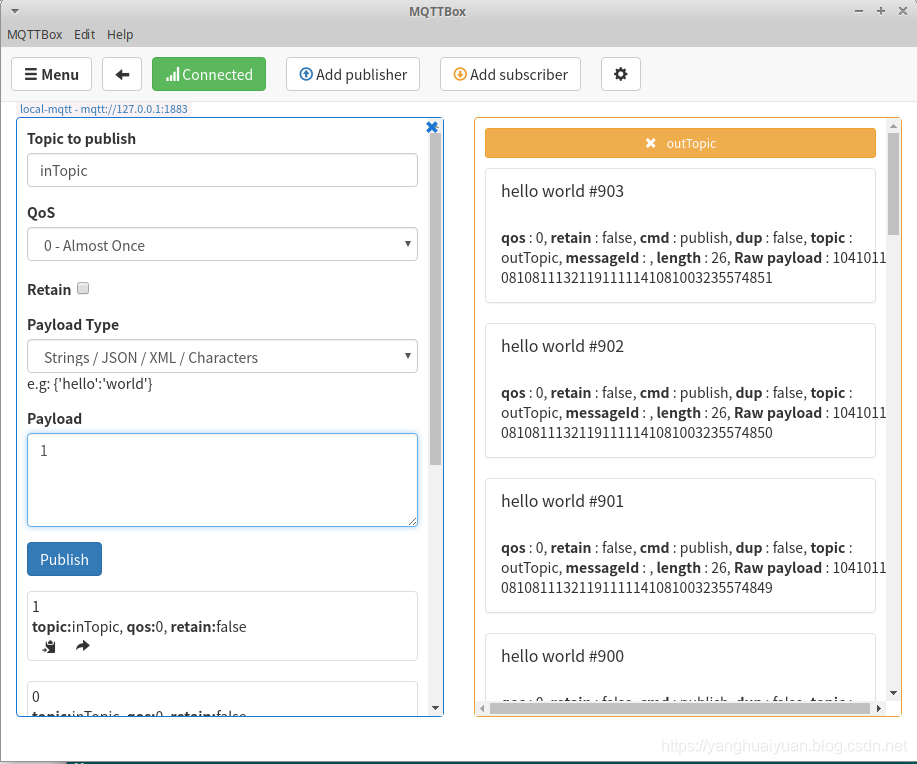
然后输入 MQTTBox 就可以启动了,配置本地 地址:
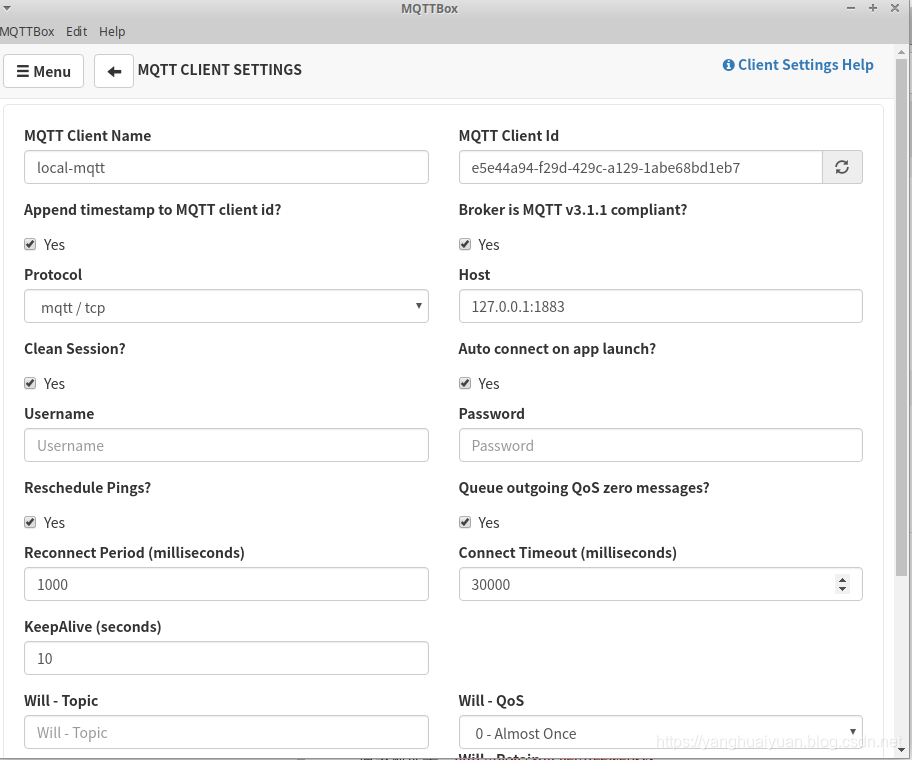
然后订阅 outTopic ,向 inTopic 发送消息 0 1 ,就可以控制 led 灯,开和关闭了。
3,总结
arduino 现在已经非常的成熟了,是一个非常成熟的解决方案了。
在调研的过程中找到了很多的资料。
通过 本地 创建 mqtt broker ,使用 esp8266 设备发送消息,同时 向设备发送 1 , 0 信息进行
简单的控制 LED 灯的开和关闭。
完成基本的 MQTT 实验。超级赞!!!
本文的原文连接是:
https://blog.csdn.net/freewebsys/article/details/104172590
