【持续更新】Android开发笔记汇总篇,爬各种坑,敲高效代码,各种奇难杂症,有您要治的病 。
一、AndroidStudio 开发工具的那些事 。
问题 1: AndroidStudio2.2以上在编译工程时候发现多个类重复加载到apk了!
- 提示类重复 , 类似下面的信息 ,表示 com/facebook/common/logging/FLog.class 这个类重复加载了!
Error:Execution failed for task ':
app:transformClassesWithJarMergingForRelease'. com.android.build.api.transform.TransformException:
 java.util.zip.ZipException: duplicate entry: com/facebook/common/logging/FLog.class
解决方法:
先确认这个类所在的jar包,我们可以使用AS的快捷键 ctrl + N ,搜索重复的类 FLog ,截图发现如下,目前的AS都是本地libs文件夹依赖和gradle远程依赖,我们必须确认在哪个架包所依赖的。
如果是本地的依赖,那么我们只把任意一个包去掉即可!如果一个去掉的话有问题,那么尝试另外一个去掉!
如果是远程的依赖,比如我们在这2个类的对应的后面后面看到不同的包,那么我们得在依赖这个包的的语句下面,再做处理。同样的,如果一个去掉的话有问题,那么尝试另外一个去掉!因为有些情况,会报错依赖找不到!
比如我要的架包:com.aliyun.alink:sdk-bonekit:0.0.1.6 也是依赖这个flog , 而 用到的 com.aliyun.alink.external:sdk-rn-external-fresco:0.41.2-20170630-sds 也是依赖这个flog,咋办?我们从一个架包移除吧!见第下面的代码:
* 笔记:exclude group后面接的是 被重复类所在的包名,而module也就是逗号之后的内容。

 //引入 fresco 图片库后,需要 exclude 掉 flog 模块,否则会出现类冲突
 compile('com.aliyun.alink:sdk-bonekit:0.0.1.6') {
     exclude group: 'com.aliyun.alink.external', module: 'flog'
    }
// 引入 fresco 图片库
 compile 'com.aliyun.alink.external:sdk-rn-external-fresco:0.41.2-20170630-sds'
* 问题 2: Gradle3.0以上集成NDK环境搭建( 包括 AndroidStudio3.0 )!
截止迄今2018/1/12最新的NDK集成教程,在已有的项目上集成NDK环境!**
确保您的工程是AS编译器,gradle是3.0版本或以上,先下载好NDK所需的文件,在工程设置下找到SDK下载选项,选择为下面:CMake、LLDB和NDK。

- 设置所要编写的c源码位置,以及编译后so文件的名字。在模块下的 build.gradle 的
defaultConfig节点下添加如下,
   externalNativeBuild {
            cmake {
                cppFlags ""
                //生成多个版本的so文件
                abiFilters 'arm64-v8a', 'armeabi-v7a', 'x86', 'x86_64'
            }
}- 在build.gradle的
android节点下加入:
   // 配置CMakeLists.txt路径
    externalNativeBuild {
        cmake {
            path "CMakeLists.txt"
        }
    }

- 我们把视线转移到CMakeLists.txt 文件,截图如下:

- 代码如下:
# For more information about using CMake with Android Studio, read the
# documentation: https://d.android.com/studio/projects/add-native-code.html

# Sets the minimum version of CMake required to build the native library.

cmake_minimum_required(VERSION 3.4.1)

# Creates and names a library, sets it as either STATIC
# or SHARED, and provides the relative paths to its source code.
# You can define multiple libraries, and CMake builds them for you.
# Gradle automatically packages shared libraries with your APK.

add_library( # Sets the name of the library.
             xlinyunSDK_v1

             # Sets the library as a shared library.
             SHARED

             # Provides a relative path to your source file(s).
             src/main/cpp/xlinyunSDK_v1.cpp )

# Searches for a specified prebuilt library and stores the path as a
# variable. Because CMake includes system libraries in the search path by
# default, you only need to specify the name of the public NDK library
# you want to add. CMake verifies that the library exists before
# completing its build.

find_library( # Sets the name of the path variable.
              log-lib

              # Specifies the name of the NDK library that
              # you want CMake to locate.
              log )

# Specifies libraries CMake should link to your target library. You
# can link multiple libraries, such as libraries you define in this
# build script, prebuilt third-party libraries, or system libraries.

target_link_libraries( # Specifies the target library.
                       xlinyunSDK_v1

                       # Links the target library to the log library
                       # included in the NDK.
${log-lib} )- 好,我们开始写c语言啦,表示回调字符串的 Hello from C++ 给java。
#include <jni.h>
#include <string>

extern "C"
JNIEXPORT jstring JNICALL
Java_com_xuhong_xlsdk_1demo_MainActivity_stringFromJNI(JNIEnv *env,
        jobject /* this */) {
    std::string hello = "Hello from C++";
    return env->NewStringUTF(hello.c_str());
}

- 开始编译,makeProject。找到我们的编译后的文件夹,build - intermediates -cmake -release 或者 debug文件夹下面发现,多出了几个so文件,这就是我们在gradle.build文件配置的输出的文件类型。如下:

- 开始使用,在您所需要的类中,先在类的静态方法调用这个库,库的文字,记得要对应上面的CMakeLists.txt文件中提到的名字!
  static {
        System.loadLibrary("xlinyunSDK_v1");
}- 在类中编写方法stringFromJNI,其中stringFromJNI()方法是对应我们cpp文件的方法名字哦!:
public native String stringFromJNI();- 比如我使用textView调用:
tv.setText(stringFromJNI());非常感谢:https://www.jianshu.com/p/997ae19a5fae
* 问题 3: AndroidStudio工程引用第三方的so文件所引发的问题!
首先在您的 src - main 下新建 jniLibs文件夹,把so扔进去,如果区别了各种系统类型的,也把目录扔进去,比如我下面的截图多个系统类型的文件夹。
在您的gradle.build下面添加:
ndk {
            abiFilters "armeabi-v7a", "x86", "armeabi"
}- 还有:
 sourceSets {
        main {
            jniLibs.srcDir 'libs'
        }
    }
* 问题 3: windows电脑adb命令连接本地手机时候出现如下:
adb connect 192.168.6.119:5555
unable to connect to 192.168.6.119:5555: cannot connect to 192.168.6.119:5555: 由于目标计算机积极拒绝,无法连接。 (10061)
解决步骤:
第一步:先用数据线连接到手机,控制台输入
adb tcpip 5555。- 第二步:之后找到手机的本地IP地址,比如我的
192.168.31.5,之后就可以连接了:
D:\SDK\platform-tools>adb connect 192.168.6.119:5555
connected to 192.168.6.119:5555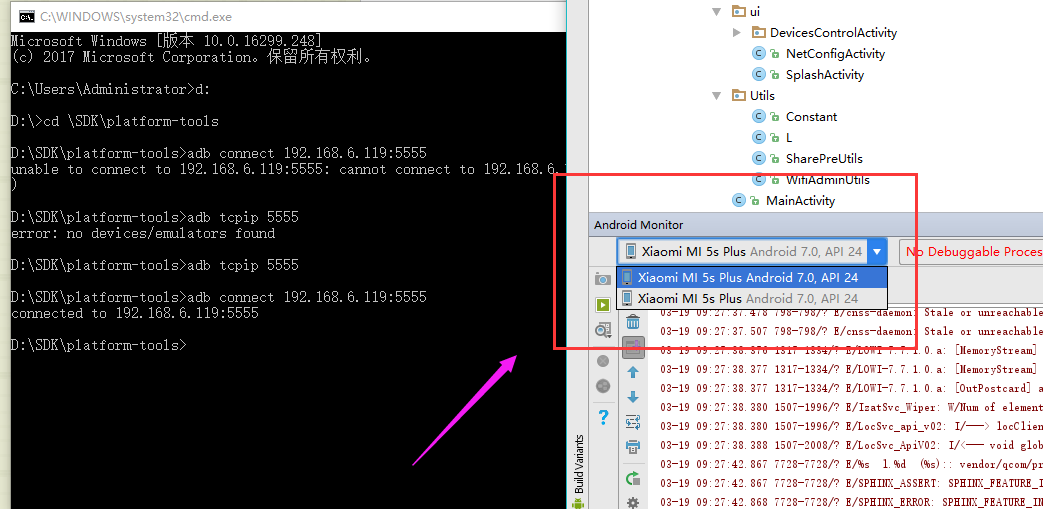
* 问题 4: 安卓6.0以上的动态权限一次性申请代码:
//是否大于6.0版本
if (Build.VERSION.SDK_INT >= Build.VERSION_CODES.M) {
   requestRuntimePermission(new String[]{ Manifest.permission.READ_EXTERNAL_STORAGE,                   Manifest.permission.WRITE_EXTERNAL_STORAGE
                    , Manifest.permission.ACCESS_FINE_LOCATION
                    , Manifest.permission.ACCESS_COARSE_LOCATION
                    , Manifest.permission.READ_PHONE_STATE});

        }


 private void requestRuntimePermission(String[] permissions) {
        for (String permission : permissions) {
            if (ContextCompat.checkSelfPermission(this, permission) != PackageManager.PERMISSION_GRANTED) {
                ActivityCompat.requestPermissions(this, permissions, REQUEST_CODE);
            }
        }
}- 在回调处理:
    @Override
    public void onRequestPermissionsResult(int requestCode, @NonNull String[] permissions, @NonNull int[] grantResults) {
        super.onRequestPermissionsResult(requestCode, permissions, grantResults);
        switch (requestCode) {
            case 103:
                if (grantResults.length > 0) {
                    List<String> deniedPermissions = new ArrayList<>();
                    for (int i = 0; i < grantResults.length; i++) {
                        int grantResult = grantResults[i];
                        String permission = permissions[i];
                        if (grantResult != PackageManager.PERMISSION_GRANTED) {
                            deniedPermissions.add(permission);
                        }
                    }
                    if (deniedPermissions.isEmpty()) {
                        //L.e("权限全部通过");
                        mHandler.sendEmptyMessage(105);
                        //被拒绝权限
                    } else {
                        // L.e("被拒绝权限:" + deniedPermissions.toArray());
                    }
                }
                break;
        }
    }
* 问题 5: 8266的在window下的虚拟机编译 gen_misc.sh发现报错:
bash: ./gen_misc.sh: /bin/bash^M: bad interpreter: No such file or directory
- 原因在于,其格式不是 unix 通过以下指令即可把该文件
gen_misc.sh转为 unix格式:
dos2unix gen_misc.sh