一.SpringMVC简介
/ 除了jsp以外全部过滤,/* 全部过滤了,front设计模式是前端设计模式。
SpringMVC中重要组件
DispatcherServlet,前端控制器,接收所有请求(如果配置/不包含jsp)。HandlerMapping,解析请求格式的,判断希望要执行哪个具体的方法。HandlerAdapter,负责调用具体的方法。ViewResovler,视图解析器,解析结果,准备跳转到具体的物理视图。
SpringMVC运行原理图

二.使用纯配置文件搭建SpringMVC环境
第一步,新建web项目,导入webmvc包,但是这个jar包依赖spring的包,所以spring所需要的expression、core、context、beans、aop、aspects、web、tx、commons-logging包也需要导入一下,jdbc包如果整合mybatis需要导入。

第二步,在web.xml中配置前端控制器DispatcherServlet。

<?xml version="1.0" encoding="UTF-8"?>
<web-app xmlns="http://xmlns.jcp.org/xml/ns/javaee"
         xmlns:xsi="http://www.w3.org/2001/XMLSchema-instance"
         xsi:schemaLocation="http://xmlns.jcp.org/xml/ns/javaee http://xmlns.jcp.org/xml/ns/javaee/web-app_4_0.xsd"
         version="4.0">
    <servlet>
        <servlet-name>springmvc123</servlet-name>
        <!--创建对象默认走该类的无参构造方法-->
        <servlet-class>org.springframework.web.servlet.DispatcherServlet</servlet-class>
        <!--修改配置文件路径和名称-->
        <!--默认路径为/WEB-INF/springmvc123-servlet.xml-->
        <init-param>
            <param-name>contextConfigLocation</param-name>
            <param-value>classpath:springmvc.xml</param-value>
        </init-param>
        <!--自启动-->
        <load-on-startup>1</load-on-startup>
    </servlet>
    <servlet-mapping>
        <servlet-name>springmvc123</servlet-name>
        <url-pattern>/</url-pattern>
    </servlet-mapping>
</web-app>
第三步,配置springmvc.xml文件。
<?xml version="1.0" encoding="UTF-8"?>
<beans xmlns="http://www.springframework.org/schema/beans"
       xmlns:xsi="http://www.w3.org/2001/XMLSchema-instance"
       xmlns:context="http://www.springframework.org/schema/context"
       xsi:schemaLocation="http://www.springframework.org/schema/beans
           http://www.springframework.org/schema/beans/spring-beans.xsd
           http://www.springframework.org/schema/context
           http://www.springframework.org/schema/context/spring-context.xsd">
    <bean id="demo123" class="com.lidong.controller.DemoController"></bean>
    <bean class="org.springframework.web.servlet.handler.SimpleUrlHandlerMapping">
        <property name="urlMap">
            <map>
                <!--解析出来的控制器逻辑名-->
                <entry key="demo" value-ref="demo123"></entry>
            </map>
        </property>
    </bean>
    <bean class="org.springframework.web.servlet.mvc.SimpleControllerHandlerAdapter"></bean>
    <bean id="viewResolver" class="org.springframework.web.servlet.view.InternalResourceViewResolver">
        <property name="prefix" value="/"></property>
        <property name="suffix" value=".jsp"></property>
    </bean>
</beans>
第四步,控制器。
package com.lidong.controller;

import org.springframework.web.servlet.ModelAndView;
import org.springframework.web.servlet.mvc.Controller;

import javax.servlet.http.HttpServletRequest;
import javax.servlet.http.HttpServletResponse;

public class DemoController implements Controller{
    @Override
    public ModelAndView handleRequest(HttpServletRequest request, HttpServletResponse response) throws Exception {
        System.out.println("执行了springmvc控制器");
        ModelAndView mav = new ModelAndView("main");
        return mav;
    }
}
三.SpringMVC运行过程源码跟踪
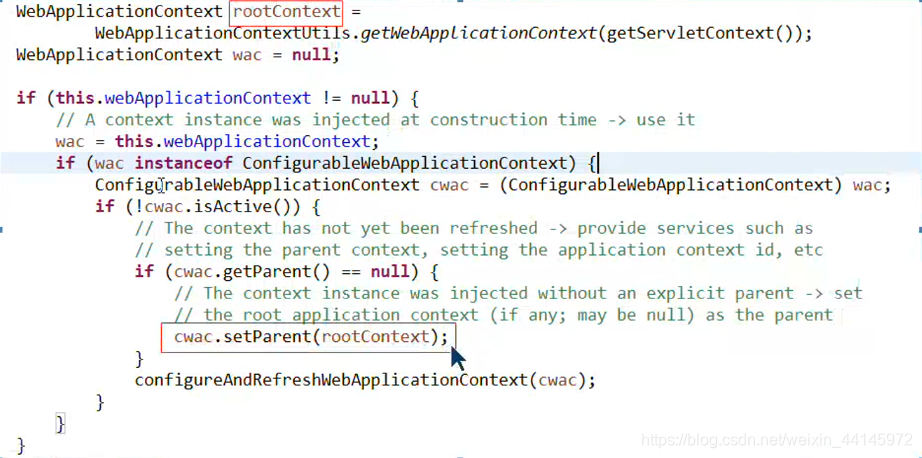
DispatcherServlet实际上就是一个标准Servlet,父类的的父类HttpServletBean有final的init方法,init方法会调用子类FrameworkServlet的initServletBean,里面调用了initWebApplicationContext方法,这个方法特别重要。
Spring容器和SpringMVC容器的关系,Spring容器和SpringMVC容器是父子容器,SpringMVC容器中能够调用Spring容器的所有内容,cwac.setParent(rootContext)设置了SpringMVC容器是Spring容器的子容器,图示。

init方法走完会走service方法,FrameworkServlet类有service方法,放行请求到DispatcherServlet有doService方法,设置一堆东西然后调用doDispatch方法,这个方法是用来转发的,里面使用了HandlerMapping、HandlerAdapter,HandlerMapping负责解析路径,根据key知道调用哪个value,然后HandlerAdapter负责调用这个Controller对象,DispatcherServlet还有initStrategies方法,SpringMVC所有能用到的组件全在这里初始化。
四.SpringMVC注解方式环境搭建
第一步、第二步和使用纯配置文件搭建SpringMVC环境一样。
第三步,在src下新建springmvc.xml,引入xmlns:mvc命名空间。
<?xml version="1.0" encoding="UTF-8"?>
<beans xmlns="http://www.springframework.org/schema/beans"
       xmlns:xsi="http://www.w3.org/2001/XMLSchema-instance"
       xmlns:context="http://www.springframework.org/schema/context"
       xmlns:mvc="http://www.springframework.org/schema/mvc"
       xsi:schemaLocation="http://www.springframework.org/schema/beans
           http://www.springframework.org/schema/beans/spring-beans.xsd
           http://www.springframework.org/schema/context
           http://www.springframework.org/schema/context/spring-context.xsd
           http://www.springframework.org/schema/mvc
           http://www.springframework.org/schema/mvc/spring-mvc.xsd">
    <!--扫描注解-->
    <context:component-scan base-package="com.lidong.controller"></context:component-scan>
    <!--注解驱动-->
    <!--org.springframework.web.servlet.mvc.annotation.DefaultAnnotationHandlerMapping-->
    <!--org.springframework.web.servlet.mvc.annotation.AnnotationMethodHandlerAdapter-->
    <mvc:annotation-driven></mvc:annotation-driven>
    <!--静态资源-->
    <mvc:resources location="/WEB-INF/js/" mapping="/js/**"></mvc:resources>
    <mvc:resources location="/WEB-INF/css/" mapping="/css/**"></mvc:resources>
    <mvc:resources location="/WEB-INF/images/" mapping="/images/**"></mvc:resources>
</beans>
第四步,编写控制器类。
package com.lidong.controller;

import org.springframework.stereotype.Controller;
import org.springframework.web.bind.annotation.RequestMapping;

@Controller
public class DemoController {
    @RequestMapping("demo")
    public String demo(){
        System.out.println("执行demo");
        return "main.jsp";
    }
}
