- 微信扫码关注公众号 :前端前端大前端,追求更精致的阅读体验 ,一起来学习啊
- 关注后发送关键资料,免费获取一整套前端系统学习资料和老男孩python系列课程

项目描述
该项目借助snabbdom模拟实现React的主要功能
- jsx
- 函数组件
- 类组件
- 事件绑定
- 列表渲染
项目源码
项目脚手架
安装依赖
npm i
启动
npm start
jsx实现
jsx其实就是一个js对象而已,遇到JSX的地方都通过 @babel/plugin-transform-react-jsx 插件转换为 React.createElement函数调用的形式,所以我们需要手动实现这个方法。同时,这也解释了为什么出现jsx的地方即使不显式使用React也要引入。
React.createElement
//src/react.js
const createElement = (type, props = {}, ...children) => {
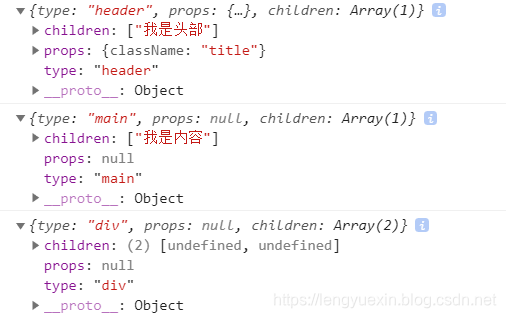
console.log({
type, props, children
});
};
const React = {
createElement
};
export default React;
index.js
//src/index.js
import React from "./react";

const App = (
    <div>
        <header className="title">
            我是头部
        </header>
        <main>
            我是内容
        </main>
    </div>
);
- 值得注意的是,我们在index.js中写了jsx代码段,但是没有手动去调用React.createElement方法,控制台却有预期输出。很正常,这就是上边介绍的插件帮我们做的事。
- 到这里我们可以知道React.createElement 的本质是生成一个虚拟dom,所以光打印肯定是不够的。这里就需要引入snabbdom,这个就是虚拟dom相关的库,vue2使用的也是它。
React.createElement完善
//src/react.js
import { h } from 'snabbdom';

const createElement = (type, props = {}, ...children) => {
    return h(type, { props }, children);
};


const React = {
    createElement
};

export default React;
- 此时代码正常运行,但是渲染不到页面上。这是因为虚拟dom还没有转成真实dom,所以我们需要react-DOM中新增render方法。而这个render方法的具体实现,直接交给snabbdom处理即可
ReactDOM.render
//src/ReactDOM.js
import {init} from 'snabbdom';
import propsModule from 'snabbdom/modules/props';
const reconcile = init([propsModule]);

const render = (el, mountedNode) => {
    reconcile(mountedNode, el);
}

const ReactDOM = {
    render
}
export default ReactDOM;
在index.js中渲染
//src/index.js
import React from "./react";
import ReactDOM from './reactDOM';
const App = (
    <div>
        <header className="title">
            我是头部
        </header>
        <main>
            我是内容
        </main>
    </div>
);


ReactDOM.render(App,document.getElementById("root"))
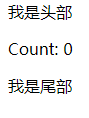
- 此时页面上已经可以正常显示我们预期的内容了

- 但问题还没有结束,当我们在 index.js 中多次调用 render,会报错。这是因为我们只有在第一次渲染时,可以在真实的DOM节点上调用 reconcile 方法,此后所有的渲染都应该在之前返回的虚拟DOM节点上调用reconcile 。
ReactDOM.render完善
//src/ReactDOM.js
import {init} from 'snabbdom';
import propsModule from 'snabbdom/modules/props';
const reconcile = init([propsModule]);
let vMountedNode = null;
const render = (el, mountedNode) => {
    if (vMountedNode == null) {
        //第一次调用 render 时渲染真实dom节点
        vMountedNode = mountedNode;
    }
    //此后所有渲染在之前返回的虚拟dom上进行
    vMountedNode = reconcile(vMountedNode, el);

}
const ReactDOM = {
    render
}
export default ReactDOM;
- ok ,到此,第一部分jsx完成
函数组件实现
接下来我们在index.js中添加一个函数组件,看看会怎么个情况
import React from "./react";
import ReactDOM from './reactDOM';
const App = (
    <div>
        <header className="title">
            我是头部
        </header>
        <main>
            我是内容
        </main>
        <Footer/>
    </div>
);

function Footer(){
    return <div>我是尾部</div>
}


ReactDOM.render(App,document.getElementById("root"))
- 预料之中的报错,
sel.indexOf is not a function - 问题关键是我们上边写的React.createElement方法接收的第一个参数只能识别原生的html标签,也就是字符串类型。
- createElement方法张打印type后发现,函数组件的type是一个函数。
- 解决方法也很简单,做一次类型判断,是字符串的直接创建,是函数就调用一下,将props传入,然后再创建。
//src/react.js
import { h } from 'snabbdom';

const createElement = (type, props = {}, ...children) => {

    //如果是函数组件,那么调用它,并返回执行结果
    if (typeof type === 'function') {
        return type(props);
    }
    return h(type, { props }, children);
};


const React = {
    createElement
};

export default React;
- 此时我们发现,函数组件可以正常工作了

- 注意上边的
type(props),你也许好奇为什么要传递props参数。 - 如果不传,函数组件的的props哪来呢?
- 看下函数组件的用法就能理解了
function App(props){
	return <div>{props.title}</div>
}
类组件实现(重点)
类组件的实现比函数组件要难一些,因为它除了状态更新还要考虑生命周期函数,下面开始类组件的逐步实现
添加Component基类
//src/react.js
import { h } from 'snabbdom';

const createElement = (type, props = {}, ...children) => {

    //如果是函数组件,那么调用它,并返回执行结果
    if (typeof type == 'function') {
        return type(props);
    }
    return h(type, { props }, children);
};

class Component {
    constructor() { }

    componentDidMount() { }

    setState(partialState) { }

    render() { }
}


const React = {
    createElement,
    Component
};

export default React;
-
这里解释了类组件用法中的
class Child extends React.Component{} -
接下来新建一个类组件counter.js去继承上述react.js中的基类Component并且在index.js中使用
counter.js
//src/counter.js
import React from './react';

export default class Counter extends React.Component {
    constructor(props) {
        super(props);

        this.state = {
            count: 0
        }
    }

    componentDidMount() {
        console.log('Component mounted');
    }

    render() {
        return <p>Count: {this.state.count}</p>
    }
}
在index.js中使用类组件
import React from "./react";
import ReactDOM from './reactDOM';
import Counter from "./counter";
const App = (
    <div>
        <header className="title">
            我是头部
        </header>
        <main>
            <Counter/>
        </main>
        <Footer/>
    </div>
);

function Footer(){
    return <div>我是尾部</div>
}


ReactDOM.render(App,document.getElementById("root"))
- 意料之中的报错
Cannot call a class as a function - 字面意思,函数可以调用,类自然不能像函数那样调用
- js基础好的应该清楚es6中的class其实只是语法糖,底层还是function
- 像函数组件那样排查错误,React.createElement中打印一下类组件的type,底层还是函数
- 既然都是函数,如何区分?
原型添加标识即可 - 所以,类实例化之后,并调用实例的render方法,之后就和函数组件一毛一样
- 这个实例化过程,也是类组件不如函数组件性能好的原因之一
添加原型标识
class Component {
    constructor() { }

    componentDidMount() { }

    setState(partialState) { }

    render() { }
}

//这样就能区分类组件和函数组件了
Component.prototype.isReactClassComponent = true;
完善React.createElement方法
const createElement = (type, props = {}, ...children) => {

    /**
      * 如果是类组件,创建实例,调用实例的 render 方法
      * 如果是函数组件,直接调用
      */
    if (type.prototype && type.prototype.isReactClassComponent) {
        const componentInstance = new type(props);
        return componentInstance.render();
    }

    if (typeof type === 'function') {
        return type(props);
    }
    return h(type, { props }, children);

};
- ok,改完后类组件正常工作
- 下边就到了问题的关键,state和setState。如果你有看过react源码,你会发现负责状态更新的是react-dom,而不是react本身。这是为了多平台的代码复用。一样的更新逻辑可以对react用,也可以对reactNative使用。关键是react-dom中在React身上添加的__updater 方法,该方法定义了this.setState更新dom时候的具体逻辑,像这样
//src/react-DOM.js
import React from './react'
import { init } from 'snabbdom';
import propsModule from 'snabbdom/modules/props';
const reconcile = init([propsModule]);

let vMountedNode = null;
const render = (el, mountedNode) => {
    if (vMountedNode == null) {
        //第一次调用 render 时渲染真实dom节点
        vMountedNode = mountedNode;
    }
    //此后所有渲染在之前返回的虚拟dom上进行
    vMountedNode = reconcile(vMountedNode, el);

}

React.__updater = function () {
    //do something
}
const ReactDOM = {
    render
}
export default ReactDOM;
-
但仅仅如此是不够的,react在进行this.setState的时候会比较旧数据和新数据,是差异更新,也就是常说的diff算法。这里的新旧数据是相对render前和render后而言的。为了进行比较,我们在类组件上添加 __vNode 属性,以维护该组件当前的 VNode 实例。
-
所以类组件创建那里要细化一下
  if (type.prototype && type.prototype.isReactClassComponent) {
        const componentInstance = new type(props);
        componentInstance.__vNode = componentInstance.render();
        return componentInstance.__vNode;
    }
- 然后去在基类中完善状态更新的方法
class Component {
    constructor() { }

    componentDidMount() { }

    setState(partialState) {
        this.state = {
            ...this.state,
            ...partialState
        }
       //这里的this实际就是基类实例化出的实例
        React.__updater(this);
    }

    render() { }
}
- 此时我们可以完善__updater方法了
React.__updater = (componentInstance) => {
    //当调用 this.setState 的时候更新 DOM 逻辑
    //获取在 __vNode 上存储的 oldVNode
    const oldVNode = componentInstance.__vNode;
    //获取 newVNode
    const newVNode = componentInstance.render();
    //更新 __vNode
    componentInstance.__vNode = reconcile(oldVNode, newVNode);
}
- 完善更新逻辑后,我们在counter.js中执行一下this.setState的逻辑
//src/counter.js
import React from './react';

export default class Counter extends React.Component {
    constructor(props) {
        super(props);

        this.state = {
            count: 0
        }


        setInterval(() => {
            this.setState({
                count: this.state.count + 1
            })
        }, 1000);


    }


    render() {
        return <p>Count: {this.state.count}</p>
    }
}
-
到这里你会发现界面上的计时器确实符合预期的在执行
-
下面要实现的是生命周期函数,大同小异,这里只介绍挂载时候的钩子函数实现,更多信息可参考这里
     if (type.prototype && type.prototype.isReactClassComponent) {
        const componentInstance = new type(props);
        componentInstance.__vNode = componentInstance.render();
          //增加钩子函数(当虚拟DOM被添加到真实DOM节点上时)
          componentInstance.__vNode.data.hook = {
            create: () => {
                componentInstance.componentDidMount()
            }
        }
        return componentInstance.__vNode;
    }
- 接下来在counter.js中使用一下componentDidMount函数
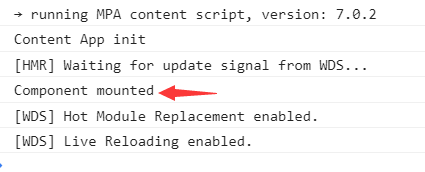
  componentDidMount() {
        console.log('Component mounted');
    }
- ok,此时控制台会打印Component mounted
事件绑定
大家都清楚react中事件都是小驼峰形式,而我们上边还没有对事件绑定这块进行处理。借助snabbom中的事件模块,很容易解决这个问题
ReactDOM中引入eventlistenersModule
import eventlistenersModule from 'snabbdom/modules/eventlisteners';
const reconcile = init([propsModule,eventlistenersModule]);
React.createElement对props进行完善
const createElement = (type, props = {}, ...children) => {

    let dataProps = {};
    let eventProps = {};

    for (let propKey in props) {
        // event 属性总是以 `on` 开头
        if (propKey.startsWith('on')) {
            const event = propKey.substring(2).toLowerCase();
            eventProps[event] = props[propKey];
        } else {
            dataProps[propKey] = props[propKey];
        }
    }

    /**
      * 如果是类组件,创建实例,调用实例的 render 方法
      * 如果是函数组件,直接调用
      */
    if (type.prototype && type.prototype.isReactClassComponent) {
        const componentInstance = new type(props);

          //增加钩子函数(当虚拟DOM被添加到真实DOM节点上时)
        componentInstance.__vNode = componentInstance.render();

        componentInstance.__vNode.data.hook = {
            create: () => {
                componentInstance.componentDidMount()
            }
        }
        return componentInstance.__vNode;


    }

    if (typeof type === 'function') {
        return type(props);
    }
    return h(type, { props: dataProps, on: eventProps }, children);

};
- 下面我们把counter.js中的定时器去掉,改成点击事件实现
//src/counter.js
import React from './react';

export default class Counter extends React.Component {
    constructor(props) {
        super(props);

        this.state = {
            count: 0
        }


    }

    componentDidMount() {
        console.log('Component mounted');
    }

    render() {
        return <p onClick={()=>{
            this.setState({
                count:this.state.count+1
            })
        }}>Count: {this.state.count}</p>
    }
}
- 此时点击试试,发现符合预期,事件绑定ok
列表渲染
这是处理起来最简单的,涉及一个扁平化处理
- 先不处理,直接在index.js中拿来用一把
import React from "./react";
import ReactDOM from './reactDOM';
const list = ["vue", "react", "angular"]
import Counter from "./counter";
const App = (
    <div>
        <header className="title">
            我是头部
        </header>
        <main>
            {
                list.map((item, i) => {
                    return <p key={i}>{item}</p>
                })
            }


            <Counter />


        </main>
        <Footer />
    </div>
);

function Footer() {
    return <div>我是尾部</div>
}


ReactDOM.render(App, document.getElementById("root"))
- 渲染结果是undefined
- 排查原因,React.createElement中打印一下type,props,children,发现children是嵌套数组

-
扁平化处理就能识别了,es6+系列已经在高级浏览器原生支持flat方法
-
React.createElement中对children进行处理
children=children.flat(Infinity)//Infinity表示无限展开
-
再看界面,发现列表渲染ok
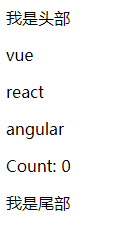
-
参考文章 https://juejin.im/post/5db0a9876fb9a020794d8c25
