You can allow an application administrator to create custom persistent fields and display the added fields' data in the UI without recompiling the application. In this example, the SkypeID field will be added to the Contact business object in the MainDemo application.
您可以允许应用程序管理员创建自定义持久字段,并在 UI 中显示添加的字段的数据,而无需重新编译应用程序。在此示例中,SkypeID 字段将添加到 MainDemo 应用程序中的"联系人"业务对象中。

The following sections describe the process of implementation custom persistent fields from application settings to runtime customization.
- Prerequisites
- Setup the Application
- Choose the Model Editor Type
- Implement the Persistent Field and Display It
- Apply Changes to the Database
以下各节介绍了从应用程序设置到运行时自定义的实现自定义持久字段的过程。
- 先决条件
- 设置应用程序
- 选择模型编辑器类型
- 实现持久字段并显示它
- 将更改应用于数据库
Prerequisites
先决条件
Ensure that your application does not contradict the following conditions. Otherwise, creating new persistent fields is impossible at runtime.
- WinForms and ASP.NET applications should be based on the XPO data model.
- Mobile applications do not support UI customization without recompilation, so the approach described in this topic is not supported by the Mobile platform.
-
The following features should not be used together.
- SecuredObjectSpaceProvider or XPObjectSpaceProvider created using the constructor with the threadSafe parameter set to true (this parameter enables ThreadSafeDataLayer).
- An Administrator's Model Differences stored in the database using the XafApplication.CreateCustomModelDifferenceStore event (you can still store the User's differences in the database using the XafApplication.CreateCustomUserModelDifferenceStore event).
- Custom Persistent Fields declared in the Administrator's Model Differences.
确保您的应用程序不与以下条件相矛盾。否则,在运行时无法创建新的持久字段。
- WinForms 和ASP.NET应用程序应基于 XPO 数据模型。
- 移动应用程序不支持 UI 自定义而不重新编译,因此移动平台不支持本主题中描述的方法。
- 以下功能不应一起使用。
- 使用线程安全参数设置为 true 的构造函数创建的安全对象空间提供程序或 XPObjectSpaceProvider(此参数启用线程安全数据层)。
- 使用 Xaf 应用程序存储在数据库中的管理员模型差异.创建自定义模型差异存储事件(您仍可以使用 Xaf 应用程序将用户的差异存储在数据库中。事件)。
- 在管理员的模型差异中声明的自定义持久字段。
With this configuration, your application loads information on custom persistent fields from the database and then updates the database schema. However, a thread-safe data layer does not support altering the data model after the database connection is established.
- Middle Tier Security - WCF Service, Workflow Server Service, or any other appllication that creates and configures a ServerApplication/XafApplication cannot access custom fields added in the client XAF application project (in code or in XAFML), or by customizing the application model at runtime. You should add a custom field in a common module and reference it in all applications where you are going to use it.
使用此配置,应用程序将从数据库中加载自定义持久性字段的信息,然后更新数据库架构。但是,线程安全的数据层不支持在建立数据库连接后更改数据模型。
- 中间层安全性 - WCF 服务、工作流服务器服务或任何其他创建和配置服务器应用程序/Xaf 应用程序的应用程序应用程序无法访问客户端 XAF 应用程序项目中添加的自定义字段(在代码中或在 XAFML 中),也无法在运行时自定义应用程序模型。应在公共模块中添加自定义字段,并在要使用的所有应用程序中引用该字段。
Setup the Application
设置应用程序
Apply the following changes in the application code to allow application administrators to create and display custom persistent field data in the UI.
-
Set the static ModelMemberReadOnlyCalculator.AllowPersistentCustomProperties property to true to allow creating persistent fields at runtime. Open the Module.cs (Module.vb) file and add the following code to the module's constructor.
在应用程序代码中应用以下更改,以允许应用程序管理员在 UI 中创建和显示自定义持久字段数据。
- 将静态模型成员ReadOnly计算器.允许持久自定义属性属性设置为 true,以便在运行时创建持久字段。打开Module.cs (module.vb) 文件,并将以下代码添加到模块的构造函数中。
DevExpress.ExpressApp.Model.Core.ModelMemberReadOnlyCalculator.AllowPersistentCustomProperties = true;
-
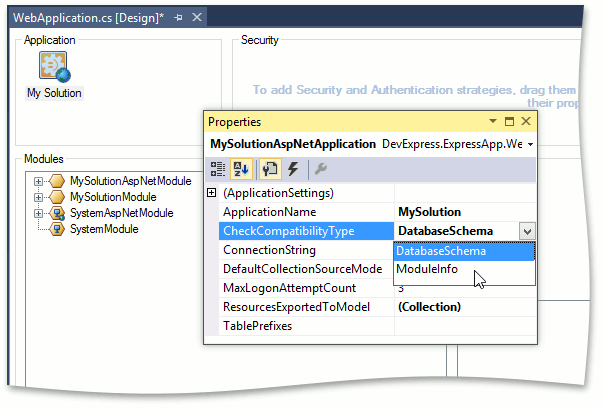
Set the IObjectSpaceProvider.CheckCompatibilityType property to CheckCompatibilityType.DatabaseSchema to catch the database changes and update the database if the schema is modified.
-
将 IObjectSpaceProvider.Check兼容性类型属性设置为 CheckCompatibilityType.数据库架构以捕获数据库更改,并在修改架构时更新数据库。
- To allow the database schema updates, set the XafApplication.DatabaseUpdateMode property to DatabaseUpdateMode.UpdateDatabaseAlways or DatabaseUpdateMode.UpdateOldDatabase.
- Copy the DBUpdater.v19.2.exe and DBUpdater.v19.2.config files from the %PROGRAMFILES(x86)%\DevExpress 19.2\Components\Tools\eXpressAppFramework\DBUpdater\ folder to the application's installation folder.
- 要允许数据库架构更新,请将 XafApplication.DatabaseUpdateMode 属性设置为数据库更新模式.始终更新数据库或数据库更新模式。更新旧数据库。
- 将 DBUpdater.v19.2.exe 和 DBUpdater.v19.2.config 文件从 %PROGRAMFILES(x86)%_DevExpress 19.2_组件_工具_eXpressAppFramework_DBUpdater_文件夹复制到应用程序的安装文件夹。
Choose the Model Editor Type
选择模型编辑器类型
It is necessary to determine which type of the Model Editor is appropriate for your application: standalone or built-in.
-
A built-in Model Editor
When an administrator uses a WinForms application, it is possible to invoke the built-in Model Editor tool to add a custom field to the application model. Using this Model Editor type, the administrator can edit both Model Differences stored in the application database and Model Differences from the XAFML file.
-
A standalone Model Editor
The use of the standalone Model Editor is preferred if an administrator uses only an ASP.NET application and Model Differences are stored in the XAFML file. For information on how to use this tool, refer to the Deploy and Run the Standalone Model Editor section of the Ways to Invoke the Model Editor topic.
Implement the Persistent Field and Display It
Follow the steps below to add a custom persistent field at an end-user workstation.
-
Invoke the built-in Model Editor using the Tools | Edit Model command at runtime or close the application and start the standalone Model Editor by running the DevExpress.ExpressApp.ModelEditor.v19.2.exe executable file.
If you use the standalone Model Editor, specify the path to the application configuration file (e.g., MainDemo.Win.exe.config or Web.config) and click Open in the Open Model dialog.

-
Navigate to the BO_Model | Contact node in the tree on the left. Right-click the OwnMembers child node and choose Add... | Member.

-
Set the Name property of the newly added node to "SkypeID". Then, set the IsCalculated property to "False", Type to "System.String", Size to "32", and Caption to "Skype ID".

-
If the built-in Model Editor is in use, copy the differences that you have introduced in the administrator's layer using the Merge Differences command. Otherwise, skip this step and move to the next one.

- Save changes using the Save button or the CTRL+S shortcut and restart the Model Editor.
-
Navigate to the Views | Contact_DetailView node in the tree on the left. Right-click the Items child node and choose Add... | PropertyEditor.

-
Set PropertyName and Id to "SkypeID".

-
Focus the Layout node. Right-click the empty space within the form preview displayed on the right and select Customize Layout.

-
Drag the Skype ID item from the invoked Customization window to an appropriate position within the form.

You can also add the Skype ID column to the Contact List View using a similar approach (see List View Columns Customization).
- If the built-in Model Editor is in use, merge the differences as described at the forth step.
- Save the changes and close the Model Editor.
- Update your database schema as described in the Apply Changes to the Database section.
- Restart the application and open the Contact Detail View to see the result demonstrated in the introduction of this topic.
Important
If the application is installed on several PCs and the Administrator's Model Differences are stored in the Model.xafml file, copy it from the application's working folder to each PC. Otherwise, the created field will be available only at the workstation where you added it.
Apply Changes to the Database
Use the DBUpdater tool to add the column mapped to the newly created custom persistent field to the database.
Open the Command Prompt, change the current directory to the applications working directory, and run the following command.
DBUpdater.v19.2.exe MainDemo.Win.exe.config -forceUpdate