还记得我在《Spring入门第十讲——Hibernate-5.0.7+Struts-2.3.24+Spring-4.2.4三大框架整合开发》这一讲中介绍SSH三大框架整合的时候,说过这三个框架的整合一共有三种方式,其中前两种方式已经讲过了,本讲介绍第三种方式,即纯注解的方式。
搭建SSH注解开发的环境
创建web项目,引入jar包
创建一个web项目,例如ssh3,并引入相关的jar包,那到底引入哪些jar包呢?相信你看过我的这篇文章——《Spring入门第十讲——Hibernate-5.0.7+Struts-2.3.24+Spring-4.2.4三大框架整合开发》的话,就知道应该要导入哪些jar包了。总体来讲,你可能需要导入如下44个jar包。
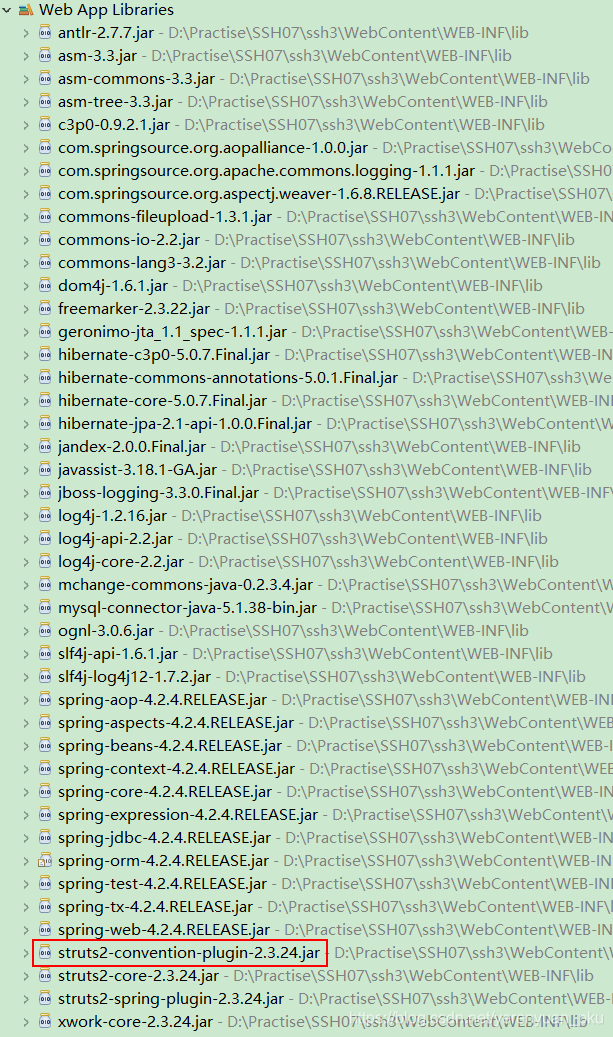
尤其要注意引入struts2-convention-plugin-2.3.24.jar这个jar包,因为它是Struts2的注解开发包,你要想使用Struts2的注解,必然就要在项目中引入该jar包。
创建数据库和表
创建一个数据库,例如s2sh_crm,并在该数据库下新建一张客户表,这里笔者使用的数据库是MySQL。
create database s2sh_crm;
use s2sh_crm;

CREATE TABLE `cst_customer` (
	`cust_id` bigint(32) NOT NULL AUTO_INCREMENT COMMENT '客户编号(主键)',
	`cust_name` varchar(32) NOT NULL COMMENT '客户名称(公司名称)',
	`cust_source` varchar(32) DEFAULT NULL COMMENT '客户信息来源',
	`cust_industry` varchar(32) DEFAULT NULL COMMENT '客户所属行业',
	`cust_level` varchar(32) DEFAULT NULL COMMENT '客户级别',
	`cust_phone` varchar(64) DEFAULT NULL COMMENT '固定电话',
	`cust_mobile` varchar(16) DEFAULT NULL COMMENT '移动电话',
	PRIMARY KEY (`cust_id`)
) ENGINE=InnoDB AUTO_INCREMENT=1 DEFAULT CHARSET=utf8;
引入相关的配置文件
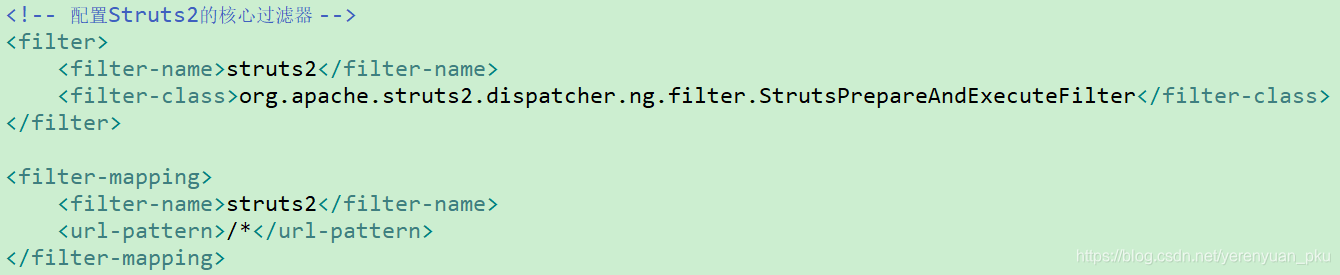
首先,既然是使用纯注解的方式来整合这三个框架,那么Struts2框架所须的配置文件就没必要有了。虽说struts.xml文件是可以不用写了,但是我们还是应在项目的web.xml文件中配置Struts2的核心过滤器。
然后,Struts2框架所须的配置文件没了,不代表Spring框架所须的配置文件就没必要创建了。之前讲Spring整合Hibernate框架的时候,我们可以不必创建Hibernate的核心配置文件,其里面应有的数据库连接的配置信息(包括数据库驱动类的全名称、要连接的数据库、用户名以及密码等)可以抽取到一个属性文件(例如jdbc.properties)当中,而且建议将该属性文件置于项目的src目录下。
jdbc.driverClass=com.mysql.jdbc.Driver
jdbc.url=jdbc:mysql:///s2sh_crm
jdbc.username=root
jdbc.password=liayun
接着,在Spring配置文件(例如applicationContext.xml)中引入外部的jdbc.properties属性文件。
<?xml version="1.0" encoding="UTF-8"?>
<beans xmlns="http://www.springframework.org/schema/beans"
	xmlns:xsi="http://www.w3.org/2001/XMLSchema-instance"
	xmlns:context="http://www.springframework.org/schema/context"
	xmlns:aop="http://www.springframework.org/schema/aop"
	xmlns:tx="http://www.springframework.org/schema/tx"
	xsi:schemaLocation="http://www.springframework.org/schema/beans
	http://www.springframework.org/schema/beans/spring-beans.xsd
	http://www.springframework.org/schema/context
	http://www.springframework.org/schema/context/spring-context.xsd
	http://www.springframework.org/schema/aop
	http://www.springframework.org/schema/aop/spring-aop.xsd
	http://www.springframework.org/schema/tx
	http://www.springframework.org/schema/tx/spring-tx.xsd">

	<!-- 引入外部属性文件 -->
	<context:property-placeholder location="classpath:jdbc.properties" />
	<!-- 配置C3P0连接池 -->
	<bean id="dataSource" class="com.mchange.v2.c3p0.ComboPooledDataSource">
		<property name="driverClass" value="${jdbc.driverClass}" />
		<property name="jdbcUrl" value="${jdbc.url}" />
		<property name="user" value="${jdbc.username}" />
		<property name="password" value="${jdbc.password}" />
	</bean>

</beans>
在以上applicationContext.xml文件中,可以看到我们的项目使用的是C3P0连接池,连接池对象中所使用到的配置信息都来自于src目录下的jdbc.properties属性文件当中。
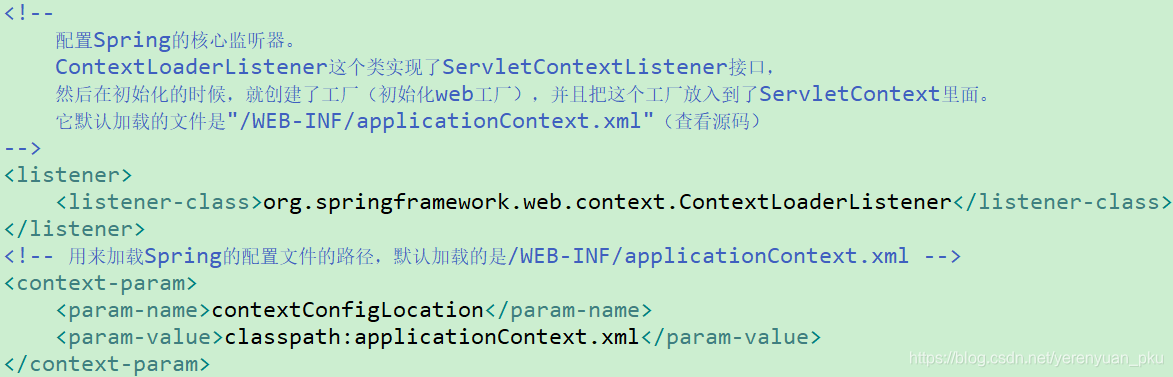
紧接着,就要使用Spring中的核心监听器(即ContextLoaderListener)来整合web项目了。咋整合呢?在web.xml文件中配置Spring中的核心监听器(即ContextLoaderListener),这样在服务器启动的时候,它就会加载Spring的配置文件了,并且还要手动配置让其加载类路径下的配置文件。
最后,还要记得在src目录下引入Log4j的配置文件(log4j.properties)哟!也就是日志记录文件,该文件内容如下:
### direct log messages to stdout ###
log4j.appender.stdout=org.apache.log4j.ConsoleAppender
log4j.appender.stdout.Target=System.err
log4j.appender.stdout.layout=org.apache.log4j.PatternLayout
log4j.appender.stdout.layout.ConversionPattern=%d{ABSOLUTE} %5p %c{1}:%L - %m%n

### direct messages to file mylog.log ###
log4j.appender.file=org.apache.log4j.FileAppender
log4j.appender.file.File=c\:mylog.log
log4j.appender.file.layout=org.apache.log4j.PatternLayout
log4j.appender.file.layout.ConversionPattern=%d{ABSOLUTE} %5p %c{1}:%L - %m%n

### set log levels - for more verbose logging change 'info' to 'debug' ###
# error warn info debug trace
log4j.rootLogger= info, stdout
创建相关的包结构

引入相关的页面
该项目所用到的相关后台页面,大家也没必要费心费力地写了,直接点击我这里给的百度网盘链接进行下载即可。
- 百度网盘链接地址:https://pan.baidu.com/s/16Z4zNk677WPIIWV62D2PYw,提取码: 6tw4。
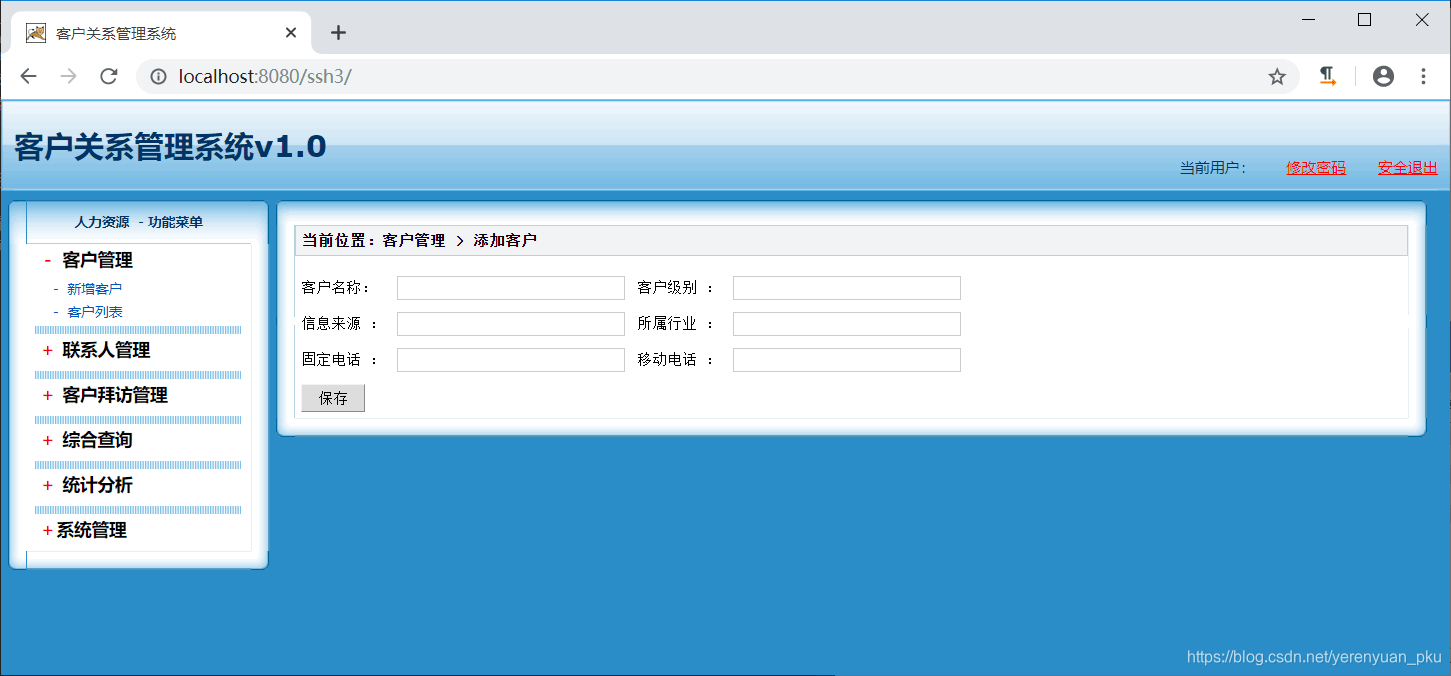
将下载下来的所有东东拷贝到我们的项目中之后,发布我们的项目,试着访问一下项目的首页,点击新增客户超链接,看能不能跳转到客户添加页面。
至此,SSH纯注解开发的环境算是搭建好了,接下来,就要编写代码实现保存客户这一功能了。
编写代码实现保存客户的功能
创建Customer实体类
在com.meimeixia.ssh.domain包下创建一个Customer实体类。
package com.meimeixia.ssh.domain;

/**
 * 客户管理的实体
 * @author liayun
 *
 */
public class Customer {

	private Long cust_id;
	private String cust_name;
	private String cust_source;
	private String cust_industry;
	private String cust_level;
	private String cust_phone;
	private String cust_mobile;

	public Long getCust_id() {
		return cust_id;
	}
	public void setCust_id(Long cust_id) {
		this.cust_id = cust_id;
	}
	public String getCust_name() {
		return cust_name;
	}
	public void setCust_name(String cust_name) {
		this.cust_name = cust_name;
	}
	public String getCust_source() {
		return cust_source;
	}
	public void setCust_source(String cust_source) {
		this.cust_source = cust_source;
	}
	public String getCust_industry() {
		return cust_industry;
	}
	public void setCust_industry(String cust_industry) {
		this.cust_industry = cust_industry;
	}
	public String getCust_level() {
		return cust_level;
	}
	public void setCust_level(String cust_level) {
		this.cust_level = cust_level;
	}
	public String getCust_phone() {
		return cust_phone;
	}
	public void setCust_phone(String cust_phone) {
		this.cust_phone = cust_phone;
	}
	public String getCust_mobile() {
		return cust_mobile;
	}
	public void setCust_mobile(String cust_mobile) {
		this.cust_mobile = cust_mobile;
	}

}
由于是SSH三大框架纯注解方式的整合开发,所以不必创建该实体类相对应的映射配置文件,没了映射配置文件,那到底如何建立表和类之间的映射关系呢?别急,后面会使用Hibernate的注解来实现。
Spring框架整合Struts2框架
首先,在com.meimeixia.ssh.web.action包下创建一个CustomerAction类,并在该类中编写如下的一个保存客户的方法(save方法)。
package com.meimeixia.ssh.web.action;

import com.meimeixia.ssh.domain.Customer;
import com.opensymphony.xwork2.ActionSupport;
import com.opensymphony.xwork2.ModelDriven;

/**
 * 客户管理的Action类
 * @author liayun
 *
 */
public class CustomerAction extends ActionSupport implements ModelDriven<Customer> {

	//模型驱动使用的对象
	private Customer customer = new Customer();

	@Override
	public Customer getModel() {
		return customer;
	}

	//保存客户的方法
	public String save() {
		System.out.println("CustomerAction中的save方法执行了......");
		return NONE;
	}

}
然后,在Spring中配置以上Action类。之前,我们都是这样配置的:将Action类交给Spring来管理,于是在Spring核心配置文件中就要添加如下的配置。
<bean id="customerAction" class="com.meimeixia.ssh.web.action.CustomerAction" scope="prototype">

</bean>
但我们现在使用的是纯注解方式,所以就不能像上面那样配置了,得在Action类上使用@Controller注解和@Scope注解。大家一定要记得在类上使用注解时,要开启组件扫描,即在Spring核心配置文件中添加如下的配置。
<!-- 开启组件扫描,即将我们的类交给Spring去管理,直接扫描父包 -->
<context:component-scan base-package="com.meimeixia.ssh" />
一旦开启了组件扫描,就可以在我们所创建的CustomerAction类上添加@Controller注解和@Scope注解了。
package com.meimeixia.ssh.web.action;

import org.springframework.context.annotation.Scope;
import org.springframework.stereotype.Controller;

import com.meimeixia.ssh.domain.Customer;
import com.opensymphony.xwork2.ActionSupport;
import com.opensymphony.xwork2.ModelDriven;

/**
 * 客户管理的Action类
 * @author liayun
 */
@Controller("customerAction")
@Scope("prototype")
public class CustomerAction extends ActionSupport implements ModelDriven<Customer> {

	//模型驱动使用的对象
	private Customer customer = new Customer();

	@Override
	public Customer getModel() {
		return customer;
	}

	//保存客户的方法
	public String save() {
		System.out.println("CustomerAction中的save方法执行了......");
		return NONE;
	}

}
接着,还要在Struts2中配置以上Action类,用于负责处理请求和页面跳转。之前,我们都是在Struts2配置文件中添加像下面这样的配置。
<package name="demo" extends="struts-default" namespace="/">
    <action name="customer_save" class="customerAction" method="save">

    </action>
    <action name="customer_update" class="customerAction" method="update">

    </action>
</package>
但我们现在使用的是纯注解方式,所以就不能像上面那样配置了,得使用注解了。
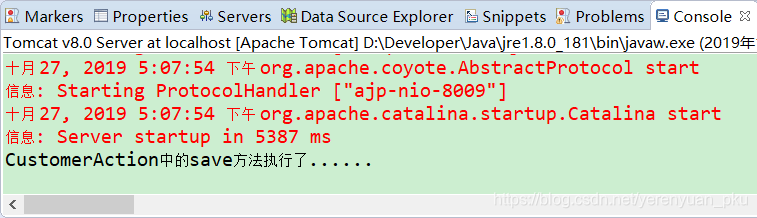
这时,你可以做一个测试,发布咱们的项目到Tomcat服务器中,访问项目的首页之后,点击新增客户超链接,在跳转到客户添加页面后,直接点击保存按钮,那么你就会看到Eclipse控制台打印了如下信息,这就说明了程序并没有任何问题。
在Action类中调用service层中的服务
现在,咱就需要在Action类中调用service层中的服务了。哎呀!service层中的接口和实现类咱也没有写啊!所以,接下来,我们还要编写service层中的接口和实现类。首先,在com.meimeixia.ssh.service包下编写如下一个名为CustomerService的接口。
package com.meimeixia.ssh.service;

import com.meimeixia.ssh.domain.Customer;

/**
* 客户管理的业务层的接口
* @author liayun
*
*/
public interface CustomerService {

    void save(Customer customer);

}
然后,再在com.meimeixia.ssh.service.impl包下编写一个以上接口的实现类,即CustomerServiceImpl.java。
package com.meimeixia.ssh.service.impl;

import com.meimeixia.ssh.domain.Customer;
import com.meimeixia.ssh.service.CustomerService;

/**
* 客户管理的service的实现类
* @author liayun
*/
public class CustomerServiceImpl implements CustomerService {

    @Override
    public void save(Customer customer) {
        System.out.println("CustomerServiceImpl类中的save方法执行了......");
    }

}
接着,便要将以上CustomerServiceImpl实现类交给Spring来管理了。之前,我们都是在Spring核心配置文件中添加像下面这样的配置。
<bean id="customerService" class="com.meimeixia.ssh.service.impl.CustomerServiceImpl">

</bean>
但我们现在使用的是纯注解方式,所以就不能像上面那样配置了,得在类上使用@Service注解。
package com.meimeixia.ssh.service.impl;

import org.springframework.stereotype.Service;

import com.meimeixia.ssh.domain.Customer;
import com.meimeixia.ssh.service.CustomerService;

/**
 * 客户管理的service的实现类
 * @author liayun
 */
@Service("customerService")
public class CustomerServiceImpl implements CustomerService {

	@Override
	public void save(Customer customer) {
		System.out.println("CustomerServiceImpl类中的save方法执行了......");
	}

}
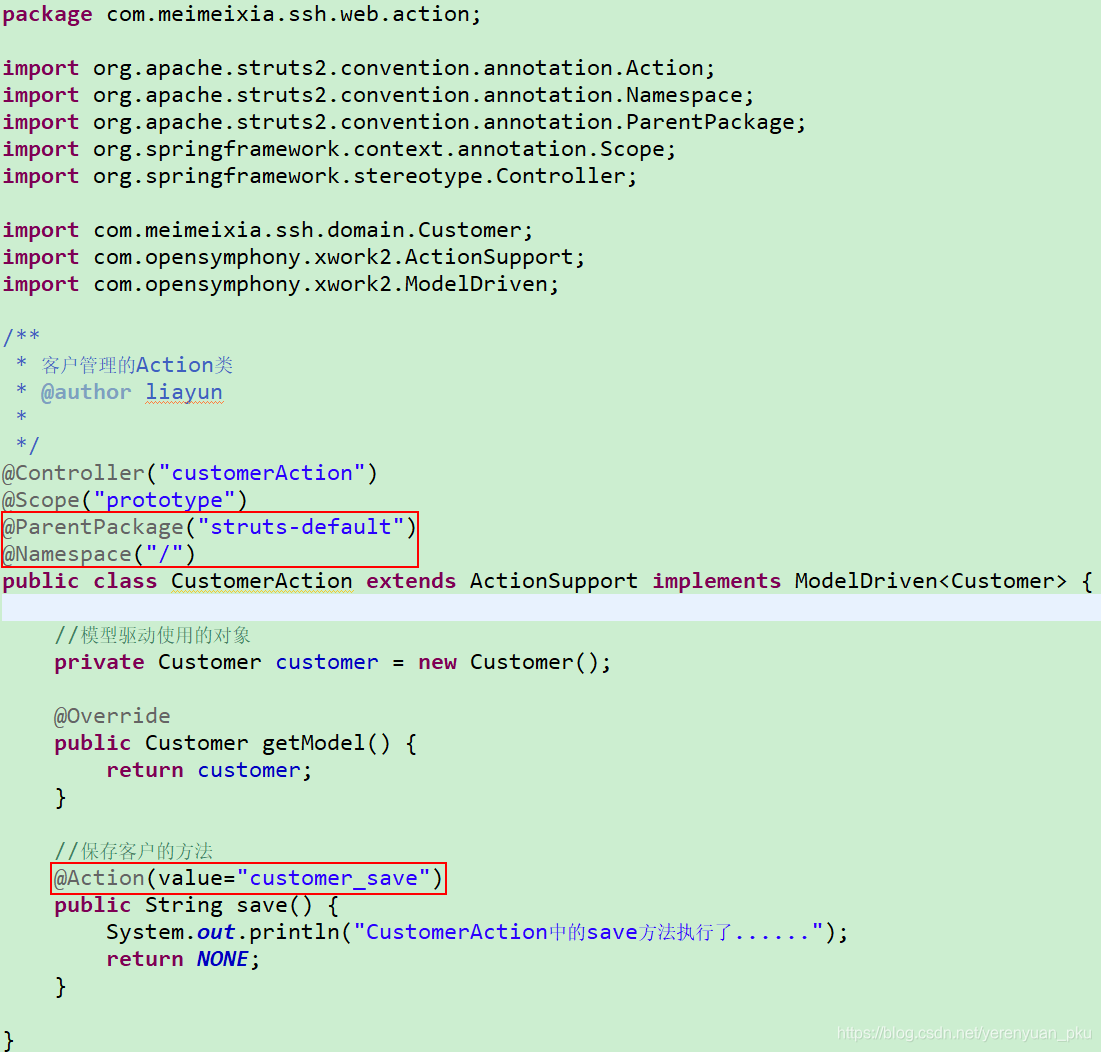
紧接着,在CustomerAction类中使用注解注入CustomerService类型的属性,并在save方法中调用service层中的服务。
package com.meimeixia.ssh.web.action;

import javax.annotation.Resource;

import org.apache.struts2.convention.annotation.Action;
import org.apache.struts2.convention.annotation.Namespace;
import org.apache.struts2.convention.annotation.ParentPackage;
import org.springframework.context.annotation.Scope;
import org.springframework.stereotype.Controller;

import com.meimeixia.ssh.domain.Customer;
import com.meimeixia.ssh.service.CustomerService;
import com.opensymphony.xwork2.ActionSupport;
import com.opensymphony.xwork2.ModelDriven;

/**
 * 客户管理的Action类
 * @author liayun
 *
 */
@Controller("customerAction")
@Scope("prototype")
@ParentPackage("struts-default")
@Namespace("/")
public class CustomerAction extends ActionSupport implements ModelDriven<Customer> {

	//模型驱动使用的对象
	private Customer customer = new Customer();

	@Override
	public Customer getModel() {
		return customer;
	}

	//注入service
	@Resource(name="customerService")
	private CustomerService customerService;

	//保存客户的方法
	@Action(value="customer_save")
	public String save() {
		System.out.println("CustomerAction中的save方法执行了......");
		customerService.save(customer);
		return NONE;
	}

}
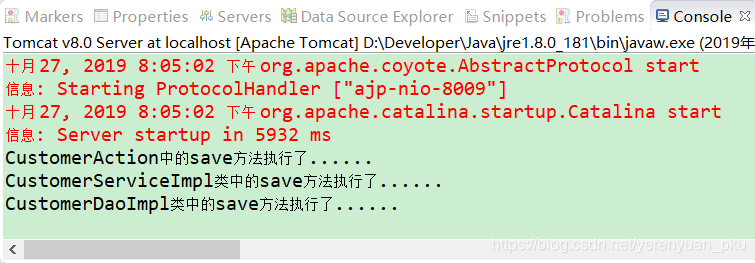
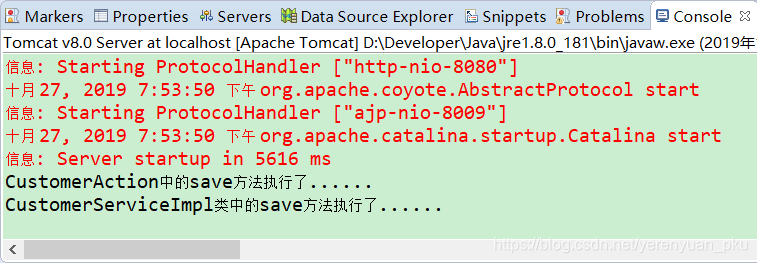
这时,不妨做个测试,发布咱们的项目到Tomcat服务器中,访问项目的首页之后,点击新增客户超链接,在跳转到客户添加页面后,直接点击保存按钮,那么你就会看到Eclipse控制台打印了如下信息,这就说明了程序并没有任何问题。
在service层调用dao层对外提供的方法
现在,咱就需要在service层中调用dao层中对外提供的方法了。哎呀!dao层中的接口和实现类咱也没有写啊!所以,接下来,我们还要编写dao层中的接口和实现类。首先,在com.meimeixia.ssh.dao包下编写如下一个名为CustomerDao的接口。
package com.meimeixia.ssh.dao;

import com.meimeixia.ssh.domain.Customer;

/**
 * 客户管理的dao的接口
 * @author liayun
 *
 */
public interface CustomerDao {

	void save(Customer customer);

}
然后,再在com.meimeixia.ssh.dao.impl包下编写一个以上接口的实现类,即CustomerDaoImpl.java。
package com.meimeixia.ssh.dao.impl;

import com.meimeixia.ssh.dao.CustomerDao;
import com.meimeixia.ssh.domain.Customer;

/**
 * 客户管理的dao的实现类
 * @author liayun
 */
public class CustomerDaoImpl implements CustomerDao {

	@Override
	public void save(Customer customer) {
		System.out.println("CustomerDaoImpl类中的save方法执行了......");
	}

}
接着,便要将以上CustomerDaoImpl实现类交给Spring来管理了。之前,我们都是在Spring核心配置文件中添加像下面这样的配置。
<bean id="customerDao" class="com.meimeixia.ssh.dao.impl.CustomerDaoImpl">

</bean>
但我们现在使用的是纯注解方式,所以就不能像上面那样配置了,得在类上使用@Repository注解。
package com.meimeixia.ssh.dao.impl;

import org.springframework.stereotype.Repository;

import com.meimeixia.ssh.dao.CustomerDao;
import com.meimeixia.ssh.domain.Customer;

/**
 * 客户管理的dao的实现类
 * @author liayun
 */
@Repository("customerDao")
public class CustomerDaoImpl implements CustomerDao {

	@Override
	public void save(Customer customer) {
		System.out.println("CustomerDaoImpl类中的save方法执行了......");
	}

}
紧接着,在CustomerServiceImpl实现类中使用注解注入CustomerDao类型的属性,并在save方法中调用dao层中的对外提供的方法。
package com.meimeixia.ssh.service.impl;

import javax.annotation.Resource;

import org.springframework.stereotype.Service;

import com.meimeixia.ssh.dao.CustomerDao;
import com.meimeixia.ssh.domain.Customer;
import com.meimeixia.ssh.service.CustomerService;

/**
 * 客户管理的service的实现类
 * @author liayun
 * 现在要将Service交给Spring去管理,原来得写成下面这样:
 */
@Service("customerService")
public class CustomerServiceImpl implements CustomerService {

	//注入dao
	@Resource(name="customerDao")
	private CustomerDao customerDao;

	@Override
	public void save(Customer customer) {
		System.out.println("CustomerServiceImpl类中的save方法执行了......");
		customerDao.save(customer);
	}

}
这时,不妨做个测试,发布咱们的项目到Tomcat服务器中,访问项目的首页之后,点击新增客户超链接,在跳转到客户添加页面后,直接点击保存按钮,那么你就会看到Eclipse控制台打印了如下信息,这就说明了程序并没有任何问题。