github:https://github.com/eitail/Face_Recognition
参考博客:
人脸识别实战之用QT做点事(二):做一个人脸检测界面 有一些类似
OpenCV haarcascade_frontalface_alt2.xml人脸检测测试 detectMultiScale()函数介绍
Qt Creator 窗体控件自适应窗口大小布局 layout
OpenCV&Qt学习之四——OpenCV 实现人脸检测与相关知识整理 【推荐看一下】
这是一个简单的人脸识别代码,适合初学者研究,开发者使用的是Ubuntu系统,QT,以及Opencv实现的功能。
由于是刚接触qt,所以只尝试做了一些小修改:
1.原本的视频处理用imshow返送,这样结束程序后,还需要手动关闭,比较麻烦,改成了setPixmap返送至ui->label
2.增加了closeCamera按钮,修改后closeCamera后可再次openCamera打开视频
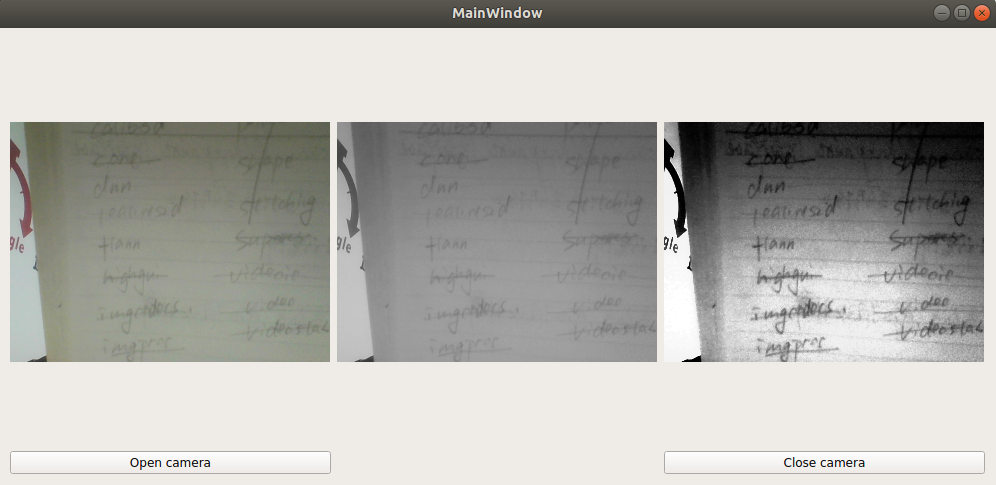
3.做了一个简单的grid布局,三个视频通道(scale=0.5),两个按钮
4.原图改为灰度图后,通道数减少了,QImage::Format_RGB888 =》 QImage::Format_Indexed8
从左到右依次是:原图、灰度图、直方图均衡化
代码是直接git的,修改掉的不需要的部分我都注释掉了
mainwindow.h


/*-------------------------------------------------
*
* Project created by QtCreator 2017-11-03T01:20:33
*
* author:Leo
*
* url:http://www.linuxkiss.com
*
-------------------------------------------------*/
#ifndef MAINWINDOW_H
#define MAINWINDOW_H

#include <QMainWindow>
#include <QDebug>

#include <opencv.hpp>
#include <opencv2/core/core.hpp>
#include <opencv2/highgui/highgui.hpp>

#include "opencv2/objdetect/objdetect.hpp"
#include "opencv2/imgproc/imgproc.hpp"
#include <cv.h>
#include <iostream>
#include <stdio.h>

using namespace std;
using namespace cv;


namespace Ui {
class MainWindow;
}

class MainWindow : public QMainWindow
{
    Q_OBJECT

    public:
        explicit MainWindow(QWidget *parent = 0);
        ~MainWindow();

    private:
        void        Face_recognition();
        void        Pic2Gray(Mat camerFrame,Mat &gray);

    private:
        Ui::MainWindow *ui;
        string face_cascade_name;
        CascadeClassifier face_cascade;
        VideoCapture capture;

    private slots:
        void        openCamara();
        void        closeCamera();
};

#endif // MAINWINDOW_H
mainwindow.cpp
#include "mainwindow.h"
#include "ui_mainwindow.h"

MainWindow::MainWindow(QWidget *parent) :
    QMainWindow(parent),
    ui(new Ui::MainWindow)
{
    ui->setupUi(this);

    //****** 这个路径自行修改 ******
    face_cascade_name = "haarcascade_frontalface_alt2.xml";
    connect(ui->open, SIGNAL(clicked()), this, SLOT(openCamara()));
    connect(ui->close, SIGNAL(clicked()), this, SLOT(closeCamera()));

}

MainWindow::~MainWindow()
{
    delete ui;
}


/**
 * @brief 打开本机摄像头,开始人脸识别
 *
 */
void MainWindow::openCamara()
{
    /*
     * 人脸检测器(快速的Haar):haarcascade_frontalface_alt2.xml,需要先加载这个,在进行人脸识别
     */
    qDebug() << "openCamara ... ";
    if (!face_cascade.load(face_cascade_name)){
        qDebug() << "级联分类器错误,可能未找到文件,拷贝该文件到工程目录下! ";
        return;
    }

      Face_recognition();
}


void MainWindow::Face_recognition()
{
    //打开摄像头
    capture.open(0);
    while (true)
    {
        Mat camerFrame;
        capture >> camerFrame;
        if (camerFrame.empty())
        {
            std::cerr << "无法获取摄像头图像" << std::endl;
//            getchar();
//            exit(1);
            break;
        }
//        Mat displayedFrame(camerFrame.size(),CV_8UC3);

        double scale = 0.5;
        Size dsize = Size(camerFrame.cols*scale, camerFrame.rows*scale);
        cv::resize(camerFrame, camerFrame, dsize);

        //人脸检测只试用于灰度图像
        Mat gray;
        Pic2Gray(camerFrame, gray);

        //直方图均匀化(改善图像的对比度和亮度)
        Mat equalizedImg;
        equalizeHist(gray, equalizedImg);
       // int flags = CASCADE_FIND_BIGGEST_OBJECT|CASCADE_DO_ROUGH_SEARCH;    //只检测脸最大的人
        int flags = CASCADE_SCALE_IMAGE;  //检测多个人
        Size minFeatureSize(30, 30);
        float searchScaleFactor = 1.1f;
        int minNeighbors = 4;
        std::vector<Rect> faces;

        //选择最终的人脸分类器后,若想在这个基础上继续优化,那就试试这个detectMultiScale函数.
        face_cascade.detectMultiScale(equalizedImg, faces, searchScaleFactor, minNeighbors, flags, minFeatureSize);

        //画矩形框
        cv::Mat face;
        cv::Point text_lb;
        for (size_t i = 0; i < faces.size(); i++)
        {
            if (faces[i].height > 0 && faces[i].width > 0)
            {
//                face = gray(faces[i]);
//                text_lb = cv::Point(faces[i].x, faces[i].y);
                cv::rectangle(equalizedImg, faces[i], cv::Scalar(255, 0, 0), 1, 8, 0);
                cv::rectangle(gray, faces[i], cv::Scalar(255, 0, 0), 1, 8, 0);
                cv::rectangle(camerFrame, faces[i], cv::Scalar(255, 0, 0), 1, 8, 0);
                qDebug() << "这是个脸";
            }
        }


//        imshow("直方图均匀化", equalizedImg);
//        imshow("灰度化", gray);
//        imshow("原图", camerFrame);

        QImage image = QImage((const uchar*)camerFrame.data,camerFrame.cols,camerFrame.rows,QImage::Format_RGB888).rgbSwapped();
        ui->label->setPixmap(QPixmap::fromImage(image));
        QImage image2 = QImage((const uchar*)gray.data,gray.cols,gray.rows,QImage::Format_Indexed8);
        ui->label_2->setPixmap(QPixmap::fromImage(image2));
        QImage image3 = QImage((const uchar*)equalizedImg.data,equalizedImg.cols,equalizedImg.rows,QImage::Format_Indexed8).rgbSwapped();
        ui->label_3->setPixmap(QPixmap::fromImage(image3));

        waitKey(50);
    }

}

void MainWindow::Pic2Gray(Mat camerFrame,Mat &gray)
{
    //普通台式机3通道BGR,移动设备为4通道
    if (camerFrame.channels() == 3)
    {
        cvtColor(camerFrame, gray, CV_BGR2GRAY);
    }
    else if (camerFrame.channels() == 4)
    {
        cvtColor(camerFrame, gray, CV_BGRA2GRAY);
    }
    else
        gray = camerFrame;
}


void MainWindow::closeCamera()
{
    capture.release();
}