版权声明:本文为博主原创文章,未经博主允许不得转载。 https://blog.csdn.net/eases_stone/article/details/89447410
spring-clound 学习打卡2:简单入门-服务消费,基于【rest+ribbon】 【Greenwich.SR1版本】
一,工程传送门。
https://github.com/unnunique/SpringCloundDakaLearning/tree/master/Chapter-2
二,简介。
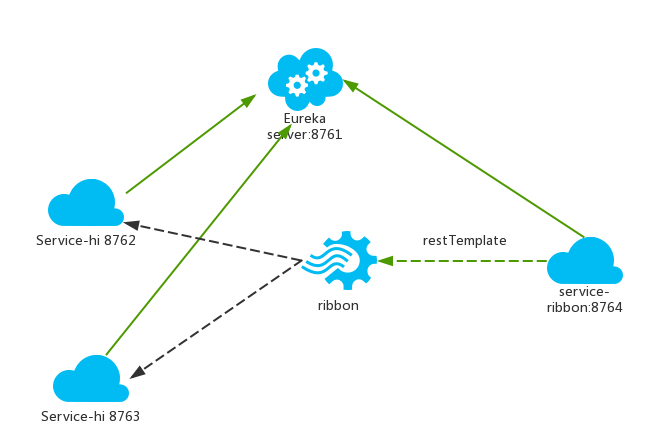
ribbon是一个负载均衡客户端,可以很好的控制htt和tcp的一些行为。Feign默认集成了ribbon。
本文通俗地说,主要是用来调用注册在注册中心的服务。用基于ribbon的方式。
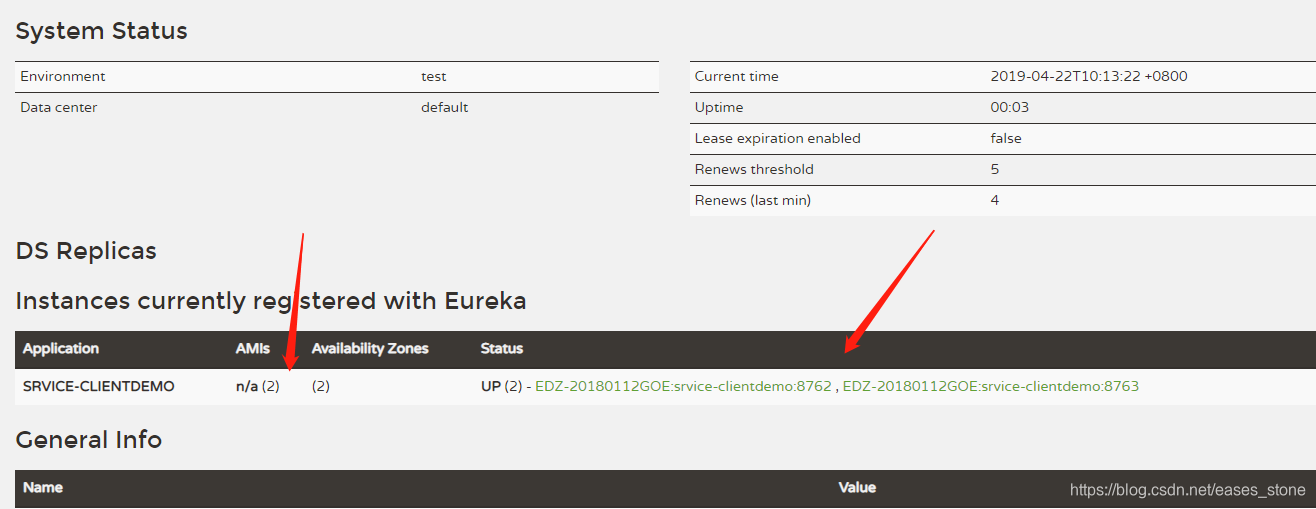
三,环境准备,首先启动上一篇中的server 和两个client.
启动后,通过网页访问注册中心,如下,可以看到注册中心注册有两个相同的服务,组成了一个小的集群。
四,上手工程,演示访问注册中心的服务。
4.1 首先是新建一个maven 子模块,maven pom 文件如下。
<?xml version="1.0" encoding="UTF-8"?>
<project xmlns="http://maven.apache.org/POM/4.0.0"
         xmlns:xsi="http://www.w3.org/2001/XMLSchema-instance"
         xsi:schemaLocation="http://maven.apache.org/POM/4.0.0 http://maven.apache.org/xsd/maven-4.0.0.xsd">
    <parent>
        <artifactId>parent</artifactId>
        <groupId>com.sydney.dream.springclound</groupId>
        <version>1.0.0</version>
    </parent>
    <modelVersion>4.0.0</modelVersion>

    <artifactId>chapter-2</artifactId>

    <properties>
        <java.version>1.8</java.version>
        <spring-cloud.version>Greenwich.SR1</spring-cloud.version>
    </properties>

    <dependencies>
        <dependency>
            <groupId>org.springframework.cloud</groupId>
            <artifactId>spring-cloud-starter-netflix-eureka-client</artifactId>
        </dependency>
        <dependency>
            <groupId>org.springframework.boot</groupId>
            <artifactId>spring-boot-starter-web</artifactId>
        </dependency>
        <dependency>
            <groupId>org.springframework.cloud</groupId>
            <artifactId>spring-cloud-starter-netflix-ribbon</artifactId>
        </dependency>
        <dependency>
            <groupId>org.springframework.boot</groupId>
            <artifactId>spring-boot-starter-test</artifactId>
            <scope>test</scope>
        </dependency>
    </dependencies>

    <dependencyManagement>
        <dependencies>
            <dependency>
                <groupId>org.springframework.cloud</groupId>
                <artifactId>spring-cloud-dependencies</artifactId>
                <version>${spring-cloud.version}</version>
                <type>pom</type>
                <scope>import</scope>
            </dependency>
        </dependencies>
    </dependencyManagement>

    <build>
        <plugins>
            <plugin>
                <groupId>org.springframework.boot</groupId>
                <artifactId>spring-boot-maven-plugin</artifactId>
            </plugin>
        </plugins>
    </build>


</project>
4.2 然后配置项目properties
server.port=8764

spring.application.name=service-consumer-client-demo1

eureka.instance.hostname=localhost
eureka.client.register-with-eureka=true
eureka.client.fetch-registry=true
eureka.client.service-url.default-zone=http://${eureka.instance.hostname}:${server.port}/eureka/

remote.eureka.servername=srvice-clientdemo
4.3 编写启动类
注意添加如下两个注释:
@EnableEurekaClient
@EnableDiscoveryClient
并且注册一个restTemplate Bean
@Bean
@LoadBalanced
RestTemplate restTemplate() {
return new RestTemplate();
}
package com.sydney.dream.chapter2;

import org.springframework.boot.SpringApplication;
import org.springframework.boot.autoconfigure.SpringBootApplication;
import org.springframework.cloud.client.discovery.EnableDiscoveryClient;
import org.springframework.cloud.client.loadbalancer.LoadBalanced;
import org.springframework.cloud.netflix.eureka.EnableEurekaClient;
import org.springframework.context.annotation.Bean;
import org.springframework.web.client.RestTemplate;

@SpringBootApplication
@EnableEurekaClient
@EnableDiscoveryClient
public class RibbonClinet {
    public static void main(String[] args) {
        SpringApplication.run(RibbonClinet.class, args);
    }

    @Bean
    @LoadBalanced
    RestTemplate restTemplate() {
        return new RestTemplate();
    }
}
4.4, 编写Service 类
注意这里的${remote.eureka.servername}, 值的是注册到注册中心的服务的名字。 本文是: service-consumer-client-demo1
package com.sydney.dream.chapter2;

import org.springframework.beans.factory.annotation.Autowired;
import org.springframework.beans.factory.annotation.Value;
import org.springframework.stereotype.Service;
import org.springframework.web.client.RestTemplate;

@Service
public class HelloService {
    @Autowired
    RestTemplate restTemplate;

    @Value("${remote.eureka.servername}")
    private String serverName;

    public String hiService(String name) {
        return restTemplate.getForObject("http://" + serverName + "/hi?name="+name,String.class);
    }
}
4.5 编写controller 类。
package com.sydney.dream.chapter2;

import org.springframework.beans.factory.annotation.Autowired;
import org.springframework.web.bind.annotation.GetMapping;
import org.springframework.web.bind.annotation.RequestParam;
import org.springframework.web.bind.annotation.RestController;

@RestController
public class HelloWorldController {
    @Autowired
    HelloService helloService;

    @GetMapping(value = "/hi")
    public String hi(@RequestParam String name) {
        return helloService.hiService( name );
    }
}
4.6 启动服务
通过如下链接访问几次,可以看到访问的时候,实现了应该是轮询的负载均衡的情况。
http://localhost:8764/hi?name=didi
相应结果。
hi didi,i am from port:8762
hi didi,i am from port:8763
4.7 至此,入门打卡篇2, Done
五,此时的架构