形态学原理原理介绍
本文所有程序均在ubuntu环境编写,Windows 兼容性未知,理论上不会有什么问题,如果运气不好,运行失败,建议百度。
腐蚀膨胀
opencv4.0中提供了腐蚀膨胀的函数 erode()、dilate()函数,用起来也方便。但是我的课程实践要求自己编写函数,所以这里附上不依赖opencv膨胀腐蚀函数的c++的腐蚀膨胀程序的实现代码。
//膨胀函数
void dilatetest(uchar *imageBuffer,uchar *outBuffer,int imageWidth,int imageHeight)
{
	uchar *dilateBuffer = (uchar *)malloc((imageWidth+2)*(2+imageHeight));   //开辟空间 (扩展边界便于处理原图像边界)
	memset(dilateBuffer,0,(imageHeight+2)*(imageWidth+2));

	for (int i = 0;i < imageHeight;i++)  //读取img的值,跳过边界点。
	{
		for (int j = 0 ; j < imageWidth; j++)
		{
		     dilateBuffer[(i+1)*(imageWidth+2)+j+1] = imageBuffer[i*imageWidth + j];
         	}
	}
        /*以rows=cols=3为例 imageBuffer为[123456789] dilateBuffer为[0000001230045600789000000]*/

	uchar *srcImage = dilateBuffer;

	for (int i = 0;i < imageWidth; i++)
	{
		for (int j = 0;j < imageHeight;j++)
		{
			uchar MaxNum = 0;

			srcImage = (dilateBuffer + (i*(imageWidth +2)+j));  //实现锚点的遍历
			for (int m = 0;m<3;m++)  //3x3的内核
			{
				for (int n = 0; n < 3;n++)
				{
					if (MaxNum < srcImage[n])  //将内核中最大的像素值提取
					{
						MaxNum = srcImage[n];
					}
				}
				srcImage = (srcImage + m*(imageWidth +2)); //跳到内核下一行
			}

			outBuffer[i*imageWidth +j] = MaxNum; //将锚点的值付给一个动态内存空间
		}
	}
}
//腐蚀定义  定义与膨胀雷同 区别是提取最小像素值
void erodetest(uchar *imageBuffer,uchar *outBuffer,int imageWidth,int imageHeight)
{
	uchar *erodeBuffer = (uchar *)malloc((imageWidth+2)*(2+imageHeight));
	memset(erodeBuffer,255,(imageHeight+2)*(imageWidth+2));

	for (int i = 0;i < imageHeight;i++)
	{
		for (int j = 0 ; j < imageWidth; j++)
		{
			erodeBuffer[(i+1)*(imageWidth+2)+j+1] = imageBuffer[i*imageWidth + j];
		}
	}

	uchar *srcImage = erodeBuffer;

	for (int i = 0;i < imageWidth; i++)
	{
		for (int j = 0;j < imageHeight;j++)
		{
			uchar tempNum = 255;

			srcImage = (erodeBuffer + (i*(imageWidth +2)+j));
			for (int m = 0;m<3;m++)
			{
				for (int n = 0; n < 3;n++)
				{
					if (tempNum > srcImage[n])
					{
						tempNum = srcImage[n];
					}
				}
				srcImage = (srcImage + m*(imageWidth +2));
			}

			outBuffer[i*imageWidth +j] = tempNum;
		}
	}
}
开闭运算、顶帽黑帽运算
开运算、顶帽运算就是利用图像的腐蚀膨胀进行操作
开运算 :先腐蚀再膨胀。
顶帽运算:原图像减去开运算图像
开运算、顶帽运算代码(闭运算、黑帽运算类似):
#include <stdio.h>
#include <stdlib.h>
#include <opencv2/opencv.hpp>
#include <opencv2/highgui/highgui.hpp>
#include <opencv2/imgproc/imgproc.hpp>

void dilatetest(uchar *imageBuffer,uchar *outBuffer,int imageWidth,int imageHeight);  //声明膨胀函数
void erodetest(uchar *imageBuffer,uchar *outBuffer,int imageWidth,int imageHeight);  //声明腐蚀函数
int main()
{

	cv::Mat img;
        img = cv::imread("lena.jpg");
	cv::cvtColor(img,img,cv::COLOR_BGR2GRAY);  //读取图片转化为灰度图
	int imageWidth = img.cols;
	int imageHeight = img.rows;  //读取图片行列数
	cv::imshow("src",img);
        cv::Mat img2=img.clone();
	uchar * imageBuffer = (uchar *) malloc(imageHeight * imageWidth);  //开辟空间
	memset(imageBuffer,0,imageHeight * imageWidth);  //赋初值0
                //遍历图像每个像素,将图像的像素值保存在imageBuffer数组
		for (int i = 0; i< imageHeight; i++)
		{
			for (int j = 0; j < imageWidth;j++)
			{
				imageBuffer[i*imageWidth + j] =  img.at<uchar>(i,j);
			}
		}
                //开运算
                erodetest(imageBuffer,imageBuffer,imageWidth,imageHeight);  //先腐蚀
                dilatetest(imageBuffer,imageBuffer,imageWidth,imageHeight);  //再膨胀
		//将imageBuffer数组里的值替换图像对应点的像素
                for (int i = 0; i< imageHeight; i++)
		{
			for (int j = 0; j < imageWidth;j++)
			{
				img.at<uchar>(i,j) = imageBuffer[i*imageWidth + j];
			}
		}

        img2=img2-img;  //TopHat=src-open
        cv::Mat copyImage;
        cv::imshow("open",img);
        cv::imshow("Top-Hat",img2);
	cv::waitKey(100000);
}

//膨胀定义
void dilatetest(uchar *imageBuffer,uchar *outBuffer,int imageWidth,int imageHeight)
{
	uchar *dilateBuffer = (uchar *)malloc((imageWidth+2)*(2+imageHeight));   //开辟空间 (扩展边界便于处理原图像边界)
	memset(dilateBuffer,0,(imageHeight+2)*(imageWidth+2));

	for (int i = 0;i < imageHeight;i++)  //读取img的值,跳过边界点。
	{
		for (int j = 0 ; j < imageWidth; j++)
		{
		     dilateBuffer[(i+1)*(imageWidth+2)+j+1] = imageBuffer[i*imageWidth + j];
         	}
	}
        /*以rows=cols=3为例 imageBuffer为[123456789] dilateBuffer为[0000001230045600789000000]*/

	uchar *srcImage = dilateBuffer;

	for (int i = 0;i < imageWidth; i++)
	{
		for (int j = 0;j < imageHeight;j++)
		{
			uchar MaxNum = 0;

			srcImage = (dilateBuffer + (i*(imageWidth +2)+j));  //实现锚点的遍历
			for (int m = 0;m<3;m++)  //3x3的内核
			{
				for (int n = 0; n < 3;n++)
				{
					if (MaxNum < srcImage[n])  //将内核中最大的像素值提取
					{
						MaxNum = srcImage[n];
					}
				}
				srcImage = (srcImage + m*(imageWidth +2)); //跳到内核下一行
			}

			outBuffer[i*imageWidth +j] = MaxNum; //将锚点的值付给一个动态内存空间
		}
	}
}
//腐蚀定义  定义与膨胀雷同 区别是提取最小像素值
void erodetest(uchar *imageBuffer,uchar *outBuffer,int imageWidth,int imageHeight)
{
	uchar *erodeBuffer = (uchar *)malloc((imageWidth+2)*(2+imageHeight));
	memset(erodeBuffer,255,(imageHeight+2)*(imageWidth+2));

	for (int i = 0;i < imageHeight;i++)
	{
		for (int j = 0 ; j < imageWidth; j++)
		{
			erodeBuffer[(i+1)*(imageWidth+2)+j+1] = imageBuffer[i*imageWidth + j];
		}
	}

	uchar *srcImage = erodeBuffer;

	for (int i = 0;i < imageWidth; i++)
	{
		for (int j = 0;j < imageHeight;j++)
		{
			uchar tempNum = 255;

			srcImage = (erodeBuffer + (i*(imageWidth +2)+j));
			for (int m = 0;m<3;m++)
			{
				for (int n = 0; n < 3;n++)
				{
					if (tempNum > srcImage[n])
					{
						tempNum = srcImage[n];
					}
				}
				srcImage = (srcImage + m*(imageWidth +2));
			}

			outBuffer[i*imageWidth +j] = tempNum;
		}
	}
}
粒度测定
opencv里有一个很好的函数morphologyEx,我们只要往这个函数传相应的处理参数,就可以进行相应结构元素的操作了,使用起来非常方便。
morphologyEx() 函数的使用参考下面这个文章:
opencv形态学操作函数morphologyEx
opencv中 getStructuringElement()函数可用于构造一个特定大小和形状的结构元素,用于图像形态学处理。
介绍如下:
opencv之getStructuringElement()函数
代码如下:
#include <opencv2/opencv.hpp>
#include <opencv2/highgui/highgui.hpp>
#include <opencv2/imgproc/imgproc.hpp>
#include <stdio.h>
#include <iostream>
using namespace cv;
using namespace std;
Mat src, dst;
int element_size = 3;
int max_size = 40;
char OUTPUT_WIN[] = "output image";
void CallBack_demo(int, void*);

int main( )
{
       Mat image = imread("1.tif");
       int sum[36];
       int mus[36];

        for(int n=3;n<40;n++)
       {
       Mat image1 = image.clone();
       Mat element = getStructuringElement(MORPH_ELLIPSE, Size(n*2+1, n*2+1));
       morphologyEx(image1,image1, MORPH_OPEN, element);
       sum[n-3]=cv::sum(image1).val[0];
        }
       //读取点
       std::vector<cv::Point> points;
       for(int m = 0;m<37;m++)
       {
               mus[m]=sum[m]-sum[m+1];
               int n;
               n=480-mus[m]/10000-50;
               points.push_back(cv::Point(20*m, n));
       }
         //for(int x= 1; x < 37; x ++)  可以输出数据 再通过excel作图
         //{cout<< mus[x] << endl;}
        src = imread("1.tif");
        if (!src.data) {
		printf("cloud not load image");
		return -1;
	}
	imshow("原图", src);
	namedWindow(OUTPUT_WIN, WINDOW_AUTOSIZE);
	createTrackbar("Element size", OUTPUT_WIN, &element_size, max_size, CallBack_demo);
	CallBack_demo(0, 0);
       	//创建用于绘制的深蓝色背景图像
	cv::Mat imagep = cv::Mat::zeros(480, 640, CV_8UC3);
	imagep.setTo(cv::Scalar(100, 0, 0));

	for (int i = 0; i < points.size(); i++)
	{
		cv::circle(imagep, points[i], 5, cv::Scalar(0, 0, 255), 2, 8, 0);
	}
	//绘制折线
	cv::polylines(imagep, points, false, cv::Scalar(0, 255, 0), 1, 8, 0);
	cv::Mat A;
	cv::imshow("image", imagep);
       waitKey(0);
       return 0;
}


void CallBack_demo(int, void*)
{
		int s = element_size * 2 + 1;
		Mat Element = getStructuringElement(MORPH_ELLIPSE, Size(s, s));
		//膨胀
		//dilate(src, dst, structrueElement, Point(0, 0), 1);
		//腐蚀
		//erode(src, dst, Element);
        morphologyEx(src,dst, MORPH_OPEN, Element);
		imshow(OUTPUT_WIN, dst);
		return;
}
这里添加了一个结构元素动态调整的功能,便于观察图像的变化。
实现功能的函数是:createTrackbar()、CallBack_demo().
形态学重建
代码:
#include <opencv2/opencv.hpp>
#include <opencv2/highgui/highgui.hpp>
#include <opencv2/imgproc/imgproc.hpp>
#include <stdio.h>
using namespace cv;
using namespace std;
void Reconstruct(Mat marker, Mat mask, Mat& dst,int n);
int main( )
{
       //载入原始图
       Mat src = imread("1.tif");
       Mat msk = src.clone();
       Mat dst;
       Mat temp3;
       Mat element = getStructuringElement(MORPH_CROSS, Size(1, 71));
       erode(src, dst, element);  //先腐蚀
       Reconstruct(dst, msk, dst,71); //开运算重建
       Mat temp4;
       Mat temp5;
       temp4=src-dst;   //顶帽重建
       morphologyEx(src,temp3, MORPH_OPEN, element); //对原图开运算
       temp5=src-temp3; //顶帽运算
       Mat element1 = getStructuringElement(MORPH_CROSS, Size(1, 11));
       Mat temp6;
       Mat temp7=temp5.clone();
       erode(temp7, temp6, element1);  //腐蚀
       Reconstruct(temp6, temp7, temp6,11); //重建
       imshow("reopen",dst);
       imshow("open",temp3);
       imshow("reTopHat",temp4);
       imshow("TopHat",temp5);
       imshow("reopenTOP",temp6);
       waitKey(0);
}
//重建
void Reconstruct(Mat marker, Mat mask, Mat& dst,int n)
{
    Mat se=getStructuringElement(MORPH_RECT,Size(1,n));   //定义内核
    Mat tmp1(marker.size(), marker.type()), tmp2(marker.size(), marker.type());
    cv::min(marker, mask, dst);   //将marker mask 图像中较小的输入到dst中
    do {
        dst.copyTo(tmp1);
        dilate(dst, mask, se);  //膨胀
        cv::min(marker, mask, dst);
        tmp2=abs(tmp1-dst); //做差取绝对值
    } while (sum(tmp2).val[0] != 0);  //判断像素和
}
这个程序有一些问题,运行的结果有一些失真,需要优化重建函数。
运行结果
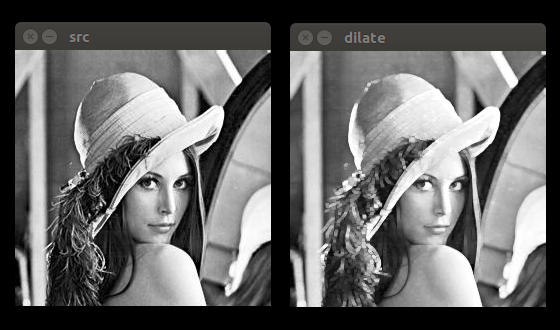
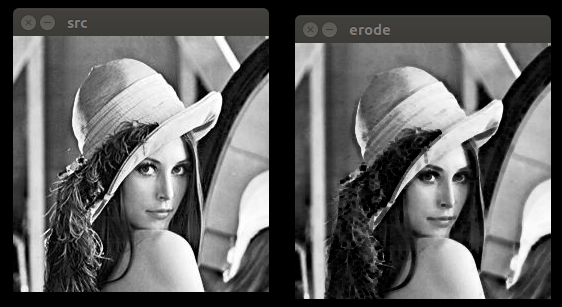
膨胀腐蚀
膨胀
腐蚀

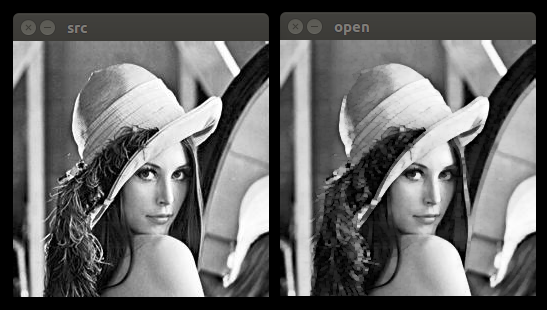
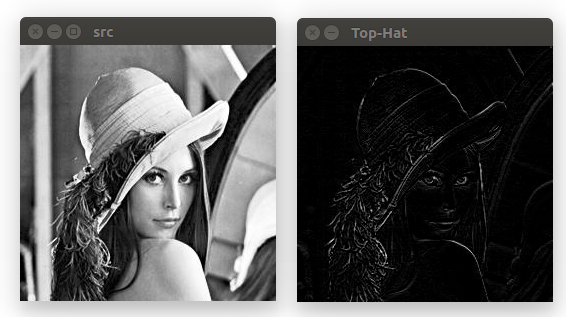
开运算、顶帽运算
开运算
顶帽运算
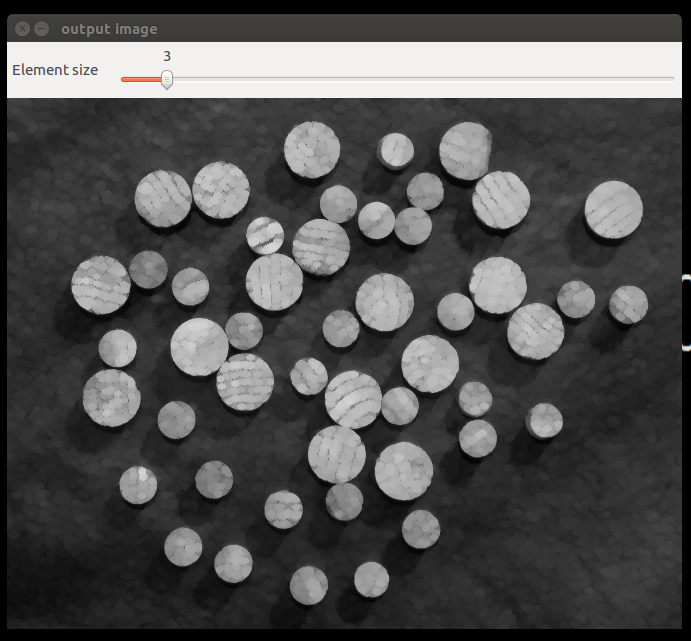
粒度测定
原图
可以看出图中有许多圆形的钉子

粒度测定
图中的拉条可以动态调整结构元素element的大小,便于观察图像的变化过程。
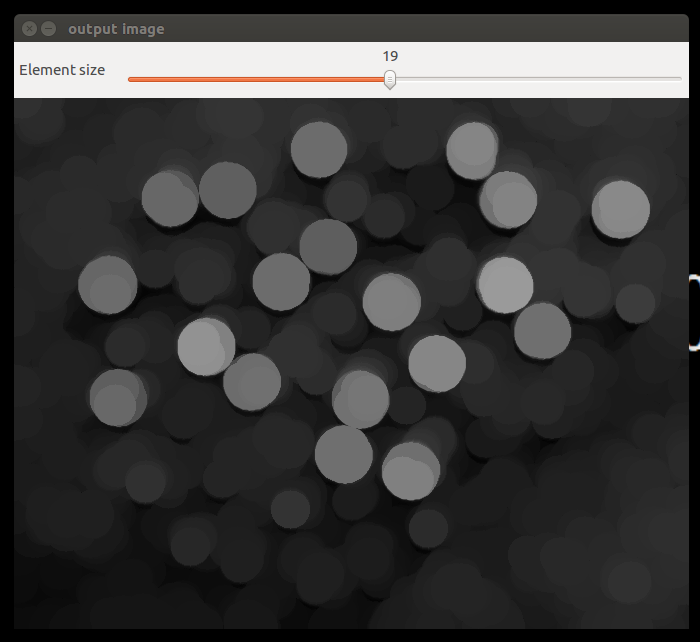
粒度测定,element=19:
当element的大小为19时,图中的小钉子已经基本消失
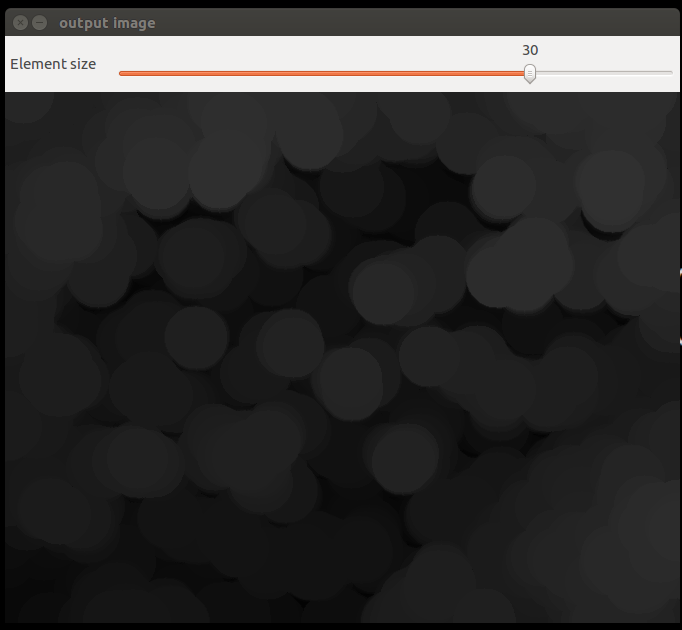
粒度测定,element=30:
当element的大小为30时,图中的大钉子也已经消失
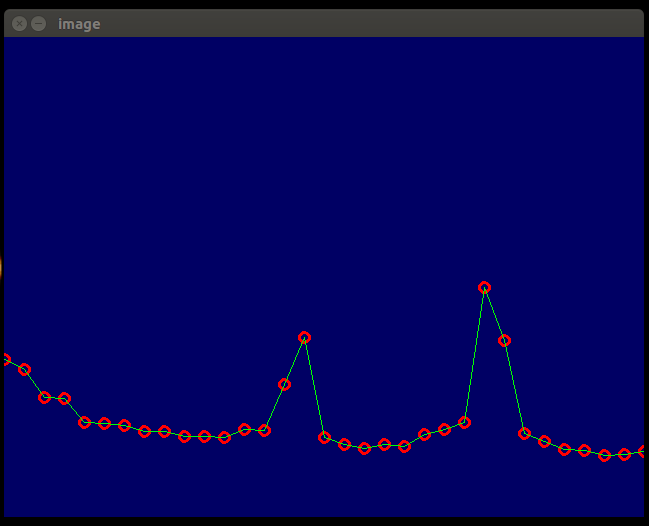
粒度测定,折线图:
通过绘制相邻像素差的与折线图,可以清晰的看到两个峰值,也就说明原图中有2种大小的钉子,且钉子的尺寸对应相应峰值点的element的大小。
参考
[1]https://blog.csdn.net/whchang8/article/details/56834608
[2]https://blog.csdn.net/lhm_19960601/article/details/82560560