面包屑分类和分类查询下一级的显示
面包屑分类应用在分级查找下一级分类的页面。操作的只有一张表,数据库中的tb_item_cat表。
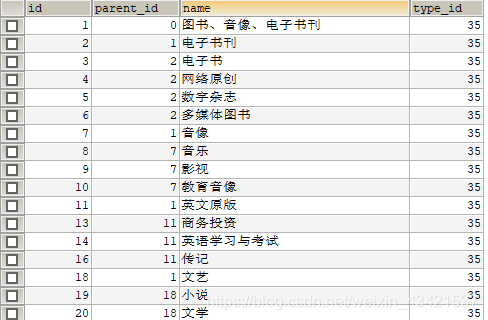
数据库数据形式如下:
一、前端部分
1、增加两个记录父分类的对象,entity_1和entity_2,在页面模型绑定

2、在页面上绑定查找下一级按钮,绑定两个方法,一个是selectType(entity),还有一个是让grade可以+1的方法setGrade(grade+1),中间用分号隔开。

3、定义传入controller用来记录父分类的对象p_entity及selectType方法
    $scope.grade = 1;	//用来记录点击的是哪一级的分类(顶级,二级,或是三级)
    $scope.selectType = function (p_entity) {
        $scope.parentId = p_entity.id;		//将传进来的父分类的id赋值给定义的parentId,方便一会保存数据使用

        if ($scope.grade == 1) {		//如果grade是1,表示是顶级分类,查询父分类id为0的商品分类。
            $scope.findParentId(0);		//查找顶级分类
            $scope.entity_1 = null;	  //为了防止再次点击顶级分类时,二级和三级分类的位置仍然有数据残留,手动置为空
            $scope.entity_2 = null;
        }
        if ($scope.grade == 2) {
            $scope.entity_1 = p_entity;		//将传进来的父分类对象赋给定义的面包屑二级分类entity_1,以便在页面显示分类信息名称。
            $scope.findParentId(p_entity.id);	//根据传入的父分类id查找所有分类
            $scope.entity_2 = null;		//防止点击过三级分类之后再次点击二级分类,面包屑三级分类的位置还有数据残留,手动置为空。
        }
        if ($scope.grade == 3) {			//表示三级分类
            $scope.entity_2 = p_entity;
            $scope.findParentId(p_entity.id);	//根据传入的父分类id查找所有分类
        }
    }
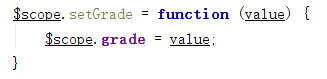
4、定义使grade+1的方法(因为页面不能直接进行+1或者++的操作,所以只能调用方法)
5、在面包屑的级别栏,绑定方法上述两个方法,但是setGrade方法中传入这个级别的值,如setGrade(grade=1).
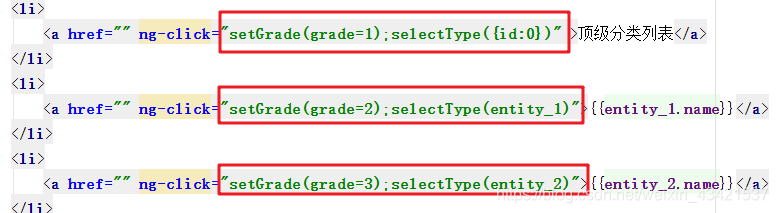
6、使第三个级别显示时,不显示查找下一级按钮,在对应标签添加 ng-if(“grade!=3”);

二、后端部分
常规操作。
商品分类的修改和删除
数据新增
前端
在弹窗面包屑分类栏上模型绑定entity_1和2两个对象。
 //保存			//判断是否有id属性,如果有就是修改,如果没有就是新增。
    $scope.save = function () {
        //手动赋值父id
        $scope.entity.parentId =  $scope.parentId;	//在selectType方法中,每执行一次查询,都会将他的父分类id记录下来,这里直接引用作为父分类的id。

        var serviceObject;//服务层对象
        if ($scope.entity.id != null) {
            serviceObject = itemCatService.update($scope.entity); //修改
        } else {
            serviceObject = itemCatService.add($scope.entity);//增加
        }
        serviceObject.success(
            function (response) {
                if (response.success) {
                    //重新查询
                    //$scope.selectType({id:$scope.entity.parentId});//重新加载
                    $scope.findParentId($scope.parentId);
                } else {
                    alert(response.message);
                }
            }
        );
    }
后端
正常保存。
商品分类的删除
前端
绑定updateSelection($event,entity.id)和 ischecked(entity.id)两个方法。
删除绑定方法
后端
正常删除。
springSecurity安全框架
使用综述
在pom文件中导入依赖坐标
在web.xml文件中配置监听器,文件加载(加载spring-security.xml),和过滤器链
在spring-security.xml文件中配置 :
	释放css,js等静态资源。
	配置页面拦截规则(包括是否使用spel表达式,访问角色,登录页面,注销页面,更改deny设置放开框架集)。
	认证管理器(包括认证提供者authentication-provider,这个配置里面配置当前系统的用户 authorities该用户属于哪个角色user-service)
1、在pom文件中引入坐标
    <dependency>
      <groupId>org.springframework.security</groupId>
      <artifactId>spring-security-web</artifactId>
      <version>4.1.0.RELEASE</version>
    </dependency>
    <dependency>
      <groupId>org.springframework.security</groupId>
      <artifactId>spring-security-config</artifactId>
      <version>4.1.0.RELEASE</version>
    </dependency>
2、在web.xml中配置相关项
<!--安全框架的配置-->
	<context-param>
		<param-name>contextConfigLocation</param-name>
		<param-value>classpath:spring/spring-security.xml</param-value>
	</context-param>
	<listener>
		<listener-class>
			org.springframework.web.context.ContextLoaderListener
		</listener-class>
	</listener>

	<filter>
		<filter-name>springSecurityFilterChain</filter-name>
		<filter-class>org.springframework.web.filter.DelegatingFilterProxy</filter-class>
	</filter>
	<filter-mapping>
		<filter-name>springSecurityFilterChain</filter-name>
		<url-pattern>/*</url-pattern>
	</filter-mapping>
3、在配置文件中创建和第2步中的context-param路径对应的spring-security.xml文件
<?xml version="1.0" encoding="UTF-8"?>
<beans:beans xmlns="http://www.springframework.org/schema/security"
	xmlns:beans="http://www.springframework.org/schema/beans" xmlns:xsi="http://www.w3.org/2001/XMLSchema-instance"
	xsi:schemaLocation="http://www.springframework.org/schema/beans http://www.springframework.org/schema/beans/spring-beans.xsd
						http://www.springframework.org/schema/security http://www.springframework.org/schema/security/spring-security.xsd">

	<!-- 设置页面不登陆也可以访问 -->
	<http pattern="/*.html" security="none"></http>
	<http pattern="/css/**" security="none"></http>
	<http pattern="/img/**" security="none"></http>
	<http pattern="/js/**" security="none"></http>
	<http pattern="/plugins/**" security="none"></http>


	<!-- 页面的拦截规格 use-expressions:默认启用SPEL表达式 需要将 access="hasRole('ROLE_USER')" -->
	<http use-expressions="false">
		<!-- 当前用户必须有ROLE_USER的角色才可以访问根目录及所属子目录的资源 -->
		<intercept-url pattern="/**" access="ROLE_USER" />
		<!-- 开启表单登录功能,会有默认登录页 -->
		<form-login login-page="/login.html" default-target-url="/admin/index.html" always-use-default-target="true"/>

		<logout></logout>

		<csrf disabled="true"/>

		<headers>
			<!--DENY:浏览器拒绝当前页面加载任何Frame页面-->
			<!--SAMEORIGIN:frame页面的地址只能为同源域名下的页面-->
			<!--ALLOW-FROM:origin为允许frame加载的页面地址。-->
			<frame-options policy="SAMEORIGIN"/>
		</headers>

	</http>
	<!-- 认证管理器 -->
	<authentication-manager>
		<!-- 认证提供者 -->
		<authentication-provider>
			<user-service>
				<!-- 配置当前系统的用户 authorities该用户属于哪个角色 -->
				<user name="admin" password="123456" authorities="ROLE_USER" />
			</user-service>
		</authentication-provider>
	</authentication-manager>
</beans:beans>
4、这个配置中已经包含了用户名和密码以及角色的配置,不需要使用后端查询。
登陆后显示登录用户名
1、前端部分
添加getName的方法,在页面相应位置将‘测试用户’改为{{loginName}}。在js文件中的controller和service添加对应方法,向后端LoginController发送请求
2、后端部分
新建LoginController类,返回一个字符串(最好是map集合,如果是返回的字符串,显示在页面上会有两个双引号,返回map不会)
@RequestMapping("/getName")
    	public String getName(){
      	 	 return SecurityContextHolder.getContext().getAuthentication().getName();
	    }
注销登录功能
前端
在注销按钮上绑定logout,在配置文件的http中写上<logout></logout>即可

后端
不涉及后端。
商家模块搭建
前端
	新建model(shop-web),复制静态资源,导入js相关文件
后端
	复制代码生成器的java类。
8、商家注册
前端
	页面模型绑定
	在controller定义保存方法,在返回值为true时,跳转页面 location.href = "shoplogin.html";
 //保存商家注册信息
    $scope.register = function () {
        sellerService.add($scope.entity).success(
            function (response) {
                if (response.success) {
                    //注册成功跳转页面
                    location.href = "shoplogin.html";
                } else {
                    alert(response.message);
                }
            }
        )
    }
后端
修改在spring-security.xml中的dubbox端口号
在controller层调用的SellerService 使用@Reference注解。
注意:由于表中数据状态和时间不能为空。所以在serviceImpl中,手动设置两个值,一个是状态,一个是时间。
/**
	 * 增加(这是在sellerServiceImpl类中的增加)
	 */
	@Override
	public void add(TbSeller seller) {

		seller.setStatus("0");
		seller.setCreateTime(new Date());
        sellerMapper.insert(seller);

	}
商家增加springSecurity认证(没有加密验证密码)
前端
大体同上
将认证管理器中的注释掉。暂时不做加密处理。
(表示使用security来判断密码是否正确)
			<authentication-manager>
				<authentication-provider user-service-ref="userDetailService">
					<!--<password-encoder ref="bcryptEncoder"></password-encoder>-->
				</authentication-provider>
			</authentication-manager>
后端
判断用户登录信息
新建一个类UserDetailsServiceImpl继承UserDetailsService,重写方法loadUserByUsername
注意在这个类中需要调用SellerService这个接口。使用set注入的方式(因为配置文件中已经配置)
具体代码如下
public class UserDetailsServiceImpl implements UserDetailsService {

    private SellerService sellerService;

    public void setSellerService(SellerService sellerService) {
        this.sellerService = sellerService;
    }

    @Override
    public UserDetails loadUserByUsername(String username) throws UsernameNotFoundException {
        TbSeller seller = sellerService.findOne(username);
        if (seller != null) {
            List<SimpleGrantedAuthority> authorities = new ArrayList<>();
            authorities.add(new SimpleGrantedAuthority("ROLE_SELLER"));
            User user = new User(username, seller.getPassword(), authorities);
            return user;
        }
        return null;
    }
}
附:spring-security.xml配置文件
		<?xml version="1.0" encoding="UTF-8"?>
<beans:beans xmlns="http://www.springframework.org/schema/security"
	xmlns:beans="http://www.springframework.org/schema/beans"
	xmlns:dubbo="http://code.alibabatech.com/schema/dubbo"
	xmlns:xsi="http://www.w3.org/2001/XMLSchema-instance"
	xsi:schemaLocation="http://www.springframework.org/schema/beans http://www.springframework.org/schema/beans/spring-beans.xsd
						http://code.alibabatech.com/schema/dubbo http://code.alibabatech.com/schema/dubbo/dubbo.xsd
						http://www.springframework.org/schema/security http://www.springframework.org/schema/security/spring-security.xsd">

	<!-- 设置页面不登陆也可以访问 -->
	<http pattern="/*.html" security="none"></http>
	<http pattern="/css/**" security="none"></http>
	<http pattern="/img/**" security="none"></http>
	<http pattern="/js/**" security="none"></http>
	<http pattern="/plugins/**" security="none"></http>
	<http pattern="/seller/add.do" security="none"></http>

	<!-- 页面的拦截规则    use-expressions:是否启动SPEL表达式 默认是true -->
	<http use-expressions="false">
		<!-- 当前用户必须有ROLE_USER的角色 才可以访问根目录及所属子目录的资源 -->
		<intercept-url pattern="/**" access="ROLE_SELLER"/>
		<!-- 开启表单登陆功能 -->
		<form-login  login-page="/shoplogin.html" default-target-url="/admin/index.html" authentication-failure-url="/shoplogin.html" always-use-default-target="true"/>
		<csrf disabled="true"/>
		<!-- 为了解决frame框架访问问题默认是deny不允许访问,改成同一域下可以进行访问-->
		<headers>
			<frame-options policy="SAMEORIGIN"/>
		</headers>
		<logout/>
	</http>

	<!-- 认证管理器 -->
	<authentication-manager>
		<authentication-provider user-service-ref="userDetailService">
			<!--暂时不做密码的加密处理,所以先把这句话注销掉-->
			<!--<password-encoder ref="bcryptEncoder"></password-encoder>-->
		</authentication-provider>
	</authentication-manager>

	<!-- 认证类 -->
	<beans:bean id="userDetailService" class="com.pinyougou.service.UserDetailsServiceImpl">
		<beans:property name="sellerService" ref="sellerService"></beans:property>
	</beans:bean>

	<!-- 引用dubbo 服务 -->
	<dubbo:application name="pinyougou-shop-web" />
	<dubbo:registry address="zookeeper://192.168.25.128:2181"/>
	<dubbo:reference id="sellerService" interface="com.pinyougou.sellergoods.service.SellerService"></dubbo:reference>


	<beans:bean id="bcryptEncoder" class="org.springframework.security.crypto.bcrypt.BCryptPasswordEncoder"></beans:bean>

</beans:beans>