LQREmojiLibrary
简介:一个超级牛逼的表情库,可使用表情及贴图功能,方便好用,抽离图片加载接口,图片加载工具可让开发者自己选择。
标签:
一个超级牛逼的表情库,可使用表情及贴图功能,方便好用,抽离图片加载接口,图片加载工具可让开发者自己选择。
一、简述
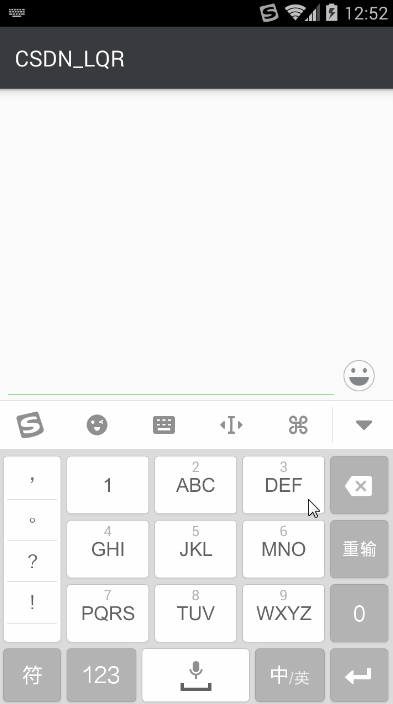
这个库相当牛逼,好用。这个库相当牛逼,好用。这个库相当牛逼,好用。好了,接下来直接看效果图吧:
二、引用初始化
1、在自己项目中添加本项目依赖:
compile 'com.lqr.emoji:library:1.0.2'
2、初始化
使用本库必须在自定义的 Application 中使用 LQREmotionKit 对库进行初始化,LQREmotionKit 提供了四种初始化方法,请根据自己的需要选择。
*使用前需要注意以下几点:
- 本库抽离出了图片加载接口,可让开发者自己选择图片加载工具(如:Glide、UIL 等),所以使用本库必须实现 IImageLoader 接口。
- 本库支持设置贴图的存放路径,这意味着开发者可以根据自己项目需求修改贴图的存放位置,并且支持贴图自定义。默认的贴图存放在/data/data/包名/files/stickers 目录下。
1)不带 IImageLoader 的 init()
public static void init(Context context)

public static void init(Context context, String stickerPath)
2)带 IImageLoader 的 init()
public static void init(Context context, IImageLoader imageLoader)

public static void init(Context context, String stickerPath, IImageLoader imageLoader)
3)示例
public class App extends Application {

    @Override
    public void onCreate() {
        super.onCreate();
        LQREmotionKit.init(this, new IImageLoader() {
            @Override
            public void displayImage(Context context, String path, ImageView imageView) {
                Glide.with(context).load(path).centerCrop().diskCacheStrategy(DiskCacheStrategy.SOURCE).into(imageView);
            }
        });
    }
}
三、表情功能集成
1、布局中使用 EmotionLayout 控件
<?xml version="1.0" encoding="utf-8"?>
<LinearLayout xmlns:android="http://schemas.android.com/apk/res/android"
              android:layout_width="match_parent"
              android:layout_height="match_parent"
              android:orientation="vertical">

    <!--内容区-->
    <LinearLayout
        android:id="@+id/llContent"
        android:layout_width="match_parent"
        android:layout_height="0dp"
        android:layout_weight="1"
        android:orientation="vertical">

        ...
        这里一般是放消息列表,和内容输入框等控件
        ...

    </LinearLayout>

    <!--表情区-->
    <com.lqr.emoji.EmotionLayout
        android:id="@+id/elEmotion"
        android:layout_width="match_parent"
        android:layout_height="270dp"
        android:visibility="gone"/>

</LinearLayout>
2、实现输入框图文混排
1)将内容输入框交给 EmotionLayout 管理(强烈建议!!!)
mElEmotion.attachEditText(mEtContent);
2)实现 IEmotionSelectedListener 接口,手动实现图文混排(有自己的实现方式的,可以采用这种方式)
mElEmotion.setEmotionSelectedListener(new IEmotionSelectedListener() {
    @Override
    public void onEmojiSelected(String key) {
        if (mEtContent == null)
            return;
        Editable editable = mEtContent.getText();
        if (key.equals("/DEL")) {
            mEtContent.dispatchKeyEvent(new KeyEvent(KeyEvent.ACTION_DOWN, KeyEvent.KEYCODE_DEL));
        } else {
            int start = mEtContent.getSelectionStart();
            int end = mEtContent.getSelectionEnd();
            start = (start < 0 ? 0 : start);
            end = (start < 0 ? 0 : end);
            editable.replace(start, end, key);

            int editEnd = mEtContent.getSelectionEnd();
            MoonUtils.replaceEmoticons(LQREmotionKit.getContext(), editable, 0, editable.toString().length());
            mEtContent.setSelection(editEnd);
        }
    }

    @Override
    public void onStickerSelected(String categoryName, String stickerName, String stickerBitmapPath) {

    }
});
3、实现内容区与表情区仿微信切换效果
private EmotionKeyboard mEmotionKeyboard;

private void initEmotionKeyboard() {
    mEmotionKeyboard = EmotionKeyboard.with(this);
    mEmotionKeyboard.bindToContent(mLlContent);
    mEmotionKeyboard.bindToEmotionButton(mIvEmo);
    mEmotionKeyboard.bindToEditText(mEtContent);
    mEmotionKeyboard.setEmotionLayout(mElEmotion);
}
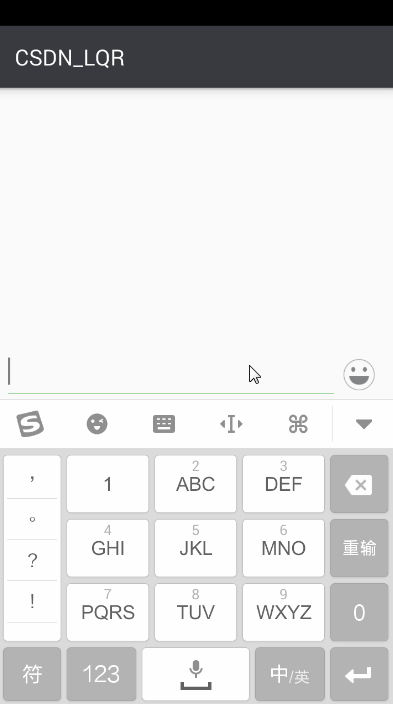
4、效果
经过上面几步,就可以实现以下效果了:
四、贴图功能集成
1、设置贴图的存放位置
这一步可略过,不设置的话,贴图的默认存放位置是 /data/data/包名/files/stickers ,可通过 LQREmotionKit.getStickerPath()获得。
贴图的存放位置只能通过 LQREmotionKit 的 init()来设置:
LQREmotionKit.init(this, Environment.getExternalStorageDirectory().getAbsolutePath()+ File.separator+"sticker");

LQREmotionKit.init(this, Environment.getExternalStorageDirectory().getAbsolutePath() + File.separator + "sticker", new IImageLoader() {
        @Override
        public void displayImage(Context context, String path, ImageView imageView) {
            Glide.with(context).load(path).centerCrop().diskCacheStrategy(DiskCacheStrategy.SOURCE).into(imageView);
        }
    });
2、将贴图下载到指定贴图的存放位置
1)自带贴图
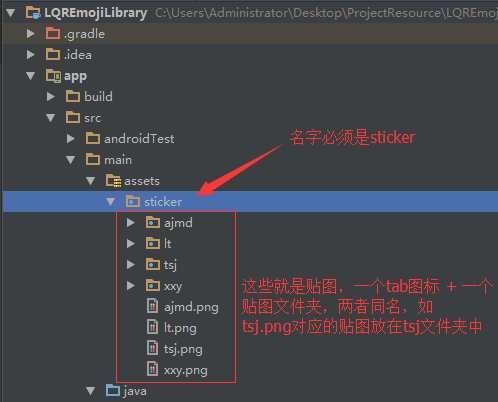
本库支持 集成默认贴图,可将贴图按规则放置在 assets 的 sticker 目录下,当程序启动时,会自动将 assets 的 sticker 目录下所有的贴图复制到贴图的存放位置。
2)网络下载贴图
//得到贴图的存放位置
String stickerPath = LQREmotionKit.getStickerPath();
...
网络下载(这里不同项目实现方式不同,请根据自己的项目实现该部分代码)
...
3、监听用户点击贴图事件
mElEmotion.setEmotionSelectedListener(new IEmotionSelectedListener() {
    @Override
    public void onEmojiSelected(String key) {

    }

    @Override
    public void onStickerSelected(String categoryName, String stickerName, String stickerBitmapPath) {
        String stickerPath = stickerBitmapPath;
        ...
        发送图片
        ...
    }
});
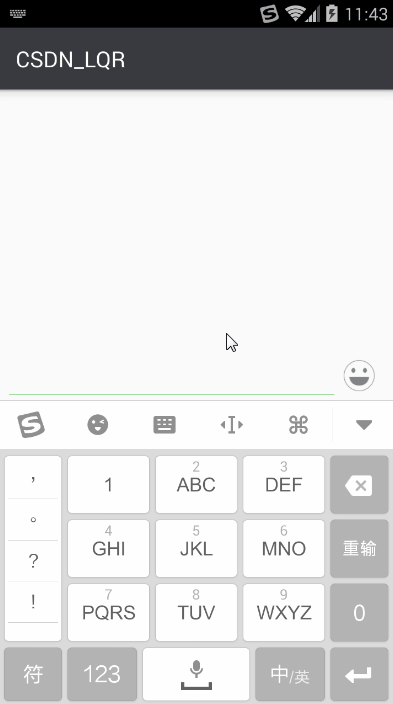
4、效果
经过上面几步,就可以实现以下效果了:
五、拓展按钮的控制
1、设置表情控件的拓展按钮
默认表情控件的底部 Tab 是不显示“添加”按钮和“设置”按钮的,如果需要,可通过以下代码进行控制。
mElEmotion.setEmotionAddVisiable(true);
mElEmotion.setEmotionSettingVisiable(true);
mElEmotion.setEmotionExtClickListener(new IEmotionExtClickListener() {
    @Override
    public void onEmotionAddClick(View view) {
        Toast.makeText(getApplicationContext(), "add", Toast.LENGTH_SHORT).show();
    }

    @Override
    public void onEmotionSettingClick(View view) {
        Toast.makeText(getApplicationContext(), "setting", Toast.LENGTH_SHORT).show();
    }
});
2、效果