什么是进程?
操作系统中一个程序的执行周期(从打开到关闭)。进程是具有一个或多个线程的线程组。
什么是线程?
- 一个进程可以同时执行多个任务,任务就是线程,一个进程至少有一个线程。
- 线程运行在进程内部,线程是轻量级进程。
进程和线程比较:
- 与进程相比,线程更加轻量级,创建,撤销一个线程比启动、撤销一个进程开销小的多。一个进程中的所有线程共享此进程的所有的资源;
- 没有进程就没有线程,进程一旦终止,其内的线程也不复存在;
- 进程是操作系统资源分配的基本单位,进程可以独享资源;
线程需要依托进程提供的资源,无法独立申请操作系统资源,是操作系统任务执行 (cpu调度) 的基本单位。
多线程的表现:360浏览器可以同时下载多个图片或者响应用户的其他请求;
在高峰期买票时,12306需要同时处理多个客户的请求,但是请求数量过多,也就是访问线程量过多,会导致12306服务器崩溃…
实现多线程
实现多线程有三种方式:
- 继承Thread类实现多线程
- Runable接口实现多线程
- 实现接口Callable来实现多线程(juc)
一:继承Thread类实现多线程
java.lang.Thread 是线程操作的核心类。新建一个线程最简单的方法是直接继承Thread类,而后覆写run( )方法(相当于主线程的main方法)。run是线程的入口方法。
///继承Thread类实现多线程

class Mythread extends Thread
{
    private String title;
    public Mythread(String title)
    {
        this.title=title;
    }
    @Override
    public void run()  //run是线程的入口,相当于main
    {
        for(int i=0;i<10;i++)
        {
            System.out.println(title+" "+ i);
        }
    }
}

public class Thread1
{
    public static void main(String[] args) {
        //有3个线程
        Mythread thread1=new Mythread("thread1");
        Mythread thread2=new Mythread("thread2");
        Mythread thread3=new Mythread("thread3");
        thread1.run();  //线程直接调用run方法
        thread2.run();
        thread3.run();
    }
}
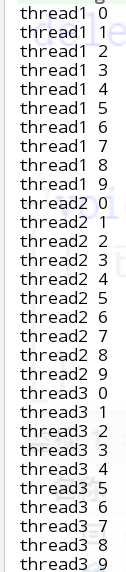
从结果看出,三个线程顺序打印,并没有实现多线程,是因为实现多线程必须用Thread.start()方法。
任何启动多线程的方式都是调用Thread类中的start()方法。
//Thread类的start方法
public class Thread1
{
    public static void main(String[] args) {
        Mythread thread1=new Mythread("thread1");
        Mythread thread2=new Mythread("thread2");
        Mythread thread3=new Mythread("thread3");
        thread1.start();  //实现多线程必须用Thread类的start方法
        thread2.start();
        thread3.start();
    }
}

从结果看书,调用start实现了多线程,即同时执行多个任务。
为什么要调用start方法不能直接调用run方法实现多线程?
先看调用Thread.start( )方法实现多线程过程:
Thread.start( )源码:
public synchronized void start() {

        if (threadStatus != 0)
            throw new IllegalThreadStateException();
        group.add(this);

        boolean started = false;
        try {
            start0();   //调用start0方法
            started = true;
        } finally {
            try {
                if (!started) {
                    group.threadStartFailed(this);
                }
            } catch (Throwable ignore) {
            }
        }
    }
    private native void start0();
从start源码中发现会抛一个IllegalThreadStateException异常,按照异常处理方式,会在调用处处理该异常,但是调用处没有处理并且没有报错,是因为IllegalThreadStateException是一个RunTime Exception异常即非受查异常,该异常是因为如果多次启动同一个线程引起的。那么,一个线程只能启动一次。
并且在start源码中调用了start0方法,而且该方法是本地方法,即调用本机的原生系统函数。Thread 类有个 registerNatives 本地方法, registerNatives在静代码块中,也就是当类加载到JVM中会调用该方法,该方法主要的作用就是注册一些本地方法供Thraed使用,比如start0和stop0等。
本地方法 registerNatives 是定义在 Thread.c 文件中的。Thread.c 是个很小的文件,它定义了各个操作系统平台都要用到的关于线程的公用数据和操作,其中有start0,如下:
"start0", "()V",(void \*)&JVM_StartThread
而JVM_StartThread如下:
JVM_ENTRY(void, JVM_StartThread(JNIEnv* env, jobject jthread)){
...
native_thread = new JavaThread(&thread_entry, sz);
...
}
JVM_ENTRY是一个宏,,用来定义JVM_StartThread 函数,可以看到函数内创建了真正的平台相关的本地线程,其线程函数是 thread_entry,定义如下:
static void thread_entry(JavaThread* thread, TRAPS) {
HandleMark hm(THREAD);
Handle obj(THREAD, thread->threadObj());
JavaValue result(T_VOID);
JavaCalls::call_virtual(&result,obj,
KlassHandle(THREAD,SystemDictionary::Thread_klass()),
vmSymbolHandles::run_method_name(), //调用run_method_name
vmSymbolHandles::void_method_signature(),THREAD);
}
在线程函数 thread_entry中调用了vmSymbolHandles::run_method_name(),
而run_method_name是在 vmSymbols.hpp 用宏定义的:
class vmSymbolHandles: AllStatic {
...
template(run_method_name,"run") // 这里决定了调用的方法名称是 “run”
...
}
最终调用了Java线程的入口方法run。
所以当启动一个线程需要Java程序调用start方法,start方法中的本地方法start0由JVM调用来准备Thread类所需要的资源(如果直接调用run方法,将不会准备这些资源,那就不是一个线程),JVM调用start0后,会回调run方法来执行的具体操作任务。
二:Runable接口实现多线程
Runable接口实现多线程解决了单继承局限。
Runable接口源码:
@FunctionalInterface
public interface Runnable {
    /**
     * When an object implementing interface <code>Runnable</code> is used
     * to create a thread, starting the thread causes the object's
     * <code>run</code> method to be called in that separately executing
     * thread.
     * <p>
     * The general contract of the method <code>run</code> is that it may
     * take any action whatsoever.
     *
     * @see     java.lang.Thread#run()
     */
    public abstract void run();
}
Runable接口中只允许有一个run抽象方法,可以用子类实现,也可以用函数式接口。
但是我们知道启动一个线程必须用Thread类的start方法,所以需要把Runable接口转化为Thread类,通过Thread类的构造方法:
public Thread(Runnable target); //将Runnable接口对象转化为Thread类
用Runnable接口实现多线程:
class MythreadImpl implements  Runnable
{
    private String title;
    public MythreadImpl(String title)
    {
        this.title=title;
    }
    public void run()
    {
        for(int i=0;i<10 ;i++)
        {
            try {
                Thread.sleep(20);
            } catch (InterruptedException e) {
                e.printStackTrace();
            }  //睡眠一会,更好看到多线程并发执行效果
            System.out.println(title+":"+ i);
        }
    }
}
public class Thread1
{
    public static void main(String[] args)
    {
        Runnable thread1=new MythreadImpl("thread1");
        Runnable thread2=new MythreadImpl("thraed2");
        Runnable thread3=new MythreadImpl("thraed3");
        //3个线程
        new Thread(thread1).start();
        new Thread(thread2).start();
        new Thread(thread3).start();
    }
}
因为我们目的是用Thread类的start方法,所以可以用匿名内部类来创建Runable接口对象:
/////匿名内部类进行Runnable对象创建
public class Thread1
{
public static void main(String[] args)
{
//用Runable接口实现一个线程
new Thread(new Runnable() {
@Override
public void run() {
for (int i = 0; i < 5; i++) {
System.out.println(Thread.currentThread().getName()+":" + i);
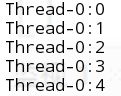
//Thread.currentThread().getName()获取当前线程名称,默认从Thread-0开始
}
}
}).start();
}
}
由于Runable接口被@FunctionalInterface注解,所以可以用lambda表达式实现Runable接口:
///lambada实现Runnable接口
public class Thread1
{
    public static void main(String[] args) {
        Runnable thread1 = () -> {
            for (int i = 0; i < 5; i++) {
                System.out.println(Thread.currentThread().getName() + " " + i);
            }
        };

        Runnable thread2 = () -> {
            for (int i = 5; i < 10; i++) {
                System.out.println(Thread.currentThread().getName() + " " + i);
            }
        };
        //两个线程同时执行
        new Thread(thread1).start();
        new Thread(thread2).start();
    }
}

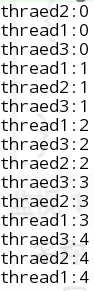
从结果看出,2个线程并发执行。
Thread类的Runable区别和联系:
- 通过看Thread类的源码发现,Thread类实现了Runable接口:
public
class Thread implements Runnable{}
那么Thread类肯定覆写了Runable接口的run抽象方法,如果是用Runable接口实现多继承,Runable自定义子类也会覆写run抽象方法,那么就可以得出一个结论,Thread类与自定义线程类(实现了Runable接口),是一个典型的代理设计模式:
hread类负责辅助真实业务的实现,(资源调度,创建进程并实现)
自定义线程负责真实业务的实现(run方法具体做的事)。
- 使用Runbale接口实现的多线程程序类可以更好的描述共享概念。
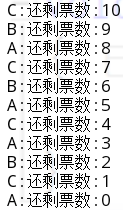
一共10张票,3个线程买票,如果用同一个Runable接口对象,那么这3个线程访问的是同一个tickets:
/////Runable接口实现数据共享
class Mythread implements Runnable
{
    private Integer tickets=10;

    @Override
    public void run()
    {
        while(tickets>0)
        {
            try {
                Thread.sleep(10);
            } catch (InterruptedException e) {
                e.printStackTrace();
            }
            System.out.println(Thread.currentThread().getName()+":"+"还剩票数:"+tickets--);
        }
    }
}
public class Thread1
{
    public static void main(String[] args)
    {
        Mythread thread = new Mythread();
        new Thread(thread, "A").start();
        new Thread(thread, "B").start();
        new Thread(thread, "C").start();
    }
}
三:实现接口Callable来实现多线程(juc)
JDK1.5新导入程序包java.util.concurrent.Callable,开发包主要是进行高并发编程使用的,包含很多在高并发操作中会使用的类。这个包里的Callable接口的出现是为了多线程有返回值而存在的。
首先看Callabl接口源码:
@FunctionalInterface
public interface Callable<V> {
    /**
     * Computes a result, or throws an exception if unable to do so.
     *
     * @return computed result
     * @throws Exception if unable to compute a result
     */
    V call() throws Exception;
}
FutureTask定义:
public class FutureTask<V> implements RunnableFuture<V>
{
		....
        public FutureTask(Callable<V> callable) {
        if (callable == null)
            throw new NullPointerException();
        this.callable = callable;
        this.state = NEW;       // ensure visibility of callable
        }
        ...
        //覆写Runable接口的run方法
        public void run() {
        if (state != NEW ||
            !UNSAFE.compareAndSwapObject(this, runnerOffset,
                                         null, Thread.currentThread()))
            return;
        try {
            Callable<V> c = callable;
            if (c != null && state == NEW) {
                V result;
                boolean ran;
                try {
                    result = c.call();   //调用call方法
                    ran = true;
                } catch (Throwable ex) {
                    result = null;
                    ran = false;
                    setException(ex);
                }
                if (ran)
                    set(result);
            }
        } finally {
            // runner must be non-null until state is settled to
            // prevent concurrent calls to run()
            runner = null;
            // state must be re-read after nulling runner to prevent
            // leaked interrupts
            int s = state;
            if (s >= INTERRUPTING)
                handlePossibleCancellationInterrupt(s);
        }
    }
}
FutureTask类实现接口RunableFuture;
RunableFuture接口定义:继承Runable和Future(接口可以实现多继承)
public interface RunnableFuture<V> extends Runnable, Future<V> {
    /**
     * Sets this Future to the result of its computation
     * unless it has been cancelled.
     */
    void run();
}
接口Future定义,可以取得Callable接口对象返回值
public interface Future<V> {
      ...
      /**
     * Waits if necessary for the computation to complete, and then
     * retrieves its result.
     *
     * @return the computed result
     * @throws CancellationException if the computation was cancelled
     * @throws ExecutionException if the computation threw an
     * exception
     * @throws InterruptedException if the current thread was interrupted
     * while waiting
     */
    V get() throws InterruptedException, ExecutionException;
    }
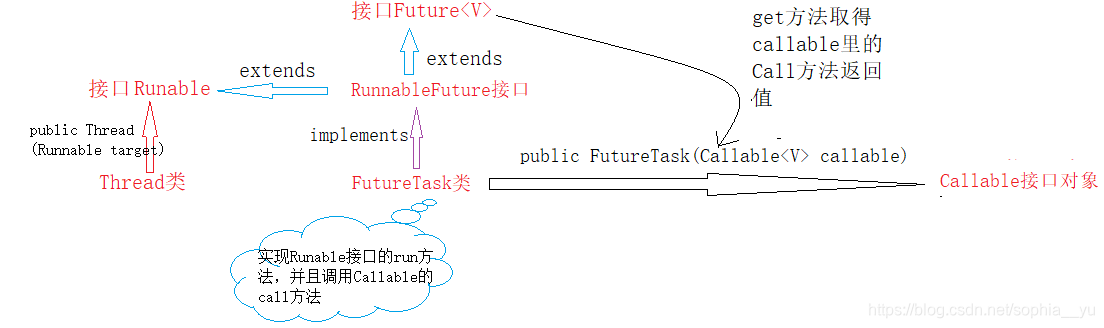
从上图可以了解到:如果要用Callable接口对象实现多线程,可以借助FutureTask,因为FutureTask实现了RunnableFuture,而RunnableFuture继承了Runable和Future,Future可以获得Callable的call方法返回值,也就是说FutureTask继承了Runable和Future,所以可以用Future这个中间媒介实现Callable接口到Thread类的转化。
package CODE.多线程;

/////Callable接口实现多线程
import java.util.concurrent.Callable;
import java.util.concurrent.ExecutionException;
import java.util.concurrent.FutureTask;

class MyCallImpl implements Callable<String>
{
    private Integer tickets=50;

    public String call() throws Exception
    {
        while(tickets>0)
        {
            System.out.println(Thread.currentThread().getName()+"剩余票数:"+tickets--);
        }
        return "票已售罄";
    }
}

public class Call
{
    public static void main(String[] args) throws InterruptedException ,ExecutionException
    {
        FutureTask<String> task=new FutureTask<>(new MyCallImpl());
        new Thread(task).start();
        new Thread(task).start();
        new Thread(task).start();
        System.out.println(task.get()); //票已售罄
    }
}
注:当线程有返回值时,只能用Callable接口实现多线程。