版权声明:本文为博主原创文章,未经博主允许不得转载。 https://blog.csdn.net/u013282507/article/details/54136812
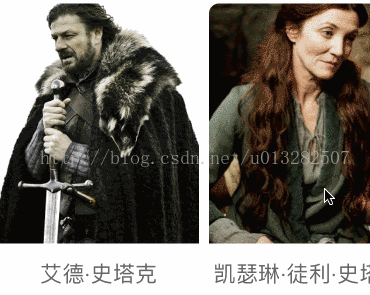
一、实现效果

二、原理说明
要实现这样的效果总共分三步:实现横向滚动、居中放大、自动居中。下面就仔细说一下具体的细节:
1、横向滚动
横向滚动是通过UICollectionView的横向滚动特性实现的,这里的数据源用plist文件模拟了一下
初始化数据:
NSString *filePath = [[NSBundle mainBundle] pathForResource:@"DataPropertyList" ofType:@"plist"];
    NSArray *arr = [NSArray arrayWithContentsOfFile:filePath];
    NSMutableArray *models = [NSMutableArray new];
    for (NSDictionary *dic in arr) {
        XLCardModel *model = [XLCardModel new];
        [model setValuesForKeysWithDictionary:dic];
        [models addObject:model];
    }
下面是Collectionview创建的方法:
    XLCardSwitchFlowLayout *flowLayout = [[XLCardSwitchFlowLayout alloc] init];
    [flowLayout setItemSize:CGSizeMake(200,self.bounds.size.height)];
    //设置滚动方向
    [flowLayout setScrollDirection:UICollectionViewScrollDirectionHorizontal];


    _collectionView = [[UICollectionView alloc] initWithFrame:self.bounds collectionViewLayout:flowLayout];
    _collectionView.showsHorizontalScrollIndicator = false;
    _collectionView.backgroundColor = [UIColor clearColor];
    [_collectionView registerClass:[XLCard class] forCellWithReuseIdentifier:@"XLCard"];
    [_collectionView setUserInteractionEnabled:YES];
    _collectionView.delegate = self;
    _collectionView.dataSource = self;
    [self addSubview:_collectionView];
数据源方法:
-(UICollectionViewCell *)collectionView:(UICollectionView *)collectionView cellForItemAtIndexPath:(NSIndexPath *)indexPath
{
    static NSString* cellId = @"XLCard";
    XLCard* card = [collectionView dequeueReusableCellWithReuseIdentifier:cellId forIndexPath:indexPath];
    card.model = _models[indexPath.row];
    return  card;
}
要实现第一个cell和最后一个cell都能滚动到屏幕居中的位置还需要加一下缩进:
扫描二维码关注公众号,回复:
3761192 查看本文章

//设置左右缩进
-(CGFloat)collectionInset
{
    return self.bounds.size.width/2.0f - [self cellWidth]/2.0f;
}

-(UIEdgeInsets)collectionView:(UICollectionView *)collectionView layout:(UICollectionViewLayout *)collectionViewLayout insetForSectionAtIndex:(NSInteger)section
{
    return UIEdgeInsetsMake(0, [self collectionInset], 0, [self collectionInset]);
}
效果如下:

2、居中放大
在自定义的UIcollectionFlowLayout中的layoutAttributesForElementsInRect方法里中设置放大的功能,放大功能主要是通过余弦函数曲线特性实现的,当x = 0时y = 1,两侧递减:

可以参考我之前写过的一篇博客:利用余弦函数实现卡片浏览工具
//设置放大动画
-(NSArray<UICollectionViewLayoutAttributes *> *)layoutAttributesForElementsInRect:(CGRect)rect
{
    NSArray *arr = [self getCopyOfAttributes:[super layoutAttributesForElementsInRect:rect]];
    //屏幕中线
    CGFloat centerX = self.collectionView.contentOffset.x + self.collectionView.bounds.size.width/2.0f;
    //刷新cell缩放
    for (UICollectionViewLayoutAttributes *attributes in arr) {
        CGFloat distance = fabs(attributes.center.x - centerX);
        //移动的距离和屏幕宽度的的比例
        CGFloat apartScale = distance/self.collectionView.bounds.size.width;
        //把卡片移动范围固定到 -π/4到 +π/4这一个范围内
        CGFloat scale = fabs(cos(apartScale * M_PI/4));
        //设置cell的缩放 按照余弦函数曲线 越居中越趋近于1
        attributes.transform = CGAffineTransformMakeScale(1.0, scale);
    }
    return arr;
}
//防止报错 先复制attributes
- (NSArray *)getCopyOfAttributes:(NSArray *)attributes
{
NSMutableArray *copyArr = [NSMutableArray new];
for (UICollectionViewLayoutAttributes *attribute in attributes) {
[copyArr addObject:[attribute copy]];
}
return copyArr;
}
//是否需要重新计算布局
-(BOOL)shouldInvalidateLayoutForBoundsChange:(CGRect)newBounds
{
    return true;
}
实现效果如下:

3、自动居中
设置全局属性,保存拖拽开始位置、结束位置和更新之后的位置。在手指拖拽开始记录起始位置,手指离开时记录结束位置并居中卡片。
    NSInteger _currentIndex;

    CGFloat _dragStartX;

    CGFloat _dragEndX;
//手指拖动开始
-(void)scrollViewWillBeginDragging:(UIScrollView *)scrollView
{
_dragStartX = scrollView.contentOffset.x;
}
//手指拖动停止
-(void)scrollViewDidEndDragging:(UIScrollView *)scrollView willDecelerate:(BOOL)decelerate
{
_dragEndX = scrollView.contentOffset.x;
dispatch_async(dispatch_get_main_queue(), ^{
[self fixCellToCenter];
});
}//配置cell居中
-(void)fixCellToCenter
{
//最小滚动距离
float dragMiniDistance = self.bounds.size.width/20.0f;
if (_dragStartX - _dragEndX >= dragMiniDistance) {
_currentIndex -= 1;//向右
}else if(_dragEndX - _dragStartX >= dragMiniDistance){
_currentIndex += 1;//向左
}
NSInteger maxIndex = [_collectionView numberOfItemsInSection:0] - 1;
_currentIndex = _currentIndex <= 0 ? 0 : _currentIndex;
_currentIndex = _currentIndex >= maxIndex ? maxIndex : _currentIndex;
[_collectionView scrollToItemAtIndexPath:[NSIndexPath indexPathForRow:_currentIndex inSection:0] atScrollPosition:UICollectionViewScrollPositionCenteredHorizontally animated:YES];
}
三、使用方法
1、创建方法
    _cardSwitch = [[XLCardSwitch alloc] initWithFrame:CGRectMake(0, 64, self.view.bounds.size.width, self.view.bounds.size.height - 64)];
    _cardSwitch.models = models;
    _cardSwitch.delegate = self;
    [self.view addSubview:_cardSwitch];
2、代理
-(void)XLCardSwitchDidSelectedAt:(NSInteger)index
{
    NSLog(@"选中了:%zd",index);
}