一、canvas基本使用
1.1 canvas元素
<canvas>元素只有两个属性width、height,当没有设置width、height时,<canvas>也就是画布的默认的width为300px,height为150px。
<canvas id="myCanvas" width="200" height="100">
	您当前的浏览器不支持canvas
</canvas>
ps:canvas 元素本身是没有绘图能力的。所有的绘制工作必须在 脚本(JavaScript) 内部完成
1.2 设置canvas的宽和高
设置canvsa的宽高有两种方式:
- 直接在
<canvas>标签中通过width和height属性来设置,可以不写单位,默认单位为px
<canvas id="myCanvas1" width="200" height="100">
	您当前的浏览器不支持canvas
</canvas>
<canvas id="myCanvas2" width="200px" height="100px">
	您当前的浏览器不支持canvas
</canvas>
- 在JS脚本中设置
<canvas>的宽和高。
	<canvas id="canvas" class="canvas">
		你的浏览器不支持canvas
	</canvas>
	<script type="text/javascript">
		var canvas = document.getElementById('canvas');
		canvas.width = 100;
		height.height = 100;
		var ctx = canvas.getContext('2d');
	</script>
- 不要在css中设置
<canvas>的宽和高
在css中设置<canvas元素的宽和高,并不是设置了元素的大小,而是对已经画好内容的进行的缩放。
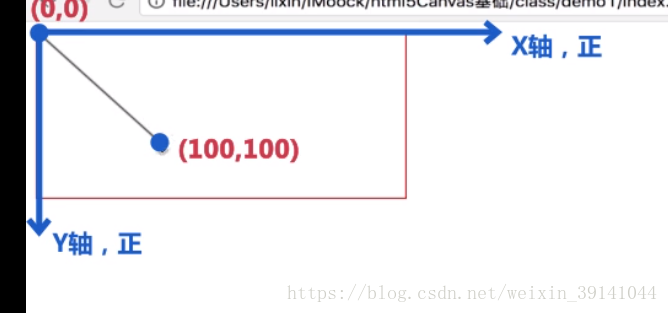
二、canvas坐标系统
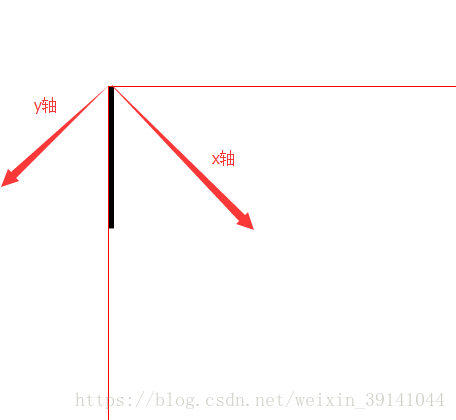
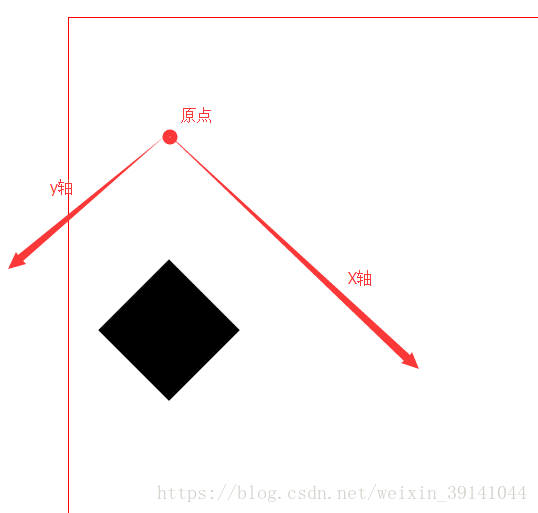
Canvas有2D和3D之分,因此Canvas坐标系统也是有区别的,我们可以通过设置getContext('2d')让canvas获得一个2d环境。
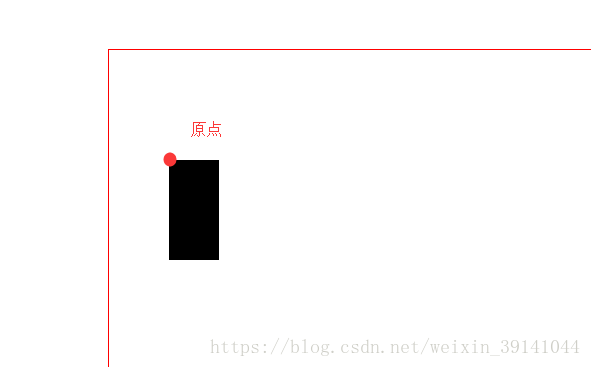
在Canvas中2D环境中其坐标系统和Web坐标系统,以及和svg的最初坐标系统是一致的。
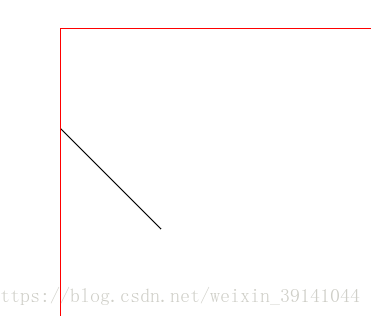
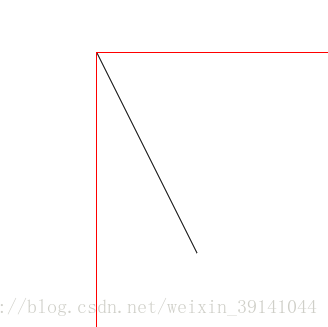
坐标原点(0,0)在canvas画布的左上角。
三、canvas绘制图形
- 路径(直线)
- 圆弧
- 矩形
3.1 路径(直线)
绘制路径用到的方法
- moveTo(x,y)
将画笔移动到指定的位置。 - lineTo(x,y)
定义一条从上一个坐标到当前坐标(x,y)的路径。 - stroke()
描边,绘制出通过 moveTo() 和 lineTo() 方法定义的路径,默认颜色为黑色。 - strokeStyle = “color”
在调用绘制前,改变路径的颜色。 - beginPath()
起始一条新路径。 - closePath()
闭合路径,并将画笔也移动到开始处。
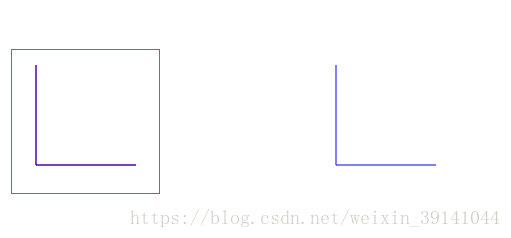
3.1.1 绘制一条路径
	var canvas = document.getElementById('canvas');
	canvas.width = 500;
	canvas.height = 500;
	var ctx = canvas.getContext('2d');
	ctx.moveTo(100,100);
	ctx.lineTo(200,200);
	ctx.lineTo(200,300);
	ctx.stroke();
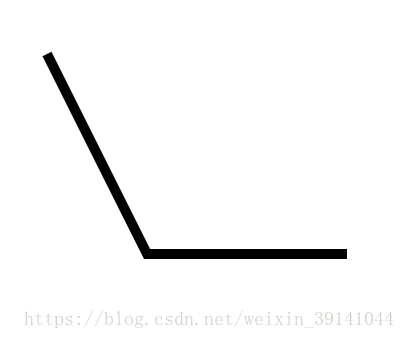
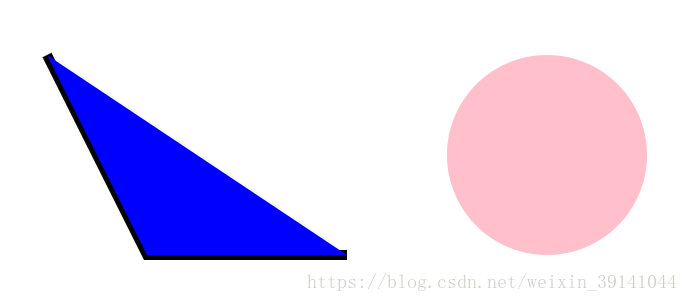
3.1.2 绘制三角形
	   var canvas = document.getElementById('canvas');
       var ctx = canvas.getContext('2d');
       ctx.strokeStyle = 'red';
       ctx.moveTo(300,150);
       ctx.lineTo(100,450);
       ctx.lineTo(500,450);
       ctx.closePath();
       ctx.stroke();
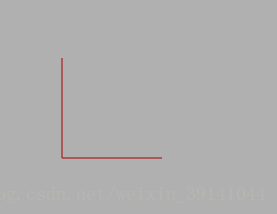
3.1.3 多次调用.stroke()方法重复绘制路径问题
坑2:ctx.stroke()方法是将我们做出的图从内存中画到画布上。多次使用ctx.stroke()会把之前的内容也重新画一遍,并重叠在原来的画上。
因为已经做好的图依旧 保存在内存 当中,ctx.stroke()仅仅是把内容绘制出来,并没有清除,所以在当要画出第二条线的时候,也会把第一条线再画一遍。
		var canvas = document.getElementById('canvas');
		canvas.width = 800;
		canvas.height = 800;
		var ctx = canvas.getContext('2d');
		ctx.moveTo(100,100);
		ctx.lineTo(100,200);
		ctx.lineTo(200,200);
		ctx.strokeStyle="#f00";
		ctx.stroke();

		ctx.moveTo(400,100);
		ctx.lineTo(400,200);
		ctx.lineTo(500,200);
		ctx.strokeStyle="#00F";
		ctx.stroke();
打个断点验证一下。
	//...
	ctx.strokeStyle= 'red';
	ctx.stroke();
	debugger;
	ctx.moveTo(400,100);
	//...
执行到第一个ctx.stroke()
执行到第二个ctx.stroke()
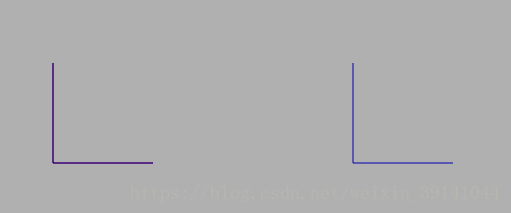
3.1.2 解决,stroke()重复绘制问题
方法一:
在所有图像绘制完成后再调用.stroke()将图像绘制到画布上。
	var canvas = document.getElementById('canvas');
	canvas.width = 800;
	canvas.height = 800;
	var ctx = canvas.getContext('2d');
	ctx.moveTo(100,100);
	ctx.lineTo(100,200);
	ctx.lineTo(200,200);
	ctx.strokeStyle= 'red';
	ctx.moveTo(400,100);
	ctx.lineTo(400,200);
	ctx.lineTo(500,200);
	ctx.strokeStyle="blue";

	ctx.stroke();
方法二:
使用.beginPath()方法释放之前已经画好的图像。
	var canvas = document.getElementById('canvas');
	canvas.width = 800;
	canvas.height = 800;
	var ctx = canvas.getContext('2d');
	ctx.moveTo(100,100);
	ctx.lineTo(100,200);
	ctx.lineTo(200,200);
	ctx.strokeStyle= 'red';
	ctx.stroke();
	ctx.beginPath();

	ctx.moveTo(400,100);
	ctx.lineTo(400,200);
	ctx.lineTo(500,200);
	ctx.strokeStyle="blue";
	ctx.stroke();
但是一旦使用了begin清除了之前的路径,可能就无法使用closePath闭合路径了
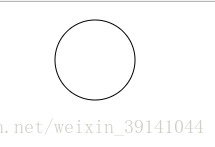
3.2 圆弧(圆)
arc(x,y,r,startAngle,endAngle[,anticlosewise])
- (x, y)为圆心,r为半径。
- startAngle 圆弧开始的弧度。(0 常用)
- endAngle 圆弧结束的弧度。(2*Math.PI 常用)
- anticlosewise是布尔值,true表示逆时针,false表示顺时针。(默认true,只是单纯画圆的话就可以省略)
案例1
        var canvas=document.getElementById("canvas");
        var ctx=canvas.getContext("2d");
        ctx.beginPath();
        ctx.arc(95,50,40,0,2*Math.PI);
        ctx.stroke();
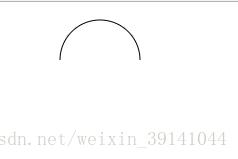
案例2
        var canvas=document.getElementById("canvas");
        var ctx=canvas.getContext("2d");
        ctx.beginPath();
        ctx.arc(95,50,40,0,Math.PI,true);
        ctx.stroke();
3.3 矩形
描绘出一个矩形边框。
strokeRect(x, y, width, height)
- x和y是矩形左上角的坐标。
- width和height是宽和高。
	  var canvas = document.getElementById('canvas');
      var ctx = canvas.getContext('2d');

      ctx.strokeStyle = 'red';
      ctx.moveTo(400,400);
      ctx.lineTo(500,500);
      ctx.stroke();
      //描出矩形
      ctx.strokeRect(100,100,300,200);
使用strokeRect()绘制矩形,不需要再调用stroke()
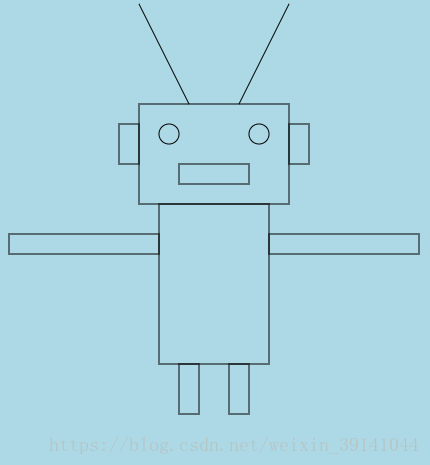
复杂一点的案例:
        var canvas = document.getElementById('canvas');
        var ctx = canvas.getContext('2d');
        ctx.moveTo(300,50);
        ctx.lineTo(350,150);
        ctx.moveTo(450,50);
        ctx.lineTo(400,150);
        ctx.stroke();
        //头
        ctx.strokeRect(300,150,150,100);
        //耳
        ctx.strokeRect(280,170,20,40);
        ctx.strokeRect(450,170,20,40);
        //眼
        ctx.beginPath();
        ctx.arc(330,180,10,0,2*Math.PI,true);
        ctx.stroke();
        ctx.beginPath();
        ctx.arc(420,180,10,0,2*Math.PI,true);
        ctx.stroke();
        //嘴
        ctx.strokeRect(340,210,70,20);
        //身体
        ctx.strokeRect(320,250,110,160);
        //膀子
        ctx.strokeRect(170,280,150,20);
        ctx.strokeRect(430,280,150,20);
        //脚
        ctx.strokeRect(340,410,20,50);
        ctx.strokeRect(390,410,20,50);
四、描边与填充
常用的属性
| 属性 | 描述 |
|---|---|
| lineWidth | 设置或返回当前的线条宽度 |
| fillStyle | 设置或返回一个区间的填充颜色,使用fill()方法进行填充,支持十六进制,支持rgba |
| strokeStyle | 设置或返回画笔的颜色,支持十六进制,支持rgba |
| lineCap | 设置或返回线条的结束端点样式 |
| lineJoin | 设置或返回两条线相交时,所创建的拐角类型 |
| fill() | 给路径围成的区域(不包括使用strokeRect()绘制的矩形)填充颜色 |
| fillRect() | 绘制一个有填充色的矩形(也可以给矩形填充颜色,定位宽高一样就行) |
4.1 lineWidth
lineWidth 设置的是最终stroke()画笔的宽度。只要是放在stroke()前,那放哪里都无所谓。
	var canvas = document.getElementById('canvas');
	canvas.width = 800;
	canvas.height = 800;
	var ctx = canvas.getContext('2d');
	ctx.moveTo(100,100);
	ctx.lineTo(200,300);

	ctx.lineWidth =10;
	ctx.lineTo(400,300);
	ctx.stroke();
4.2 fillStyle和fill()
和fill()配合使用,要填充的区域无需闭合。
<canvas> 只支持一种原生的 图形绘制:矩形。其他所有图形都是由路径(path)形成的。所以使用fill()是无法填充矩形的,填充矩形和填充圆的语法是不一样的。
先用fillStyle="color"设置填充颜色,再使用fill()进行填充。
		var canvas = document.getElementById('canvas');
		canvas.width = 800;
		canvas.height = 800;
		var ctx = canvas.getContext('2d');
		ctx.moveTo(100,100);
		ctx.lineTo(200,300);
		ctx.lineWidth = 10;
		ctx.lineTo(400,300);
		ctx.stroke();
		ctx.fillStyle = 'blue';
		ctx.fill();

		//绘制圆
		ctx.beginPath();
		ctx.arc(600,200,100,0,2*Math.PI,true);
		ctx.fillStyle = 'pink';
		ctx.fill();
两条非平行的连线可以构成一个区域。
4.3 strokeStyle
设置的是最终stroke()画笔的颜色。只要是放在stroke()前,那放哪里都无所谓。
使用strokeStyle的正确打开方式:
       var canvas = document.getElementById('canvas');
       var ctx = canvas.getContext('2d');

       ctx.strokeStyle = 'red';
       ctx.moveTo(300,150);
       ctx.lineTo(100,450);
       ctx.stroke();

       ctx.beginPath();
       ctx.strokeStyle = 'blue';
       ctx.moveTo(300,150);
       ctx.lineTo(500,450);
       ctx.stroke();

       ctx.beginPath();
       ctx.strokeStyle = 'green';
       ctx.moveTo(100,450);
       ctx.lineTo(500,450);
       ctx.stroke();
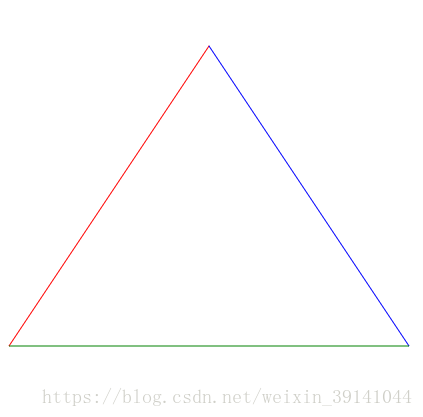
错误打开方式:
最终起作用的strokeStyle是stroke()前的那一个。
妄想用这种方法画一个三条边不同颜色的三角形是错误的。
	   var canvas = document.getElementById('canvas');
       var ctx = canvas.getContext('2d');

       ctx.strokeStyle = 'red';
       ctx.moveTo(300,150);
       ctx.lineTo(500,450);
       ctx.strokeStyle = 'green';
       ctx.lineTo(100,450);
       ctx.strokeStyle = 'blue';
       ctx.closePath();
       ctx.stroke();
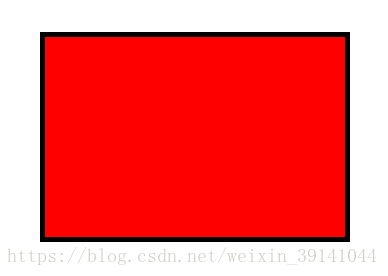
4.4 fillRect()
绘制一个带有填充颜色的矩形。
换个思路:当这个带有填充颜色的矩形 定位 和 宽高 与strokeRect()绘制的矩形一样,那不就是填充了嘛。
		ctx.lineWidth = 10;
		ctx.strokeRect(200,500,300,200);
		ctx.fillStyle = 'red';
		ctx.fillRect(200,500,300,200);
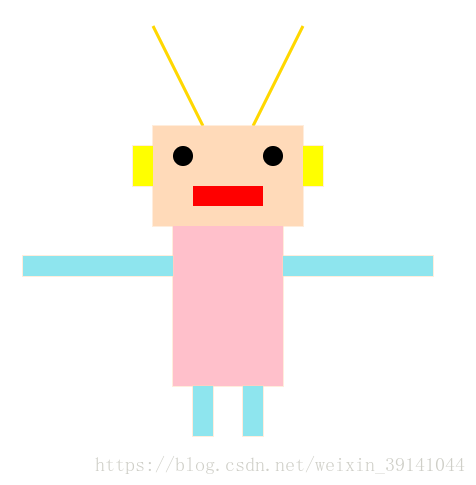
4.5使用fill()和fillRect()填充综合案例
        var canvas = document.getElementById('canvas');
        var ctx = canvas.getContext('2d');
		//二毛
        ctx.moveTo(300,50);
        ctx.lineTo(350,150);
        ctx.moveTo(450,50);
        ctx.lineTo(400,150);
        ctx.lineWidth = 3;
        ctx.strokeStyle = '#FFD700';
        ctx.stroke();
        //头
        ctx.lineWidth = 1;
        ctx.strokeStyle = 'rgba(255,218,185)';
        ctx.fillStyle = 'rgba(255,218,185)';
        ctx.strokeRect(300,150,150,100);
        ctx.fillRect(300,150,150,100);
        //耳朵
        ctx.fillStyle = 'yellow';
        ctx.strokeRect(280,170,20,40);
        ctx.fillRect(280,170,20,40);
        ctx.strokeRect(450,170,20,40);
        ctx.fillRect(450,170,20,40);
        //眼睛
        ctx.beginPath();
        ctx.fillStyle = '#000';
        ctx.arc(330,180,10,0,2*Math.PI,true);
        ctx.stroke();
        ctx.fill();
        ctx.beginPath();
        ctx.arc(420,180,10,0,2*Math.PI,true);
        ctx.stroke();
        ctx.fill();
        //嘴
        ctx.strokeRect(340,210,70,20);
        ctx.fillStyle = 'red';
        ctx.fillRect(340,210,70,20);
        //身体
        ctx.strokeRect(320,250,110,160);
        ctx.fillStyle = 'pink';
        ctx.fillRect(320,250,110,160);
        //膀子
        ctx.fillStyle = '#8EE5EE';
        ctx.strokeRect(170,280,150,20);
        ctx.fillRect(170,280,150,20);
        ctx.strokeRect(430,280,150,20);
        ctx.fillRect(430,280,150,20);
        //脚
        ctx.strokeRect(340,410,20,50);
        ctx.fillRect(340,410,20,50);
        ctx.strokeRect(390,410,20,50);
        ctx.fillRect(390,410,20,50);
五、Canvas图形转换
- 平移 translate
- 旋转 rotate
- 缩放 scale
- 三个方法效果可以叠加
由于图形转换的三个方法时可以叠加的,构图的环境会越来复杂。所以会配合save和restore方法使用。
- save():保存调用该方法前面的环境(包括坐标系,图形的变换,样式。)
- restore():恢复环境,恢复到保存环境之前的环境
-一定要成对出现。
5.1 translate 平移
平移是改变坐标系的原点。
平移<canvas>坐标原点到指定的位置。并不是平移<canvas>的位置。
translate(x, y)
平移影响的是调用translate(x, y)后,后面在图形的定位。
案例1:
	var canvas = document.getElementById('canvas');
	canvas.width = 800;
	canvas.height = 800;
	var ctx = canvas.getContext('2d');

	ctx.translate(0,100);
	ctx.moveTo(0,0);
	ctx.lineTo(100,100);
	ctx.stroke();
案例2:
	var canvas = document.getElementById('canvas');
	canvas.width = 800;
	canvas.height = 800;
	var ctx = canvas.getContext('2d');

	ctx.moveTo(0,0);
	ctx.translate(0,100);	//改变调用平移的位置
	ctx.lineTo(100,100);
	ctx.stroke();
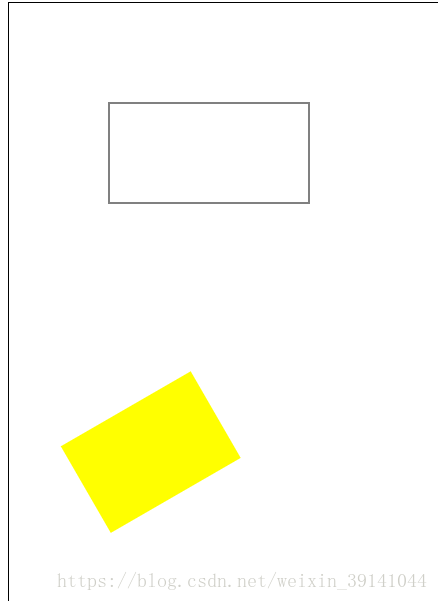
5.2 旋转
旋转是以坐标系原点为圆心,旋转坐标系。如果原点被平移了,那就是以平移后的原点为圆心。
rotate(angle)
rotate() 是旋转正个坐标系
- angle 它是顺时针方向的,值是弧度。
案例1:
		var canvas = document.getElementById('canvas');
		canvas.width = 800;
		canvas.height = 800;
		var ctx = canvas.getContext('2d');

		ctx.lineWidth = 10;
 		ctx.rotate(Math.PI / 180 * 45);
		ctx.moveTo(0,0);
		ctx.lineTo(100,100);
		ctx.stroke();
案例2:
	var canvas = document.getElementById('canvas');
	canvas.width = 800;
	canvas.height = 800;
	var ctx = canvas.getContext('2d');

	ctx.lineWidth = 10;
	ctx.translate(100,100);
	ctx.rotate(Math.PI / 180 * 45);
	ctx.fillRect(100,100,100,100);
5.3 scale 缩放
这玩意缩放的是坐标系。
scale(x, y)
- x x轴方向上的缩放倍数,必须为正数,比1大为放大,比1小为缩小。
- y y轴方向上的缩放倍数,必须为正数,比1大为放大,比1小为缩小。
		var canvas = document.getElementById('canvas');
		canvas.width = 800;
		canvas.height = 800;
		var ctx = canvas.getContext('2d');

		ctx.translate(10,10);

 		ctx.scale(0.5,1);
		ctx.fillRect(100,100,100,100)
5.4 save() 和 restore()
save()和restore()方法是绘制复杂图形必不可少的方法,使用save()在作图之前保存上文的原始环境,包括图形变换和样式。再使用restore()恢复之前的环境。
     	var canvas = document.getElementById('canvas');
     	var ctx = canvas.getContext('2d');

     	ctx.save();	//保存之前的原始环境

     	ctx.translate(200,300);
     	ctx.rotate(Math.PI/3);
     	ctx.scale(0.5,0.5);
     	ctx.fillStyle = 'yellow';
     	ctx.fillRect(100,100,200,300);

     	ctx.restore();
     	ctx.strokeRect(100,100,200,100);
再画出的没有填充的矩形,不受之前的环境影响。
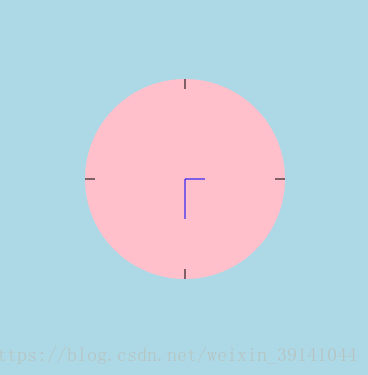
5.5 使用转换画出时钟
案例:
        var canvas=document.getElementById("canvas");
        var context=canvas.getContext("2d");

        context.save();

        //时钟圆盘
        context.translate(300,300);
        context.fillStyle = 'pink';
        context.arc(0,0,100,0,2*Math.PI,true);
        context.fill();

        //时钟刻度
        context.beginPath();
        context.strokeStyle = 'black';
        for(var i=0;i<4;i++){
            context.rotate(Math.PI/2);
            context.moveTo(90,0);
            context.lineTo(100,0);
        }
        context.stroke();

        //时针
        context.beginPath();
        context.strokeStyle = 'blue';
        context.moveTo(0,0);
        context.lineTo(20,0);
        context.stroke();
        //分针
        context.beginPath();
        context.moveTo(0,0);
        context.lineTo(0,40);
        context.stroke();

        context.restore();
六、渐变
渐变可以理解为一种颜色, canvas中有两种渐变:
- 线性渐变
- 径向渐变
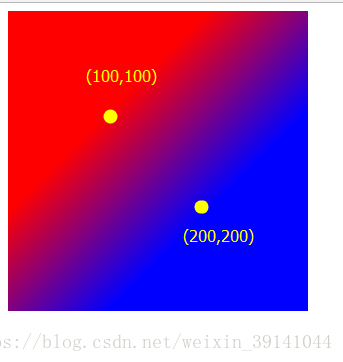
6.1线性渐变
var linearGradient = ctx.createLinearGradient(xStart,yStart,xEnd,yEnd);
linearGradient.addColorStop(0~1,color);
ctx.fillStyle = linearGradient;
- (xStart,yStart)是渐变的起点。
- (xEnd,yEnd)是渐变的终点。这两个坐标就是设置需要渐变区域。
- 0~1 是 百分比小数,在0和1的地方是纯色,小数的地方是渐变色。
- color 渐变颜色。
案例1:两种颜色线性渐变
      var canvas=document.getElementById("canvas");
      var ctx=canvas.getContext("2d");

      var linearGradient = ctx.createLinearGradient(100,100,200,200);
      linearGradient.addColorStop(0,'rgba(255,0,0,1)');
      linearGradient.addColorStop(1,'rgba(0,0,255,1)');

      ctx.fillStyle = linearGradient;
      ctx.fillRect(0,0,300,300);
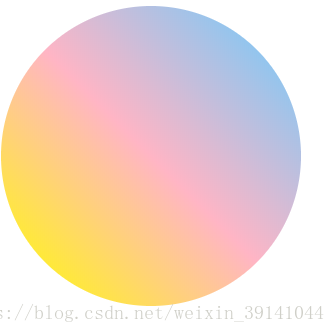
案例2:多种颜色线性渐变
      var canvas=document.getElementById("canvas");
      var ctx=canvas.getContext("2d");

      var linearGradient = ctx.createLinearGradient(0,300,300,0);
      linearGradient.addColorStop(0,'#FFFF00');
      linearGradient.addColorStop(0.5,' #FFB5C5');
      linearGradient.addColorStop(1,' #66ccff');

      ctx.fillStyle = linearGradient;
      ctx.arc(150,150,150,0,2*Math.PI,true);
      ctx.fill();
6.2径向渐变
ctx.createRadialGradient(xStart,yStart,radiusStart,xEnd,yEnd,radiusEnd);
linearGradient.addColorStop(0~1,color);
ctx.fillStyle = linearGradient;
- (xStart,yStart)是第一个圆的圆心。
- (xEnd,yEnd)是第二个圆的圆心。
这两个圆就是需要设置渐变的区域,第一个圆到第二个圆之间的颜色呈现渐变。 - radiusStart圆的半径。
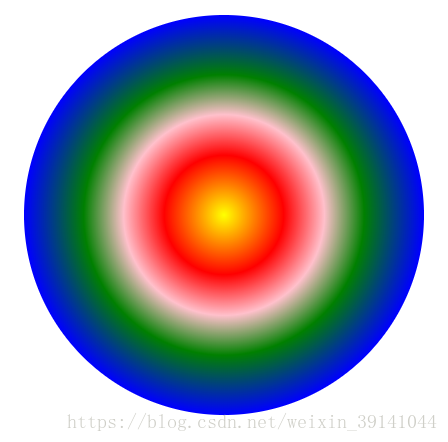
案例1:
        ctx.arc(400,400,200,0,Math.PI*2,true);
        //线性渐变
        var radialGradient = ctx.createRadialGradient(400,400,0,400,400,200);
        //设置渐变颜色
        radialGradient.addColorStop(0,'yellow');
        radialGradient.addColorStop(0.3,'red');
        radialGradient.addColorStop(0.5,'pink');
        radialGradient.addColorStop(0.7,'green');
        radialGradient.addColorStop(1,'blue');
        //设置渐变作为样式
        ctx.fillStyle = radialGradient;
        ctx.fill();
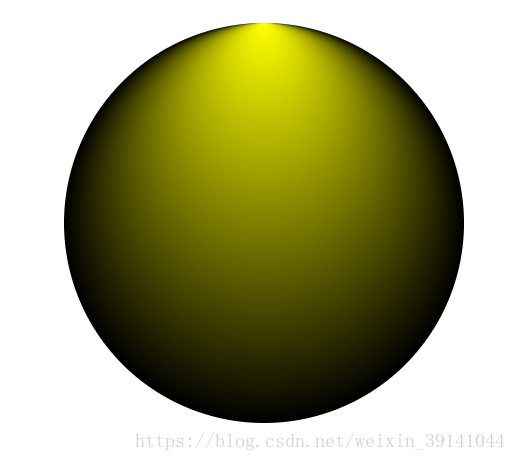
案例2:
        ctx.arc(400,400,200,0,Math.PI*2,true);
        //径向渐变
        var radialGradient = ctx.createRadialGradient(400,200,0,400,400,200);
        //设置渐变颜色
        radialGradient.addColorStop(0,'rgb(255,255,0)');
        radialGradient.addColorStop(1,'rgb(0,0,0)');
        //设置渐变作为样式
        ctx.fillStyle = radialGradient;
        ctx.fill();
七、Canvas中的文本
| 属性 | 说明 | 值 |
|---|---|---|
| font | 设置或返回文本内容的当前字体属性 | |
| textAlign | 设置或返回文本内容的当前对齐方式 | left,start左对齐; center居中对齐; end,right右对齐; |
| textBaseline | 设置或返回在绘制文本时使用的当前文本基线 | top顶对齐; middle居中; bottom底部对齐; |
| 方法 | 说明 |
|---|---|
| fillText() | 填充文字 |
| strokeText() | 描边文字 |
| measureText() | 计算文本宽度 |
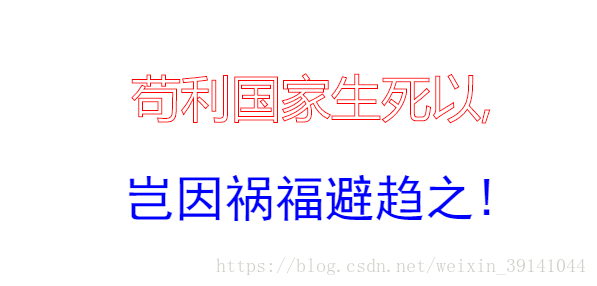
案例1:
若是要实现文本水平居中,要先将文本定位到
<canvas>元素 width/2的位置,再设置ctx.textAlign = 'center'才能实现水平居中。
        var canvas=document.getElementById("canvas");
        var ctx=canvas.getContext('2d');

        var str1 = '苟利国家生死以,';
        var str2 = '岂因祸福避趋之!'
        ctx.font = '50px Microsoft Yahei';
        ctx.strokeStyle = 'red';
        ctx.textAlign = 'center';
        ctx.strokeText(str1,400,350);

        ctx.font = '50px SimHei';
        ctx.fillStyle = 'blue';
        ctx.textAlign = 'center';
        ctx.fillText(str2,400,450);
案例2:
获取文本的宽度,以便以后能动态的使文本居中。
        var canvas=document.getElementById("canvas");
        var ctx=canvas.getContext('2d');
        var str2 = '岂因祸福避趋之!';
        var strWidth = ctx.measureText(str2).width;
        console.log(strWidth);
八、Canvas绘制图片
绘制图片3种方法:
ctx.drawImage(image,x,y)把图片绘制在(x,y)处。ctx.drawImage(image,x,y,w,h)把图片绘制在(x,y)处,并缩放为宽w,高hctx,drawImage(image,sx,sy,sw,sh,dx,dy,dw,dh)把图片中(sx,sy)处的宽sw,高sh的区域,绘制到(dx,dy)处,并缩放为宽dw,高dh。
8.1 绘制一个图片
创建<img>元素
    var img = new Image();
    img.src = '../Drag/upload/44379492.jpg';
在img的回调函数onload中绘制
如果 drawImage 的时候图片还没有完全加载完成,则什么都不会显示,个别浏览器会抛异常。所以一定要在图像加载完成后的回调中绘制图像。
        img.onload = function(){
            ctx.drawImage(img,0,0);
        }
8.2 图片画刷
创建一个画刷,进而可以把图片设置到fillStyle中,使用fil()进行填充
    var img = new Image();
    img.src = '../Drag/upload/44379492.jpg';
    img.onload = function(){
		ctx.createPattern(img,'repeat/no-repeat/repeat-x/repeat-y');
		ctx.fillStyle = pattern;
		ctx.fillRect(.....);//或者ctx.fill();
	}
参数:repeat/no-repeat/repeat-x/repeat-y就是设置背景图是否重复。
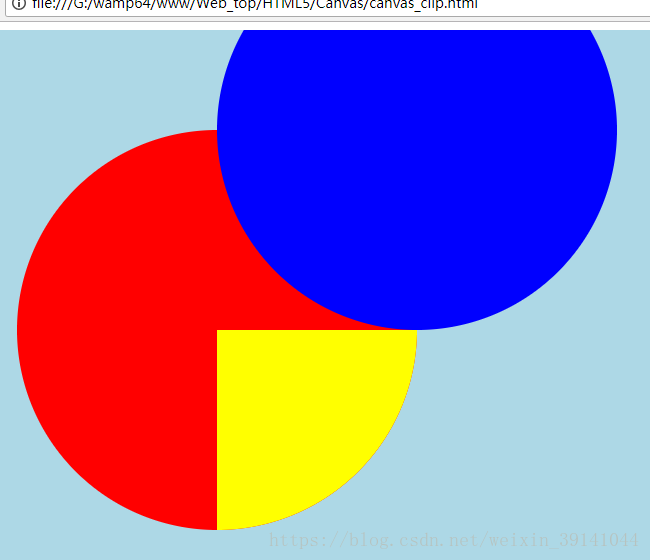
九、Canvas裁剪区域
canvas使用clip()方法进行裁剪区域。
先绘制绘制一个区域A,调用clip()方法后,所绘制的所有图形,只有在区域A中的部分才会被显示,区域A外部都会被裁剪到。
案例1:
        var canvas=document.getElementById("canvas");
        var ctx=canvas.getContext('2d');

		//绘制一个圆形
        ctx.arc(300,300,200,0,2*Math.PI);
        ctx.fillStyle = 'red';
        ctx.fill();
        ctx.clip(); //将上面的绘制的区域设置成裁剪区域。

		//绘制一个正方形
        ctx.fillStyle = 'yellow';
        ctx.fillRect(300,300,200,200);

		//绘制一个圆
        ctx.beginPath();
        ctx.arc(500,100,200,0,2*Math.PI);
        ctx.fillStyle = 'blue';
        ctx.fill();
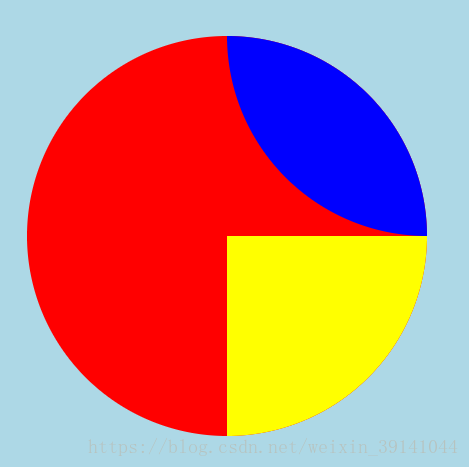
clip()后面所绘制的所有图形都会被裁剪,如果不想被裁剪,那就使用save()和restore()。
案例2:
        var canvas=document.getElementById("canvas");
        var ctx=canvas.getContext('2d');
        ctx.save();

        ctx.arc(300,300,200,0,2*Math.PI);
        ctx.fillStyle = 'red';
        ctx.fill();
        ctx.clip();

        ctx.fillStyle = 'yellow';
        ctx.fillRect(300,300,200,200);

        ctx.restore();

        ctx.beginPath();
        ctx.arc(500,100,200,0,2*Math.PI);
        ctx.fillStyle = 'blue';
        ctx.fill();
十、阴影绘制
绘制阴影会用到一下4个属性:
- ctx.shadowOffsetX = num ;设置距离原图形左上角的x偏移量,可以为负数。
- ctxshadowOffsetY = num; 设置距离原图形左上角的y偏移量,可以为负数。
- ctxshadowColor = ‘’;设置阴影的颜色。
- ctxshadowBlur = num;阴影的模糊半径。
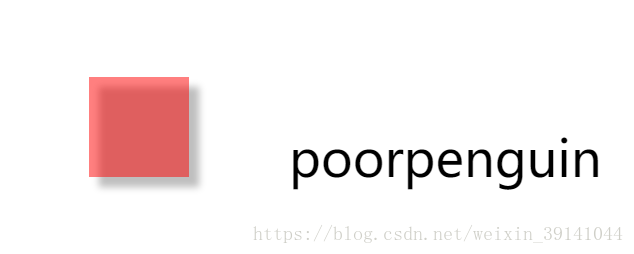
案例1:
       var canvas=document.getElementById("canvas");
       var context=canvas.getContext("2d");

        //设置阴影
       context.shadowOffsetX = 10;
       context.shadowOffsetY = 10;
       context.shadowColor = 'rgba(0,0,0,0.5)';
       context.shadowBlur = 10;

       context.fillStyle = 'rgba(255,0,0,0.5)'; //设置红色半透明。
       context.fillRect(200,200,100,100);

       context.font = '50px sans-serif';
       context.fillText('poorpenguin',400,300);
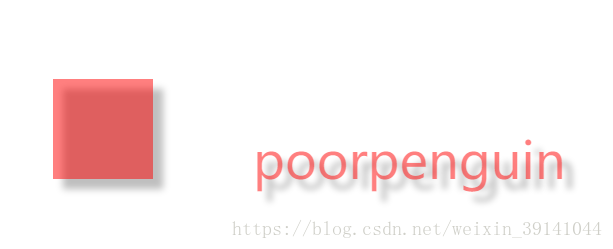
设置阴影后对后面新的图形或者文字都是默认带阴影的。可以使用save()和restore()还原默认环境。
案例2:
        var canvas=document.getElementById("canvas");
        var context=canvas.getContext("2d");

        context.save();
        //设置阴影
        context.shadowOffsetX = 10;
        context.shadowOffsetY = 10;
        context.shadowColor = 'rgba(0,0,0,0.5)';
        context.shadowBlur = 10;

        context.fillStyle = 'rgba(255,0,0,0.5)'; //设置红色半透明。
        context.fillRect(200,200,100,100);

        context.restore();

        context.font = '50px sans-serif';
        context.fillText('poorpenguin',400,300);
十一、Canvas绘制曲线
Canvas绘制曲线有三种方法:
-
圆弧:
arc(x,y,r,startAngle,endAngle[,anticlosewise])
-
二次贝塞尔曲线:
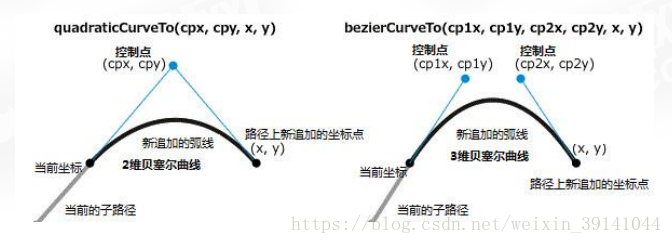
ctx.quadraticCurveTo(x2,y2,x3,y3);
x2,y2是与前面个点连接,x3,y3是与x2,y2的连接,形成的切线斜率构成曲线。
-
三次贝塞尔曲线:
ctx.bezierCurveTo(x2,y2,x3,y3,x4,y4);
分别由前面两个点,后面两个点的斜率构成的曲线。
1. 圆弧绘制曲线
案例1:
    var canvas=document.getElementById("canvas");
    var context=canvas.getContext("2d");

    context.arc(400,400,100,0,Math.PI/2, true);
    context.stroke();
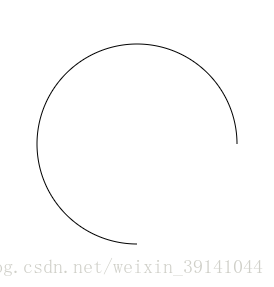
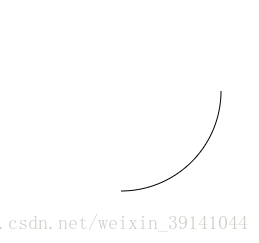
案例2:
        var canvas=document.getElementById("canvas");
        var context=canvas.getContext("2d");

        context.arc(400,400,100,0,Math.PI/2, false);
        context.stroke();
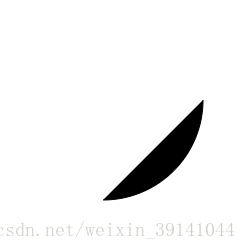
案例3:
        var canvas=document.getElementById("canvas");
        var context=canvas.getContext("2d");

        context.arc(400,400,100,0,Math.PI/2, false);
        context.stroke();
        context.fill();
2. 二次贝塞尔曲线和三次贝塞尔曲线
Canvas绘制曲线生成工具
- 二次贝塞尔曲线:
http://blogs.sitepointstatic.com/examples/tech/canvas-curves/quadratic-curve.html - 三次贝塞尔曲线:
http://blogs.sitepointstatic.com/examples/tech/canvas-curves/bezier-curve.html
十二、Canvas动画
Canvas的动画一般就是鼠标和键盘事件+定时器+clearRect()组合实现的。
- clearRect(x,y,width,height);清空一个指定的矩形区域。
clearRect()方法配合setInterval()使用可以实现大部分动画。
案例1:一个简单的动画
<!DOCTYPE html>
<html lang="en">
<head>
	<meta charset="UTF-8">
	<title>canvas动画--方块四处碰撞</title>
	<style>
		*{
			margin: 0;
			padding: 0;
		}
		canvas{
			border: 1px solid red;
			position: relative;
			margin: 50px;
		}
	</style>
</head>
<body>
	<canvas id="canvas" width="1000" height="800">

	</canvas>

	<script type="text/javascript">
		var canvas = document.getElementById('canvas');
		var ctx = canvas.getContext('2d');

		var rectX = 0,
			rectY = 0,
			dirX = 1,
			dirY = 1,
			speed = 10;
			isMouseEnterRect = false;

		canvas.onmousemove = function(e){
			var mouseX = e.offsetX;
			var mouseY = e.offsetY;
			if(rectX<mouseX && mouseX<rectX+50 && rectY<mouseY && mouseY<rectY+50){
				isMouseEnterRect = true;
			}else{
				isMouseEnterRect = false;
			}
		}


		var timer = setInterval(function(){
			if(!isMouseEnterRect){
				rectX += speed*dirX;
				rectY += speed*dirY;
				ctx.clearRect(0,0,canvas.width,canvas.height);
				ctx.fillRect(rectX,rectY,50,50);
				if(rectX+50 >= canvas.width){
					dirX = -1;
				}else if(rectX<=0){
					dirX = 1;
				}
				if(rectY+50 >= canvas.height){
					dirY = -1;
				}else if(rectY<=0){
					dirY = 1;
				}
			}
		},100);
	</script>
</body>
</html>
十三、Canvas离屏技术
什么是离屏技术?
通过在离屏Canvas中绘制元素,再复制到显示Canvas中,从而大幅度提高性能的技术。一种思想。
什么时候使用离屏技术?
在一个动画中会有动态场景和静态场景,每一次绘制动态场景的时候也会重新绘制一次静态场景,这样特别浪费资源。所以一般把静态场景绘制在离屏(离屏:不在屏幕上显示的canvas,也就是display:none),更新动态场景后,把静态场景copy过来,而不是重新绘制。
离屏技术用到的三个方法:
ctx.drawImage(canvas,x,y)把图片绘制在(x,y)处。ctx.drawImage(canvas,x,y,w,h)把图片绘制在(x,y)处,并缩放为宽w,高hctx,drawImage(canvas,sx,sy,sw,sh,dx,dy,dw,dh)把图片中(sx,sy)处的宽sw,高sh的区域,绘制到(dx,dy)处,并缩放为宽dw,高dh。
对,你没看错,就是绘制图片的三个方法。但是里面绘制的就不是图片而是canvas
案例1:
<!DOCTYPE html>
<html lang="en">
<head>
	<meta charset="UTF-8">
	<title>canvas动画--方块四处碰撞</title>
	<style>
		*{
			margin: 0;
			padding: 0;
		}
		canvas{
			border: 1px solid red;
			position: relative;
			margin: 50px;
		}
		#bgCanvas{
			display: none;
		}
	</style>
</head>
<body>
	<canvas id="canvas" width="1000" height="800">
		您的浏览器不支持canvas
	</canvas>
	<!-- 离屏 -->
	<canvas id="bgCanvas" width="1000" height="800">
		您的浏览器不支持canvas
	</canvas>

	<script type="text/javascript">
		var canvas = document.getElementById('canvas');
		var bgCanvas = document.getElementById('bgCanvas');
		var ctx = canvas.getContext('2d');
		var bgctx = bgCanvas.getContext('2d');

		//将背景花在离屏上
		var drawBg = function(){
			for(var i=0;i<canvas.width;i+=10){
				for(var j=0;j<canvas.height;j+=10){
					bgctx.beginPath();
					bgctx.arc(i,j,5,0,Math.PI*2,true);
					bgctx.stroke();
				}
			}
		}
		drawBg();

		var rectX = 0,
			rectY = 0,
			dirX = 1,
			dirY = 1,
			speed = 10;
			isMouseEnterRect = false;

		canvas.onmousemove = function(e){
			var mouseX = e.offsetX;
			var mouseY = e.offsetY;
			if(rectX<mouseX && mouseX<rectX+50 && rectY<mouseY && mouseY<rectY+50){
				isMouseEnterRect = true;
			}else{
				isMouseEnterRect = false;
			}
		}


		var timer = setInterval(function(){
			if(!isMouseEnterRect){
				rectX += speed*dirX;
				rectY += speed*dirY;
				ctx.clearRect(0,0,canvas.width,canvas.height);

				//将离屏作为背景图
				ctx.drawImage(bgCanvas,0,0,bgCanvas.width,bgCanvas.height,0,0,canvas.width,canvas.height);


				ctx.fillRect(rectX,rectY,50,50);
				if(rectX+50 >= canvas.width){
					dirX = -1;
				}else if(rectX<=0){
					dirX = 1;
				}
				if(rectY+50 >= canvas.height){
					dirY = -1;
				}else if(rectY<=0){
					dirY = 1;
				}
			}
		},100);
	</script>
</body>
</html>