一、spring boot全局异常处理
通知机制 @ControllerAdvice
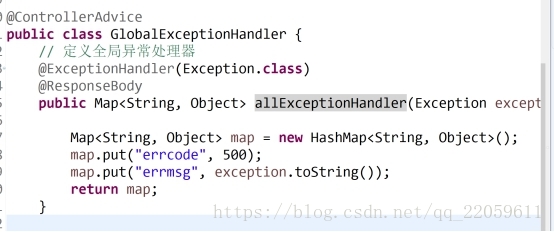
输入url测试,这样就可以处理各种报错信息了:

二、Springboot整合jsp
spring boot当然不推荐jsp,现在jsp的模式已经渐渐式微啦,现在了解一下这个东西的机制还是可以的,毕竟几年前的项目基本上都用的jsp,但是呢,由于jsp对html的支持不是非常完美,尤其现在的前端技术如此强大,要更好的支撑html需要有其他框架,比如thymeleaf。
1,加入依赖
言归正传,要支持jsp首先要加依赖:
导入依赖:
<!-- 整合jsp 依赖的包 必须是war工程 -->
<dependency>
<groupId>org.springframework.boot</groupId>
<artifactId>spring-boot-starter-tomcat</artifactId>
</dependency>
<dependency>
<groupId>org.apache.tomcat.embed</groupId>
<artifactId>tomcat-embed-jasper</artifactId>
</dependency>
<build>
<plugins>
<plugin>
<groupId>org.apache.maven.plugins</groupId>
<artifactId>maven-war-plugin</artifactId>
<version>2.3</version>
<!-- web.xml报错解决 -->
<configuration>
<failOnMissingWebXml>false</failOnMissingWebXml>
</configuration>
</plugin>
</plugins>
</build>
当然packaging是:
<packaging>war</packaging>
2,编写测试类
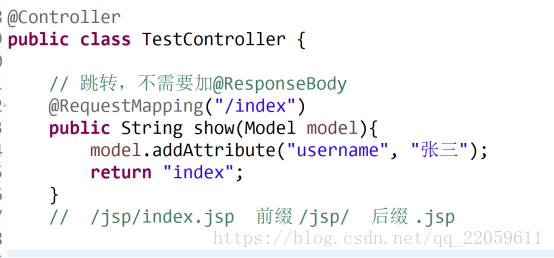
model就是传递给前台页面的数据咯。
有个spring mvc概念的应该知道,对于前缀和后缀我们是自有处理办法的!
3,,jsp文件的位置及内容

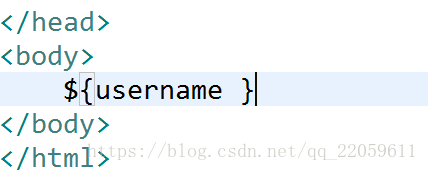
index.jsp文件很简单,就是取出username。
咦,这么路径和index的不同,别急,我们需要加上前缀和后缀啦
4,加入前缀后后缀
在application.properties中加入这两行就行啦!
spring.mvc.view.prefix=/jsp/
spring.mvc.view.suffix=.jsp
是不是很神奇!其实就是这些配置,要是没书,没资料,真的麻烦,要是让我一个个得看api,看guide,那得多累,感谢有分享精神的各个大神。嘿嘿,说起来要是有人能像我一样写的那么细,那也是可以少走很多弯路的!
访问一下:

噢啦
三、Springboot整合mybatis(xml配置方式)
1,导入依赖
<dependencies>
<dependency>
<groupId>org.mybatis.spring.boot</groupId>
<artifactId>mybatis-spring-boot-starter</artifactId>
<version>1.3.2</version>
</dependency>
<dependency>
<groupId>org.springframework.boot</groupId>
<artifactId>spring-boot-starter-web</artifactId>
</dependency>
<dependency>
<groupId>mysql</groupId>
<artifactId>mysql-connector-java</artifactId>
<scope>runtime</scope>
</dependency>
<!-- 阿里巴巴的druid数据库连接池 -->
<dependency>
<groupId>com.alibaba</groupId>
<artifactId>druid-spring-boot-starter</artifactId>
<version>1.1.10</version>
</dependency>
</dependencies>
// 阿里巴巴的druid数据库连接池 在本项目是用来处理数据源的
2,配置文件
这个配置文件换了一种方式,用的是application.yml,yml格式的配置文件,spring boot也支持;在application.yml填入以下内容:
spring:
datasource:
type: com.alibaba.druid.pool.DruidDataSource
driverClassName: com.mysql.jdbc.Driver
driver-class-name: com.mysql.jdbc.Driver
platform: mysql
url: jdbc:mysql://127.0.0.1:3306/test?characterEncoding=utf-8&useSSL=false
username: root
password: 123456
initialSize: 5
minIdle: 5
maxActive: 20
maxWait: 60000
timeBetweenEvictionRunsMillis: 60000
minEvictableIdleTimeMillis: 300000
validationQuery: SELECT1FROMDUAL
testWhileIdle: true
testOnBorrow: false
testOnReturn: false
filters: stat,wall,log4j
logSlowSql: true
mybatis:
mapper-locations: classpath:mapper/ItemsMapper.xml
type-aliases-package: com.model
config-location: classpath:mybatis-config.xml
3,导入逆向工程生成的mapper.xml和pojo类和mapper接口,并编写相应controller和service代码
当然也可以手写咯,mybatis逆向工程可以参考我的博客《mybatis延迟加载、缓存及逆向工程》有专门讲mybatis的逆向工程。

以user为例,各文件原代码如下:
User类:
public class User implements java.io.Serializable {
private static final long serialVersionUID = 1L;
private int id;
private String username;
private String userpwd;
private String birthday;
private String sex;
private String address;
public int getId() {
return id;
}
public void setId(int id) {
this.id = id;
}
public String getUsername() {
return username;
}
public void setUsername(String username) {
this.username = username;
}
public String getUserpwd() {
return userpwd;
}
public void setUserpwd(String userpwd) {
this.userpwd = userpwd;
}
public String getBirthday() {
return birthday;
}
public void setBirthday(String birthday) {
this.birthday = birthday;
}
public String getSex() {
return sex;
}
public void setSex(String sex) {
this.sex = sex;
}
public String getAddress() {
return address;
}
public void setAddress(String address) {
this.address = address;
}
}
UserMapper类:
@Mapper
public interface UserMapper {
public List<User> listUser();
public User findById(int id);
public int deleteById(int id);
public int insertUser(User user);
public int updateUser(User user);
public List<User> findByName(String username);
public int delete(String name);
}
UserMapper.xml:
<?xml version="1.0" encoding="UTF-8" ?>
<!DOCTYPE mapper
PUBLIC "-//mybatis.org//DTD Mapper 3.0//EN"
"http://mybatis.org/dtd/mybatis-3-mapper.dtd">
<!-- namespace : 命名空间 -->
<mapper namespace="com.mapper.UserMapper">
<!-- 开启本mapper namespace下的二级缓存 -->
<!-- <cache /> -->
<!-- 定义resultMap
把SELECT id u_id,username u_name FROM USER和User的属性做一个映射
type:是最终映射成的java对象类型,可以使用别名
id:resultMap的唯一标识
-->
<resultMap type="User" id="userResultMap">
<!-- id:表示查询结果中的唯一标识
column:查询出的列名
property:pojo类中的属性名
-->
<id column="u_id" property="id" />
<!--
result:对普通字段的映射定义
-->
<result column="u_name" property="username" />
</resultMap>
<!-- resultType: 返回值类型 -->
<!-- <select id="listUser" resultType="com.mybatis.model.User">
select * from user
</select> -->
<select id="listUser" resultMap="userResultMap">
SELECT id u_id,username u_name FROM USER
</select>
<!-- parameterType:参数类型 -->
<!-- #{id}: 相当于是 ?占位符 -->
<!-- 查询 -->
<select id="findById" parameterType="java.lang.Integer" resultType="User"
useCache="true">
select * from user where id = #{value}
</select>
<!-- 删除 -->
<delete id="deleteById" parameterType="int">
delete from user where id = #{id}
</delete>
<!-- 删除 -->
<delete id="delete" parameterType="int">
delete from user where username like '%${value}%';
</delete>
<!-- 新增 -->
<!--
flushCache: 默认是true 立即刷新,false:不会刷新,会读取旧数据,脏读
-->
<insert id="insertUser" parameterType="User" flushCache="true">
<!--
返回插入数据的主键,返回到user对象中
LAST_INSERT_ID() 获取自增主键
keyProperty:将查询到的主键值设置到parameterType指定对象的对应属性中
order: 执行顺序 相对于insert语句来说的执行顺序 after:在...之后 before:...之前
resultType: 指定 select LAST_INSERT_ID()的返回值类型
-->
<selectKey keyProperty="id" order="AFTER" resultType="java.lang.Integer">
select LAST_INSERT_ID()
</selectKey>
insert into user(username,userpwd) values (#{username},#{userpwd});
</insert>
<!-- 更新 -->
<update id="updateUser" parameterType="User">
update User set username = #{username} where id = #{id}
</update>
<!--
${} 中只能用value
${} 拼接sql 容易引起sql注入
-->
<select id="findByName" parameterType="java.lang.String" resultType="User">
<!-- select * from user where username like '%${value}%'; -->
select * from user where username like CONCAT('%',#{username},'%');
</select>
</mapper>
测试,可以了!:

四、注解方式整合mybatis
在mapper接口添加相应方法和注解代码,别的都是一样的

相关mapper:
package com.unicom.mapper;
import com.unicom.model.Items;
import com.unicom.model.ItemsExample;
import java.util.List;
import org.apache.ibatis.annotations.Param;
import org.apache.ibatis.annotations.Select;
public interface ItemsMapper {
int countByExample(ItemsExample example);
int deleteByExample(ItemsExample example);
int deleteByPrimaryKey(Integer id);
int insert(Items record);
int insertSelective(Items record);
List<Items> selectByExampleWithBLOBs(ItemsExample example);
List<Items> selectByExample(ItemsExample example);
Items selectByPrimaryKey(Integer id);
int updateByExampleSelective(@Param("record") Items record, @Param("example") ItemsExample example);
int updateByExampleWithBLOBs(@Param("record") Items record, @Param("example") ItemsExample example);
int updateByExample(@Param("record") Items record, @Param("example") ItemsExample example);
int updateByPrimaryKeySelective(Items record);
int updateByPrimaryKeyWithBLOBs(Items record);
int updateByPrimaryKey(Items record);
@Select("select * from items where id = #{id}")
Items get(@Param("id") int id);
}
编写相应实现方法(controller service serviceImpl)
测试结果:
