接下来直接做一个综合一些的示例,用上服务注册和发现、配置服务器、断路器、消息。
1 创建子项目
之前创建的子项目不需要了,按上几篇说的方法重新创建下列子项目:
- config-dashboard(配置服务器)
- breaker-dashboard(断路器监控)
- microservice1 (微服务1,主要演示服务提供者)
- microservice2 (微服务2,主要演示服务消费者)
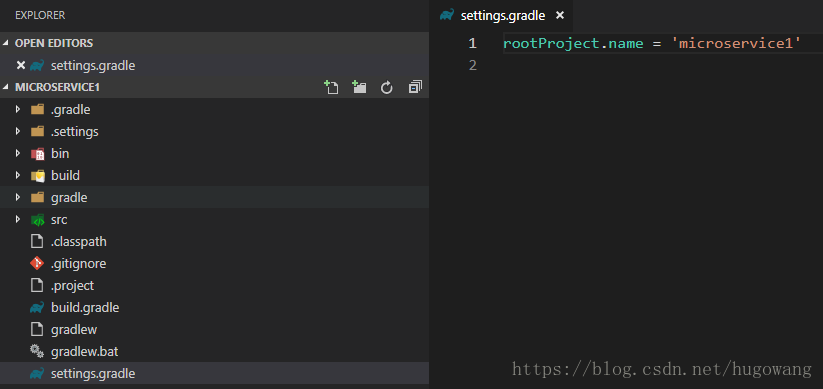
各个子项目的settings.gradle中name该成上面的名字,分别打开文件夹,自动生成项目相关文件。

之后打开主项目文件夹,在settings.gradle中包含子项目
include 'config-dashboard'
include 'breaker-dashboard'
include 'microservice1'
include 'microservice2'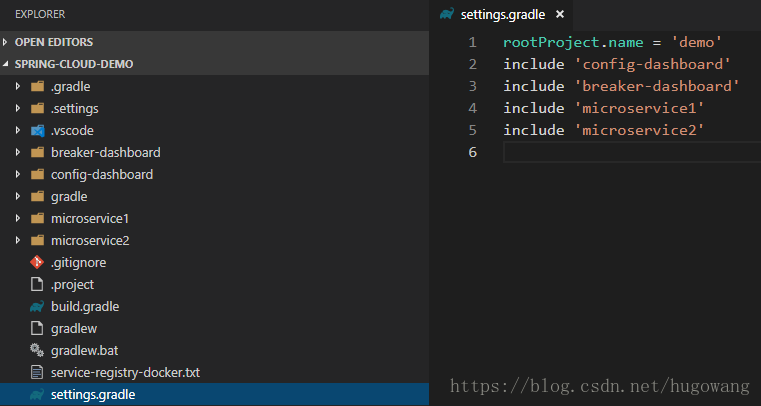
2 增加依赖
2.1 主项目
把通用依赖加到主项目的build.gradle
subprojects { //只应用在子项目(不包括主项目)中
    buildscript {
        ext {
            springBootVersion = '2.0.4.RELEASE'
            springCloudVersion = 'Finchley.RELEASE'
        }
        repositories {
            mavenCentral()
        }
        dependencies {
            classpath("org.springframework.boot:spring-boot-gradle-plugin:${springBootVersion}")
        }
    }

    apply plugin: 'java'
    apply plugin: 'eclipse'
//  apply plugin: 'org.springframework.boot'
//  apply plugin: 'io.spring.dependency-management'

    group = 'com.example'
    version = '0.0.1-SNAPSHOT'
    sourceCompatibility = 10 //自动生成的是1.8,我装的是jdk10,所以会有警告

    repositories {
        mavenCentral()
    }

    dependencies {
        compile('org.springframework.boot:spring-boot-starter')
        runtime('org.springframework.boot:spring-boot-devtools')
        compile('org.springframework.boot:spring-boot-starter-web') //支持Web,包括了Spring MVC和嵌入式Tomcat
        compile('org.springframework.boot:spring-boot-starter-actuator') //使微服务支持监控和管理
        testCompile('org.springframework.boot:spring-boot-starter-test')
    }
}
2.2 配置服务器
apply plugin: 'org.springframework.boot'
apply plugin: 'io.spring.dependency-management'

dependencyManagement {
    imports {
        mavenBom "org.springframework.cloud:spring-cloud-dependencies:${springCloudVersion}"
    }
}

dependencies {
    compile('org.springframework.cloud:spring-cloud-starter-consul-discovery') //consul发现服务
    compile('org.springframework.cloud:spring-cloud-config-server') //配置服务器依赖
}
2.3 断路器监控
apply plugin: 'org.springframework.boot'
apply plugin: 'io.spring.dependency-management'

dependencyManagement {
    imports {
        mavenBom "org.springframework.cloud:spring-cloud-dependencies:${springCloudVersion}"
    }
}

dependencies {
    compile('org.springframework.cloud:spring-cloud-starter-netflix-hystrix') //支持断路器
    compile('org.springframework.cloud:spring-cloud-starter-netflix-hystrix-dashboard') //支持断路器监控
    compile('org.springframework.cloud:spring-cloud-netflix-turbine') //支持断路器聚合监控(Hystrix Turbine),不加starter就是不包含Eureka
    compile('org.springframework.cloud:spring-cloud-starter-consul-discovery') //consul发现服务
}
2.4 微服务1
apply plugin: 'org.springframework.boot'
apply plugin: 'io.spring.dependency-management'

dependencyManagement {
    imports {
        mavenBom "org.springframework.cloud:spring-cloud-dependencies:${springCloudVersion}"
    }
}

dependencies {
    compile('org.springframework.cloud:spring-cloud-starter')
    compile('org.springframework.cloud:spring-cloud-starter-netflix-hystrix') //支持断路器
    compile('org.springframework.cloud:spring-cloud-starter-netflix-hystrix-dashboard') //支持断路器监控
    compile('org.springframework.cloud:spring-cloud-starter-consul-discovery') //支持consul发现服务
    compile('org.springframework.cloud:spring-cloud-starter-config') //支持配置服务
    compile('org.springframework.cloud:spring-cloud-starter-bus-amqp') //支持Spring Cloud Bus
}
2.5 微服务2
apply plugin: 'org.springframework.boot'
apply plugin: 'io.spring.dependency-management'

dependencyManagement {
    imports {
        mavenBom "org.springframework.cloud:spring-cloud-dependencies:${springCloudVersion}"
    }
}

dependencies {
    compile('org.springframework.cloud:spring-cloud-starter')
    compile('org.springframework.cloud:spring-cloud-starter-consul-discovery') //支持consul发现服务
    compile('org.springframework.cloud:spring-cloud-starter-config') //支持配置服务
    compile('org.springframework.cloud:spring-cloud-starter-openfeign') //支持feign消费服务
}
3 完善配置服务器
3.1 application.yml
server:
    port: 8888 #配置服务器端口
spring:
    cloud:
        consul:
            host: localhost #服务注册地址
            port: 8501 #服务注册端口
            discovery:
                instance-id: config-server1 #服务实例id,同名服务做集群时id要不同
                serviceName: config-server #服务名(serviceId),服务消费者根据这个名称找到服务
                hostname: 192.168.3.115 #服务所在的IP,这里用局域网地址,则同网的其他机也能找到服务
        config:
            server:
                native:
                    searchLocations: D:/Develop/Spring/spring-cloud-demo/config-dashboard/config-file #配置文件的目录
    profiles:
        active: native #配置文件在本地
    application:
        name: config-dashboard #app名称
management:
    endpoints:
        web:
            exposure:
                include: "*" #开放Actuator监控的所以服务
3.2 config-file/microservice1-dev.yml
微服务1连上配置服务器后会根据“name-profile”找配置文件,所以文件名用这个。
server:
    port: 8081 #微服务1端口
spring:
    cloud:
        consul:
            host: localhost
            port: 8501
            discovery:
                instance-id: microservice1-1
                serviceName: microservice1
                hostname: 192.168.3.115
        bus:
            enabled: true #开启总线
            trace:
                enabled: true #开启自动刷新配置
    rabbitmq: #rabbitmq地址账号
        host: localhost
        port: 5672
        username: guest
        password: guest
management:
    endpoints:
        web:
            exposure:
                include: "*"
serviceName: service1 #配置示例
3.3 config-file/microservice2-dev.yml
server:
    port: 8082
spring:
    cloud:
        consul:
            host: localhost
            port: 8501
            discovery:
                register: false #这个微服务目前只演示服务消费者功能,所以不注册
        bus:
            enabled: true
            trace:
                enabled: true
    rabbitmq:
        host: localhost
        port: 5672
        username: guest
        password: guest
management:
    endpoints:
        web:
            exposure:
                include: "*"
serviceName: service2 #配置示例
3.4DemoApplication.java
package com.example.demo;

import org.springframework.boot.SpringApplication;
import org.springframework.boot.autoconfigure.SpringBootApplication;
import org.springframework.cloud.config.server.EnableConfigServer;

@SpringBootApplication
@EnableConfigServer //开启配置服务器
public class DemoApplication {

    public static void main(String[] args) {
        SpringApplication.run(DemoApplication.class, args);
    }
}
配置服务器就开发好了。
4 完善断路器监控
4.1 application.yml
server:
    port: 8090 #断路器监控端口
spring:
    application:
        name: service-turbine
    cloud:
        consul:
            host: localhost
            port: 8501
            discovery:
                register: false #只作为消费者,不注册服务
turbine:
    appConfig: microservice1 #监控微服务1
    clusterNameExpression: "'default'"
management:
    endpoints:
        web:
            exposure:
                include: "*"
4.2 DemoApplication.java
package com.example.demo;

import org.springframework.boot.SpringApplication;
import org.springframework.boot.autoconfigure.SpringBootApplication;
import org.springframework.cloud.client.circuitbreaker.EnableCircuitBreaker;
import org.springframework.cloud.netflix.hystrix.EnableHystrix;
import org.springframework.cloud.netflix.hystrix.dashboard.EnableHystrixDashboard;
import org.springframework.cloud.netflix.turbine.EnableTurbine;

@SpringBootApplication
@EnableHystrix //开启断路器
@EnableHystrixDashboard //开启断路器仪表盘
@EnableCircuitBreaker //开启断路器
@EnableTurbine //开启断路器聚合监控
public class DemoApplication {

    public static void main(String[] args) {
        SpringApplication.run(DemoApplication.class, args);
    }
}
断路器监控就开发好了。
5 完善微服务1
5.1 bootstrap.yml
把原来的application.yml改名为bootstrap.yml
spring:
    cloud:
        config:
            uri: http://localhost:8888 #配置服务器地址
            profile: dev #可以看做事配置文件的类别,如dev,test,release
            label: master #可以看做是版本分支,默认是master
    application:
        name: microservice1 #app名称
5.2 DemoApplication.java
package com.example.demo;

import org.springframework.boot.SpringApplication;
import org.springframework.boot.autoconfigure.SpringBootApplication;
import org.springframework.cloud.client.circuitbreaker.EnableCircuitBreaker;
import org.springframework.cloud.client.discovery.EnableDiscoveryClient;
import org.springframework.cloud.netflix.hystrix.EnableHystrix;
import org.springframework.cloud.netflix.hystrix.dashboard.EnableHystrixDashboard;

@SpringBootApplication
@EnableDiscoveryClient //开启注册服务
@EnableHystrix //开启断路器
@EnableCircuitBreaker //开启断路器
@EnableHystrixDashboard //开启断路器监控
public class DemoApplication {

    public static void main(String[] args) {
        SpringApplication.run(DemoApplication.class, args);
    }
}
5.3 HelloController.java
package com.example.demo;

import com.netflix.hystrix.contrib.javanica.annotation.HystrixCommand;
import org.springframework.beans.factory.annotation.Value;
import org.springframework.cloud.context.config.annotation.RefreshScope;
import org.springframework.web.bind.annotation.RequestMapping;
import org.springframework.web.bind.annotation.RequestParam;
import org.springframework.web.bind.annotation.RestController;

@RefreshScope //开启配置更新
@RestController
public class HelloController {

    @Value("${serviceName}") //读配置文件的这个属性
    private String serviceName;

    @RequestMapping("/hello")
    @HystrixCommand(fallbackMethod = "helloError") //指定断路器方法,断路器监控用
    public String hello(@RequestParam(value = "name", defaultValue = "Hugo") String name) {
        return "hello " + name + ", my name is " + serviceName;
    }

    public String helloError(String name) {
        return "hystrix,"+name+"!";
    }
}
6 完善微服务2
6.1 bootstrap.yml
把原来的application.yml改名为bootstrap.yml
spring:
    cloud:
        config:
            uri: http://localhost:8888
            profile: dev
            label: master
    application:
        name: microservice2
6.2 DemoApplication.java
package com.example.demo;

import org.springframework.boot.SpringApplication;
import org.springframework.boot.autoconfigure.SpringBootApplication;
import org.springframework.cloud.client.discovery.EnableDiscoveryClient;
import org.springframework.cloud.openfeign.EnableFeignClients;

@SpringBootApplication
@EnableDiscoveryClient //开启注册服务
@EnableFeignClients //开启feign消费服务
public class DemoApplication {

    public static void main(String[] args) {
        SpringApplication.run(DemoApplication.class, args);
    }
}
6.3 HelloController.java
package com.example.demo;

import org.springframework.beans.factory.annotation.Autowired;
import org.springframework.web.bind.annotation.GetMapping;
import org.springframework.web.bind.annotation.RequestParam;
import org.springframework.web.bind.annotation.RestController;

@RestController
public class HelloController {

    //因为这个Bean是在程序启动的时候注入的,编译器感知不到,报错不用管。
    @Autowired
    HelloService helloService;

    @GetMapping(value = "/hello")
    public String hello(@RequestParam String name) {
        return helloService.hello( name );
    }
}
6.4 HelloService.java
package com.example.demo;

import org.springframework.cloud.openfeign.FeignClient;
import org.springframework.web.bind.annotation.RequestMapping;
import org.springframework.web.bind.annotation.RequestMethod;
import org.springframework.web.bind.annotation.RequestParam;

@FeignClient(value = "microservice1", fallback = HelloServiceHystric.class) //访问微服务1,指定断路器类
public interface HelloService {
    @RequestMapping(value = "/hello",method = RequestMethod.GET)
    String hello(@RequestParam(value = "name") String name);
}
6.5 HelloServiceHystric.java
package com.example.demo;

import org.springframework.stereotype.Component;

@Component
public class HelloServiceHystric implements HelloService { //实现feign client的断路器
    @Override
    public String hello(String name) {
        return "hystric "+name;
    }
}
7 运行
7.1 启动consul服务
docker run -d -h node1 --name node1 -p 8501:8500 consul agent -server -bootstrap -client 0.0.0.0 -ui7.2 启动RabbitMQ
docker run -d -h rabbitmq --name rabbitmq -p 5672:5672 -p 15672:15672 rabbitmq:3-management5672是RabbitMQ的通信端口,15672是管理页面端口
7.3 启动配置服务器
        {
            "type": "java",
            "name": "Debug (Launch)-DemoApplication<config-dashboard>",
            "request": "launch",
            "cwd": "${workspaceFolder}",
            "console": "internalConsole",
            "stopOnEntry": false,
            "mainClass": "com.example.demo.DemoApplication",
            "args": "",
            "projectName": "config-dashboard"
        },
7.4 启动断路器监控
        {
            "type": "java",
            "name": "Debug (Launch)-DemoApplication<breaker-dashboard>",
            "request": "launch",
            "cwd": "${workspaceFolder}",
            "console": "internalConsole",
            "stopOnEntry": false,
            "mainClass": "com.example.demo.DemoApplication",
            "args": "",
            "projectName": "breaker-dashboard"
        },
7.5 启动微服务1
        {
            "type": "java",
            "name": "Debug (Launch)-DemoApplication<microservice1>",
            "request": "launch",
            "cwd": "${workspaceFolder}",
            "console": "internalConsole",
            "stopOnEntry": false,
            "mainClass": "com.example.demo.DemoApplication",
            "args": "",
            "projectName": "microservice1"
        },
7.6 启动微服务2
        {
            "type": "java",
            "name": "Debug (Launch)-DemoApplication<microservice2>",
            "request": "launch",
            "cwd": "${workspaceFolder}",
            "console": "internalConsole",
            "stopOnEntry": false,
            "mainClass": "com.example.demo.DemoApplication",
            "args": "",
            "projectName": "microservice2"
        }
8 检验运行结果
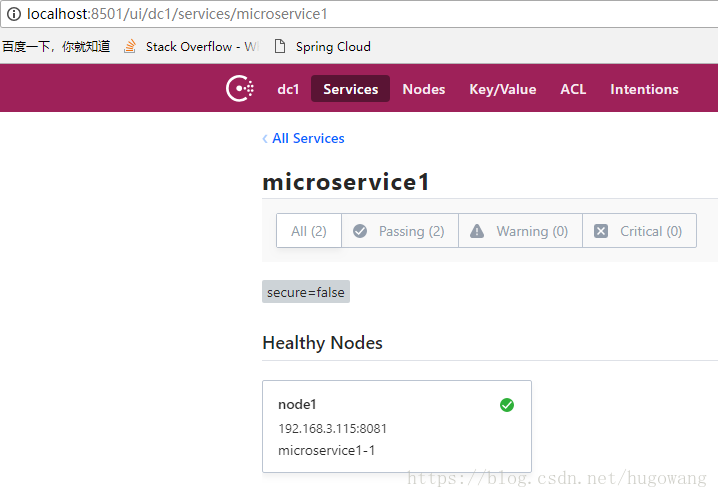
8.1 Consul服务
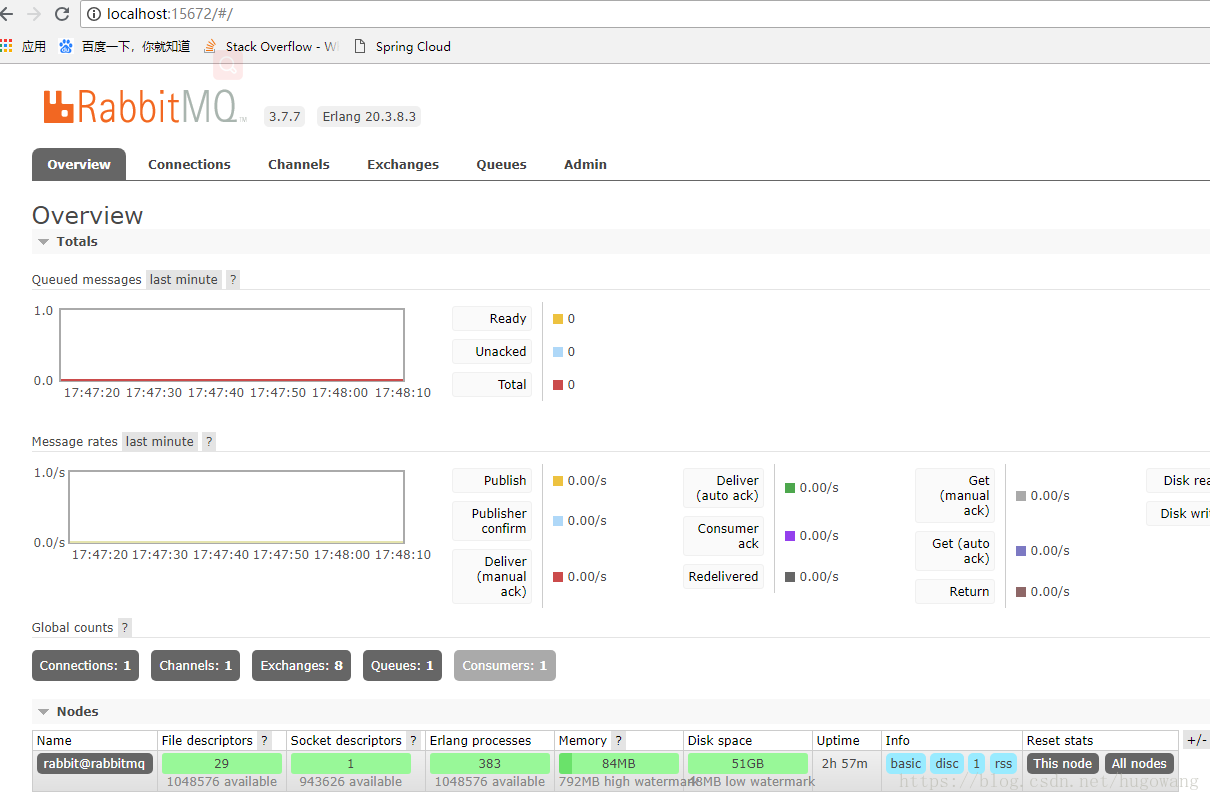
8.2 RabbitMQ
8.3 配置服务器
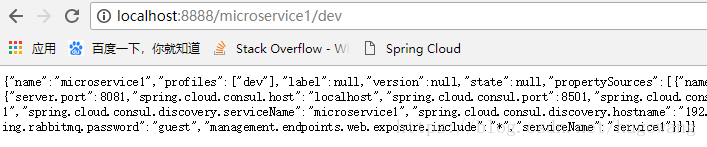
访问:http://localhost:8888/microservice1/dev
8.4 微服务1
访问:http://localhost:8081/hello
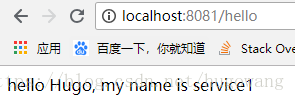
出来service1,说明读到了配置。
8.5微服务2
访问:http://localhost:8082/hello?name=aa,name随意
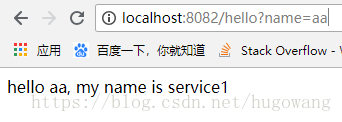
出来的是请求微服务1返回的内容。
8.6 断路器监控
访问:http://localhost:8081/hystrix

在Hystrix Dashboard下面输入http://localhost:8090/turbine.stream,点击MonitorStream(直接访问http://localhost:8081/hystrix/monitor?stream=http%3A%2F%2Flocalhost%3A8090%2Fturbine.stream也可以)
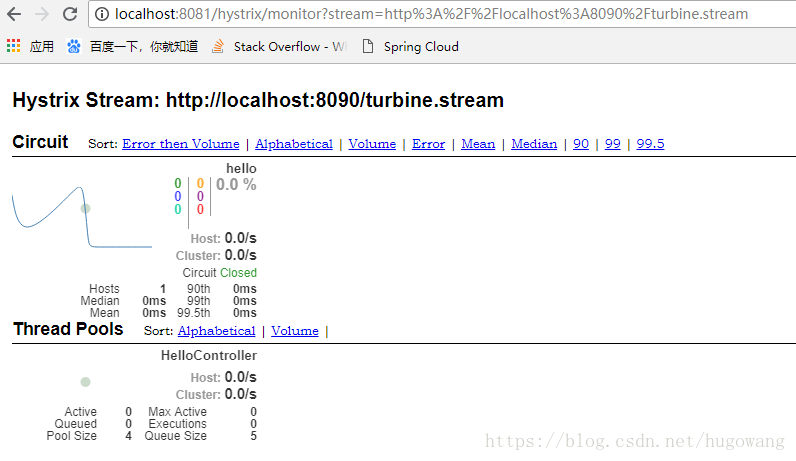
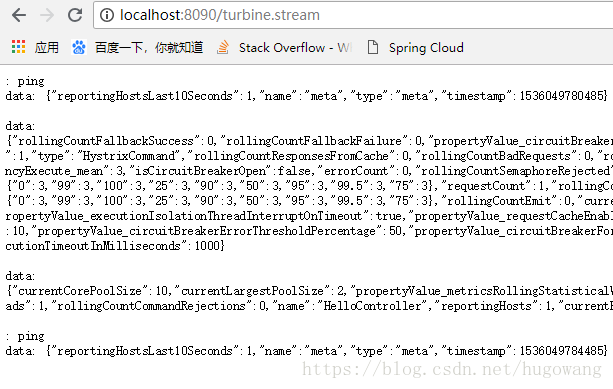
这里已经把监控聚合。
访问:http://localhost:8090/turbine.stream
8.7 修改配置
把配置服务器下config-file/microserver1-dev.yml的serviceName: service1改为service11
打开postman,输入http://localhost:8081/actuator/bus-refresh(因为这个链接不支持get,所以要用post工具,详细使用方法见Postman 使用方法详解),发送。
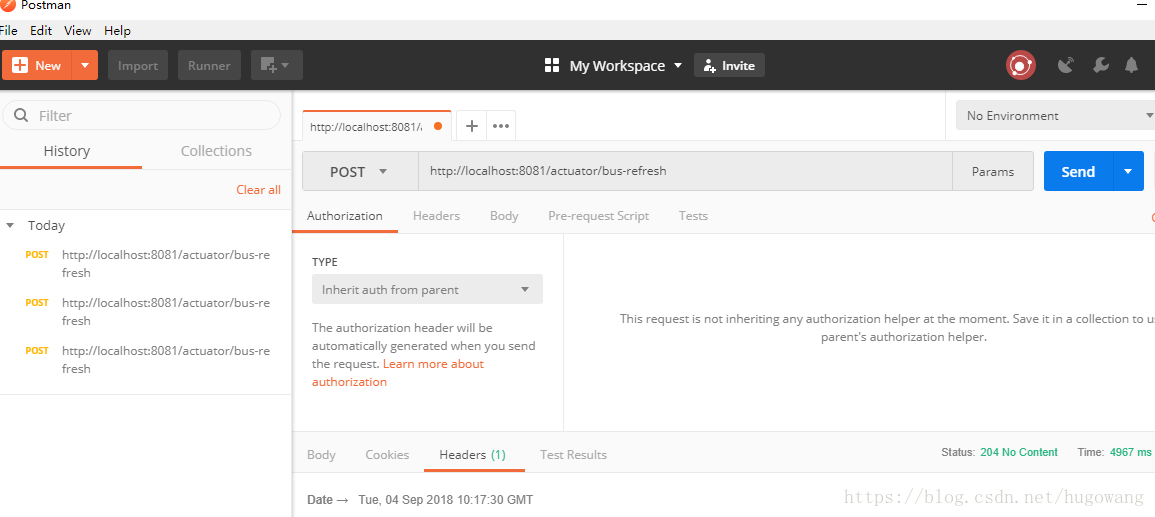
再访问http://localhost:8081/hello
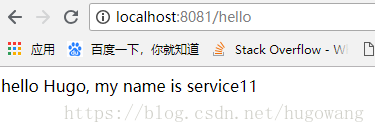
配置以更新。
主要参考文章:史上最简单的 SpringCloud 教程 | 终章