(1)安卓手机与蓝牙模块联合调试(一)—— 蓝牙模块的串口通讯
(2)安卓手机与蓝牙模块联合调试(二)—— 单片机蓝牙控制LED灯亮灭(上)
(3)安卓手机与蓝牙模块联合调试(三)—— 单片机蓝牙控制LED灯亮灭(下)
(4)安卓手机与蓝牙模块联合调试(四)—— 单片机数据上传至蓝牙(STC89C52 + DS18b20)
本教程的项目地址:1989Jiangtao/BluetoothSCM: 安卓手机通过蓝牙与单片机通信-发送指令/接收数据
Github参考: dingjikerbo/BluetoothKit: Android BLE蓝牙通信库
zagum/Android-SwitchIcon: Google launcher-style implementation of switch (enable/disable) icon
huangyanbin/CalendarView: 日历 仪表盘 圆盘,提供全新RecyclerView日历,功能更加强大。
Android BLE4.0 常用的一些Service和Characteristic的UUID - CSDN博客
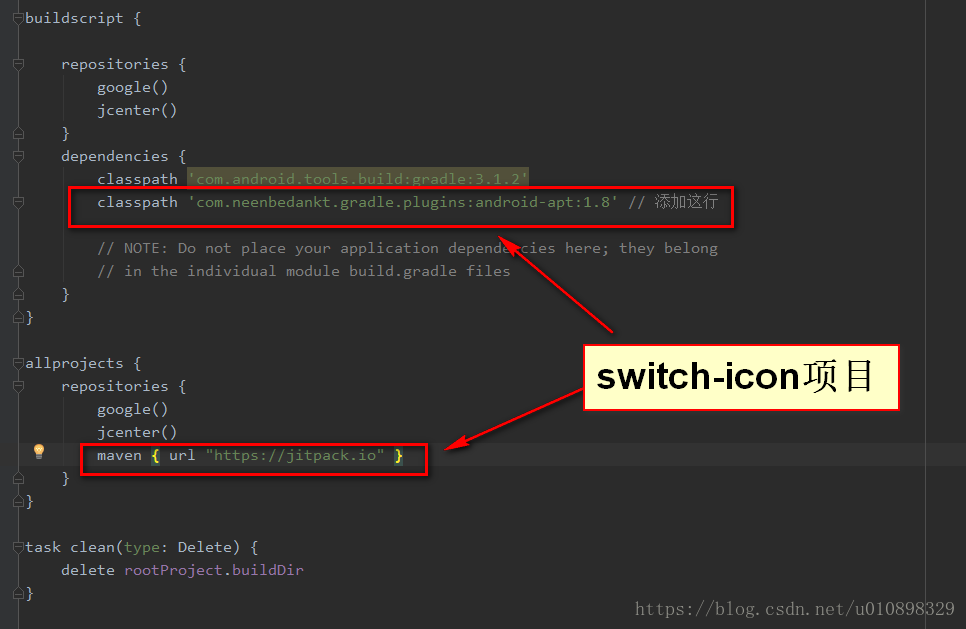
1.AS添加依赖的注意事项。
由于许多前辈的开源精神和无私奉献,才使得现如今你的IT事业日新月异,也让我们后来人免去了很多重复造轮子的繁琐工作,因此在这里感谢无私的开源奉献者。
下面说下依赖项目引入时候的注意事项,其实如果自己去git上看也能够自己搞懂。switch-icon的依赖请务必在项目project/build.gradle中添加如下两行,原因是因为该项目放在了jitpack上,使用maven方式。
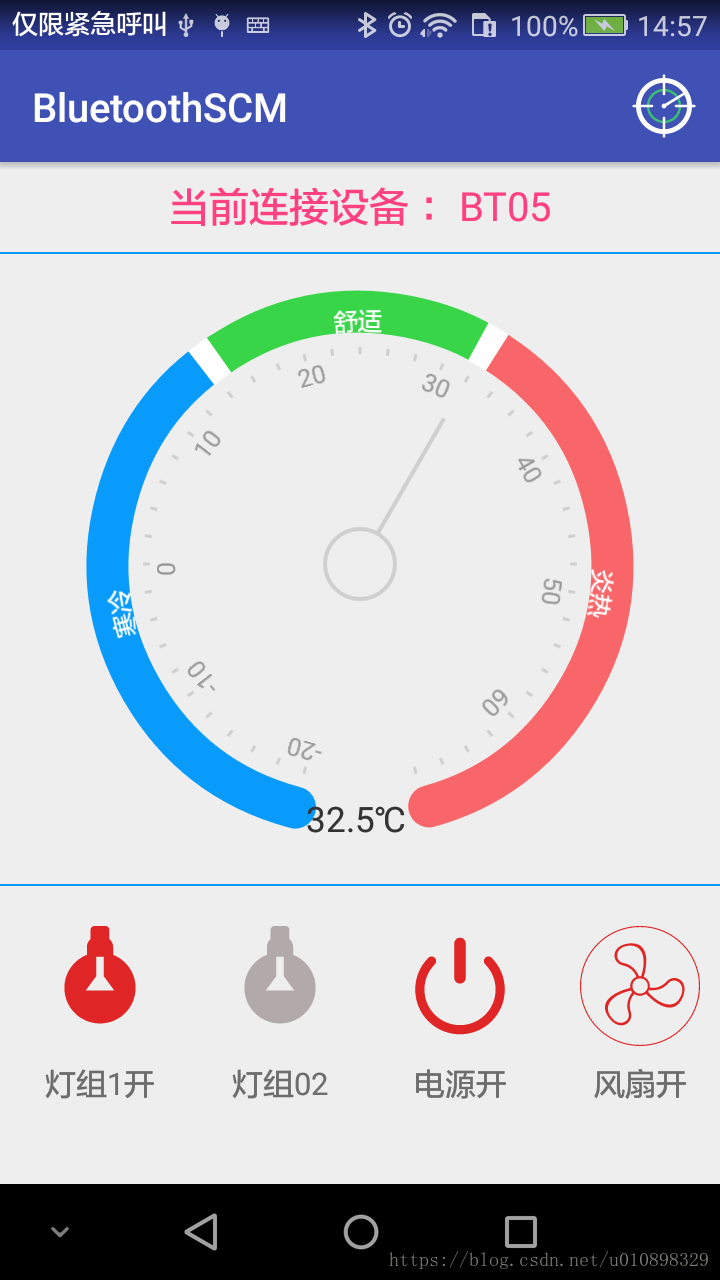
2.看下演示的效果。

3.上代码,本篇就提交部分主要代码,后续会更新到GitHub。
先看下依赖引入,使用了第三方的蓝牙扫描连接和读写库,按钮切换库,自定义的表盘,build.gradle文件如下
apply plugin: 'com.android.application'

android {
    compileSdkVersion 27
    defaultConfig {
        applicationId "com.cjt.bluetoothscm"
        minSdkVersion 15
        targetSdkVersion 27
        versionCode 1
        versionName "1.0"
        testInstrumentationRunner "android.support.test.runner.AndroidJUnitRunner"
        /*由于使用了Vector Asset,所以必须添加支持*/
        vectorDrawables.useSupportLibrary = true
    }
    buildTypes {
        release {
            minifyEnabled false
            proguardFiles getDefaultProguardFile('proguard-android.txt'), 'proguard-rules.pro'
        }
    }
}

dependencies {
    implementation fileTree(dir: 'libs', include: ['*.jar'])
    implementation 'com.android.support:appcompat-v7:27.1.1'
    implementation 'com.android.support.constraint:constraint-layout:1.1.3'
    implementation 'com.android.support:design:27.1.1'
    testImplementation 'junit:junit:4.12'
    androidTestImplementation 'com.android.support.test:runner:1.0.2'
    androidTestImplementation 'com.android.support.test.espresso:espresso-core:3.0.2'
    /*第三方蓝牙操作库*/
    implementation 'com.inuker.bluetooth:library:1.4.0'
    /*第三方SwitchIcon,图标切换库*/
    implementation 'com.github.zagum:Android-SwitchIcon:1.3.7'
}
由于我在项目中大量使用了Vector Asset图标,所以依赖中要添加对VectorDrawable的支持。还有一个表盘的自定义View,我没有引入依赖,直接拷贝了别人的java代码和资源文件到项目中使用的,稍后也会贴出来部分。

布局全部使用的约束布局,感觉比RelativeLayout还好用,如果有不熟悉的同学,建议可以找相关的教程学习下,刚开始可能不习惯,后面用熟练了会感觉很爽,以前我都是手写布局xml文件,现在有了这个东西,反而喜欢直接拖拽,简单快捷。下面的是activity_main.xml布局文件
<?xml version="1.0" encoding="utf-8"?>
<android.support.constraint.ConstraintLayout xmlns:android="http://schemas.android.com/apk/res/android"
    xmlns:app="http://schemas.android.com/apk/res-auto"
    xmlns:tools="http://schemas.android.com/tools"
    android:layout_width="match_parent"
    android:layout_height="match_parent"
    tools:context=".MainActivity">

    <TextView
        android:id="@+id/main_title"
        android:layout_width="0dp"
        android:layout_height="wrap_content"
        android:layout_marginEnd="8dp"
        android:layout_marginLeft="8dp"
        android:layout_marginRight="8dp"
        android:layout_marginStart="8dp"
        android:layout_marginTop="8dp"
        android:gravity="center"
        android:textSize="18sp"
        android:text="@string/scan_hint"
        android:textColor="@color/colorAccent"
        app:layout_constraintEnd_toEndOf="parent"
        app:layout_constraintStart_toStartOf="parent"
        app:layout_constraintTop_toTopOf="parent" />

    <View
        android:id="@+id/top_div"
        android:layout_width="wrap_content"
        android:layout_height="1dp"
        android:layout_marginEnd="5dp"
        android:layout_marginLeft="5dp"
        android:layout_marginRight="5dp"
        android:layout_marginStart="5dp"
        android:layout_marginTop="10dp"
        android:background="@color/arc1"
        app:layout_constraintEnd_toEndOf="parent"
        app:layout_constraintStart_toStartOf="parent"
        app:layout_constraintTop_toBottomOf="@+id/main_title" />

    <com.cjt.bluetoothscm.DashboardView
        android:id="@+id/temp_view"
        android:layout_width="280dp"
        android:layout_height="280dp"
        android:layout_marginTop="15dp"
        app:angleTextSize="16sp"
        app:layout_constraintEnd_toEndOf="parent"
        app:layout_constraintStart_toStartOf="parent"
        app:layout_constraintTop_toBottomOf="@+id/top_div" />

    <View
        android:id="@+id/top_div2"
        android:layout_width="wrap_content"
        android:layout_height="1dp"
        android:layout_marginEnd="5dp"
        android:layout_marginLeft="5dp"
        android:layout_marginRight="5dp"
        android:layout_marginStart="5dp"
        android:layout_marginTop="20dp"
        android:background="@color/arc1"
        app:layout_constraintEnd_toEndOf="parent"
        app:layout_constraintStart_toStartOf="parent"
        app:layout_constraintTop_toBottomOf="@id/temp_view" />

    <com.github.zagum.switchicon.SwitchIconView
        android:id="@+id/sw_lamp_01"
        android:layout_width="60dp"
        android:layout_height="60dp"
        android:layout_marginLeft="20dp"
        android:layout_marginStart="20dp"
        android:layout_marginTop="20dp"
        app:layout_constraintStart_toStartOf="parent"
        app:layout_constraintTop_toBottomOf="@+id/top_div2"
        app:si_animation_duration="200"
        app:si_disabled_alpha=".5"
        app:si_disabled_color="@color/colorOff"
        app:si_enabled="false"
        app:si_no_dash="true"
        app:si_tint_color="@color/colorOn"
        app:srcCompat="@drawable/ic_lamp" />

    <com.github.zagum.switchicon.SwitchIconView
        android:id="@+id/sw_lamp_02"
        android:layout_width="60dp"
        android:layout_height="60dp"
        android:layout_marginLeft="30dp"
        android:layout_marginStart="30dp"
        android:layout_marginTop="20dp"
        app:layout_constraintStart_toEndOf="@+id/sw_lamp_01"
        app:layout_constraintTop_toBottomOf="@+id/top_div2"
        app:si_animation_duration="200"
        app:si_disabled_alpha=".5"
        app:si_disabled_color="@color/colorOff"
        app:si_enabled="false"
        app:si_no_dash="true"
        app:si_tint_color="@color/colorOn"
        app:srcCompat="@drawable/ic_lamp" />

    <com.github.zagum.switchicon.SwitchIconView
        android:id="@+id/sw_power"
        android:layout_width="60dp"
        android:layout_height="60dp"
        android:layout_marginLeft="30dp"
        android:layout_marginStart="30dp"
        android:layout_marginTop="20dp"
        app:layout_constraintStart_toEndOf="@+id/sw_lamp_02"
        app:layout_constraintTop_toBottomOf="@+id/top_div2"
        app:si_animation_duration="200"
        app:si_disabled_alpha=".5"
        app:si_disabled_color="@color/colorOff"
        app:si_enabled="false"
        app:si_no_dash="true"
        app:si_tint_color="@color/colorOn"
        app:srcCompat="@drawable/ic_switch" />

    <com.github.zagum.switchicon.SwitchIconView
        android:id="@+id/sw_fan"
        android:layout_width="60dp"
        android:layout_height="60dp"
        android:layout_marginLeft="30dp"
        android:layout_marginStart="30dp"
        android:layout_marginTop="20dp"
        app:layout_constraintStart_toEndOf="@+id/sw_power"
        app:layout_constraintTop_toBottomOf="@+id/top_div2"
        app:si_animation_duration="200"
        app:si_disabled_alpha=".5"
        app:si_disabled_color="@color/colorOff"
        app:si_enabled="false"
        app:si_no_dash="true"
        app:si_tint_color="@color/colorOn"
        app:srcCompat="@drawable/ic_fan" />

    <TextView
        android:id="@+id/lamp_01_name"
        android:layout_width="60dp"
        android:layout_height="wrap_content"
        android:layout_marginTop="8dp"
        android:gravity="center"
        android:text="@string/lamp_01"
        app:layout_constraintEnd_toEndOf="@+id/sw_lamp_01"
        app:layout_constraintStart_toStartOf="@+id/sw_lamp_01"
        app:layout_constraintTop_toBottomOf="@+id/sw_lamp_01"
        tools:ignore="HardcodedText" />

    <TextView
        android:id="@+id/lamp_02_name"
        android:layout_width="60dp"
        android:layout_height="wrap_content"
        android:layout_marginTop="8dp"
        android:gravity="center"
        android:text="@string/lamp_02"
        app:layout_constraintEnd_toEndOf="@+id/sw_lamp_02"
        app:layout_constraintStart_toStartOf="@+id/sw_lamp_02"
        app:layout_constraintTop_toBottomOf="@+id/sw_lamp_02" />

    <TextView
        android:id="@+id/power_name"
        android:layout_width="60dp"
        android:layout_height="wrap_content"
        android:layout_marginTop="8dp"
        android:gravity="center"
        android:text="@string/power_sw"
        app:layout_constraintEnd_toEndOf="@+id/sw_power"
        app:layout_constraintStart_toStartOf="@+id/sw_power"
        app:layout_constraintTop_toBottomOf="@+id/sw_power" />

    <TextView
        android:id="@+id/fan_name"
        android:layout_width="60dp"
        android:layout_height="wrap_content"
        android:layout_marginTop="8dp"
        android:gravity="center"
        android:text="@string/fan_sw"
        app:layout_constraintEnd_toEndOf="@+id/sw_fan"
        app:layout_constraintStart_toStartOf="@+id/sw_fan"
        app:layout_constraintTop_toBottomOf="@+id/sw_fan" />

</android.support.constraint.ConstraintLayout>
接着贴出来MainActivity.java文件
package com.cjt.bluetoothscm;

import android.app.Activity;
import android.bluetooth.BluetoothDevice;
import android.content.Intent;
import android.os.Bundle;
import android.support.v7.app.AppCompatActivity;
import android.text.TextUtils;
import android.util.Log;
import android.view.Menu;
import android.view.MenuItem;
import android.view.View;
import android.widget.TextView;
import android.widget.Toast;

import com.github.zagum.switchicon.SwitchIconView;
import com.inuker.bluetooth.library.Constants;
import com.inuker.bluetooth.library.connect.options.BleConnectOptions;
import com.inuker.bluetooth.library.connect.response.BleConnectResponse;
import com.inuker.bluetooth.library.connect.response.BleNotifyResponse;
import com.inuker.bluetooth.library.connect.response.BleWriteResponse;
import com.inuker.bluetooth.library.model.BleGattProfile;

import java.util.UUID;

import static com.inuker.bluetooth.library.Constants.REQUEST_SUCCESS;

/*****************
 * 包名:com.cjt.bluetoothscm
 * 类名:MainActivity.java
 * 时间:2018/9/11  23:28
 * 作者:Cao Jiangtao
 * 首页:https://1989jiangtao.github.io/index.html
 ******************/
public class MainActivity extends AppCompatActivity implements View.OnClickListener {

    private static final int REQUEST_CONNECT_DEVICE = 0x100;

    TextView mainTitle ;

    // 温度显示仪表盘
    DashboardView tempView ;
    private final static int invs[] = {35, 18, 35};
    private final static int[] colorRes = {R.color.arc1, R.color.arc2, R.color.arc3};

    // 灯组01 ,灯组02 , 电源开关, 风扇开关
    SwitchIconView lamp01 , lamp02 , powerSw , fanSw ;
    TextView lamp01Name , lamp02Name ,powerName , fanName;

    // 蓝牙通信的地址和两个UUID
    String MAC = "" ;
    UUID serviceUuid , characterUuid ;

    @Override
    protected void onCreate(Bundle savedInstanceState) {
        super.onCreate(savedInstanceState);
        setContentView(R.layout.activity_main);

        initView();

        // 运行的时候检查是否打开蓝牙,没有打开就开启蓝牙
        if(!MyApp.getBluetoothClient().isBluetoothOpened())
            MyApp.getBluetoothClient().openBluetooth();

    }

    private void initView() {

        mainTitle = findViewById(R.id.main_title);
        tempView = findViewById(R.id.temp_view);
        lamp01 = findViewById(R.id.sw_lamp_01);
        lamp02 = findViewById(R.id.sw_lamp_02);
        powerSw = findViewById(R.id.sw_power);
        fanSw = findViewById(R.id.sw_fan);
        lamp01Name = findViewById(R.id.lamp_01_name);
        lamp02Name = findViewById(R.id.lamp_02_name);
        powerName = findViewById(R.id.power_name);
        fanName = findViewById(R.id.fan_name);

        // 为按钮设置点击事件
        lamp01.setOnClickListener(this);
        lamp02.setOnClickListener(this);
        powerSw.setOnClickListener(this);
        fanSw.setOnClickListener(this);

        // 初始化温度表盘
        String[] str = getResources().getStringArray(R.array.mult_temp_dash);
        tempView.initDash(-20, invs, str, "℃", colorRes);

    }

    @Override
    public boolean onCreateOptionsMenu(Menu menu) {
        getMenuInflater().inflate(R.menu.menu_main , menu); // 加载菜单页面
        return super.onCreateOptionsMenu(menu);
    }

    @Override
    public boolean onOptionsItemSelected(MenuItem item) {
        if(item.getItemId() == R.id.action_scan){
            Intent intent = new Intent(MainActivity.this , ScanResultActivity.class);
            startActivityForResult(intent , REQUEST_CONNECT_DEVICE);
            return true;
        }
        return super.onOptionsItemSelected(item);
    }

    @Override
    protected void onDestroy() {
        // 关闭蓝牙
        MyApp.getBluetoothClient().closeBluetooth();
        super.onDestroy();
    }

    @Override
    public void onClick(View v) {

        // 当蓝牙有连接,并且MAC地址存在,两个UUID都不为空的情况下,点击按钮才有效
        // 以下只要有一个条件不满足,就不让点击按钮发送数据
        if(!MyApp.getBluetoothClient().isBleSupported()
                || TextUtils.isEmpty(MAC)
                || TextUtils.isEmpty(serviceUuid.toString())
                || TextUtils.isEmpty(characterUuid.toString())){
            Toast.makeText(MainActivity.this , "请先检查蓝牙设备与手机是否连接正常",Toast.LENGTH_SHORT).show();
            return;
        }

        switch (v.getId()){
            case R.id.sw_lamp_01: // 灯组01
                lamp01.switchState();
                lamp01Name.setText(lamp01.isIconEnabled() ? "灯组1开" : "灯组1关");
                writeCmd(MAC , serviceUuid , characterUuid , "001-on\r\n");
                break;
            case R.id.sw_lamp_02: // 灯组02
                lamp02.switchState();
                lamp02Name.setText(lamp02.isIconEnabled() ? "灯组1开" : "灯组1关");
                break;
            case R.id.sw_power: // 电源
                powerSw.switchState();
                powerName.setText(powerSw.isIconEnabled() ? "电源开" : "电源关");
                writeCmd(MAC , serviceUuid , characterUuid , "power-on\r\n");
                break;
            case R.id.sw_fan: // 风扇
                fanSw.switchState();
                fanName.setText(fanSw.isIconEnabled() ? "风扇开" : "风扇关");
                writeCmd(MAC , serviceUuid , characterUuid , "fan-sw\r\n");
                break;
        }
    }

    @Override
    protected void onActivityResult(int requestCode, int resultCode, Intent data) {
        super.onActivityResult(requestCode, resultCode, data);
        Log.d("CJT" , "requestCode = "+ requestCode +" ,  resultCode = "+ resultCode + " , data ="+data);
        if(requestCode == REQUEST_CONNECT_DEVICE) {
            // 响应结果
            switch (resultCode) {

                case Activity.RESULT_CANCELED:
                    Toast.makeText(this , "取消了扫描!",Toast.LENGTH_SHORT).show();
                    break;
                case Activity.RESULT_OK:
                    // 选择连接的设备
                    final BluetoothDevice device = data.getParcelableExtra(RecycleAdapter.EXTRA_DEVICE);
                    // 得到选择后传过来的MAC地址
                    MAC = device.getAddress();
                    Log.d("CJT" , "address ===================== " +MAC);

                    // 设置BLE设备的连接参数
                    BleConnectOptions options = new BleConnectOptions.Builder()
                            .setConnectRetry(3)   // 连接如果失败重试3次
                            .setConnectTimeout(30000)   // 连接超时30s
                            .setServiceDiscoverRetry(3)  // 发现服务如果失败重试3次
                            .setServiceDiscoverTimeout(20000)  // 发现服务超时20s
                            .build();

                    // 开始连接操作
                    MyApp.getBluetoothClient().connect(MAC, options, new BleConnectResponse() {
                        @Override
                        public void onResponse(int code, BleGattProfile data) {
                            Log.d("CJT" , "getBluetoothClient().connect  --- code ----- " + code);

                            // 表示连接成功
                            if(code == REQUEST_SUCCESS){

                                mainTitle.setText("当前连接设备 :"+device.getName());
//                                for(BleGattService sls : data.getServices()){
//                                    Log.d("CJT" , "onActivityResult -------1111111111-------  : "+sls.getUUID());
//                                    for(BleGattCharacter gls : sls.getCharacters()){
//                                        Log.d("CJT" , "onActivityResult *******22222222222*****  : "+gls.getUuid());
//                                    }
//                                }
                                serviceUuid = data.getServices().get(3).getUUID();
                                Log.d("CJT" , "getBluetoothClient().connect  --- serviceUuid  : "+serviceUuid);
                                characterUuid = data.getService(serviceUuid).getCharacters().get(0).getUuid();
                                Log.d("CJT" , "getBluetoothClient().connect  --- characterUuid : "+characterUuid);

                                // 获取温度值
                                getTemperature(MAC , serviceUuid , characterUuid);

                                // 下发数据
                                writeCmd(MAC , serviceUuid , characterUuid , "finish\r\n");

                            }else{
                                mainTitle.setText("当前暂无蓝牙设备连接");
                                Toast.makeText(MainActivity.this , "蓝牙连接不成功!",Toast.LENGTH_SHORT).show();
                            }
                        }
                    });

                    break;
            }

        }
    }

    /***
     * 获取温度值并显示到界面上
     * @param address           设备地址
     * @param serviceUuid       服务UUID
     * @param characterUuid     特征UUID
     */
    private void getTemperature(String address , UUID serviceUuid , UUID characterUuid ){
        MyApp.getBluetoothClient().notify(address, serviceUuid, characterUuid, new BleNotifyResponse() {
            @Override
            public void onNotify(UUID service, UUID character, byte[] value) {
                    String hexStr = bytesToHexString(value);
                    int beginIndex = hexStr.indexOf("2b") + 2; // 加号开始截取,并且跳过加号
                    int endIndex = hexStr.indexOf("2e") + 2 ;  // 小数点开始截取
                    String validTemp = hexStr.substring(beginIndex , endIndex );
                    Log.d("CJT" , "valid temp = "+validTemp+", hex2Str = "+ new String(hexStringToBytes(validTemp)));

                    // 设置温度值
                    tempView.setAngleWithAnim(Double.valueOf(new String(hexStringToBytes(validTemp))));
            }

            @Override
            public void onResponse(int code) {

            }
        });
    }

    /***
     * 向设备下发指令
     * @param address           设备MAC地址
     * @param serviceUuid       服务UUID
     * @param characterUuid     特征UUID
     * @param cmd               待下发的命令
     */
    private void writeCmd(String address , UUID serviceUuid , UUID characterUuid , String cmd){
        MyApp.getBluetoothClient().write(address, serviceUuid, characterUuid, cmd.getBytes(), new BleWriteResponse() {
            @Override
            public void onResponse(int code) {
                if(code == Constants.REQUEST_SUCCESS){

                }
            }
        });
    }

    /**
     * Convert byte[] to hex string.这里我们可以将byte转换成int,然后利用Integer.toHexString(int)来转换成16进制字符串。
     * @param src byte[] data
     * @return hex string
     */
    public static String bytesToHexString(byte[] src){
        StringBuilder stringBuilder = new StringBuilder("");
        if (src == null || src.length <= 0) {
            return null;
        }
        for (int i = 0; i < src.length; i++) {
            int v = src[i] & 0xFF;
            String hv = Integer.toHexString(v);
            if (hv.length() < 2) {
                stringBuilder.append(0);
            }
            stringBuilder.append(hv);
        }
        return stringBuilder.toString();
    }

    /**
     * Convert hex string to byte[]
     * @param hexString the hex string
     * @return byte[]
     */
    public static byte[] hexStringToBytes(String hexString) {
        if (hexString == null || hexString.equals("")) {
            return null;
        }
        hexString = hexString.toUpperCase();
        int length = hexString.length() / 2;
        char[] hexChars = hexString.toCharArray();
        byte[] d = new byte[length];
        for (int i = 0; i < length; i++) {
            int pos = i * 2;
            d[i] = (byte) (charToByte(hexChars[pos]) << 4 | charToByte(hexChars[pos + 1]));
        }
        return d;
    }
    /**
     * Convert char to byte
     * @param c char
     * @return byte
     */
    private static byte charToByte(char c) {
        return (byte) "0123456789ABCDEF".indexOf(c);
    }

}
代码可能暂时比较乱,我就挑主要的给大家梳理下逻辑,注释中有的已经写的很清楚了。
(1)先在界面上Toolbar上添加扫描的按钮,点击扫描按钮会跳转到扫描界面。

贴出来main.xml的菜单文件
<menu xmlns:android="http://schemas.android.com/apk/res/android"
    xmlns:app="http://schemas.android.com/apk/res-auto"
    xmlns:tools="http://schemas.android.com/tools"
    tools:context="com.cjt.bluetoothscm.MainActivity">
    <item
        android:id="@+id/action_scan"
        android:orderInCategory="100"
        android:icon="@drawable/ic_scan"
        android:title="@string/action_settings"
        tools:ignore="AppCompatResource"
        app:showAsAction="always" />
</menu>
其中有个icon,引用的是drawable下的一个VectorDrawable资源文件,ic_scan.xml
<vector android:height="42dp" android:viewportHeight="1024"
    android:viewportWidth="1024" android:width="42dp" xmlns:android="http://schemas.android.com/apk/res/android">
    <path android:fillColor="#ffffff" android:pathData="M512,960c-249.6,0 -448,-198.4 -448,-448s198.4,-448 448,-448 448,198.4 448,448 -198.4,448 -448,448zM512,883.2c204.8,0 371.2,-166.4 371.2,-371.2S716.8,140.8 512,140.8 140.8,307.2 140.8,512s166.4,371.2 371.2,371.2z"/>
    <path android:fillColor="#3cbc74" android:pathData="M512,787.2c-153.6,0 -275.2,-121.6 -275.2,-275.2S358.4,236.8 512,236.8s275.2,121.6 275.2,275.2 -121.6,275.2 -275.2,275.2zM512,748.8c128,0 236.8,-108.8 236.8,-236.8S640,275.2 512,275.2 275.2,384 275.2,512 384,748.8 512,748.8z"/>
    <path android:fillColor="#ffffff" android:pathData="M512,512m-38.4,0a38.4,38.4 0,1 0,76.8 0,38.4 38.4,0 1,0 -76.8,0Z"/>
    <path android:fillColor="#ffffff" android:pathData="M524.8,531.2l345.6,-217.6 -19.2,-32 -352,211.2zM492.8,25.6L492.8,320c0,12.8 6.4,19.2 19.2,19.2s19.2,-6.4 19.2,-19.2L531.2,25.6c0,-12.8 -6.4,-19.2 -19.2,-19.2s-19.2,6.4 -19.2,19.2zM998.4,492.8L704,492.8c-12.8,0 -19.2,6.4 -19.2,19.2s6.4,19.2 19.2,19.2h294.4c12.8,0 19.2,-6.4 19.2,-19.2s-6.4,-19.2 -19.2,-19.2zM531.2,998.4L531.2,704c0,-12.8 -6.4,-19.2 -19.2,-19.2s-19.2,6.4 -19.2,19.2v294.4c0,12.8 6.4,19.2 19.2,19.2s19.2,-6.4 19.2,-19.2zM25.6,531.2L320,531.2c12.8,0 19.2,-6.4 19.2,-19.2s-6.4,-19.2 -19.2,-19.2L25.6,492.8c-12.8,0 -19.2,6.4 -19.2,19.2s6.4,19.2 19.2,19.2z"/>
</vector>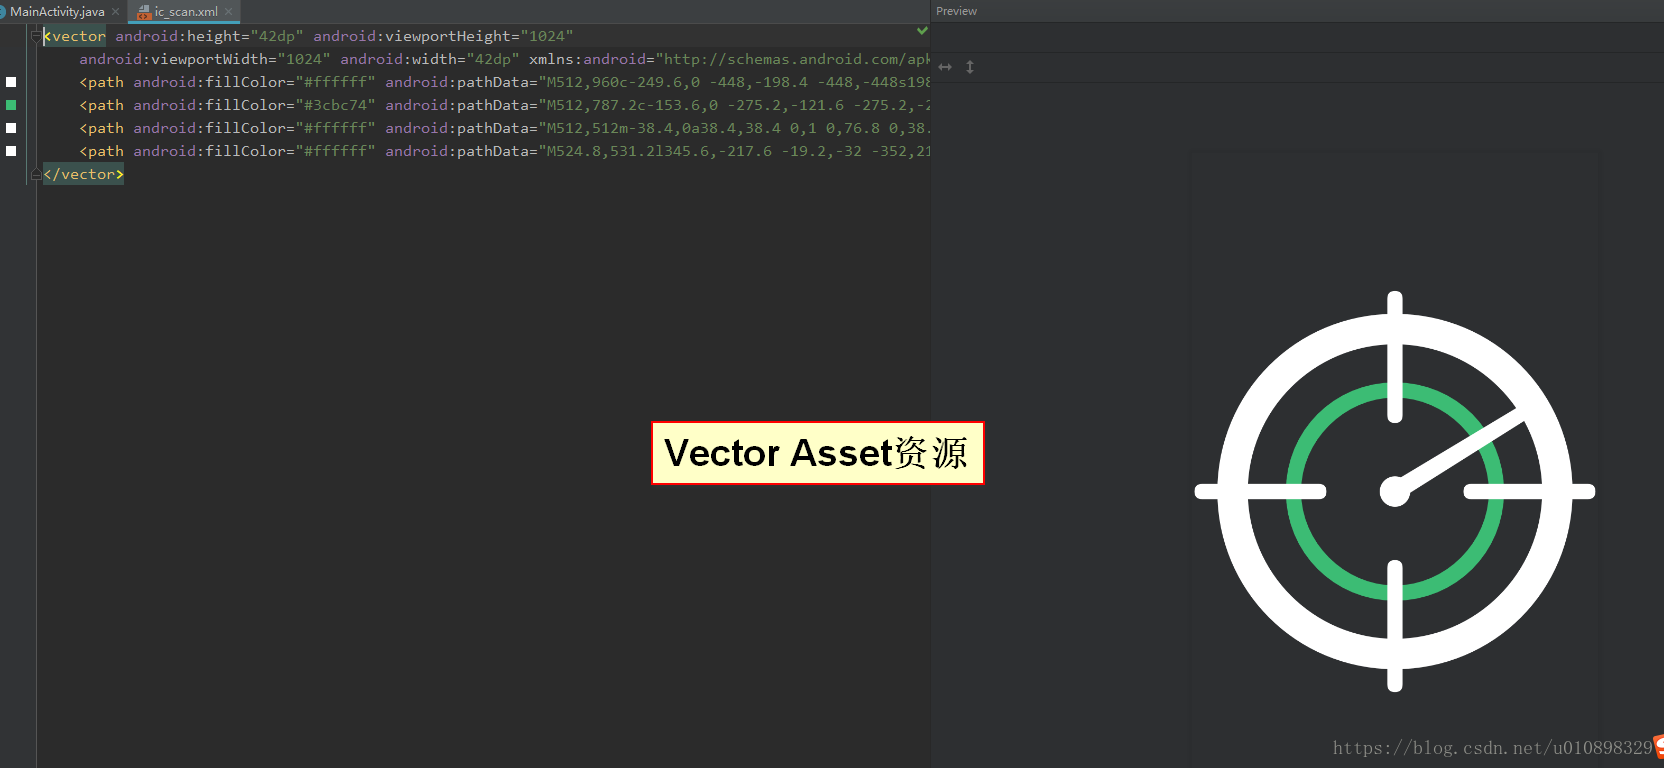
使用这个的好处就是,改变大小的时候不会失真,因为使用的矢量作图。
(2)蓝牙连接的处理,这一块大家要恶补下关于蓝牙UUID的知识,由于我也研究的不深入,所以就不误导大家了,梳理下onActivityResult回调方法

(3)我把client写到了全局Application中,如下
package com.cjt.bluetoothscm;

import android.app.Application;

import com.inuker.bluetooth.library.BluetoothClient;

/*****************
 * 包名:com.cjt.bluetoothscm
 * 类名:MyApp.java
 * 时间:2018/9/17  23:46
 * 作者:Cao Jiangtao
 * 首页:https://1989jiangtao.github.io/index.html
 ******************/

public class MyApp extends Application {

    private static MyApp instance ;

    private static BluetoothClient bluetoothClient ;

    public static MyApp getInstance() {
        return instance;
    }

    public static BluetoothClient getBluetoothClient() {
        return bluetoothClient;
    }

    @Override
    public void onCreate() {
        super.onCreate();
        instance = this ;

        // 新建全局的蓝牙客户端实例
        bluetoothClient = new BluetoothClient(this);

    }

}
(4)看下扫描界面的界面布局文件和java代码
<?xml version="1.0" encoding="utf-8"?>
<android.support.constraint.ConstraintLayout xmlns:android="http://schemas.android.com/apk/res/android"
    xmlns:app="http://schemas.android.com/apk/res-auto"
    xmlns:tools="http://schemas.android.com/tools"
    android:layout_width="match_parent"
    android:layout_height="match_parent"
    tools:context=".ScanResultActivity">


    <android.support.v7.widget.RecyclerView
        android:id="@+id/result_recycle_list"
        android:layout_width="match_parent"
        android:layout_height="0dp"
        android:layout_marginBottom="8dp"
        android:layout_marginTop="8dp"
        android:paddingLeft="8dp"
        android:paddingRight="8dp"
        app:layout_constraintBottom_toTopOf="@+id/btn_exit"
        app:layout_constraintEnd_toEndOf="parent"
        app:layout_constraintStart_toStartOf="parent"
        app:layout_constraintTop_toTopOf="parent" />

    <ProgressBar
        android:id="@+id/progressBar"
        style="?android:attr/progressBarStyle"
        android:layout_width="wrap_content"
        android:layout_height="wrap_content"
        android:layout_marginBottom="8dp"
        android:layout_marginEnd="8dp"
        android:layout_marginLeft="8dp"
        android:layout_marginRight="8dp"
        android:layout_marginStart="8dp"
        android:layout_marginTop="8dp"
        android:visibility="gone"
        app:layout_constraintBottom_toBottomOf="parent"
        app:layout_constraintEnd_toEndOf="parent"
        app:layout_constraintStart_toStartOf="parent"
        app:layout_constraintTop_toTopOf="parent" />

    <Button
        android:id="@+id/btn_exit"
        android:layout_width="0dp"
        android:layout_height="wrap_content"
        android:layout_marginBottom="8dp"
        android:layout_marginEnd="16dp"
        android:layout_marginLeft="16dp"
        android:layout_marginRight="16dp"
        android:layout_marginStart="16dp"
        android:textSize="20sp"
        android:textStyle="bold"
        android:background="@color/colorRed"
        android:textColor="@color/colorWhite"
        android:text="@string/btn_exit"
        app:layout_constraintBottom_toBottomOf="parent"
        app:layout_constraintEnd_toEndOf="parent"
        app:layout_constraintStart_toStartOf="parent" />

</android.support.constraint.ConstraintLayout>
package com.cjt.bluetoothscm;
import android.bluetooth.BluetoothDevice;
import android.support.v7.app.AppCompatActivity;
import android.os.Bundle;
import android.support.v7.widget.LinearLayoutManager;
import android.support.v7.widget.RecyclerView;
import android.text.TextUtils;
import android.util.Log;
import android.view.View;
import android.widget.Button;
import android.widget.ProgressBar;
import com.inuker.bluetooth.library.search.SearchRequest;
import com.inuker.bluetooth.library.search.SearchResult;
import com.inuker.bluetooth.library.search.response.SearchResponse;
import java.util.ArrayList;
import java.util.HashSet;
import java.util.List;
/*****************
* 包名:com.cjt.bluetoothscm
* 类名:ScanResultActivity.java
* 时间:2018/9/17 23:49
* 作者:Cao Jiangtao
* 首页:https://1989jiangtao.github.io/index.html
******************/
public class ScanResultActivity extends AppCompatActivity implements View.OnClickListener {
RecyclerView recyclerView ; // 列表展示扫描的结果
ProgressBar progressBar ; // 页面上的进度条
Button exitBtn ; // 退出按钮
RecycleAdapter adapter ; // 列表适配器
List<BluetoothDevice> bluetoothDeviceList = new ArrayList<>();
@Override
protected void onCreate(Bundle savedInstanceState) {
super.onCreate(savedInstanceState);
setContentView(R.layout.activity_scan_result);
initView(); // 界面初始化
startScan(); // 开启扫描
}
@Override
protected void onDestroy() {
// 停止扫描
MyApp.getBluetoothClient().stopSearch();
super.onDestroy();
}
/**开启蓝牙扫描**/
private void startScan() {
// 新建一个扫描结果集
SearchRequest request = new SearchRequest.Builder()
.searchBluetoothLeDevice(3000, 3) // 先扫BLE设备3次,每次3s
.searchBluetoothClassicDevice(5000) // 再扫经典蓝牙5s
.searchBluetoothLeDevice(2000) // 再扫BLE设备2s
.build();
// 开始扫描
MyApp.getBluetoothClient().search(request, new SearchResponse() {
@Override
public void onSearchStarted() {
progressBar.setVisibility(View.VISIBLE);
Log.d("CJT" , "onSearchStarted ***** ");
}
@Override
public void onDeviceFounded(SearchResult device) {
Log.d("CJT" , "onDeviceFounded == name :"+ device.device.getName()+", address : " + device.device.getAddress());
if(!TextUtils.isEmpty(device.device.getName())){
bluetoothDeviceList.add(device.device);
}
}
@Override
public void onSearchStopped() {
progressBar.setVisibility(View.GONE);
// 实时更新列表适配器
adapter.notifyData(removeDuplicate(bluetoothDeviceList));
Log.d("CJT" , "onSearchStopped ###### 设备数量 :"+removeDuplicate(bluetoothDeviceList).size());
}
@Override
public void onSearchCanceled() {
progressBar.setVisibility(View.GONE);
}
});
}
/***
* 列表去重复
* @param list 待去除重复数据的列表
* @return 返回去重后的列表
*/
public static List removeDuplicate(List list) {
HashSet h = new HashSet(list);
list.clear();
list.addAll(h);
return list;
}
/**初始化页面和控件**/
private void initView(){
// 初始化页面控件
recyclerView = findViewById(R.id.result_recycle_list);
progressBar = findViewById(R.id.progressBar);
exitBtn = findViewById(R.id.btn_exit);
exitBtn.setOnClickListener(this);
// 设置recycleView显示方式
recyclerView.setLayoutManager(new LinearLayoutManager(this , LinearLayoutManager.VERTICAL , false));
adapter = new RecycleAdapter();
// 设置适配器
recyclerView.setAdapter(adapter);
}
@Override
public void onClick(View v) {
finish();
}
}
代码中有一个去重复的方法,避免最后的列表中很多重复的设备,因为蓝牙在后台不停的扫描,会有很多重复的设备。
(5)看下列表适配器的写法,我用了RecycleView来列表展示已扫描到的设备,同时添加了点击事件,当选择和点击的时候就携带相关的设备信息跳转到MainActivity,进行读写操作。
package com.cjt.bluetoothscm;

import android.app.Activity;
import android.bluetooth.BluetoothDevice;
import android.content.Intent;
import android.support.annotation.NonNull;
import android.support.constraint.ConstraintLayout;
import android.support.v7.widget.RecyclerView;
import android.util.Log;
import android.view.LayoutInflater;
import android.view.View;
import android.view.ViewGroup;
import android.widget.TextView;

import java.util.ArrayList;
import java.util.List;

/*****************
 * 包名:com.cjt.bluetoothscm
 * 类名:RecycleAdapter.java
 * 时间:2018/9/14  10:14
 * 作者:Cao Jiangtao
 * 首页:https://1989jiangtao.github.io/index.html
 ******************/
public class RecycleAdapter extends RecyclerView.Adapter<RecycleAdapter.MyViewHolder> {

    public static final String EXTRA_DEVICE = "extra_device";

    List<BluetoothDevice> deviceList = new ArrayList<>();

    @NonNull
    @Override
    public MyViewHolder onCreateViewHolder(@NonNull ViewGroup parent, int viewType) {
        Log.d("CJT"," RecycleAdapter --- onCreateViewHolder --  ");
        return new RecycleAdapter.MyViewHolder(LayoutInflater.from(parent.getContext()).inflate(R.layout.item_device_layout,parent,false));
    }

    @Override
    public void onBindViewHolder(@NonNull MyViewHolder holder, int position) {
        holder.deviceName.setText(getItem(position).getName());
        holder.deviceAddress.setText(getItem(position).getAddress());
        // 为列表添加点击事件,传入的参数是当前项的蓝牙设备BluetoothDevice
        holder.deviceItem.setOnClickListener(new itemClick(getItem(position)));
    }

    @Override
    public int getItemCount() {
        return deviceList.size();
    }

    /***
     * 获取指定位置的元素
     * @param position
     * @return
     */
    private BluetoothDevice getItem(int position){
        return deviceList.get(position);
    }

    /***
     * 数据集合改变的方法
     * @param deviceList
     */
    public void notifyData(List<BluetoothDevice> deviceList){
        Log.d("CJT" , "notifyData == %%%%%%%%%%%%%% ");
        this.deviceList = deviceList ;
        this.notifyDataSetChanged();
    }


    class MyViewHolder extends RecyclerView.ViewHolder{

        ConstraintLayout deviceItem ; // item的单个布局
        TextView deviceName ; // 设备名称
        TextView deviceAddress; // 设备地址

        public MyViewHolder(View itemView) {
            super(itemView);
            deviceItem = itemView.findViewById(R.id.item_layout);
            deviceName = itemView.findViewById(R.id.item_device_name);
            deviceAddress = itemView.findViewById(R.id.item_device_address);
        }
    }

    /**点击事件内部类**/
    private class itemClick implements View.OnClickListener {

        private BluetoothDevice device ;

        public itemClick(BluetoothDevice item) {
            this.device = item ;
        }

        @Override
        public void onClick(View v) {
            // 设置返回数据
            Intent intent = new Intent();
            intent.putExtra(EXTRA_DEVICE, device);
            Log.d("CJT" , "device.getAddress() == "+device.getAddress());
            // 设置返回值并结束程序
            ((Activity)v.getContext()).setResult(Activity.RESULT_OK, intent);
            ((Activity)v.getContext()).finish();
        }
    }
}
(6)还有一个表盘布局的文件,关于自定义View,有不明白的同学可以自行去学习下,我这里就不深入讲解了。
4.小结。
主要的代码就是上面给大家展示的部分,由于使用的第三方的蓝牙库,这个蓝牙库呢还有一个比较有缺陷的地方就是可以扫描到经典蓝牙的设备,却没有相应的connect方法,更不能去读写了,所以后面我会再去完善连接经典蓝牙模块的部分,本次蓝牙模块我使用的是蓝牙BLE模块cc2541。
好了,本篇就到此为止了,后面代码上传了GitHub我会跟进更新地址,另外下一篇我会主要讲解和演示单片机接收数据的部分。