2018
写在前面:如果你是一个技术小白,请一定要耐心听我讲走过的坑。本文主要讲述实现以及Fragment切换之间如何优化,减少内存的开销,相信不少朋友吃过Fragment生命周期的亏。话不多说,切入正题。
1、结合ToolBarTabLayout+ViewPager+Fragment实现的底部导航功能 效果 与 分析
效果图如下,一般的手机应用首页就是这种样式,包括手机淘宝、QQ、微信。
我的主页
QQ

下面是新版QQ的界面,底部的导航栏实现的是切换Fragment效果,四个标签选项卡。“看点”就是从前的“QQ看点”,这个选项有点特殊,里面内嵌了顶部导航栏,而且数据刷新实现了“懒加载”的效果,也就是我不点击,它就不会更新推送,但只要我切换到这个选项就会自动加载新的推送内容,这就是关于ViewPager+Fragment的一点妙用。懒加载会在分析QQ看点改版的博文中详细讲解。

- 简单描述一下控件作用
(1)TabLayout:标签布局,用于新建导航栏。
(2)ViewPager:视图翻页容器,将多个View放在同一个ViewPager,通过左右滑动实现翻页效果。Google推荐使用Fragment+ViewPager的组合,更便于管理生命周期。
(3)Fragment:碎片,可以理解为需要依赖于Activity存在的小型Activity,有自己的生命周期。
(4)ToolBar:工具栏,标题栏。
想要详细了解这几个控件作用的朋友可以参考下面的文章:
TabLayout属性
ToolBar简单实用
2、实现导航栏
使用TabLayout需要先添加依赖
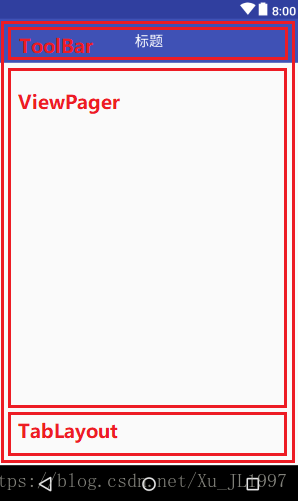
implementation 'com.android.support:design:26.1.0',ViewPager在v4包里,可以直接使用。写布局文件,将ToolBar、ViewPager和TabLayout 的位置分配好,新建activity_main.xml:
<?xml version="1.0" encoding="utf-8"?>
<LinearLayout xmlns:android="http://schemas.android.com/apk/res/android"
    xmlns:app="http://schemas.android.com/apk/res-auto"
    xmlns:tools="http://schemas.android.com/tools"
    android:layout_width="match_parent"
    android:layout_height="match_parent"
    android:orientation="vertical"
    tools:context=".MainActivity">

    <android.support.v7.widget.Toolbar
        android:id="@+id/main_toolbar"
        android:layout_width="match_parent"
        android:layout_height="?attr/actionBarSize"
        android:background="@color/colorPrimary">

        <TextView
            android:id="@+id/toolbar_title"
            android:layout_width="wrap_content"
            android:layout_height="wrap_content"
            android:layout_gravity="center"
            android:text="标题"
            android:textColor="@android:color/white"
            android:textSize="18sp" />

    </android.support.v7.widget.Toolbar>


    <android.support.v4.view.ViewPager
        android:id="@+id/main_viewpager"
        android:layout_width="match_parent"
        android:layout_height="0dp"
        android:layout_weight="1"/>

    <android.support.design.widget.TabLayout
        android:id="@+id/main_tablayout"
        android:layout_width="match_parent"
        android:layout_height="wrap_content"
        android:layout_gravity="bottom"
        app:tabIndicatorHeight="0dp" />
</LinearLayout>
效果如下,外层还是套一个LinearLayout,里面只放三个View控件,TabLayout要移到底部。自定义一个ToolBar实现标题居中,ToolBar里面只放标题,居中,在不同的Page将会使用代码设置不同的标题。属性都很简单,就是大小、字体和位置的设置。注意TabLayout的 app:tabIndicatorHeight="0dp" ,这样能够隐藏标签下面的导航条。当然,你也可以尝试不隐藏的效果哦。
小技巧:引入自己的ToolBar之前要隐藏系统自带的标题栏(ActionBar),否则会有两个标题栏。现在基本没有多少项目会使用ActionBar了,都使用功能更加强大的ToolBar。新建项目的时候,res文件下的values文件的 styles.xml 如下图,只有一个style,就是系统的默认主题,看到第一句parent="Theme.AppCompat.Light.DarkActionBar",将DarkActionBar改为NoActionBar即可。现在你再去看布局文件就会发现顶部的标题栏已经不见了。
<resources>
    <!-- Base application theme. -->
    <style name="AppTheme" parent="Theme.AppCompat.Light.DarkActionBar">
        <!-- Customize your theme here. -->
        <item name="colorPrimary">@color/colorPrimary</item>
        <item name="colorPrimaryDark">@color/colorPrimaryDark</item>
        <item name="colorAccent">@color/colorAccent</item>
    </style>
</resources>- 还有碎片布局,也就是我们准备好要切换的几个页面布局,为了简单起见,所有页面只添加一个TextView,背景颜色不同,这种页面准备了四个,其中一个如下,命名为fragment_layout_1.xml:
<?xml version="1.0" encoding="utf-8"?>
<LinearLayout xmlns:android="http://schemas.android.com/apk/res/android"
    android:layout_width="match_parent"
    android:layout_height="match_parent"
    android:background="@android:color/holo_blue_bright">

    <TextView
        android:layout_width="wrap_content"
        android:layout_height="wrap_content"
        android:text="这里是碎片1的布局"
        android:textSize="30sp" />
</LinearLayout>- 最后就是 MainActivity.java
/*
 * @Copyright XuJiaLe
 * @Author    XuJiaLe
 * @Data      2018-9-7
 * @E-mail    [email protected]
 */

import android.support.design.widget.TabLayout;
import android.support.v4.app.Fragment;
import android.support.v4.app.FragmentManager;
import android.support.v4.app.FragmentPagerAdapter;
import android.support.v4.view.ViewPager;
import android.support.v7.app.AppCompatActivity;
import android.os.Bundle;
import android.support.v7.widget.Toolbar;
import android.view.LayoutInflater;
import android.view.View;
import android.view.ViewGroup;
import android.widget.TextView;

import java.util.ArrayList;
import java.util.List;

public class MainActivity extends AppCompatActivity {

    private ViewPager viewPager;
    private TabLayout tabLayout;

    @Override
    protected void onCreate(Bundle savedInstanceState) {
        super.onCreate(savedInstanceState);
        setContentView(R.layout.activity_main);

        initView();
        initData();
    }

    /**
     * 实例化控件,设置监听事件
     */
    private void initView() {
        Toolbar toolbar = findViewById(R.id.main_toolbar);
        toolbar.setTitle("");    //将ToolBar自带的标题设为空,隐藏
        setSupportActionBar(toolbar);    //设置为我们添加的自定义ToolBar
        viewPager = findViewById(R.id.main_viewpager);
        tabLayout = findViewById(R.id.main_tablayout);
        final TextView toolbarTitle = findViewById(R.id.toolbar_title);    //获取ToolBar标题的实例
        toolbarTitle.setText("碎片1标题");    //初始化标题
        final String[] toolbarTitles = {"碎片1标题", "碎片2标题", "碎片3标题", "碎片4标题"};
        // 添加页面切换监听,重写的第二个方法就是实现“页面切换修改ToolBar标题”的核心方法
        viewPager.addOnPageChangeListener(new ViewPager.OnPageChangeListener() {
            @Override
            public void onPageScrolled(int position, float positionOffset, int positionOffsetPixels) {
            }

            @Override
            public void onPageSelected(int position) {
                toolbarTitle.setText(toolbarTitles[position]);    //设置对应标题
            }

            @Override
            public void onPageScrollStateChanged(int state) {
            }
        });
    }

    /**
     * 加载数据,结合ViewPager和TabLayout
     */
    private void initData() {
        List<Fragment> fragments = new ArrayList<>();    //创建四个碎片
        fragments.add(new MyFragment1());
        fragments.add(new MyFragment2());
        fragments.add(new MyFragment3());
        fragments.add(new MyFragment4());
        String[] tabTitles = {"选项卡1", "选项卡2", "选项卡3", "选项卡4"};    //创建四个选项卡标签的标题

        MyFragmentPagerAdapter adapter = new MyFragmentPagerAdapter(getSupportFragmentManager(), fragments, tabTitles);
        viewPager.setAdapter(adapter);    //设置ViewPager的适配器
        tabLayout.setupWithViewPager(viewPager);    //组合ViewPager和TabLayout
        tabLayout.getTabAt(0).select();    //这是设置打开第几个选项卡,不设置就会默认打开第一个
    }

    /**
     * ViewPager的适配器
     * 这里为了方便展示就作为内部类了,建议新建java文件
     */
    class MyFragmentPagerAdapter extends FragmentPagerAdapter {
        private List<Fragment> fragments;    //碎片集合
        private String[] titles;     //标题数组

        public MyFragmentPagerAdapter(FragmentManager fm, List<Fragment> fragments, String[] titles) {
            super(fm);    //父类中只需要传入一个碎片管理器
            this.fragments = fragments;
            this.titles = titles;
        }

        @Override
        public Fragment getItem(int position) {
            return fragments.get(position);
        }

        @Override
        public int getCount() {
            return fragments.size();
        }

        //重写这个方法才能获取每一个page的标题
        @Override
        public CharSequence getPageTitle(int position) {
            return titles[position];
        }
    }

    /**
     * 自定义的Fragment,也是内部类
     */
    public static class MyFragment1 extends Fragment {
        @Override
        public View onCreateView(LayoutInflater inflater, ViewGroup container, Bundle savedInstanceState) {
            View view = inflater.inflate(R.layout.fragment_layout_1, container,false);    //动态加载布局
            /*
             * 如果想获取Fragment布局的UI控件,可以直接使用 view.findViewById(long resourceId); 来获取实例
             */
            return view;
        }
    }

    public static class MyFragment2 extends Fragment {
        @Override
        public View onCreateView(LayoutInflater inflater, ViewGroup container, Bundle savedInstanceState) {
            View view = inflater.inflate(R.layout.fragment_layout_2, container,false);
            return view;
        }
    }

    public static class MyFragment3 extends Fragment {
        @Override
        public View onCreateView(LayoutInflater inflater, ViewGroup container, Bundle savedInstanceState) {
            View view = inflater.inflate(R.layout.fragment_layout_3, container,false);
            return view;
        }
    }

    public static class MyFragment4 extends Fragment {
        @Override
        public View onCreateView(LayoutInflater inflater, ViewGroup container, Bundle savedInstanceState) {
            View view = inflater.inflate(R.layout.fragment_layout_4, container,false);
            return view;
        }
    }
}
3、优化导航栏切换
- 终于要讲到优化这个问题了,其实所谓的优化是针对Fragment的优化,文章开头就说了,推荐使用Fragment+ViewPager是因为Fragment的生命周期便于管理,如果不了解Fragment的生命周期,不知道ViewPager在切换过程中发生了什么,那么恐怕会有一些小Bug是你百思不解的。
(1)使用 FragmentPagerAdapter 来管理Fragment的切换,它不会销毁任何Fragment,全部保存在内存中。我们需要格外关注下面几个方法:setUserVisibleHint(),onCreate(),onCreateView(),onDestroyView(),onDestroy(),推荐大家仔细看 FragmentPagerAdapter的加载机制 。
(2)适配器会默认加载当前Fragment以及其左右两个Fragment,如果当前页面是Fragment 0,那Fragment 1已经加载完了,当前页面是1,那么Fragment 0、2也已经在内存中了。
(3)那么这些加载好的Fragment执行了哪些方法了?onResume() 以及之前的方法都已经执行了。在这些加载好的页面之间切换,其实只需要执行了setUserVisibleHint()方法,设置可见性即可来回切换。
(4)既然说最多只加载左右两边的Fragment,那么离得远的Fragment会怎样?会被执行onDestroyView() ,也就是所有的控件实例都被回收了,但是没有执行onDestroy() ,说明Fragment 仍在内存中,只是回收了View而已,里面的数据成员仍然保存。等到再次加载的时候就会从onCreateView中执行,重新获取UI控件的实例。
- 小技巧
看到这里,大家都有所了解了,只要页面切换太远,回来的时候onCreateView() 之后的方法会被重复执行,而离得太近,一些方法又不会重新执行。由此有以下这种场景:
- 我按照网上说的写了一个页面切换的Demo,我习惯性地只重写
onCreateView()方法,里面堆积了我包括初始化UI控件、初始化数据成员、甚至是网络请求的所有方法。我愉快地快速切换页面,所有一切都很流畅。于是,我想要升级一下这个Demo,我感觉onCreateView()方法做得太多东西了,我认为要给它减减压,我又重写了onStart()、onResume(),虽然我不知道它们有什么用,可看起来有条理很多了。
分析:这就是典型的不知道Fragment+FragmentPagerAdapter的作用机制。这么做的弊端是什么?数据成员的重复加载,对服务器的重复请求,浪费内存。在小型App、数据量不大的情况下,这种写法问题不大,手机、服务器完全支撑得起,但在不断优化升级中,我们必须对其有所警惕。我个人推荐的做法就是数据成员的初始化、只需要一次的网络请求请写在onCreate()中,或者写在自定义的Fragment构造方法,单实例方法等。
@Override
public void onCreate(Bundle saveInstanceState){
    super.onCreate(saveInstanceState);
    /*
     * 数据请求与初始化
     */
}
至此,关于底部导航栏的一些基本知识就讲解地差不多了,更多的属性需要大家努力发掘,Android毕竟是前端开发,相信大家能开发出自己风格的App。欢迎大家来 主页 查看我的其他博文,如有不当欢迎指正。