小菜鸟学习spring,最近在啃 Spring IN ACTION ,中文版书名为spring实战,本书被大多数人点赞和好评。为了提高学习效果,特此做一个简单的笔记以便温习回顾,如有错误或者您有更好的建议与意见烦请指正指导。
书接上文,上文记录的是xml的显式装配,这里记录一下使用注解和java类进行bean的装配,在此之前,记录一下spring-test模块和junit单元测试的使用。
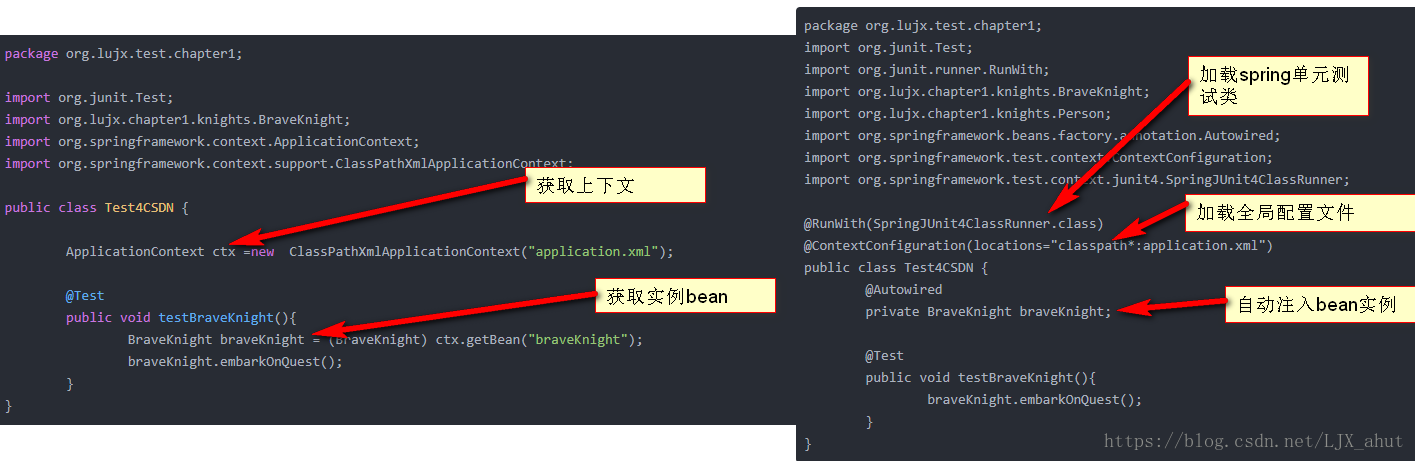
用一张截图比对两种方法的异同,如下图所示
需要注意的是:pom文件需要添加spring-test模块的依赖
贴一下使用spring-test模块测试方法的代码
package org.lujx.test.chapter1;

import org.junit.Test;
import org.junit.runner.RunWith;
import org.lujx.chapter1.knights.BraveKnight;
import org.lujx.chapter1.knights.Person;
import org.springframework.beans.factory.annotation.Autowired;
import org.springframework.test.context.ContextConfiguration;
import org.springframework.test.context.junit4.SpringJUnit4ClassRunner;

@RunWith(SpringJUnit4ClassRunner.class)
@ContextConfiguration(locations="classpath*:application.xml")
public class Test4CSDN {

	@Autowired
	private BraveKnight braveKnight;

	@Test
	public void testBraveKnight(){
		braveKnight.embarkOnQuest();
	}

}
第二种装配方式 使用注解和java类进行装配,为了匹配书上的代码片段,新建接口和类
package org.lujx.chapter2.soundSystem;

/**
 * @Description: 定义cd播放机接口
 * @author: lujx
 * @date: 2018年8月21日 下午8:20:23
 */
public interface  CompactDisc {

	void play();
}
新建其实现类
package org.lujx.chapter2.soundSystem;
import org.springframework.stereotype.Component;

//spring组件
@Component
//java依赖注入标准 JSR 330
//@Named("sgtPeppers")
public class SgtPeppers implements CompactDisc {
	private String title = "Sgt.pepper's Lonely Hearts Club Band";
	private String artist = "The Beatles";

	public void play() {
		System.out.println("Playing " + title + " by " + artist);
	}
}
可以看到,定义了CD播放机接口 CompactDisc和实现了它的接口SgtPeppers类,并且在SgtPeppers类的上方加了一个@Component注解,这个注解表示该类作为一个组件被spring管理。
编写配置类
package org.lujx.chapter2.soundSystem;

import org.springframework.context.annotation.ComponentScan;
import org.springframework.context.annotation.Configuration;

@Configuration
@ComponentScan(basePackages="org.lujx.chapter2")
public class CDPlayerConfig {

}
该类上有@Configuration注解,表示这个类是一个配置组件,@ComponentScan注解,表示自动扫描上下文中的所有组件
basePackages=“org.lujx.chapter2” 表示将扫描org.lujx.chapter2包及其子包下的所有@Component注解的组件。
由于更换了配置方式,所以测试类也需要进行相应的修改
package org.lujx.test.chapter2;

import org.junit.Test;
import org.junit.runner.RunWith;
import org.lujx.chapter2.soundSystem.CDPlayerConfig;
import org.lujx.chapter2.soundSystem.CompactDisc;
import org.springframework.beans.factory.annotation.Autowired;
import org.springframework.beans.factory.annotation.Qualifier;
import org.springframework.test.context.ContextConfiguration;
import org.springframework.test.context.junit4.SpringJUnit4ClassRunner;

@RunWith(SpringJUnit4ClassRunner.class)
@ContextConfiguration(classes=CDPlayerConfig.class)
public class CDPlayerTest {

	// java依赖注入规范 JSR 330
	// @Inject
	// spring注入
	@Autowired
	@Qualifier("sgtPeppers")
	private CompactDisc cd;

	@Test
	public void testCD() {
		cd.play();
	}


}
知识点小结:
@Component 注解表示将该类注解成spring的一个组件
@ComponentScan( basePackages="" ) 注解表示启用组件扫描,等价于在application.xml文件中配置<context:component-scan base-package = ""/>
@Autowired 注解表示spring容器自动注入bean实例,当前,前提是该实例已有@component注解或者在application.xml文件中配置了<bean>标签
@Qualifier("自定义实例名称") 注解与@Component和@Autowired配合使用,为解决自动装配的歧义性,例如当一个接口有多个实现类是,自动装配是spring无法分辨究竟注入哪一个实现类,此时使用@Qualifier进行限定。
java同样有支持依赖注入的规范,其规范编号为JSR 330,上述demo中,JSR 330 注解 @Inject 和spring注解@Autowired 功能基本相同;java依赖注入标准 JSR 330 注解 @Named("sgtPeppers") 和spring 注解 @Component("sgtPeppers")基本相同,其他的不再赘述