在上一章节我们已经完成了权限架构展示层得基础框架得搭建,本章我们将 基于springboot+bootstrap+mysql+redis搭建一套完整的权限架构这套我在原先写好的权限架构的基础上进行改造使用spring cloud来实现我们的权限架构。
在我们调用路由网关的时候我们都需要将我们的请求带上token,若是基于我们原先的系统,我们需要在每一个请求上将我们的token作为参数传递给后台,如果我们现有的系统已经非常庞大,那么这个改造的工作量将是无比庞大的,因此我们在此引入hook的工具,他会拦截所有的ajax请求,同时我们对此ajax请求做重新封装发送,因此我们只要在我们的页面引入wendu.ajaxhook.min.js文件,同时我们初始化hook大家就可以轻松的实现,无需修改原始方法的情况下的项目的快速迁移工作。以下是hook初始化的js代码:
$(function () {
    hookAjax({
        onreadystatechange:function(xhr){
           // console.log("onreadystatechange called: %O",xhr)
            //return true
        },
        onload:function(xhr){
            //console.log("onload called: %O",xhr)
            //xhr.responseText="hook"+xhr.responseText;
            //return true;
        },
        open:function(arg,xhr){
            console.log("open called: method:%s,url:%s,async:%s",arg[0],arg[1],arg[2],xhr);
            if(arg[1].indexOf("\?")!=-1){
                arg[1]+="&token="+token;
            }else{
                arg[1]+="?token="+token;
            }

            //统一添加请求头
        },
        send:function(arg,xhr){
           // console.log("send called: %O",arg[0])
            //xhr.setRequestHeader("_custom_header_","ajaxhook")
        },
        setRequestHeader:function(arg,xhr){
           // console.log("setRequestHeader called!",arg)
        }
    })

})
接着我们将改造我们的原始项目,首先是将我们的includebase.html的脚本引入页面进行改造如下:
<html xmlns:th="http://www.thymeleaf.org">
<link th:href="@{/css/bootstrap.min.css}" rel="stylesheet"/>
<link th:href="@{/css/bootstrap-table.css}" rel="stylesheet"/>
<link th:href="@{/font-awesome/css/font-awesome.min.css}" rel="stylesheet"/>
<link th:href="@{/css/bootstrap-datetimepicker.css}" rel="stylesheet"/>
<link th:href="@{/css/bootstrapValidator.min.css}" rel="stylesheet"/>
<link th:href="@{/css/fileinput.css}" rel="stylesheet"/>
<link th:href="@{/css/fileinput-rtl.css}" rel="stylesheet"/>
<link th:href="@{/css/theme.css}" rel="stylesheet"/>
<link th:href="@{/css/zTreeStyle/metro.css}" rel="stylesheet"/>


<script th:src="@{/js/sockjs.min.js}"></script>
<script th:src="@{/js/stomp.min.js}"></script>
<script th:src="@{/js/jquery.js}"></script>
<script th:src="@{/js/distpicker/distpicker.data.js}"></script>
<script th:src="@{/js/distpicker/distpicker.js}"></script>
<script th:src="@{/js/websocket/socketUtil.js}"></script>
<script th:src="@{/js/bootstrap.min.js}"></script>
<script th:src="@{/js/bootstrap/nav/nav.js}"></script>
<script th:src="@{/js/bootstrap/tab/bootstrap-tab.js}"></script>
<script th:src="@{/js/bootstrap/tree/tree.js}"></script>
<script th:src="@{/js/bootstrap/alert/alert.js}"></script>
<script th:src="@{/js/bootstrap/table/bootstrap-table.js}"></script>
<script th:src="@{/js/bootstrap/date/bootstrap-datetimepicker.js}"></script>
<script th:src="@{/js/bootstrap/validator/bootstrapValidator.min.js}"></script>
<script th:src="@{/js/bootstrap/upload/fileinput.min.js}"></script>
<script th:src="@{/js/bootstrap/upload/plugins/sortable.js}"></script>
<script th:src="@{/js/bootstrap/upload/locales/zh.js}"></script>
<script th:src="@{/js/bootstrap/upload/theme.js}"></script>
<script th:src="@{/js/bootstrap/ztree/jquery.ztree.all-3.5.min.js}"></script>
<script th:src="@{/js/bootstrap/checkbox/checkbox.js}"></script>
<script th:src="@{/js/ajaxutil/ajaxUtil.js}"></script>
<script th:src="@{/js/dict/dictUtil.js}"></script>
<script th:src="@{/js/bootstrap/date/date.prototype.format.js}"></script>
<script th:src="@{/js/bootstrap/util/number.pick.util.js}"></script>
<script th:src="@{/js/ajaxutil/loadInfoData.js}"></script>
<script th:inline="javascript">
    //  用户登陆成功以后获取token
    var token = [[${session.token }]];
    //  访问我们路由的地址,大家可以将此块的内容配置到数据字典中,这里为了方便就直接写死
    var api_url = "http://127.0.0.1:5100/v1/rbac/";
</script>
<script th:src="@{/js/ajaxhook/wendu.ajaxhook.min.js}"></script>
<script th:src="@{/js/ajaxhook/inithook.js}"></script>

<meta name="viewport" content="width=device-width, initial-scale=1.0"/>

</html>
在我们集成数据字典模块之前我们需要创建我们的通用的controller,因此我们在我们的base包底下创建我们的GenericController.java文件内容如下,该基础接口主要是为了实现页面的跳转而进行开发的:
package com.rbac.rbacshow.common.base;

import org.springframework.http.MediaType;
import org.springframework.ui.Model;
import org.springframework.web.bind.annotation.RequestMapping;
import org.springframework.web.bind.annotation.RequestMethod;

import java.util.regex.Matcher;
import java.util.regex.Pattern;

/*
* 类描述:
* @auther linzf
* @create 2018/2/5 0005
*/
public abstract class GenericController<T> {

    /**修改页面路径*/
    public final static String UPDATEPAGE = "/update";

    /**新增页面路径*/
    public final static String ADDPAGE = "/add";

    /**
     * Controller基路径
     * */
    protected String basePath;

    /**抽象方法,获取页面基路径
     * @throws Exception */
    protected String getPageBaseRoot() throws Exception{
        if(basePath==null){
            basePath = this.getClass().getName();
            Pattern p=Pattern.compile(".[a-z|A-z]+.controller.[a-z|A-z]+Controller");
            Matcher m=p.matcher(basePath);
            if(m.find()){
                basePath = m.group();
                basePath = basePath.substring(1, basePath.length()-10);
                basePath = basePath.replace(".", "/");
                basePath = basePath.replace("/controller/", "/");
                basePath = toFirstCharLowerCase(basePath);
                basePath = basePath.substring(0,basePath.lastIndexOf("/")+1)+toFirstCharLowerCase(basePath.substring(basePath.lastIndexOf("/")+1));
            }
            else{
                throw new Exception("获取页面基路径失败");
            }
        }
        return basePath;
    }

    /**
     * 功能描述:直接跳转到添加数据的页面
     * @return
     */
    @RequestMapping(value = "/addPage",method = RequestMethod.GET,produces = MediaType.APPLICATION_JSON_VALUE)
    public String addPage() throws Exception{
        return getPageBaseRoot()+ADDPAGE;
    }

    /**
     * 功能描述:直接跳转到更新数据的页面
     * @param entity
     * @return
     */
    @RequestMapping(value = "/updatePage",method = RequestMethod.GET,produces = MediaType.APPLICATION_JSON_VALUE)
    public String updatePage(T entity,Model model) throws Exception{
        model.addAttribute("entity",entity);
        return getPageBaseRoot()+UPDATEPAGE;
    }

    /**
     * 将首字母变小写
     * @param str
     * @return
     */
    private String toFirstCharLowerCase(String str){
        char[]  columnCharArr = str.toCharArray();
        StringBuffer sb = new StringBuffer();
        for (int i = 0; i < columnCharArr.length; i++) {
            char cur = columnCharArr[i];
            if(i==0){
                sb.append(Character.toLowerCase(cur));
            }else{
                sb.append(cur);
            }
        }
        return sb.toString();
    }

}
同时我们需要修改我们的路由网关的代码,在第十六章我们注释了路由网关的权限验证的代码,因此我们本章需要把十六章注释的代码放开,因此我们打开我们的api-gateway的filter包底下的AccessFilter.java文件修改好以后内容如下:
package com.gateway.filter;

import com.base.entity.Identify;
import com.base.util.ip.IPUtil;
import com.gateway.service.AuthenticationService;
import com.netflix.zuul.ZuulFilter;
import com.netflix.zuul.context.RequestContext;
import org.slf4j.Logger;
import org.slf4j.LoggerFactory;
import org.springframework.beans.factory.annotation.Autowired;

import javax.servlet.http.HttpServletRequest;
import javax.servlet.http.HttpServletResponse;
import java.util.Map;

/*
* 类描述:
* @auther linzf
* @create 2017/12/22 0022
*/
public class AccessFilter extends ZuulFilter {

    private static Logger log = LoggerFactory.getLogger(AccessFilter.class);

    @Autowired
    private AuthenticationService authenticationService;

    /**
     * filterType: 过滤器的类型, 它决定过滤器在请求的哪个生命周期中执行。 这里定义为pre, 代表会在请求被路由之前执行。
     * @return
     */
    @Override
    public String filterType() {
        return "pre";
    }

    /**
     * filterOrder: 过滤器的执行顺序。 当请求在一个阶段中存在多个过滤器时, 需要根据该方法返回的值来依次执行。
     * @return
     */
    @Override
    public int filterOrder() {
        return 0;
    }

    /**
     * shouldFilter: 判断该过滤器是否需要被执行。 这里我们直接返回了true, 因此该过滤器对所有请求都会生效。 实际运用中我们可以利用该函数来指定过滤器的有效范围。
     * @return
     */
    @Override
    public boolean shouldFilter() {
        return true;
    }

    /**
     *
     * 这里我们通过ctx.setSendZuulResponse(false)令zuul过滤该请求, 不对其进行路由, 然后通过 ctx.setResponseStatusCode
     *(401)设置了其返回的错误码, 当然也可以进 一步优化我们的返回, 比如,通过ctx.se七ResponseBody(body)对返回的body内容进行编辑等。
     * @return
     */
    @Override
    public Object run() {

        RequestContext ctx = RequestContext.getCurrentContext();
        HttpServletRequest request = ctx.getRequest();
        HttpServletResponse response= ctx.getResponse();
        // 设置允许跨域访问Access-Control-Allow-Origin设置的为当前dinner工程的IP+端口
        response.setHeader("Access-Control-Allow-Headers", "Authentication");
        response.setHeader("Access-Control-Allow-Methods","POST,GET,OPTIONS,DELETE");
        response.setHeader("Access-Control-Allow-Origin",request.getHeader("Origin"));

        log.info("send {} request to{}", request.getMethod () ,request.getRequestURL().toString()+"--"+ request.getContentType());

        Object accessToken = request.getParameter("token");
         if(accessToken == null) {
            log.warn("access token is empty");
            ctx.setSendZuulResponse(false);
            // 401错误表示需要登陆才可以
            ctx.setResponseStatusCode(401);
            //为了被error过滤器捕获
            ctx.set("error.status_code", HttpServletResponse.SC_INTERNAL_SERVER_ERROR);
            ctx.set("error.exception",new RuntimeException("AccessToken不允许为空!"));
            throw new RuntimeException("AccessToken不允许为空!");
        }
        Map<String,Object> result = authenticationService.identify(new Identify((String)accessToken, IPUtil.getIpAddress(request)));
        log.info("鉴权中心鉴定结果是:", result.get("msg"));
         if((boolean)result.get("result")==false){
             ctx.setSendZuulResponse(false);
             // 401错误表示需要登陆才可以
             ctx.setResponseStatusCode(401);
             //为了被error过滤器捕获
             ctx.set("error.status_code", HttpServletResponse.SC_INTERNAL_SERVER_ERROR);
             ctx.set("error.exception",new RuntimeException((String)result.get("msg")));
             throw new RuntimeException((String)result.get("msg"));
         }

        return null;
    }
}
在权限架构生产者的章节我在配置文件中忘记放置了redis的配置文件,因此我们打开我们的rbac-produce工程,同时找到application-prod-8100.properties配置文件修改完成以后内容如下,标红的就是我们新添加的配置的内容:
spring.application.name=rbac-produce
# 注册中心地址
eureka.client.serviceUrl.defaultZone=http://fjhyll:[email protected]:2100/eureka/
# 链路数据收集并发送地址
spring.zipkin.base-url=http://127.0.0.1:9100
# 当前应用收集信息百分比
spring.sleuth.sampler.percentage=0.1
# 路线匹配算法生产者端口号
server.port=8100

#数据库连接配置
spring.datasource.driverClassName=com.mysql.jdbc.Driver
spring.datasource.url=jdbc:mysql://10.6.71.236:3306/hyll_springboot?characterEncoding=utf-8&useSSL=false
spring.datasource.username=root
spring.datasource.password=haoyunll123
#连接池的配置信息
#初始化连接数
spring.datasource.initialSize=5
#最小空闲连接数
spring.datasource.minIdle=5
#最大连接数
spring.datasource.maxActive=20
#
spring.datasource.maxWait=60000
spring.datasource.timeBetweenEvictionRunsMillis=60000
spring.datasource.minEvictableIdleTimeMillis=300000
spring.datasource.validationQuery=SELECT 1 FROM DUAL
spring.datasource.testWhileIdle=true
spring.datasource.testOnBorrow=false
spring.datasource.testOnReturn=false
spring.datasource.poolPreparedStatements=true
spring.datasource.maxPoolPreparedStatementPerConnectionSize=20
spring.datasource.filters=stat,wall,log4j
spring.datasource.connectionProperties=druid.stat.mergeSql=true;druid.stat.slowSqlMillis=5000

# redis内存数据库配置文件
spring.redis.host=10.6.71.236
spring.redis.port=6379
spring.redis.pool.max-idle=20
接着大家打开当前工程的mvc包底下的WebMvcConfig.java,将新的模块的菜单链接页的跳转在此处配置,以下文件内容实现了字典维护、菜单管理、组织架构、用户管理和角色管理的页面跳转,大家若后续有新的模块加入可以直接在此处添加实现页面的跳转,大家也可以改造GenericController.java而无需在此进行配置,文件内容如下:
package com.rbac.rbacshow.common.config.mvc;

import org.springframework.context.annotation.Configuration;
import org.springframework.web.servlet.config.annotation.ViewControllerRegistry;
import org.springframework.web.servlet.config.annotation.WebMvcConfigurerAdapter;

/*
* 类描述:springMVC的配置
* @auther linzf
* @create 2018/1/24 0024
*/
@Configuration
public class WebMvcConfig extends WebMvcConfigurerAdapter {

    /**
     * 重写方法描述:实现在url中输入相应的地址的时候直接跳转到某个地址
     * @param registry
     */
    @Override
    public void addViewControllers(ViewControllerRegistry registry) {
        //  跳转到登陆页
        registry.addViewController("/login").setViewName("login");
        // 登陆成功跳转到首页
        registry.addViewController("/main").setViewName("main");
        // 登陆成功tab首页
        registry.addViewController("/home").setViewName("home");
        // 字典列表页
        registry.addViewController("/dictList").setViewName("/sys/dict/dictList");
        // 用户列表页
        registry.addViewController("/userList").setViewName("/sys/user/userList");
        // 角色列表页
        registry.addViewController("/userRoleList").setViewName("/sys/role/roleList");
        // 组织结构列表页
        registry.addViewController("/groupList").setViewName("/sys/orggroup/groupList");
        // 菜单管理页
        registry.addViewController("/treeList").setViewName("/sys/tree/treeList");

    }

}
接着我们集成我们的数据字典模块,首先在我们的controller包底下创建DictController.java文件内容如下:
package com.rbac.rbacshow.sys.controller;

import com.base.entity.Dict;
import com.rbac.rbacshow.common.base.GenericController;
import org.springframework.stereotype.Controller;
import org.springframework.web.bind.annotation.RequestMapping;

@Controller
@RequestMapping("/dict")
public class DictController extends GenericController<Dict> {

}
接着修改我们的dict文件夹底下的dictList.html文件,这里我们只需要修改我们的相应的远程调用获取数据的方法我们就可以直接实现我们的云权限架构,dictList.html文件内容如下:
<html xmlns:th="http://www.thymeleaf.org"
      xmlns:sec="http://www.thymeleaf.org/thymeleaf-extras-springsecurity4">
<head th:include="include/includebase"></head>
<body>
<div class="panel-body" style="padding-bottom:0px;">
    <div class="panel panel-default">
        <div class="panel-heading">查询条件</div>
        <div class="panel-body">
            <form class="form-inline" role="form" style="float: left; width: 100%;" method="post" id="queryDict">
                <div class="form-group">
                    <label for="type">字典类型:</label>
                    <input type="text" class="form-control" name="type" id="type"  placeholder="请输入字典类型" />
                </div>
                <div class="form-group">
                    <label for="code">字典编码:</label>
                    <input type="text" class="form-control" name="code" id="code"  placeholder="请输入字典编码" />
                </div>
                <div class="form-group">
                    <label for="value">字典值:</label>
                    <input type="text" class="form-control" name="value" id="value"  placeholder="请输入字典值" />
                </div>
                <div class="form-group">
                    <label for="text">字典描述:</label>
                    <input type="text" class="form-control" name="text" id="text"  placeholder="请输入字典值" />
                </div>
                <div class="form-group">
                    <button type="button" id="queryBtn" onclick="doQuery();" class="btn btn-primary">查询</button>
                </div>
            </form>
        </div>
    </div>
    <table id="dict-table" style="margin-top: -50px;">
    </table>
</div>
<script th:inline="javascript">

    // 获取当前窗口的宽度
    var winWidth = $(window.parent.document).find("#wrapper").width();


    $(function() {
        initTable();
        $('#dict-table').bootstrapTable('hideColumn', 'id');
    });

    function doQuery(){
        // 移除遮罩层的属性否则会导致在移动端无法显示滚动条
        $('body').removeClass("modal-open");
        $('#dict-table').bootstrapTable('refresh');    //刷新表格
    }

    function initTable(){
        $('#dict-table').bootstrapTable({
            url:api_url+"dict/list",
            height:  winWidth<=415?721:$(window.parent.document).find("#wrapper").height() - 252,
            width:$(window).width(),
            showColumns:true,
            formId :"queryDict",
            pagination : true,
            sortName : 'id',
            sortOrder : 'desc',
            clickToSelect: true,// 单击某一行的时候选中某一条记录
            pageSize : winWidth<=415?3:13,
            cardView : winWidth<=415?true:false,// 根据屏幕大小来决定是否试图展示
            toolbars:[
                {
                    text: '添加',
                    iconCls: 'glyphicon glyphicon-plus',
                    handler: function () {
                         window.Ewin.dialog({title:"添加",url:"dict/addPage",gridId:"gridId",width:winWidth<=415?winWidth-20:400,height:500})
                    }
                },
                {
                    text: '修改',
                    iconCls: 'glyphicon glyphicon-pencil',
                    handler: function () {
                        var rows = $('#dict-table').bootstrapTable('getSelections');
                        if(rows.length==0||rows.length>1){
                            window.Ewin.alert({message:'请选择一条需要修改的数据!'});
                            return false;
                        }
                        window.Ewin.dialog({title:"修改",url:"dict/updatePage?id="+rows[0].id,gridId:"gridId",width:winWidth<=415?winWidth-20:400,height:500});
                    }
                },
                {
                    text: '删除',
                    iconCls: 'glyphicon glyphicon-remove',
                    handler: function () {
                        var rows = $('#dict-table').bootstrapTable('getSelections');
                        if(rows.length==0){
                            window.Ewin.alert({message:'请选择一条需要删除的数据!'});
                            return false;
                        }
                        window.Ewin.confirm({title:'提示',message:'是否要删除您所选择的记录?',width:500}).on(function (e) {
                            if (e) {
                                $.post(api_url+"dict/removeBath",{json:JSON.stringify(rows)},function(e){
                                   if(e.result){
                                       window.Ewin.alert({message:e.msg});
                                       doQuery();
                                   }
                                });
                            }
                        });
                    }
                },
                {
                    text: '重新加载',
                    iconCls: 'glyphicon glyphicon-record',
                    handler: function () {
                        window.Ewin.confirm({title:'提示',message:'是否要需要重新加载数据字典的数据?',width:500}).on(function (e) {
                            if (e) {
                                $.post("dict/reload",function(e){
                                    if(e.result){
                                        window.Ewin.alert({message:e.msg});
                                    }
                                });
                            }
                        });
                    }
                }
            ],
            columns: [
                {
                    checkbox: true
                },
                {
                    field: '',
                    title: '序号',
                    formatter: function (value, row, index) {
                        return index+1;
                    }
                },
                {
                    field : 'id',
                    title : '字典流水',
                    align : 'center',
                    valign : 'middle',
                    hide : false,
                    sortable : true
                },
                {
                    field : 'type',
                    title : '字典类型',
                    align : 'center',
                    valign : 'middle',
                    sortable : true
                },
                {
                    field : 'code',
                    title : '字典编码',
                    align : 'center',
                    valign : 'middle',
                    sortable : true
                },
                {
                    field : 'value',
                    title : '字典值',
                    align : 'center',
                    valign : 'middle',
                    sortable : true
                },
                {
                    field : 'text',
                    title : '字典描述',
                    align : 'center',
                    valign : 'middle',
                    sortable : true
                },
                {
                    field : 'isLoad',
                    title : '前端加载',
                    align : 'center',
                    valign : 'middle',
                    sortable : true,
                    formatter: function (value, row, index) {
                        return getCodeDictText("DICT_IS_LOAD",value);
                    }
                }]
        });
    }
</script>
</body>
</html>
数据字典的add.html文件内容如下:
<html xmlns:th="http://www.thymeleaf.org"
      xmlns:sec="http://www.thymeleaf.org/thymeleaf-extras-springsecurity4">
<body>
<form id="dictForm"  role="form" method="post" action="dict/save">
    <div class="form-group" >
        <label for="type">字典类型:</label>
        <input type="text" class="form-control" name="type" id="type"  placeholder="请输入字典类型" />
    </div>
    <div class="form-group">
        <label for="code">字典编码:</label>
        <input type="text" class="form-control" name="code" id="code"  placeholder="请输入字典编码" />
    </div>
    <div class="form-group" >
        <label for="value">字典值:</label>
        <input type="text" class="form-control" name="value" id="value"  placeholder="请输入字典值" />
    </div>
    <div class="form-group">
        <label for="text">字典描述:</label>
        <input type="text" class="form-control" name="text" id="text"   placeholder="请输入字典描述" />
    </div>
    <div class="form-group">
        <label >前端加载:</label>
        <label  class='radio-inline'><input type='radio' name='isLoad' value='1'  checked="checked"  />允许</label>
        <label  class='radio-inline'><input type='radio' name='isLoad' value='0'   />不允许</label>
    </div>

</form>
<script th:inline="javascript">
    <![CDATA[
    $(function () {
        $('#dictForm').bootstrapValidator({
            message: 'This value is not valid',
            feedbackIcons: {
                valid: 'glyphicon glyphicon-ok',
                invalid: 'glyphicon glyphicon-remove',
                validating: 'glyphicon glyphicon-refresh'
            },
            fields: {
                type: {
                    message: '字典类型验证失败',
                    validators: {
                        notEmpty: {
                            message: '字典类型不能为空'
                        }
                    }
                },
                code: {
                    message: '字典编码验证失败',
                    validators: {
                        notEmpty: {
                            message: '字典编码不能为空'
                        },
                        threshold :  2 , //有6字符以上才发送ajax请求,(input中输入一个字符,插件会向服务器发送一次,设置限制,6字符以上才开始)
                        remote: {//ajax验证。server result:{"valid",true or false} 向服务发送当前input name值,获得一个json数据。例表示正确:{"valid",true}
                            url: api_url+"dict/isExist",//验证地址
                            data:function(validator) {// 获取需要传送到后台的验证的数据
                                return {
                                    type:$('#type').val(),
                                    code:$("#code").val(),
                                    id:$("#dictId").val()
                                }
                            },
                            message: '字典编码已存在',//提示消息
                            delay :  500,//每输入一个字符,就发ajax请求,服务器压力还是太大,设置2秒发送一次ajax(默认输入一个字符,提交一次,服务器压力太大)
                            type: 'POST'//请求方式
                        }
                    }
                },
                value: {
                    message: '字典值验证失败',
                    validators: {
                        notEmpty: {
                            message: '字典值不能为空'
                        }
                    }
                }
            }
        })

        // 绑定dialog的确定按钮的监听事件
        $("#btnOk",window.top.document).click(function() {

            // 此段是为防止需要点击两次按钮来实现验证的方法,若不添加此处的放行,那么我们将要点击两次确定按钮才可以提交验证
            var code = $("#code").val();
            // 判断当前的code又值,且当前不存在错误验证方可放开该字段的验证
            if(code != null && code != ""&&$("#code").parent("div").find('.glyphicon-remove').length==0){
                $('#dictForm').bootstrapValidator('enableFieldValidators', 'code', false);
            } else {
                $('#dictForm').bootstrapValidator('enableFieldValidators', 'code', true);
            }
            var bootstrapValidator = $("#dictForm", window.top.document).data('bootstrapValidator');
            bootstrapValidator.validate();
            if(bootstrapValidator.isValid()){
                $.post(api_url+$("#dictForm",window.top.document).attr('action'),$("#dictForm",window.top.document).serialize(),function(e){
                    if(e.result){
                        $('.modal-dialog', window.top.document).parent('div').remove()
                        $('body', window.top.document).find('.modal-backdrop').remove();
                        // jquery 调用刷新当前操作的table页面的refresh方法
                        $(window.parent.document).contents().find(".tab-pane.fade.active.in iframe")[0].contentWindow.doQuery();
                        window.Ewin.alert({message:'增加数据成功!'});
                    }else{
                        window.Ewin.alert({message:'增加数据失败!'});
                    }
                })
            }
        });
    })
    ]]>
</script>
</body>
</html>
数据字典的update.html的文件内容如下:
<html xmlns:th="http://www.thymeleaf.org"
xmlns:sec="http://www.thymeleaf.org/thymeleaf-extras-springsecurity4">
<body>
<form id="dictForm" role="form" method="post" action="dict/update">
<input type="hidden" name="id" id="id" />
<div class="form-group" >
<label for="type">字典类型:</label>
<input type="text" class="form-control" name="type" id="type" placeholder="请输入字典类型" />
</div>
<div class="form-group">
<label for="code">字典编码:</label>
<input type="text" class="form-control" name="code" id="code" placeholder="请输入字典编码" />
</div>
<div class="form-group" >
<label for="value">字典值:</label>
<input type="text" class="form-control" name="value" id="value" placeholder="请输入字典值" />
</div>
<div class="form-group">
<label for="text">字典描述:</label>
<input type="text" class="form-control" name="text" id="text" placeholder="请输入字典描述" />
</div>
<div class="form-group">
<label >前端加载:</label>
<label class='radio-inline'><input type='radio' name='isLoad' value='1' />允许</label>
<label class='radio-inline'><input type='radio' name='isLoad' value='0' />不允许</label>
</div>
</form>
<script th:inline="javascript">
<![CDATA[
$(function () {
$.fn.loadInfoData({url:api_url+"dict/get",data:{id:[[${entity.id}]]}});
$('#dictForm').bootstrapValidator({
message: 'This value is not valid',
feedbackIcons: {
valid: 'glyphicon glyphicon-ok',
invalid: 'glyphicon glyphicon-remove',
validating: 'glyphicon glyphicon-refresh'
},
fields: {
type: {
message: '字典类型验证失败',
validators: {
notEmpty: {
message: '字典类型不能为空'
}
}
},
code: {
message: '字典编码验证失败',
validators: {
notEmpty: {
message: '字典编码不能为空'
},
threshold : 2 , //有6字符以上才发送ajax请求,(input中输入一个字符,插件会向服务器发送一次,设置限制,6字符以上才开始)
remote: {//ajax验证。server result:{"valid",true or false} 向服务发送当前input name值,获得一个json数据。例表示正确:{"valid",true}
url: api_url+"dict/isExist",//验证地址
data:function(validator) {// 获取需要传送到后台的验证的数据
return {
type:$('#type').val(),
code:$("#code").val(),
id:$("#id").val()
}
},
message: '字典编码已存在',//提示消息
delay : 500,//每输入一个字符,就发ajax请求,服务器压力还是太大,设置2秒发送一次ajax(默认输入一个字符,提交一次,服务器压力太大)
type: 'POST'//请求方式
}
}
},
value: {
message: '字典值验证失败',
validators: {
notEmpty: {
message: '字典值不能为空'
}
}
}
}
})
// 绑定dialog的确定按钮的监听事件
$("#btnOk",window.top.document).click(function() {
// 此段是为防止需要点击两次按钮来实现验证的方法,若不添加此处的放行,那么我们将要点击两次确定按钮才可以提交验证
var id = $("#id").val();
if(id != null && id != ""){
$('#dictForm').bootstrapValidator('enableFieldValidators', 'code', false);
} else {
$('#dictForm').bootstrapValidator('enableFieldValidators', 'code', true);
}
var bootstrapValidator = $("#dictForm", window.top.document).data('bootstrapValidator');
bootstrapValidator.validate();
if(bootstrapValidator.isValid()){
$.post(api_url+$("#dictForm",window.top.document).attr('action'),$("#dictForm",window.top.document).serialize(),function(e){
if(e.result){
$('.modal-dialog', window.top.document).parent('div').remove()
$('body', window.top.document).find('.modal-backdrop').remove();
// jquery 调用刷新当前操作的table页面的refresh方法
$(window.parent.document).contents().find(".tab-pane.fade.active.in iframe")[0].contentWindow.doQuery();
window.Ewin.alert({message:'修改数据成功!'});
}else{
window.Ewin.alert({message:'修改数据失败!'});
}
})
}
});
})
]]>
</script>
</body>
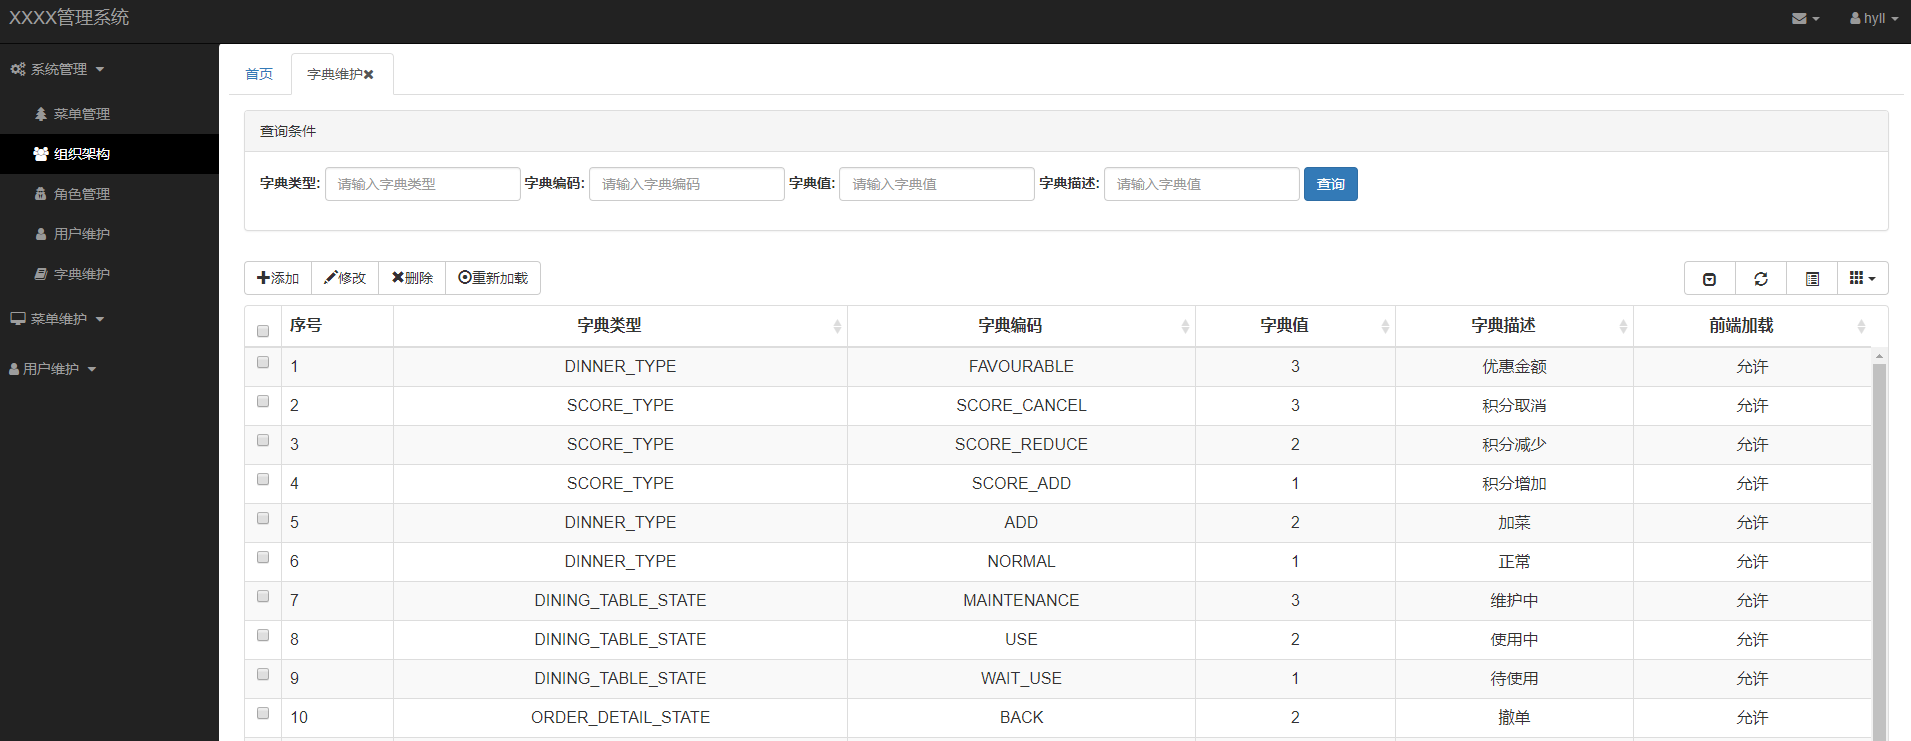
</html>到此我们已经完成了数据字典的云权限架构的迁移,因此当大家需要迁移自己的原始系统的时候,我们的前端可以只经过很少的改动就可以完成我们的迁移工作,接下来我们将链路中心、注册中心、生产者、消费者、路由网关和展示层给启动起来,大家可以看到如下的页面效果,说明我们的系统已经完成了数据字典的集成。
接下来就是集成我们的组织架构管理、菜单管理、角色管理、用户管理,此处就不再累述了大家直接看我发布在GitHub上的工程就可以了,大家有不懂的可以直接加群直接在群里@我就可以了。
到此为止的GitHub项目地址:https://github.com/185594-5-27/spring-cloud-rbac
上一篇文章地址:基于springboot+redis+bootstrap+mysql开发一套属于自己的分布式springcloud云权限架构(十七)【权限架构系统(基础框架搭建)】
QQ交流群:578746866