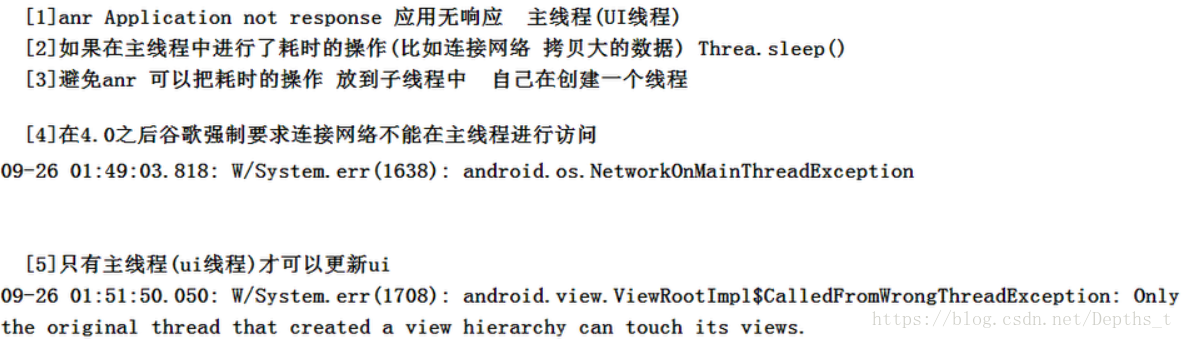
在Android4.0之后谷歌强制要求连接网络不能在主线程进行访问,所以要开辟子线程来访问网络但是子线程中无法更新ui
所以使用Handler实现从子线程快速跳回主线程的操作。

1)Handler 和runOnUiThread()的使用
可以进行ui的更新
 final Bitmap bitmap = BitmapFactory.decodeFile(file.getAbsolutePath());
                            //runOnUiThread 不管在哪里调用  action  也就是Runnable()的run()方法中的语句都在运行在UI线程
                            runOnUiThread(new Runnable() {
                                @Override
                                public void run() {
                                   iv.setImageBitmap(bitmap);
                                }
                            });
2)图片查看器案例 (如何使用图片缓存)
public class MainActivity extends AppCompatActivity {
    private EditText et_path;
    private ImageView iv;
    private Handler handler = new Handler() {
        @Override
        public void handleMessage(Message msg) {
            Bitmap bitmap = (Bitmap) msg.obj;
            iv.setImageBitmap(bitmap);
        }
    };

    @Override
    protected void onCreate(Bundle savedInstanceState) {
        super.onCreate(savedInstanceState);
        setContentView(R.layout.activity_main);
        et_path = findViewById(R.id.et_path);
        iv = findViewById(R.id.iv);
    }

    //[2]给按钮设置点击事件 查看指定路径图片
    public void click(View v) {
        new Thread() {
            public void run() {
                File file = new File(getCacheDir(), "test.png");
                if (file.exists() && file.length() > 0) {
                    //使用缓存图片
                    System.out.println("使用缓存图片");
                    Bitmap cachebitmap = BitmapFactory.decodeFile(file.getAbsolutePath());
                    //把cachebitmap显示到iv上
                    Message msg = Message.obtain();
                    msg.obj = cachebitmap;
                    handler.sendMessage(msg);
                } else {
                    //第一次访问联网获取数据
                    System.out.println("第一次联网获取图片");
                    try {
                        //[2.1] 获取指定路径
                        String path = et_path.getText().toString().trim();
                        //[2.2] 获取URL对象
                        URL url = new URL(path);
                        //[2.3]获取HttpURLConnection对象
                        HttpURLConnection conn = (HttpURLConnection) url.openConnection();
                        //[2.4]设置请求的方式
                        conn.setRequestMethod("GET");
                        //[2.5]设置超时时间
                        conn.setConnectTimeout(5000);
                        //[2.6]获取服务器返回的状态码
                        int code = conn.getResponseCode();
                        if (code == 200) {
                            //[2.7]获取图片数据  以流的形式返还
                            InputStream in = conn.getInputStream();
                            //[2.7.1] 缓存图片 谷歌提供了缓存目录

                            FileOutputStream fos = new FileOutputStream(file);
                            int len = -1;
                            byte[] buffer = new byte[1024];
                            while ((len = in.read(buffer)) != -1) {
                                fos.write(buffer, 0, len);
                            }
                            fos.close();
                            in.close();
                            //[2.8]通过位图工厂把按文件路径获取 Bitmap
                            Bitmap bitmap = BitmapFactory.decodeFile(file.getAbsolutePath());
                            //使用 Message的静态方法Message.obtain()获取Message对象可以减少创建对象提高效率
                            Message msg = Message.obtain();
                            msg.obj = bitmap;
                            handler.sendMessage(msg);
                        }
                    } catch (Exception e) {
                        e.printStackTrace();
                    }
                }
            }
        }.start();

    }

}
3) 网页源码查看器案例
public class MainActivity extends AppCompatActivity {
    private EditText et_path;
    private TextView tv_result;
    private final int REQUESTUCESS = 0;
    private final int REQUESTNOTFOUND = 1;
    private final int REQUESTEXCEPTION = 2;
    //在主线程中定义一个Handler
    private Handler handler = new Handler() {
        @Override
        //这个方法在主线程中执行所以就可以在主线程中更新ui了
        public void handleMessage(Message msg) {
            //分类识别消息
            switch (msg.what) {
                case REQUESTUCESS:
                    //将接收到的Message转化成字符串显示在TextView上
                    String content = (String) msg.obj;
                    tv_result.setText(content);
                    break;
                case REQUESTNOTFOUND:
                    Toast.makeText(getApplicationContext(), "无法连接到指定网址", Toast.LENGTH_LONG).show();
                    break;
                case REQUESTEXCEPTION:
                    Toast.makeText(getApplicationContext(), "服务器忙", Toast.LENGTH_LONG).show();
                    break;
            }


        }
    };

    @Override
    protected void onCreate(Bundle savedInstanceState) {
        super.onCreate(savedInstanceState);
        setContentView(R.layout.activity_main);
        et_path = findViewById(R.id.et_path);
        tv_result = findViewById(R.id.tv_result);
    }

    public void click(View v) {
        //[2.0]创建一个子线程
        new Thread() {
            public void run() {
                try {
                    //[2.1]获取访问路径
                    String path = et_path.getText().toString().trim();
                    //[2.2]获取URL
                    URL url = new URL(path);
                    //[2.3]获取HttpURLConnection的实例  用于发送或接收数据
                    HttpURLConnection conn = (HttpURLConnection) url.openConnection();
                    //[2.4]设置发送get请求
                    conn.setRequestMethod("GET");//GET要求大写可以不用写默认为HttpURLConnectionget请求
                    //[2.5]设置请求超时时间
                    conn.setConnectTimeout(5000);
                    //[2.6]获取服务器返回的状态码
                    int code = conn.getResponseCode();
                    //[2.7]对状态码code进行判断
                    if (code == 200) {
                        //[2.8]获取服务器返回的的数据 返回的为一个流
                        InputStream in = conn.getInputStream();
                        //[2.9] 使用定义好的工具类 把流转化成字符串
                        String content = StreamTools.readStram(in);
                        //[2.9.0] 创建Message
                        Message msg = new Message();
                        msg.what = REQUESTUCESS;//标明是哪个消息
                        msg.obj = content;
                        //2.9.1拿着我们创建的handler(助手)在子线程里对系统说要更新ui
                        //发送了一条消息(msg)携带数据这句话执行完我们重写的handleMessage(Message msg)就会执行
                        handler.sendMessage(msg);
                        //[2.9.1] 把数据显示到TextView上
                        //tv_result.setText(content);
                    } else {
                        Message msg = new Message();
                        msg.what = REQUESTNOTFOUND;//标明是哪个消息
                        handler.sendMessage(msg);
                    }
                } catch (Exception e) {
                    e.printStackTrace();
                    Message msg = new Message();
                    msg.what = REQUESTEXCEPTION;//标明是哪个消息
                    handler.sendMessage(msg);
                }
            }
        }.start();
    }
}
扫描二维码关注公众号,回复:
2403270 查看本文章
