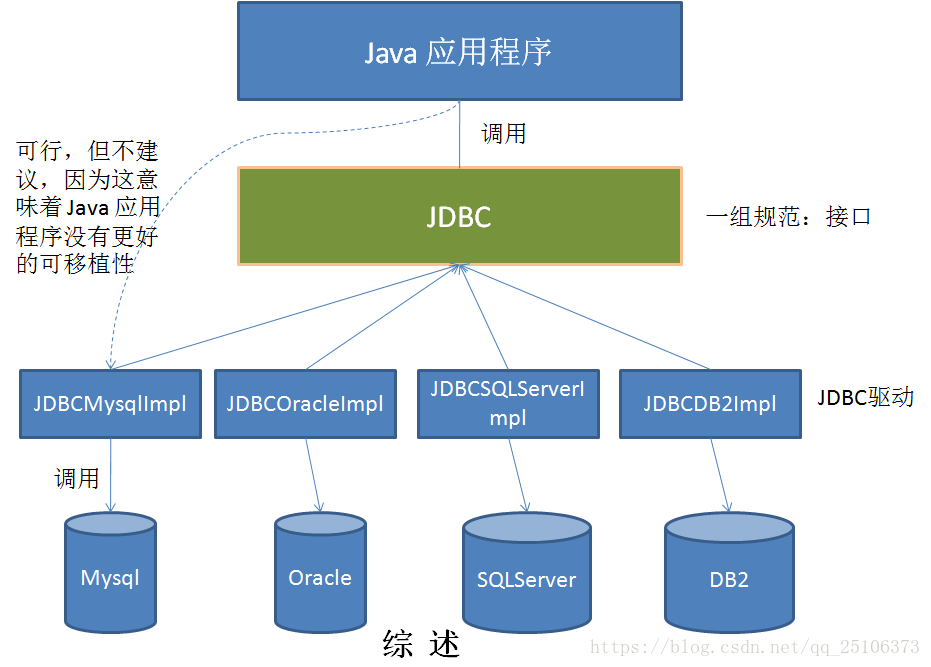
JDBC概述


获取数据库连接


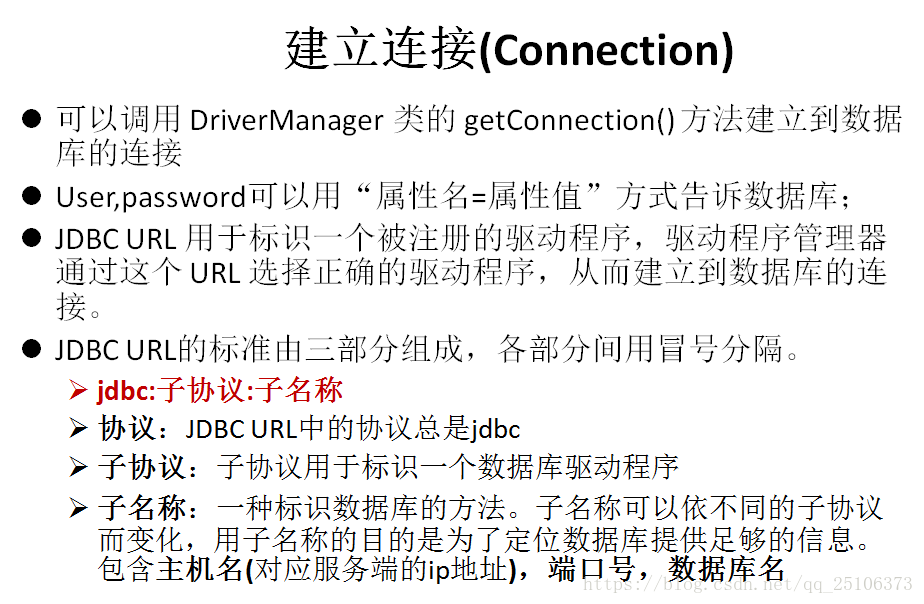
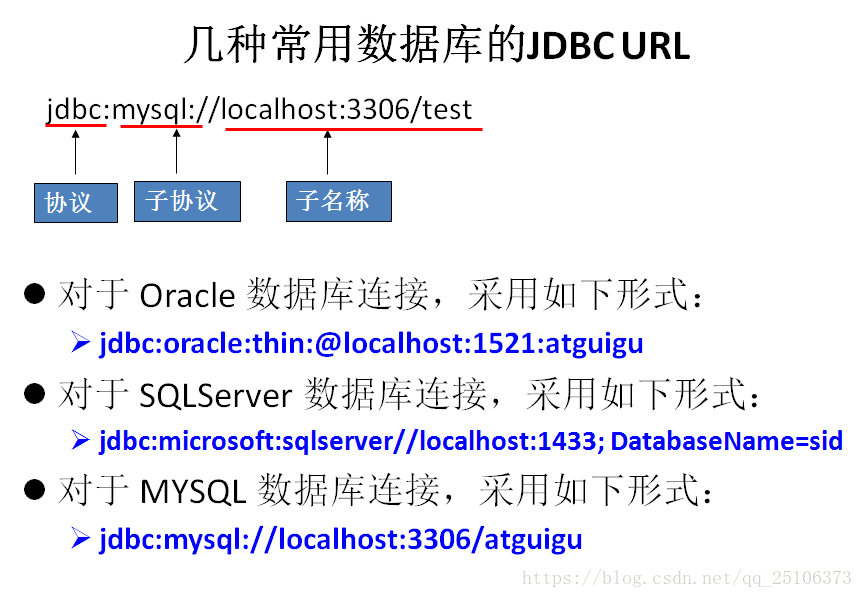
总结如下:
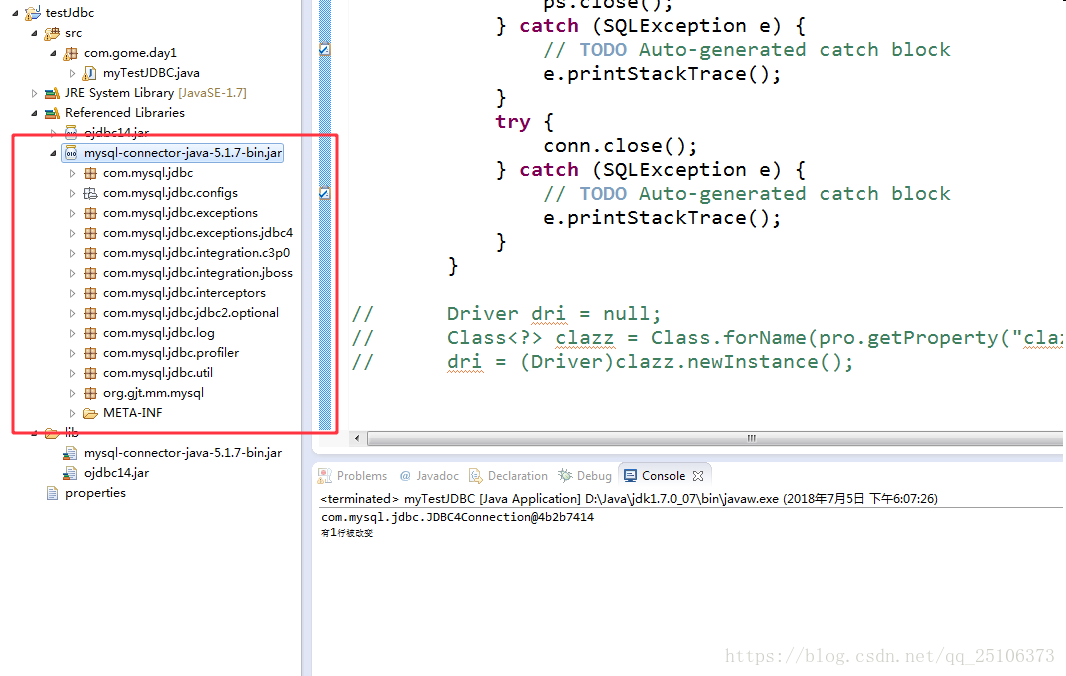
拷贝数据库的驱动文件 xxx.jar 到项目的lib(名字无所谓)文件夹下,然后选中该jar文件右击选择Build Path---->Add to Build Path,这样数据库的驱动就加载进来啦!


连接数据库代码:
public class TestJDBC {
//4.
@Test
public void test4() throws Exception{
Properties props = new Properties();
props.load(new FileInputStream("./jdbc.properties"));
String driverClassName = props.getProperty("driverClassName");
String url = props.getProperty("url");
String user = props.getProperty("user");
String password = props.getProperty("password");
//1.加载驱动
Class.forName(driverClassName);
//2.获取连接
Connection conn = DriverManager.getConnection(url, user, password);
System.out.println(conn);
}
//3. 加载驱动,获取连接
@Test
public void test3() throws Exception{
String className = "com.mysql.jdbc.Driver";
String url = "jdbc:mysql://127.0.0.1:3306/test";
String user = "root";
String password = "123456";
//1. 加载驱动
Class.forName(className);
//2. 获取连接
Connection conn = DriverManager.getConnection(url, user, password);
System.out.println(conn);
}
//2. 利用 DriverManager 驱动管理类,获取数据库连接
@Test
public void test2() throws Exception{
//1. 注册驱动
Driver driver = null;
String className = "com.mysql.jdbc.Driver";
Class clazz = Class.forName(className);
driver = (Driver) clazz.newInstance();
DriverManager.registerDriver(driver);
//2. 获取连接
String url = "jdbc:mysql://127.0.0.1:3306/test";
String user = "root";
String password = "123456";
Connection conn = DriverManager.getConnection(url, user, password);
System.out.println(conn);
}
//1. 利用 MYSQL 提供的驱动,获取与 MYSQL 数据库的连接
@Test
public void test1() throws Exception{
//1. 获取驱动
Driver driver = null;
String className = "com.mysql.jdbc.Driver";
Class clazz = Class.forName(className);
driver = (Driver) clazz.newInstance();
//2. 获取连接
String url = "jdbc:mysql://127.0.0.1:3306/test";
Properties info = new Properties();
info.setProperty("user", "root");
info.setProperty("password", "123456");
Connection conn = driver.connect(url, info);
System.out.println(conn);
}
}
代码段3中的加载连接方式很简略,那因为mysql的驱动类 Driver中有静态代码块,而静态代码块中已经实现了向DriverManager中注册Driver,所以不再需要我们像代码段2中那样自己手动注册啦,我们大家都知道类中的静态代码块会随着类的加载到内存中而被执行,所以我们只需要Class.forName(className)就好了!
查看mysql的驱动类 Driver的源码方式:选择代码中的Driver类ctrl+shift+t
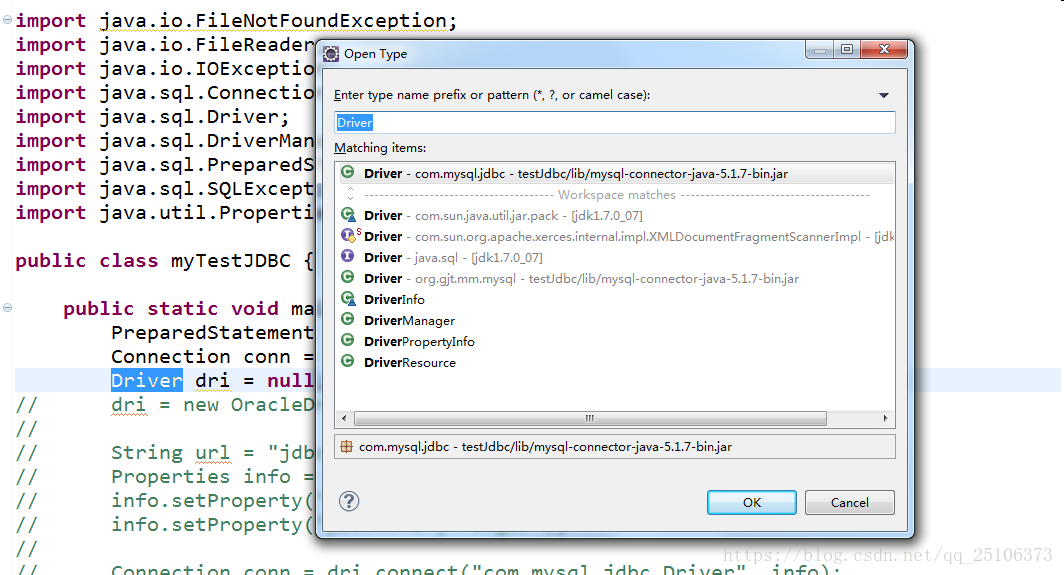
找到我们需要的mysql驱动的Driver双击,这时之前如何没有导入过源码,会找不到。。。不过没关系,还好mysql是开源的,我们点击attach source,


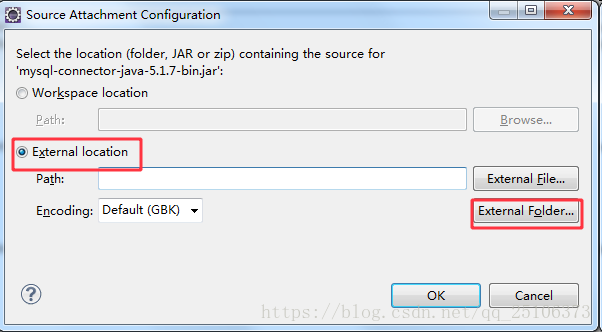

这样就可以看到源码啦 。。。

使用 PreparedStatement 完成增删改


/*
* 使用 PreparedStatement 完成增、删、改
*/
public class TestPreparedStatement {
//修改数据
@Test
public void test2(){
//1. 获取连接
Connection conn = null;
PreparedStatement ps = null;
try {
conn = JDBCUtils.getConnection();
//2. 获取 PreparedStatement, 用于发送 SQL
String sql = "update customers set name = ?, birth = ? where id = ?";
ps = conn.prepareStatement(sql);
//3. 填充占位符
ps.setString(1, "xxx");
ps.setString(2, "1888-10-10");
ps.setInt(3, 19);
//4. 执行 SQL 语句
int row = ps.executeUpdate();
System.out.println("已影响 " + row + " 行");
} catch (Exception e) {
e.printStackTrace();
} finally {
//5. 关闭连接
JDBCUtils.close(ps, conn);
}
}
//添加数据到数据库中
@Test
public void test1(){
//1. 获取连接
Connection conn = null;
PreparedStatement ps = null;
try {
conn = JDBCUtils.getConnection();
//2. 获取 PreparedStatement 的实例,用于发送 SQL 语句
String sql = "insert into customers(id, name, email, birth) values(?,?,?,?)"; //? : 占位符
ps = conn.prepareStatement(sql);
//3. 填充占位符
ps.setInt(1, 19);
ps.setString(2, "xxx");
ps.setString(3, "[email protected]");
ps.setDate(4, new java.sql.Date(new Date().getTime()));
//4. 执行 SQL 语句
ps.executeUpdate();
} catch (Exception e) {
e.printStackTrace();
} finally {
//5. 关闭连接
JDBCUtils.close(ps, conn);
}
}
// @Test
// public void test1(){
// //1. 获取连接
// Connection conn = JDBCUtils.getConnection();
//
// //2. 获取 PreparedStatement 的实例,用于发送 SQL 语句
// String sql = "insert into customers(id, name, email, birth) values(?,?,?,?)"; //? : 占位符
// PreparedStatement ps = conn.prepareStatement(sql);
//
// //3. 填充占位符
// ps.setInt(1, 19);
// ps.setString(2, "xx");
// ps.setString(3, "[email protected]");
// ps.setDate(4, new java.sql.Date(new Date().getTime()));
//
// //4. 执行 SQL 语句
// ps.executeUpdate();
//
// //5. 关闭连接
// JDBCUtils.close(ps, conn);
// }
}