Android操作SQLite数据库(极简洁,极易懂)
一、成品效果图
还是那句话,不想看我文字闲扯的,只想拿源码的,请直接跳到文字下方,有所需要的全部源码。
二、致歉声明
前几天我写了一篇Android登录、注册的文章,链接在这:
https://blog.csdn.net/midnight_time/article/details/80792255
文章里面代码有点混乱,而且内容极多,虽然很多人看完也没有抄起来板砖砸我,但我自己反思了一下,这种给人阅读带来压力的文章,绝对不是好文章。既然不是好文章,那我就是在浪费大家时间,荒废阅读者生命。我在此给大家道歉,对不起,让你们头大了!这次我吸取教训,改邪归正,追求极简,带给你阅读上轻松的体验。
三、Android操作数据库原理阐述
既然是要操作数据库,那么首先我们得选一款数据库,因为这个世界上,现存数据库种类很多。能随口就说上来的有,比如:Oracle、MySQL、SQLSever、KingBase,这四个是我随口就能说出来的,其他的像NoSQL、DB2......这些都是我得想一会才能说出来的,那么Android选的这款数据库,是我之前听都没听说过的一款,SQLite。发音是:[sk'laɪt] ,塞克赖特。当然,不是说Android数据库只能是SQLite,其它的也有办法实现,只不过,AndroidSDK中自带的是SQLite。
铺垫到此为止,下面写正文。
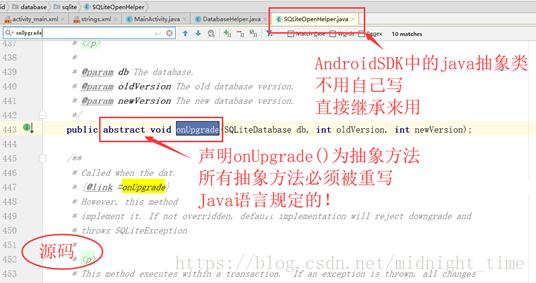
Android 提供的 SQLiteOpenHelper.java 是一个抽象类。那么我们要使用它,必须自己写一个类来继承它,为了达到见名知意的目的习惯上,我们创建的都是DatabaseHelper.java或者简写DBHelper.java,这个无所谓,你创建成1234.java都行。
这一行规定死了,只能是这样的:
public class DatabaseHelper extends SQLiteOpenHelper{ 接下来需要写一个带全部参数的DatabaseHelper类的构造函数,以后生成数据库对象的时候要用到:
//带全部参数的构造函数,此构造函数必不可少
    public DatabaseHelper(Context context, String name, CursorFactory factory, int version) {
        super(context, name, factory, version);
    }
构造函数完事之后,写继承的抽象类SQLiteOpenHelper中的两个抽象方法:
    @Override
    public void onCreate(SQLiteDatabase db) {
        //创建数据库sql语句 并 执行
        String sql = "create table user(name varchar(20))";
        db.execSQL(sql);
    }
    @Override
    public void onUpgrade(SQLiteDatabase db, int oldVersion, int newVersion) {

    }
上面的代码有两个问题,问题1.为什么onUpgrade()方法是空的?答案:因为它是抽象方法,必须被继承,但我为了达到极简的目的又没有用到它,一方面必须重写,一方面没有用到,所以就是一个空方法在这摆着样子了。问题2.为什么只重写这两个方法,其他的方法呢?答案:因为SQLiteOpenHelper.java中,只有这两个方法是抽象方法,你不信?我给你看看源码。(在AndroidStudio中我们按住Ctrl同时鼠标单击SQLiteOpenHelper就能进入它的源码中,在源码界面按住Ctrl+F 就能调出搜索框,输入abstract,点击向下箭头↓ 查找匹配项)

到此为止,我们自己创建的DatabaseHelper.java所有代码就已经写完了。
接下来看MainActivity.java文件中的代码,其中只有两部分代码。
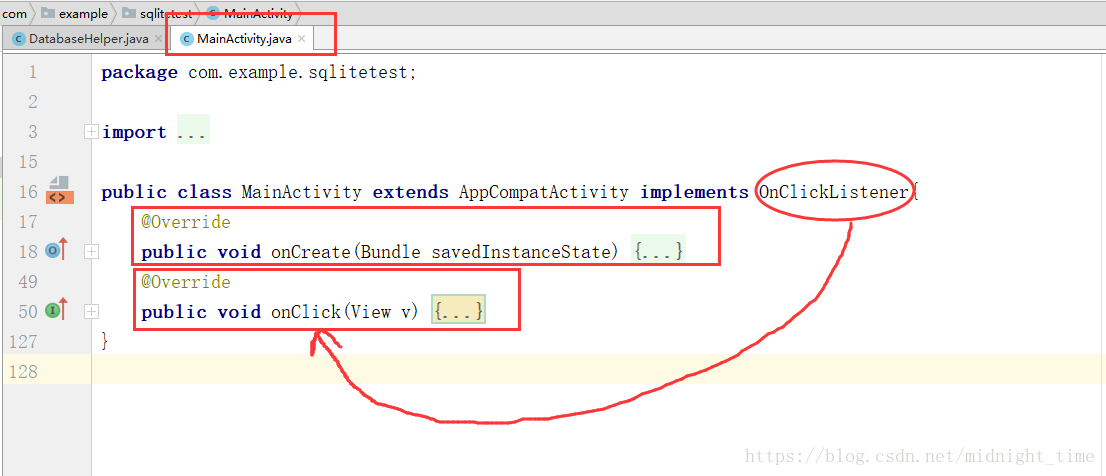
第一句代码中,创建Activity时会自动生成
public class MainActivity extends AppCompatActivity
在后面加上 下面这句,就能把onClick()方法写到onCreate()方法之外了
implements OnClickListener
MainActivity.java中第一部分代码:
创建Activity时的代码即onCreate()方法,要我们自己写的就两件事:
1.根据Layout按钮id生成Java按钮对象
就像这样:Button insert = (Button)findViewById(R.id.insert);
2.为所有Java按钮对象设置监听器
就像这样:insert.setOnClickListener(this);
MainActivity.java中第二部分代码:
响应屏幕点击时的代码即onClick()方法,我们需要写三件事:
1.生成EditText对象,用来获取文本输入框中用户输入的内容
就像这样:EditText insert_edittext = (EditText)findViewById(R.id.insert_edittext);
2.创建数据库,这里我们给数据库起名为“test_db”,数据库版本号为1,代码如下:
        //依靠DatabaseHelper带全部参数的构造函数创建数据库
        DatabaseHelper dbHelper = new DatabaseHelper(MainActivity.this, "test_db",null,1);
        SQLiteDatabase db = dbHelper.getWritableDatabase();
3.响应增、删、改、查四个按钮点击时触发的操作
①增:插入数据,首先需要new一个ContentValues,内容值对象。
所谓的内容值,就是一个K,V 键值对,K指明字段名称即列名称,V指明字段值,即单元格内容。然后将这个键值对放到ContentValues的对象values里面,再把携带着键值对的对象values插入user表中,代码如下:
            //插入数据按钮
            case R.id.insert:
                //创建存放数据的ContentValues对象
                ContentValues values = new ContentValues();
                values.put("name",insert_data);
                //数据库执行插入命令
                db.insert("user", null, values);
                break;
②删:删除数据,这里不需要生成ContentValues对象,直接从表user中delete符合要求的内容即可,代码如下:
            //删除数据按钮
            case R.id.delete:
                db.delete("user", "name=?", new String[]{delete_data});
                break;
③改:更新数据,这里和插入数据类似,需要new一个ContentValues对象,然后放入数据,执行update,代码如下:
            //更新数据按钮
            case R.id.update:
                ContentValues values2 = new ContentValues();
                values2.put("name", update_after_data);
                db.update("user", values2, "name = ?", new String[]{update_before_data});
                break;
④查:查询全部数据,这里使用了Cursor游标进行查询,游历数据同时,把数据用换行符\n连接起来,再把所有数据展示到文本显示框内,代码如下:
            //查询全部按钮
            case R.id.query:
                //创建游标对象
                Cursor cursor = db.query("user", new String[]{"name"}, null, null, null, null, null);
                //利用游标遍历所有数据对象
                //为了显示全部,把所有对象连接起来,放到TextView中
                String textview_data = "";
                while(cursor.moveToNext()){
                    String name = cursor.getString(cursor.getColumnIndex("name"));
                    textview_data = textview_data + "\n" + name;
                }
                textview.setText(textview_data);
                break;
正文到此为止,翠花上代码(三份):

DatabaseHelper.java
package com.example.sqlitetest;

import android.content.Context;
import android.database.sqlite.SQLiteDatabase;
import android.database.sqlite.SQLiteDatabase.CursorFactory;
import android.database.sqlite.SQLiteOpenHelper;
import android.util.Log;

public class DatabaseHelper extends SQLiteOpenHelper{
    //带全部参数的构造函数,此构造函数必不可少
    public DatabaseHelper(Context context, String name, CursorFactory factory, int version) {
        super(context, name, factory, version);
    }
    @Override
    public void onCreate(SQLiteDatabase db) {
        //创建数据库sql语句 并 执行
        String sql = "create table user(name varchar(20))";
        db.execSQL(sql);
    }
    @Override
    public void onUpgrade(SQLiteDatabase db, int oldVersion, int newVersion) {

    }

}
MainActivity.java
package com.example.sqlitetest;

import android.content.ContentValues;
import android.database.Cursor;
import android.database.sqlite.SQLiteDatabase;
import android.os.Bundle;
import android.support.v7.app.AppCompatActivity;
import android.view.View;
import android.view.View.OnClickListener;
import android.widget.Button;
import android.widget.EditText;
import android.widget.TextView;

public class MainActivity extends AppCompatActivity implements OnClickListener{
    @Override
    public void onCreate(Bundle savedInstanceState) {
        super.onCreate(savedInstanceState);
        setContentView(R.layout.activity_main);

        //根据Layout按钮id得到Java按钮对象
        Button insert = (Button) findViewById(R.id.insert);
        Button insert_cleardata = (Button) findViewById(R.id.insert_cleardata);

        Button update = (Button) findViewById(R.id.update);
        Button update_cleardata = (Button)findViewById(R.id.update_cleardata);

        Button delete = (Button) findViewById(R.id.delete);
        Button delete_cleardata = (Button)findViewById(R.id.delete_cleardata);

        Button query = (Button) findViewById(R.id.query);
        Button clearquery = (Button)findViewById(R.id.clear_query);

        //为所有按钮对象设置监听器
        insert.setOnClickListener(this);
        insert_cleardata.setOnClickListener(this);

        update.setOnClickListener(this);
        update_cleardata.setOnClickListener(this);

        delete.setOnClickListener(this);
        delete_cleardata.setOnClickListener(this);

        query.setOnClickListener(this);
        clearquery.setOnClickListener(this);
    }
    @Override
    public void onClick(View v) {
        //依靠DatabaseHelper的构造函数创建数据库
        DatabaseHelper dbHelper = new DatabaseHelper(MainActivity.this, "test_db",null,1);
        SQLiteDatabase db = dbHelper.getWritableDatabase();

        //因为响应点击按钮事件时要操作文本输入框中的内容
        // 所以要获取相应文本输入框的对象及其中输入内容
        EditText insert_edittext = (EditText)findViewById(R.id.inset_edittext);
        String insert_data = insert_edittext.getText().toString();

        EditText delete_edittext = (EditText)findViewById(R.id.delete_edittext);
        String delete_data = delete_edittext.getText().toString();

        EditText update_before_edittext = (EditText)findViewById(R.id.update_before_edittext);
        String update_before_data = update_before_edittext.getText().toString();
        EditText update_after_edittext = (EditText)findViewById(R.id.update_after_edittext);
        String update_after_data = update_after_edittext.getText().toString();

        TextView textview = (TextView)findViewById(R.id.textview);
        //根据响应Click的按钮id进行选择操作
        switch(v.getId()){
            //插入数据按钮
            case R.id.insert:
                //创建存放数据的ContentValues对象
                ContentValues values = new ContentValues();
                values.put("name",insert_data);
                //数据库执行插入命令
                db.insert("user", null, values);
                break;
            //插入数据按钮后面的清除按钮
            case R.id.insert_cleardata:
                insert_edittext.setText("");
                break;

            //删除数据按钮
            case R.id.delete:
                db.delete("user", "name=?", new String[]{delete_data});
                break;
            //删除数据按钮后面的清除按钮
            case R.id.delete_cleardata:
                delete_edittext.setText("");
                break;

            //更新数据按钮
            case R.id.update:
                ContentValues values2 = new ContentValues();
                values2.put("name", update_after_data);
                db.update("user", values2, "name = ?", new String[]{update_before_data});
                break;
            //更新数据按钮后面的清除按钮
            case R.id.update_cleardata:
                update_before_edittext.setText("");
                update_after_edittext.setText("");
                break;

            //查询全部按钮
            case R.id.query:
                //创建游标对象
                Cursor cursor = db.query("user", new String[]{"name"}, null, null, null, null, null);
                //利用游标遍历所有数据对象
                //为了显示全部,把所有对象连接起来,放到TextView中
                String textview_data = "";
                while(cursor.moveToNext()){
                    String name = cursor.getString(cursor.getColumnIndex("name"));
                    textview_data = textview_data + "\n" + name;
                }
                textview.setText(textview_data);
                break;
            //查询全部按钮下面的清除查询按钮
            case R.id.clear_query:
                textview.setText("");
                textview.setHint("查询内容为空");
                break;

            default:
                break;
        }
    }
}
activity_main.xml
<?xml version="1.0" encoding="utf-8"?>
<LinearLayout xmlns:android="http://schemas.android.com/apk/res/android"
    android:layout_width="match_parent"
    android:layout_height="match_parent"
    android:orientation="vertical"
    android:layout_marginTop="80dp"
    android:layout_marginBottom="50dp"
    >

    <LinearLayout
        android:layout_width="match_parent"
        android:layout_height="wrap_content"
        android:orientation="horizontal">
    <EditText
        android:id="@+id/inset_edittext"
        android:layout_width="0dp"
        android:layout_weight="5"
        android:layout_height="wrap_content"
        android:hint="请输入要插入的数据"
        android:textColorHint="#CCCCCC"/>
    <Button
        android:id="@+id/insert"
        android:layout_width="0dp"
        android:layout_weight="2"
        android:layout_height="wrap_content"
        android:text="执行插入"/>
    <Button
        android:id="@+id/insert_cleardata"
        android:layout_width="0dp"
        android:layout_weight="2"
        android:layout_height="wrap_content"
        android:text="清除"/>
    </LinearLayout>
    <LinearLayout
        android:layout_width="match_parent"
        android:layout_height="wrap_content">
        <EditText
            android:id="@+id/update_before_edittext"
            android:layout_width="0dp"
            android:layout_weight="2.5"
            android:layout_height="wrap_content"
            android:hint="请输入更新前的内容"
            android:textColorHint="#CCCCCC"/>
        <EditText
            android:id="@+id/update_after_edittext"
            android:layout_width="0dp"
            android:layout_weight="2.5"
            android:layout_height="wrap_content"
            android:hint="请输入更新后的内容"
            android:textColorHint="#CCCCCC"/>
        <Button
            android:id="@+id/update"
            android:layout_width="0dp"
            android:layout_weight="2"
            android:layout_height="wrap_content"
            android:text="执行更新"/>
        <Button
            android:id="@+id/update_cleardata"
            android:layout_width="0dp"
            android:layout_weight="2"
            android:layout_height="wrap_content"
            android:text="清除"/>
    </LinearLayout>

    <LinearLayout
        android:layout_width="match_parent"
        android:layout_height="wrap_content">
        <EditText
            android:id="@+id/delete_edittext"
            android:layout_width="0dp"
            android:layout_weight="5"
            android:layout_height="wrap_content"
            android:hint="请输入要删除的内容"
            android:textColorHint="#CCCCCC"/>
        <Button
            android:id="@+id/delete"
            android:layout_width="0dp"
            android:layout_weight="2"
            android:layout_height="wrap_content"
            android:text="执行删除"/>
        <Button
            android:id="@+id/delete_cleardata"
            android:layout_width="0dp"
            android:layout_weight="2"
            android:layout_height="wrap_content"
            android:text="清除" />
    </LinearLayout>
    <Button
        android:id="@+id/query"
        android:layout_width="match_parent"
        android:layout_height="wrap_content"
        android:text="查询所有"/>
    <Button
        android:id="@+id/clear_query"
        android:layout_width="match_parent"
        android:layout_height="wrap_content"
        android:text="清除查询"/>
    <TextView
        android:id="@+id/textview"
        android:layout_width="match_parent"
        android:layout_height="300dp"
        android:layout_marginVertical="50dp"
        android:layout_marginLeft="20dp"
        android:layout_marginRight="20dp"
        android:hint="查询内容为空"
        android:textColorHint="#CCCCCC"
        android:textColor="#6666FF"
        android:textSize="25dp"/>

</LinearLayout>
结尾
为完成本文所使用到的文章链接(感谢前人栽的树):
1.Android开发-设置监听器的四种方法:点击打开链接
2.Android之SQLite数据库的使用:点击打开链接
3.常用十六进制颜色对照表代码查询:点击打开链接
------------------------------------------------华丽丽的结尾线------------------------------------------------