文章很长,但大部分是代码,耐心看,要两三个小时。文章循序渐进,跟着走就行了。也可能会出现问题,网上百度一定能解决的。文章看完就能对redis怎么缓存数据有个清晰的认识了。
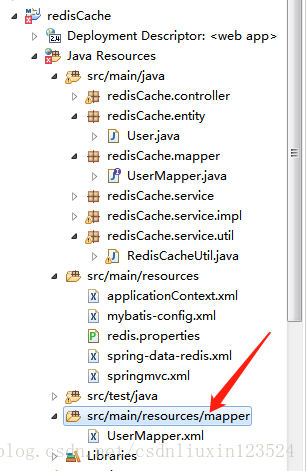
先来看下工程结构:
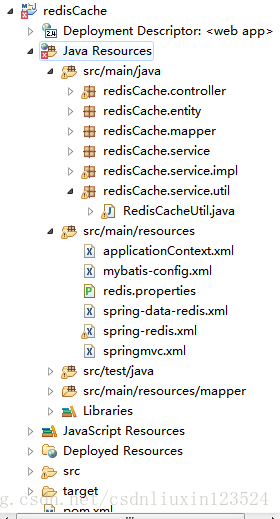
典型的mvc结构,配置文件都写在resources中,除了web.xml是在下图:

下面先建一个maven+springmvc+mybatis的工程:
新建工程:
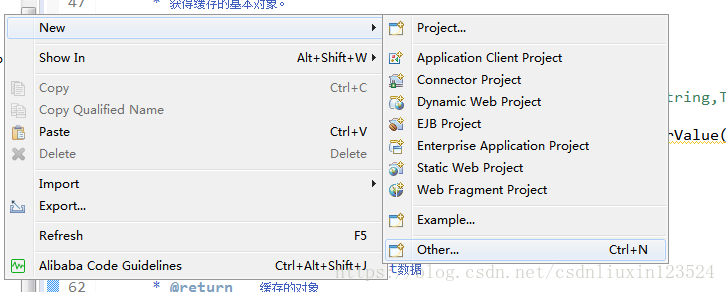
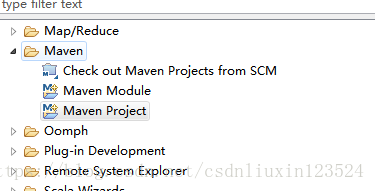
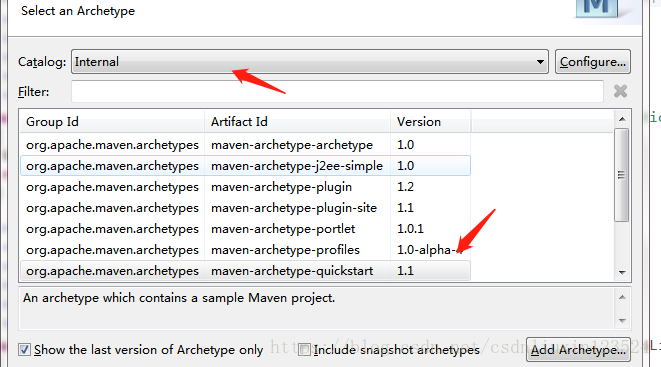
new--》other-->maven Project -->下一步--》
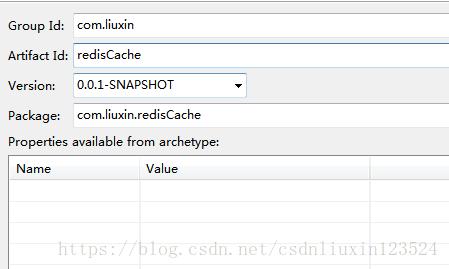
输入工程名:
结束。
然后在pom导入依赖,在联网的情况下就可以自动下载jar包了。maven配置也不用改,很方便:
<project xmlns="http://maven.apache.org/POM/4.0.0" xmlns:xsi="http://www.w3.org/2001/XMLSchema-instance"
  xsi:schemaLocation="http://maven.apache.org/POM/4.0.0 http://maven.apache.org/maven-v4_0_0.xsd">
  <modelVersion>4.0.0</modelVersion>
  <groupId>com.liuxin</groupId>
  <artifactId>redisCache</artifactId>
  <packaging>war</packaging>
  <version>0.0.1-SNAPSHOT</version>
  <name>redisCache Maven Webapp</name>
  <url>http://maven.apache.org</url>
  <properties>
    <project.build.sourceEncoding>UTF-8</project.build.sourceEncoding>
    <maven.compiler.source>1.7</maven.compiler.source>
    <maven.compiler.target>1.7</maven.compiler.target>
  </properties>
  <dependencies>
    <dependency>
      <groupId>junit</groupId>
      <artifactId>junit</artifactId>
      <version>3.8.1</version>
      <scope>test</scope>
    </dependency>
    <dependency>
      <groupId>org.springframework</groupId>
      <artifactId>spring-core</artifactId>
      <version>4.3.2.RELEASE</version>
    </dependency>
    <dependency>
      <groupId>org.springframework</groupId>
      <artifactId>spring-aop</artifactId>
      <version>4.3.2.RELEASE</version>
    </dependency>
    <dependency>
      <groupId>org.springframework</groupId>
      <artifactId>spring-aspects</artifactId>
      <version>4.3.2.RELEASE</version>
    </dependency>
    <dependency>
      <groupId>org.springframework</groupId>
      <artifactId>spring-beans</artifactId>
      <version>4.3.2.RELEASE</version>
    </dependency>
    <dependency>
      <groupId>org.springframework</groupId>
      <artifactId>spring-context</artifactId>
      <version>4.3.2.RELEASE</version>
    </dependency>
    <dependency>
      <groupId>org.springframework</groupId>
      <artifactId>spring-expression</artifactId>
      <version>4.3.2.RELEASE</version>
    </dependency>
    <dependency>
      <groupId>org.springframework</groupId>
      <artifactId>spring-jdbc</artifactId>
      <version>4.3.2.RELEASE</version>
    </dependency>
    <dependency>
      <groupId>org.springframework</groupId>
      <artifactId>spring-test</artifactId>
      <version>4.3.2.RELEASE</version>
    </dependency>
    <dependency>
      <groupId>org.springframework</groupId>
      <artifactId>spring-tx</artifactId>
      <version>4.3.2.RELEASE</version>
    </dependency>
    <dependency>
      <groupId>org.springframework</groupId>
      <artifactId>spring-web</artifactId>
      <version>4.3.2.RELEASE</version>
    </dependency>
    <dependency>
      <groupId>org.springframework</groupId>
      <artifactId>spring-webmvc</artifactId>
      <version>4.3.2.RELEASE</version>
    </dependency>
    <dependency>
      <groupId>org.mybatis</groupId>
      <artifactId>mybatis-spring</artifactId>
      <version>1.3.0</version>
    </dependency>
    <!-- https://mvnrepository.com/artifact/org.mybatis/mybatis -->
    <dependency>
      <groupId>org.mybatis</groupId>
      <artifactId>mybatis</artifactId>
      <version>3.4.4</version>
    </dependency>
    <!-- https://mvnrepository.com/artifact/commons-io/commons-io -->
    <dependency>
      <groupId>commons-io</groupId>
      <artifactId>commons-io</artifactId>
      <version>2.4</version>
    </dependency>
    <!-- https://mvnrepository.com/artifact/org.apache.commons/commons-lang3 -->
    <dependency>
      <groupId>org.apache.commons</groupId>
      <artifactId>commons-lang3</artifactId>
      <version>3.4</version>
    </dependency>
    <!-- https://mvnrepository.com/artifact/commons-logging/commons-logging -->
    <dependency>
      <groupId>commons-logging</groupId>
      <artifactId>commons-logging</artifactId>
      <version>1.1.1</version>
    </dependency>
    <!-- https://mvnrepository.com/artifact/org.apache.logging.log4j/log4j-core -->
    <dependency>
      <groupId>org.apache.logging.log4j</groupId>
      <artifactId>log4j-core</artifactId>
      <version>2.9.1</version>
    </dependency>
    <!-- https://mvnrepository.com/artifact/org.slf4j/slf4j-log4j12 -->
    <dependency>
      <groupId>org.slf4j</groupId>
      <artifactId>slf4j-log4j12</artifactId>
      <version>1.7.21</version>
      <scope>test</scope>
    </dependency>
    <!-- https://mvnrepository.com/artifact/aopalliance/aopalliance -->
    <dependency>
      <groupId>aopalliance</groupId>
      <artifactId>aopalliance</artifactId>
      <version>1.0</version>
    </dependency>
    <dependency>
      <groupId>mysql</groupId>
      <artifactId>mysql-connector-java</artifactId>
      <version>5.1.38</version>
    </dependency>
    <dependency>
      <groupId>com.mchange</groupId>
      <artifactId>c3p0</artifactId>
      <version>0.9.5.2</version>
    </dependency>
    <!-- https://mvnrepository.com/artifact/javax.servlet/jstl -->
    <dependency>
      <groupId>javax.servlet</groupId>
      <artifactId>jstl</artifactId>
      <version>1.2</version>
    </dependency>
    <!-- https://mvnrepository.com/artifact/javax.servlet/javax.servlet-api -->
    <dependency>
      <groupId>javax.servlet</groupId>
      <artifactId>javax.servlet-api</artifactId>
      <version>3.1.0</version>
      <scope>provided</scope>
    </dependency>

    <!-- https://mvnrepository.com/artifact/javax.servlet.jsp/javax.servlet.jsp-api -->
    <dependency>
      <groupId>javax.servlet.jsp</groupId>
      <artifactId>javax.servlet.jsp-api</artifactId>
      <version>2.2.1</version>
      <scope>provided</scope>
    </dependency>

    <!-- https://mvnrepository.com/artifact/taglibs/standard -->
    <dependency>
      <groupId>taglibs</groupId>
      <artifactId>standard</artifactId>
      <version>1.1.2</version>
    </dependency>
  </dependencies>
  <build>
    <finalName>redisCache</finalName>
  </build>
</project>
配置web.xml
<?xml version="1.0" encoding="ISO-8859-1"?>
<web-app xmlns:xsi="http://www.w3.org/2001/XMLSchema-instance"
         xmlns="http://java.sun.com/xml/ns/javaee"
         xsi:schemaLocation="http://java.sun.com/xml/ns/javaee http://java.sun.com/xml/ns/javaee/web-app_3_0.xsd"
         id="WebApp_ID" version="3.0">

  <!-- 配置spring -->
  <context-param>
    <param-name>contextConfigLocation</param-name>
    <param-value>classpath:applicationContext.xml</param-value>
  </context-param>

  <listener>
    <listener-class>org.springframework.web.context.ContextLoaderListener</listener-class>
  </listener>
  <!-- 编码过滤器 -->
  <filter>
    <filter-name>charsetEncodingFilter</filter-name>
    <filter-class>org.springframework.web.filter.CharacterEncodingFilter</filter-class>
    <init-param>
      <param-name>encoding</param-name>
      <param-value>UTF-8</param-value>
    </init-param>
    <init-param>
      <param-name>forceEncoding</param-name>
      <param-value>true</param-value>
    </init-param>
  </filter>

  <filter-mapping>
    <filter-name>charsetEncodingFilter</filter-name>
    <url-pattern>/*</url-pattern>
  </filter-mapping>

  <!-- 配置springmvc -->
  <servlet>
    <servlet-name>springDispatcherServlet</servlet-name>
    <servlet-class>org.springframework.web.servlet.DispatcherServlet</servlet-class>
    <init-param>
      <param-name>contextConfigLocation</param-name>
      <param-value>classpath:springmvc.xml</param-value>
    </init-param>
    <load-on-startup>1</load-on-startup>
  </servlet>
  <servlet-mapping>
    <servlet-name>springDispatcherServlet</servlet-name>
    <url-pattern>/</url-pattern><!-- 拦截所有请求 -->
  </servlet-mapping>

</web-app>
第三步:配置springmvc.xml
<?xml version="1.0" encoding="UTF-8"?>
<beans xmlns="http://www.springframework.org/schema/beans"
       xmlns:xsi="http://www.w3.org/2001/XMLSchema-instance"
       xmlns:context="http://www.springframework.org/schema/context"
       xmlns:mvc="http://www.springframework.org/schema/mvc"
       xsi:schemaLocation="http://www.springframework.org/schema/mvc http://www.springframework.org/schema/mvc/spring-mvc-4.0.xsd
        http://www.springframework.org/schema/beans http://www.springframework.org/schema/beans/spring-beans.xsd
        http://www.springframework.org/schema/context http://www.springframework.org/schema/context/spring-context-4.0.xsd">

    <!-- 配置自动扫描的包  -->
    <context:component-scan base-package="redisCache.controller"/>

    <!-- 配置静态资源文件 -->
    <mvc:default-servlet-handler/>

    <!-- 开启注解模式 -->
    <mvc:annotation-driven/>
    <!-- 配置视图解析器 -->
    <bean class="org.springframework.web.servlet.view.InternalResourceViewResolver">
        <property name="prefix" value="/WEB-INF/jsp"></property><!-- 视图路径 -->
        <property name="suffix" value=".jsp"></property><!-- 视图后缀名 -->
    </bean>
</beans>
第四步:配置applicationContext.xml
<?xml version="1.0" encoding="UTF-8"?>
<beans xmlns="http://www.springframework.org/schema/beans"
       xmlns:xsi="http://www.w3.org/2001/XMLSchema-instance"
       xmlns:context="http://www.springframework.org/schema/context"
       xmlns:tx="http://www.springframework.org/schema/tx"
       xsi:schemaLocation="http://www.springframework.org/schema/beans http://www.springframework.org/schema/beans/spring-beans.xsd
        http://www.springframework.org/schema/context http://www.springframework.org/schema/context/spring-context-4.0.xsd
        http://www.springframework.org/schema/tx http://www.springframework.org/schema/tx/spring-tx-4.0.xsd">

    <!-- 配置扫描的包 -->
    <context:component-scan base-package="redisCache.service"/>

    <!-- 配置数据库 -->
    <!-- 加载配置文件 -->
    <bean id="dataSource" class="com.mchange.v2.c3p0.ComboPooledDataSource">
        <property name="driverClass" value="com.mysql.jdbc.Driver"></property>
        <property name="jdbcUrl" value="jdbc:mysql://localhost:3306/test"></property>
        <property name="user" value="root"></property>
        <property name="password" value="123456"></property>
    </bean>
    <!-- 配置sqlSessionFactory, 并将数据源注入 -->
    <bean id="sqlSessionFactory" class="org.mybatis.spring.SqlSessionFactoryBean">
        <!-- 引入数据源 -->
        <property name="dataSource" ref="dataSource"></property>
        <!--载入mybatis配置文件-->
        <property name="configLocation" value="classpath:mybatis-config.xml"/>
        <!--载入配置mapper映射的xml-->
        <property name="mapperLocations" value="classpath:mapper/*.xml"/>
    </bean>
    <!-- 配置映射接口 -->
    <bean class="org.mybatis.spring.mapper.MapperScannerConfigurer">
        <property name="basePackage" value="redisCache.mapper"/>
        <property name="sqlSessionFactoryBeanName" value="sqlSessionFactory"></property>
    </bean>
    <!-- 配置声明式事务 -->
    <bean id="transactionManager" class="org.springframework.jdbc.datasource.DataSourceTransactionManager">
        <property name="dataSource" ref="dataSource"></property>
    </bean>
    <tx:annotation-driven transaction-manager="transactionManager"/>

</beans>
配置mybatis-config.xml:
<?xml version="1.0" encoding="UTF-8"?>
<!DOCTYPE configuration
  PUBLIC "-//mybatis.org//DTD Config 3.0//EN"
  "http://mybatis.org/dtd/mybatis-3-config.dtd">

<configuration>

    <!-- 配置mybatis的缓存,延迟加载等相关属性 -->
    <settings>
        <!-- 是否开启全局缓存 -->
        <setting name="cacheEnabled" value="true"/>
        <!-- 查询时,关闭关联对象即时加载以提高性能 -->
        <setting name="lazyLoadingEnabled" value="false"/>
        <!-- 对于未知的SQL查询,允许返回不同的结果集以达到通用的效果 -->
        <setting name="multipleResultSetsEnabled" value="true"/>
        <!-- 设置关联对象加载的形态,此处为按需加载字段(加载字段由SQL指 定),不会加载关联表的所有字段,以提高性能 -->
        <setting name="aggressiveLazyLoading" value="true"/>
    </settings>

</configuration>
实体类:entity。一定要实现序列化接口,不然redis没法对其操作
package redisCache.entity;

import java.io.Serializable;

/**
 * Created by jiangfeixiang on 2018/4/27
 */
public class User implements Serializable {
    /**
	 *
	 */
	private static final long serialVersionUID = 2262974327254276423L;
	private Integer id;
    private String username;

    public Integer getId() {
        return id;
    }

    public void setId(Integer id) {
        this.id = id;
    }

    public String getUsername() {
        return username;
    }

    public void setUsername(String username) {
        this.username = username;
    }

    @Override
    public String toString() {
        return "User{" +
                "id=" + id +
                ", username='" + username + '\'' +
                '}';
    }
}
Mapper层
编写UserMapper接口
package redisCache.mapper;

import java.util.List;

import redisCache.entity.User;

public interface UserMapper {
	 /**
     * 查询
     * @return
     */
    List<User> getAll();

    /**
     * 插入
     * @param user
     */
    void insertUser(User user);
}
之后我们编写对应的UserMapper.xml
他的位置实在这里:
内容如下:
<?xml version="1.0" encoding="UTF-8" ?>
<!DOCTYPE mapper PUBLIC "-//mybatis.org//DTD Mapper 3.0//EN"
        "http://mybatis.org/dtd/mybatis-3-mapper.dtd">

<mapper namespace="redisCache.mapper.UserMapper">

    <!-- 查询 -->
    <select id="getAll" resultType="redisCache.entity.User">
        select * from user
    </select>

    <!--插入-->
    <insert id="insertUser" parameterType="redisCache.entity.User">
        insert into user(id,username) VALUES (#{id},#{username})
    </insert>
</mapper>
第六步:service层
首先是UserService接口
package redisCache.service;

import java.util.List;

import redisCache.entity.User;

/**
 * Created by jiangfeixiang on 2018/4/27
 */
public interface UserService {
    /**
     * 查询
     * @return
     */
    List<User> getAll();

    /**
     * 插入
     */
    void insertUser(User user);
}
然后是对应的实现类
package redisCache.service.impl;

import java.util.List;

import org.springframework.beans.factory.annotation.Autowired;
import org.springframework.cache.annotation.CachePut;
import org.springframework.cache.annotation.Cacheable;
import org.springframework.stereotype.Service;
import org.springframework.transaction.annotation.Transactional;

import redisCache.entity.User;
import redisCache.mapper.UserMapper;
import redisCache.service.UserService;

/**
 * Created by jiangfeixiang on 2018/4/27
 */
@Service
@Transactional
public class UserServiceImpl implements UserService {
    //注入userMapper
    @Autowired
    private UserMapper userMapper;

    /**
     * 查询所有
     * 使用@Cacheable地很诡异缓存策略,
     * 当缓存中有值,则返回缓存数据,否则则访问数据库
     * value引用缓存管理器,key定义缓存的键
     * @return
     */
    //@Cacheable 注解是决定要不要查数据的判断,如果把这行注释掉则会每次都会查询数据库
    @Override
//    @Cacheable(value = "redisCacheManager",key = "'getAll'")
    public List<User> getAll() {
        List<User> userMapperAll = userMapper.getAll();
        for(User u:userMapperAll){
        	System.out.println(u.getUsername());
        }
        System.out.println("没有走缓存就打印我...........");
        return userMapperAll;
    }

    /**
     * 添加用户
     */
    //@Cacheable 注解是决定要不要查数据的判断,如果把这行注释掉则会每次都会查询数据库
    @Override
//     @CachePut(value = "redisCacheManager",key = "'insertUser'")
    public void insertUser(User user){
        userMapper.insertUser(user);
    }
}
第七步:controller层
UserController
package redisCache.controller;

import java.util.List;

import org.springframework.beans.factory.annotation.Autowired;
import org.springframework.stereotype.Controller;
import org.springframework.web.bind.annotation.RequestMapping;
import org.springframework.web.bind.annotation.RequestMethod;

import redisCache.entity.User;
import redisCache.service.UserService;

/**
 * Created by jiangfeixiang on 2018/4/27
 */
@Controller("/redisCache")  //注意这里/redisCache与后面的UserController2的同样位置出智能有一个,所以用那种方式就哪里把/redisCache填上,把另外一个设空
public class UserController {
    //注入
    @Autowired
    private UserService userService;

    /**
     * 查询所有用户
     */
    @RequestMapping(value = "/getAll",method = RequestMethod.GET)
    public String getAll(){
        List<User> list = userService.getAll();
        for(User u:list){
        	System.out.println(u.getUsername());
        }
//        System.out.println(list.size());
        return "list";
    }
    /**
     * 跳转到添加页面
     */
    @RequestMapping(value = "/insertUserPage",method = RequestMethod.GET)
    public String insertUserPage(){
        return "save";
    }
    /**
     * 插入
     */
    @RequestMapping(value = "/insertUser",method = RequestMethod.POST)
    public String insertUser(User user){
        userService.insertUser(user);
        return "redirect:/getAll";
    }
}
JSP页面很简单,主要是为了测试用,一个欢迎页index.jsp,一个添加用户页save.jsp

index.jsp
<%@ page language="java" contentType="text/html; charset=utf-8"
    pageEncoding="utf-8"%>
<!DOCTYPE html PUBLIC "-//W3C//DTD HTML 4.01 Transitional//EN" "http://www.w3.org/TR/html4/loose.dtd">
<html>
<body>
<h2>Hello World!</h2>
 <a href="/redisCache/getAll">第一种使用注解缓存查询方式</a></p>
 <a href="/redisCache/getAll2">第二种使用工具类缓存查询方式</a></p>
    <a href="/redisCache/insertUserPage">添加</a>
</body>
</html>
list.jsp
<%@ page language="java" contentType="text/html; charset=utf-8"
    pageEncoding="utf-8"%>
<!DOCTYPE html PUBLIC "-//W3C//DTD HTML 4.01 Transitional//EN" "http://www.w3.org/TR/html4/loose.dtd">
<html>
<head>
<meta http-equiv="Content-Type" content="text/html; charset=ISO-8859-1">
<title>Insert title here</title>
</head>
<body>
success
</body>
</html>
save.jsp
<%@ page language="java" contentType="text/html; charset=utf-8"
    pageEncoding="utf-8"%>
<!DOCTYPE html PUBLIC "-//W3C//DTD HTML 4.01 Transitional//EN" "http://www.w3.org/TR/html4/loose.dtd">
<html>
<head>
<meta http-equiv="Content-Type" content="text/html; charset=ISO-8859-1">
<title>Insert title here</title>
</head>
<body>
<form action="/insertUser" method="post">
        姓名:<input type="text" name="username">
        <input type="submit" value="提交">
    </form>
</body>
</html>
这里页面只是起辅助作用,到底是查数据库还是查redis缓存,主要看控制台打印的日志和debug。
到这里相当于搭建了springMVC工程,
数据库在配置下,这里我就建了个user表,随便加两条数据:
CREATE TABLE `user` (
  `id` int(11) NOT NULL,
  `username` varchar(255) default NULL,
  PRIMARY KEY  (`id`)
) ENGINE=InnoDB DEFAULT CHARSET=latin1;
tomcat启动后,页面如下:

--------------------------------------------------------------------------------------------------------------------------
接下来我们开始配置redis。
首先在pom.xml文件中加入jar包
      <!-- jedis -->
      <dependency>
          <groupId>redis.clients</groupId>
          <artifactId>jedis</artifactId>
          <version>2.7.3</version>
      </dependency>
      <!-- spring-data-redis -->
      <dependency>
          <groupId>org.springframework.data</groupId>
          <artifactId>spring-data-redis</artifactId>
          <version>1.6.2.RELEASE</version>
      </dependency>
然后:创建一个spring-data-redis.xml专门放置redis的配置,在来一个redis.properties属性文件,放置redis的属性配置。如下:
redis.properties
# Redis Setting
# Redis默认有16个库,序号是0-15,默认是选中的是0号数据库
spring.redis.database=0
# Redis服务器地址
spring.redis.host=192.168.72.133(改成你自己的服务器ip)
# Redis服务器连接端口,默认是6379
spring.redis.port=6379
# Redis服务器连接密码(默认为空)
spring.redis.password=
# 连接池最大阻塞等待时间(使用负值表示没有限制),根据实际情况修改
spring.redis.pool.maxWaitMillis=-1
# 连接池中的最大空闲连接,根据实际情况修改
spring.redis.pool.maxIdle=8
# 连接池中的最小空闲连接,根据实际情况修改
spring.redis.pool.minIdle=0
# 连接超时时间(毫秒),根据实际情况修改
spring.redis.timeout=2000 <?xml version="1.0" encoding="UTF-8"?>
<beans xmlns="http://www.springframework.org/schema/beans"
xmlns:xsi="http://www.w3.org/2001/XMLSchema-instance" xmlns:cache="http://www.springframework.org/schema/cache"
xmlns:context="http://www.springframework.org/schema/context"
xmlns:redis="http://www.springframework.org/schema/redis" xmlns:tx="http://www.springframework.org/schema/tx"
xsi:schemaLocation="http://www.springframework.org/schema/cache http://www.springframework.org/schema/cache/spring-cache-4.0.xsd
http://www.springframework.org/schema/beans http://www.springframework.org/schema/beans/spring-beans.xsd
http://www.springframework.org/schema/context http://www.springframework.org/schema/context/spring-context-4.0.xsd
http://www.springframework.org/schema/redis http://www.springframework.org/schema/redis/spring-redis-1.0.xsd
http://www.springframework.org/schema/tx http://www.springframework.org/schema/tx/spring-tx-4.0.xsd">
<!-- 载入redis.properties,这里要特别注意,如果有多个properties文件,必须用逗号分开,不能写成两个 <context:property-placeholder/> -->
<context:property-placeholder location="classpath:redis.properties" />
<!-- 配置JedisPoolConfig连接池-->
<bean id="poolConfig" class="redis.clients.jedis.JedisPoolConfig">
<property name="maxIdle" value="${spring.redis.pool.maxIdle}"></property>
<property name="minIdle" value="${spring.redis.pool.minIdle}"></property>
<property name="maxWaitMillis" value="${spring.redis.pool.maxWaitMillis}"></property>
</bean>
<!-- 配置jedis连接工厂 -->
<bean id="connectionFactory"
class="org.springframework.data.redis.connection.jedis.JedisConnectionFactory">
<property name="poolConfig" ref="poolConfig"></property>
<property name="hostName" value="${spring.redis.host}"></property>
<property name="port" value="${spring.redis.port}"></property>
<!--<property name="password" value="${spring.redis.password}"></property>-->
<property name="database" value="${spring.redis.database}"></property>
<property name="timeout" value="${spring.redis.timeout}"></property>
</bean>
<!-- 配置RedisTemplate -->
<bean id="redisTemplate" class="org.springframework.data.redis.core.RedisTemplate">
<property name="connectionFactory" ref="connectionFactory"></property>
<!--String-->
<property name="keySerializer">
<bean class="org.springframework.data.redis.serializer.StringRedisSerializer"></bean>
</property>
<property name="valueSerializer">
<bean class="org.springframework.data.redis.serializer.JdkSerializationRedisSerializer"></bean>
</property>
<!--hash-->
<property name="hashKeySerializer">
<bean class="org.springframework.data.redis.serializer.StringRedisSerializer"></bean>
</property>
<property name="hashValueSerializer">
<bean class="org.springframework.data.redis.serializer.StringRedisSerializer"></bean>
</property>
</bean>
<!--
定义缓存管理器redisCacheManager。
注意:cache-manager默认值是cacheManager,你的缓存管理器id要是命名是cacheManager,这里可以省略
-->
<!--1.使用注解驱动-->
<cache:annotation-driven cache-manager="redisCacheManager"></cache:annotation-driven>
<!--2.定义缓存管理器-->
<bean id="redisCacheManager" class="org.springframework.data.redis.cache.RedisCacheManager">
<!--通过构造方法注入redisTemplate-->
<constructor-arg index="0" ref="redisTemplate"></constructor-arg>
<!--定义超时时间,单位秒-->
<property name="defaultExpiration" value="5000"></property>
<!--设置缓存器名称-->
<property name="cacheNames">
<list>
<value>redisCacheManager</value>
</list>
</property>
</bean>
</beans> <!-- 引入spring-data-redis.xml -->
<import resource="spring-data-redis.xml"/>上面已经定义好缓存管理器了,下面我们就可以在serviceImpl中使用注解进行操作。如下:
在getAll查询方法上添加(serviceImpl中注释掉的那点)
@Cacheable(value = "redisCacheManager",key = "'getAll'")@CachePut(value = "redisCacheManager",key = "'insertUser'")注意:
value的值是你redis配置文件对应的缓存管理器的id值
key = "'insertUser'":是你要缓存到redis中的值,下次spring会直接通过key获取结果。注意key的值中还有个单引号。
@Cacheable:适合查询,有返回值的方法上。因为,每次请求在进入方法之前,spring会先从缓存服务器中查找对应的key,如果有,就直接返回。否则再去查询数据库,在将结果通过key保存到缓存中。
@CachePut:适合添加,修改,void方法上。因为spring不会事先去缓存服务器中查询数据,而是直接执行方法,然后将结果通过key保存到缓存中。这样是防止数据不一致。
以上都写好后可以启动服务器,然后运行。为了明显,我在serviceImpl中查询方法中有个输出,你可以先注释掉缓存注解运行,发现每次都会输入。当你启动注解时,没有输入。说明spring每次回自动到缓存中查找数据。如下:

----------------------------------------------------------------------------------------------------------------------------
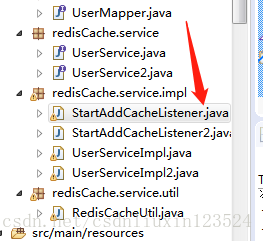
上面的redis缓存不是在启动程序就加载缓存的。可是在实际工程中一般是在启动程序的时候就加载缓存,这里需要加下面一个类:
package redisCache.service.impl;
import org.springframework.beans.factory.annotation.Autowired;
import org.springframework.context.ApplicationEvent;
import org.springframework.context.ApplicationListener;
import org.springframework.context.event.ContextRefreshedEvent;
import org.springframework.stereotype.Service;
import redisCache.service.UserService;
/**
* 此处设置是系统启动时初始化加载需要缓存的数据
* 实现监听器才能执行查库操作
* @author Administrator
*
*/
@Service
public class StartAddCacheListener implements ApplicationListener<ContextRefreshedEvent>{
@Autowired
private UserService userService;
public void onApplicationEvent(ContextRefreshedEvent event) {
// TODO Auto-generated method stub
if(event.getApplicationContext().getDisplayName().equals("Root WebApplicationContext")){
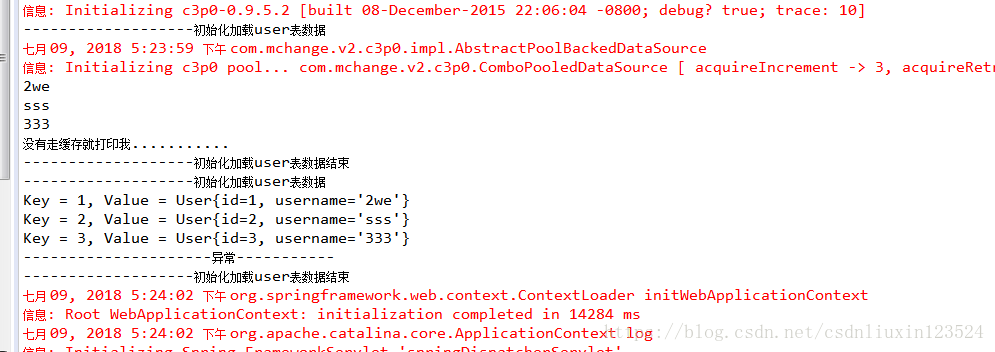
System.out.println("-------------------初始化加载user表数据");
userService.getAll();
System.out.println("-------------------初始化加载user表数据结束");
}
}
}这个是监听器类,是在系统启动时就查询数据库,把库里面的数据放在redis中,这样在系统启动时,控制台就会打印“没有走缓存就打印我...........”
-------------------------------------------------------------------------------------------------------------------------
上面明显我们使用了@Cacheable和@CachePut这两个注解,这个是用来判断要不要查库的。仔细分析下:
@Cacheable(value = "redisCacheManager",key = "'getAll'")这里如果在redis中存在key为“getAll”的key就说明已经缓存了,并且步骤下面的方法,这里我是没看懂是什么原理,所以我这里又写了第二种方法,在系统启动时把需要缓存的表数据以hash的数据机构加载到redis中。
由上而下的代码结构如下:
控制器:UserController2
package redisCache.controller;

import java.util.List;
import java.util.Map;

import org.springframework.beans.factory.annotation.Autowired;
import org.springframework.stereotype.Controller;
import org.springframework.web.bind.annotation.RequestMapping;
import org.springframework.web.bind.annotation.RequestMethod;

import redisCache.entity.User;
import redisCache.service.UserService;
import redisCache.service.UserService2;
import redisCache.service.util.RedisCacheUtil;

/**
 * Created by jiangfeixiang on 2018/4/27
 */
@Controller("/redisCache")  //注意这里/redisCache与后面的UserController2的同样位置出智能有一个,所以用那种方式就哪里把/redisCache填上,把另外一个设空
public class UserController2 {
    //注入
    @Autowired
    private UserService2 userService2;

    @Autowired
    private RedisCacheUtil<User> redisUtil;
    /**
     * 查询所有用户
     */
    @RequestMapping(value = "/getAll2",method = RequestMethod.GET)
    public String getAll(){
    	Map<Integer ,User> list = redisUtil.getCacheIntegerMap("userMap");
        for(Map.Entry<Integer, User> u : list.entrySet()){
    		System.out.println("key:"+u.getKey()+",value:"+u.getValue());
    	}
        System.out.println("第二种方式:"+list.size());
        return "list";
    }
    /**
     * 跳转到添加页面
     */
    @RequestMapping(value = "/insertUserPage2",method = RequestMethod.GET)
    public String insertUserPage(){
        return "save";
    }
    /**
     * 插入
     */
    @RequestMapping(value = "/insertUser2",method = RequestMethod.POST)
    public String insertUser(User user){
        userService2.insertUser(user);
        return "redirect:/getAll";
    }
}
service层:
package redisCache.service;

import java.util.List;

import redisCache.entity.User;

/**
 * Created by jiangfeixiang on 2018/4/27
 */
public interface UserService2 {
    /**
     * 查询
     * @return
     */
    List<User> getAll();

    /**
     * 插入
     */
    void insertUser(User user);

    /**
     * 查库
     */
    List<User> getAllFromData();
}
service实现类:
package redisCache.service.impl;

import java.util.ArrayList;
import java.util.HashMap;
import java.util.List;
import java.util.Map;

import org.springframework.beans.factory.annotation.Autowired;
import org.springframework.cache.annotation.Cacheable;
import org.springframework.stereotype.Service;
import org.springframework.transaction.annotation.Transactional;

import redisCache.entity.User;
import redisCache.mapper.UserMapper;
import redisCache.service.UserService2;
import redisCache.service.util.RedisCacheUtil;

/**
 * liuxin
 */
@Service
@Transactional
public class UserServiceImpl2 implements UserService2 {
    //注入userMapper
    @Autowired
    private UserMapper userMapper;

    @Autowired
    private RedisCacheUtil<User> redisCache;

    /**
     * 查询所有
     * 使用@Cacheable地很诡异缓存策略,
     * 当缓存中有值,则返回缓存数据,否则则访问数据库
     * value引用缓存管理器,key定义缓存的键
     * @return
     */
    //@Cacheable 注解是决定要不要查数据的判断,如果把这行注释掉则会每次都会查询数据库
    @Override
    @Cacheable(value = "redisCacheManager",key = "'userMap'")
    public List<User> getAll() {

    	Map<Integer, User> userMap=redisCache.getCacheIntegerMap("userMap");
    	List<User> listUser=new ArrayList<User>();
    	for(int key : userMap.keySet())
    	 {
    		listUser.add(userMap.get(key));
    	  System.out.println("key = " + key + ",value=" + userMap.get(key));
    	 }
        System.out.println("初始化加载是才会走这一步...........");
        return listUser;
    }


    /**
     * 添加用户
     */
    //@Cacheable 注解是决定要不要查数据的判断,如果把这行注释掉则会每次都会查询数据库
    @Override
//     @CachePut(value = "redisCacheManager",key = "'insertUser'")
    public void insertUser(User user){
        userMapper.insertUser(user);
    }


	@Override
	public List<User> getAllFromData() {
		// TODO Auto-generated method stub
		List<User> list=userMapper.getAll();
		return list;
	}
}
RedisCacheUtil工具类:
package redisCache.service.util;

import java.io.Serializable;
import java.util.ArrayList;
import java.util.HashSet;
import java.util.Iterator;
import java.util.List;
import java.util.Map;
import java.util.Set;

import javax.annotation.Resource;

import org.springframework.beans.factory.annotation.Autowired;
import org.springframework.beans.factory.annotation.Qualifier;
import org.springframework.data.redis.core.BoundSetOperations;
import org.springframework.data.redis.core.BoundZSetOperations;
import org.springframework.data.redis.core.HashOperations;
import org.springframework.data.redis.core.ListOperations;
import org.springframework.data.redis.core.RedisTemplate;
import org.springframework.data.redis.core.ValueOperations;
import org.springframework.stereotype.Component;
import org.springframework.stereotype.Service;
@Service
@Component("redisCache")
public class RedisCacheUtil<T> {
	@Resource
	 public RedisTemplate redisTemplate;


	 /**
	  * 缓存基本的对象,Integer、String、实体类等
	  * @param key 缓存的键值
	  * @param value 缓存的值
	  * @return  缓存的对象
	  */
	 public <T> ValueOperations<String,T> setCacheObject(String key,T value)
	 {

	  ValueOperations<String,T> operation = redisTemplate.opsForValue();
	  operation.set(key,value);
	  return operation;
	 }

	 /**
	  * 获得缓存的基本对象。
	  * @param key  缓存键值
	  * @param operation
	  * @return   缓存键值对应的数据
	  */
	 public <T> T getCacheObject(String key/*,ValueOperations<String,T> operation*/)
	 {
	  ValueOperations<String,T> operation = redisTemplate.opsForValue();
	  return operation.get(key);
	 }

	 /**
	  * 缓存List数据
	  * @param key  缓存的键值
	  * @param dataList 待缓存的List数据
	  * @return   缓存的对象
	  */
	 public <T> ListOperations<String, T> setCacheList(String key,List<T> dataList)
	 {
	  ListOperations listOperation = redisTemplate.opsForList();
	  if(null != dataList)
	  {
	   int size = dataList.size();
	   for(int i = 0; i < size ; i ++)
	   {

	    listOperation.rightPush(key,dataList.get(i));
	   }
	  }

	  return listOperation;
	 }

	 /**
	  * 获得缓存的list对象
	  * @param key 缓存的键值
	  * @return  缓存键值对应的数据
	  */
	 public <T> List<T> getCacheList(String key)
	 {
	  List<T> dataList = new ArrayList<T>();
	  ListOperations<String,T> listOperation = redisTemplate.opsForList();
	  Long size = listOperation.size(key);

	  for(int i = 0 ; i < size ; i ++)
	  {
	   dataList.add((T) listOperation.leftPop(key));
	  }

	  return dataList;
	 }

	 /**
	  * 缓存Set
	  * @param key  缓存键值
	  * @param dataSet 缓存的数据
	  * @return   缓存数据的对象
	  */
	 public <T> BoundSetOperations<String,T> setCacheSet(String key,Set<T> dataSet)
	 {
	  BoundSetOperations<String,T> setOperation = redisTemplate.boundSetOps(key);
	  /*T[] t = (T[]) dataSet.toArray();
	    setOperation.add(t);*/


	  Iterator<T> it = dataSet.iterator();
	  while(it.hasNext())
	  {
	   setOperation.add(it.next());
	  }

	  return setOperation;
	 }

//	 public <T> BoundSetOperations<String,T> setCacheZSet(String key,Set<T> dataSet)
//	 {
//	  BoundZSetOperations<String,T> setOperation = redisTemplate.boundZSetOps(key);
//	  /*T[] t = (T[]) dataSet.toArray();
//	    setOperation.add(t);*/
//
//
//	  Iterator<T> it = dataSet.iterator();
//	  while(it.hasNext())
//	  {
//	   setOperation.ad
//	  }
//
//	  return setOperation;
//	 }
//
	 /**
	  * 获得缓存的set
	  * @param key
	  * @param operation
	  * @return
	  */
	 public Set<T> getCacheSet(String key/*,BoundSetOperations<String,T> operation*/)
	 {
	  Set<T> dataSet = new HashSet<T>();
	  BoundSetOperations<String,T> operation = redisTemplate.boundSetOps(key);

	  Long size = operation.size();
	  for(int i = 0 ; i < size ; i++)
	  {
	   dataSet.add(operation.pop());
	  }
	  return dataSet;
	 }

	 /**
	  * 缓存Map
	  * @param key
	  * @param dataMap
	  * @return
	  */
	 public <T> HashOperations<Serializable, Object, Object> setCacheMap(String key,Map<String,T> dataMap)
	 {

		 HashOperations<Serializable,Object,Object> operations = redisTemplate.opsForHash();
	  if(null != dataMap)
	  {

	   for (Map.Entry<String, T> entry : dataMap.entrySet()) {

	    System.out.println("Key = " + entry.getKey() + ", Value = " + entry.getValue());
//	    hashOperations.put(key,entry.getKey(),entry.getValue());
		   operations.put(key, entry.getKey(), entry.getValue());
	   }

	  }

	  return operations;
	 }

	 /**
	  * 获得缓存的Map
	  * @param key
	  * @param hashOperation
	  * @return
	  */
	 public <T> Map<String,T> getCacheMap(String key/*,HashOperations<String,String,T> hashOperation*/)
	 {
	  Map<String, T> map = redisTemplate.opsForHash().entries(key);
	  /*Map<String, T> map = hashOperation.entries(key);*/
	  return map;
	 }


	 /**
	  * 缓存Map
	  * @param key
	  * @param dataMap
	  * @return
	  */
	 @SuppressWarnings({ "unchecked", "unchecked" })
	public <T> HashOperations<Serializable, Object, Object> setCacheIntegerMap(String key,Map<Integer,T> dataMap)
	 {
	  HashOperations<Serializable,Object,Object> hashOperations = redisTemplate.opsForHash();
	  if(null != dataMap)
	  {

	   for (Map.Entry<Integer, T> entry : dataMap.entrySet()) {

	    System.out.println("Key = " + entry.getKey() + ", Value = " + entry.getValue());
//	    hashOperations.put(key,entry.getKey(),entry.getValue());
	    hashOperations.put(key,entry.getKey().toString(),entry.getValue().toString());
	   }

	  }
	   System.out.println("---------------------异常-----------");
	  return hashOperations;
	 }

	 /**
	  * 获得缓存的Map
	  * @param key
	  * @param hashOperation
	  * @return
	  */
	 public <T> Map<Integer,T> getCacheIntegerMap(String key/*,HashOperations<String,String,T> hashOperation*/)
	 {
	  Map<Integer, T> map = redisTemplate.opsForHash().entries(key);
	  /*Map<String, T> map = hashOperation.entries(key);*/
	  return map;
	 }
}
监听器:
package redisCache.service.impl;

import java.util.HashMap;
import java.util.List;
import java.util.Map;

import org.springframework.beans.factory.annotation.Autowired;
import org.springframework.context.ApplicationListener;
import org.springframework.context.event.ContextRefreshedEvent;
import org.springframework.stereotype.Service;

import redisCache.entity.User;
import redisCache.service.UserService2;
import redisCache.service.util.RedisCacheUtil;
/**
 * 第二种缓存的代码方式,不使用注解
 * 此处设置是系统启动时初始化加载需要缓存的数据
 * 实现监听器才能执行查库操作
 * @author Administrator
 *
 */
@Service
public class StartAddCacheListener2 implements ApplicationListener<ContextRefreshedEvent>{
	@Autowired
	private UserService2 userService2;

	@Autowired
	 private RedisCacheUtil<Object> redisCache;

	public void onApplicationEvent(ContextRefreshedEvent  event) {
		// TODO Auto-generated method stubi
		//判断是初始启动时才回走判断里面的内容
		if(event.getApplicationContext().getDisplayName().equals("Root WebApplicationContext")){
			System.out.println("-------------------初始化加载user表数据");
			List<User> users=userService2.getAllFromData();
			Map<Integer,User> userMap=new HashMap<Integer,User>();
			for(int i=0;i<users.size();i++){
				userMap.put(users.get(i).getId(), users.get(i));
			}
			redisCache.setCacheIntegerMap("userMap", userMap);
			System.out.println("-------------------初始化加载user表数据结束");
		}
	}

}
下面简单介绍下,主要集中在监听器类:

这是在启动时查询库 ,然后把查到的数据放到map中,再存入redis中,这里的key是userMap.另外在启动程序时,控制台也有如下打印:
然后我们再到redis中看,
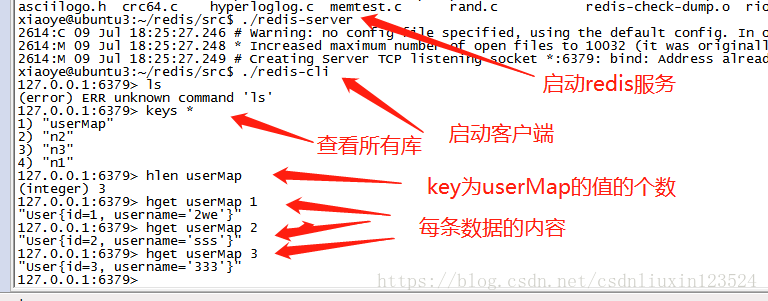
这里跟我们库里面的数据是一样的。
然后在控制再次查询的时候就执行:
get方法直接从redis中获取,下面是控制台打印的,和redis客户端的值一样:
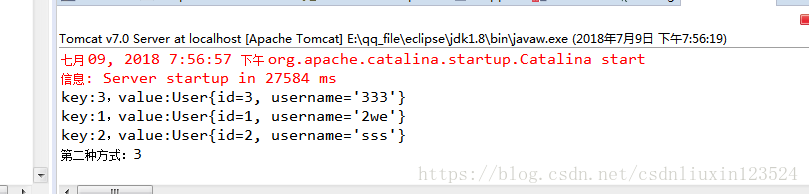
这样我们的目的就达到了。
最后感谢:https://www.cnblogs.com/smfx1314/archive/2018/04/26/8955289.html 博主的帮助,谢谢
工程百度网盘地址:https://pan.baidu.com/s/1RWq_d8zU7Idu4jNXy_ukYg