前言
人生在于折腾!
最近突然想体验一下ubuntu16.04的使用感觉,就重装了操作系统。原本在ubuntu14.04的时候,按照实验室欧大神的博客一路畅通,但此次的caffe编译之旅,可谓到处是坑,遂将这些记录下来。
主要安装路线,依然是按照这篇博客的顺序:http://blog.csdn.net/shiorioxy/article/details/52652831
安装填坑:
由于我在编译opencv时,想进行多版本的管理,故没有将opencv的安装位置设在/usr/local/中,而是自定义的位置,这需要在以后编译caffe时,在makefile.config中对动态链接库进行配置。
其他主要问题:
1. gcc g++版本问题
ubuntu16.04自带的gcc和g++为5.4.0,但是cuda8.0目前还不支持5以后的版本。如果按照欧博为了兼容matlab2014而降级到gcc4.7的话,编译opencv3.0.0时会出现:
/usr/bin/ld:cannot find -latomic 这是因为gcc4.7还没有正式支持atomic,以后才有新的支持。
我在编译opencv的时候降级到4.9.3.编译opencv没有问题了,但是在编译caffe-master时又会出现l类似下面这样的未定义引用错误:
undefined reference to `google::protobuf::io::CodedOutputStream::WriteStringWithSizeToArray
- .build_release/lib/libcaffe.so: undefined reference to `google::protobuf::io::CodedOutputStream::WriteStringWithSizeToArray(std::__cxx11::basic_string<char, std::char_traits<char>, std::allocator<char> > const&, unsigned char*)'
解决方案 :
更新google-glog-lib至0.3.4,使用ubuntu16.04自带的gcc版本进行编译并修改cuda源码,暴力注释掉报错提醒
- $ sudo gedit /usr/local/cuda/include/host_config.h
- 搜索:
- #error -- unsupported GNU version! gcc versions later than 5.3 are not supported!
- 修改为:
- //#error -- unsupported GNU version! gcc versions later than 5.3 are not supported!
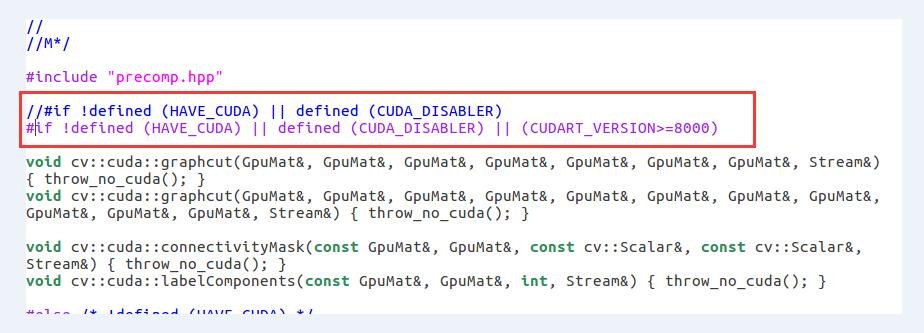
2. opencv2.4系列和opencv3.0系列跟cuda8.0的不兼容
2.1编译opencv3.0.0时,需要修改以下位置~/opencv/modules/cudalegacy/src/graphcuts.cpp
2.2编译opencv2.4.10时,nvcc fatal:Unsupported gpu architecture 'computer_11'
在cmake时指定自己的GPU架构,比如我的GTX760显卡是开普勒架构,就改为:
- cmake -D CMAKE_BUILD_TYPE=RELEASE -D CMAKE_INSTALL_PREFIX=/usr/local/ -D CUDA_GENERATION=Kepler
- -D WITH_TBB=ON -D BUILD_NEW_PYTHON_SUPPORT=ON
- -D WITH_V4L=ON -D INSTALL_C_EXAMPLES=ON -D INSTALL_PYTHON_EXAMPLES=ON -D BUILD_EXAMPLES=ON
- -D WITH_QT=OFF -D WITH_OPENGL=ON -D BUILD_TIFF=ON ..
- cmake -D CMAKE_BUILD_TYPE=Release -D CMAKE_INSTALL_PREFIX=/usr/local
- -D BUILD_TIFF=ON -D BUILD_EXAMPLES=ON -D CUDA_GENERATION=Auto -D BUILD_NEW_PYTHON_SUPPORT=ON ..
3.1 ubuntu16.04不再支持parallel_studio_xe_2016_update1.需要重新下载2017版本
3.2 安装parallel_studio_xe_2017_update1的时候提示:32-bit libraries not found on this system
- 32-bit libraries not found on this system.
- This product release requires the presence of 32-bit compatibility libraries
- when running on Intel(R) 64 architecture systems. One or more of these libraries
- could not be found:
- libstdc++ (including libstdc++6)
- glibc
- libgcc
- Without these libraries, the compiler will not function properly. Please refer
- to Release Notes for more information.
4.编译caffe-master
Makefile.config的配置,常规配置都和欧博的一样,主要需要注意的是,我的opencv安装路径不在默认位置,需要自己指定,还有就是注意hdf5的路径位置,ubuntu16.04的文件位置发生了变化。
- # Whatever else you find you need goes here.
- # 这里加入了opencv3的库路径
- INCLUDE_DIRS := $(PYTHON_INCLUDE) \
- /usr/local/include \
- /usr/include/hdf5/serial \
- /usr/local/opencv3.0.0/include \
- /usr/local/opencv3.0.0/include/opencv \
- /usr/local/opencv3.0.0/include/opencv2
- LIBRARY_DIRS := $(PYTHON_LIB) \
- /usr/lib \
- /usr/local/lib \
- /usr/lib/x86_64-linux-gnu \
- /usr/lib/x86_64-linux-gnu/hdf5/serial \
- /usr/local/opencv3.0.0/lib
当然,opencv的配置也可以使用opencv.pc文件,然后,将USE_PKG_CONFIG打开
- # Uncomment to use `pkg-config` to specify OpenCV library paths.
- # (Usually not necessary -- OpenCV libraries are normally installed in one of the above $LIBRARY_DIRS.)
- USE_PKG_CONFIG := 1
两种方法都可以。
现在可以开始 make all -j16 了。
make中opencv高低版本冲突的问题
/usr/bin/ld: warning: libopencv_core.so.3.1, needed by //usr/local/lib/libopencv_imgcodecs.so, may conflict with libopencv_core.so.2.4/usr/bin/ld: /tmp/ccDhjMld.o: undefined reference to symbol '_ZN2cv6String10deallocateEv'
//usr/local/lib/libopencv_core.so.3.1: error adding symbols: DSO missing from command line
collect2: error: ld returned 1 exit status
解决方案
sudo apt-get autoremove libopencv-dev