文章目录
学习内容来源:Jest入门到TDD/BDD双实战_前端要学的测试课
相对原教程,我在学习开始时(2023.08)采用的是当前最新版本:
| 项 | 版本 |
|---|---|
| @babel/core | ^7.16.0 |
| @pmmmwh/react-refresh-webpack-plugin | ^0.5.3 |
| @svgr/webpack | ^5.5.0 |
| @testing-library/jest-dom | ^5.17.0 |
| @testing-library/react | ^13.4.0 |
| @testing-library/user-event | ^13.5.0 |
| babel-jest | ^27.4.2 |
| babel-loader | ^8.2.3 |
| babel-plugin-named-asset-import | ^0.3.8 |
| babel-preset-react-app | ^10.0.1 |
| bfj | ^7.0.2 |
| browserslist | ^4.18.1 |
| camelcase | ^6.2.1 |
| case-sensitive-paths-webpack-plugin | ^2.4.0 |
| css-loader | ^6.5.1 |
| css-minimizer-webpack-plugin | ^3.2.0 |
| dotenv | ^10.0.0 |
| dotenv-expand | ^5.1.0 |
| eslint | ^8.3.0 |
| eslint-config-react-app | ^7.0.1 |
| eslint-webpack-plugin | ^3.1.1 |
| file-loader | ^6.2.0 |
| fs-extra | ^10.0.0 |
| html-webpack-plugin | ^5.5.0 |
| identity-obj-proxy | ^3.0.0 |
| jest | ^27.4.3 |
| jest-enzyme | ^7.1.2 |
| jest-resolve | ^27.4.2 |
| jest-watch-typeahead | ^1.0.0 |
| mini-css-extract-plugin | ^2.4.5 |
| postcss | ^8.4.4 |
| postcss-flexbugs-fixes | ^5.0.2 |
| postcss-loader | ^6.2.1 |
| postcss-normalize | ^10.0.1 |
| postcss-preset-env | ^7.0.1 |
| prompts | ^2.4.2 |
| react | ^18.2.0 |
| react-app-polyfill | ^3.0.0 |
| react-dev-utils | ^12.0.1 |
| react-dom | ^18.2.0 |
| react-refresh | ^0.11.0 |
| resolve | ^1.20.0 |
| resolve-url-loader | ^4.0.0 |
| sass-loader | ^12.3.0 |
| semver | ^7.3.5 |
| source-map-loader | ^3.0.0 |
| style-loader | ^3.3.1 |
| tailwindcss | ^3.0.2 |
| terser-webpack-plugin | ^5.2.5 |
| web-vitals | ^2.1.4 |
| webpack | ^5.64.4 |
| webpack-dev-server | ^4.6.0 |
| webpack-manifest-plugin | ^4.0.2 |
| workbox-webpack-plugin | ^6.4.1" |
具体配置、操作和内容会有差异,“坑”也会有所不同。。。
一、Jest 前端自动化测试框架基础入门
5.Jest 中的匹配器
什么是匹配器呢?在之前的案例中,toBe就是一个最基本的匹配器
toBe 匹配器
toBe 匹配器类似于 Object.is 或者 ===,精确相等。
test('测试toBe', () => {


  expect(10).toBe(10); // passed
});


test('测试toBe', () => {


  const a = {

    one: 1}
  expect(a).toBe( {

    one: 1});  // failed,因为两个对象的地址是不一样的
});
toEqual匹配器
测试对象的内容是否相等,不比较对象的地址,只关心对象的内容是否一致,递归检查对象或数组的每个字段。
test('测试toEqual', () => {


  const a = {

    one: 1}
  expect(a).toEqual( {

    one: 1});  // passed
});
toBeNull匹配器
测试某个变量是否为null,如果是则Passed,否则failed
test('测试toBeNull', () => {


  const a = null
  expect(a).toBeNull();  // passed
});
toBeUndefined匹配器和toBeDefined匹配器
测试某个变量是否未定义,如果是则Passed,否则failed
test('测试toBeUndefined', () => {


  const a = undefined;
  expect(a).toBeUndefined();  // passed
});

test('测试toBeUndefined', () => {


  const a = '';
  expect(a).toBeUndefined();  // failed
});

test('测试toBeUndefined', () => {


  const a = null;
  expect(a).toBeUndefined();  // failed
});
test('测试toBeDefined', () => {


  const a = null;
  expect(a).toBeDefined();  // passed
});

test('测试toBeDefined', () => {


  const a = undefined;
  expect(a).toBeDefined();  // failed
});
toBeTruthy匹配器
测试某个变量是否为真,如果是则Passed,否则failed
test('测试toBeTruthy', () => {


  const a = undefined;
  expect(a).toBeTruthy();  // undefined 视为false
});

test('测试toBeTruthy', () => {


  const a = null;
  expect(a).toBeTruthy();  // null视为false
});

test('测试toBeTruthy', () => {


  const a = 0;
  expect(a).toBeTruthy();  // 0 视为false
});

test('测试toBeTruthy', () => {


  const a = 1;
  expect(a).toBeTruthy();  // 1 视为true
});
toBeFalsy匹配器
测试某个变量是否为假,如果是则Passed,否则failed
test('测试toBeFalsy', () => {


  const a = 1;
  expect(a).toBeFalsy();  // failed,因为1 视为true
});

test('测试toBeFalsy', () => {


  const a = undefined;
  expect(a).toBeFalsy();  // passed,因为undefined 视为false
});

test('测试toBeFalsy', () => {


  const a = null;
  expect(a).toBeFalsy();  // passed,因为null 视为false
});

test('测试toBeFalsy', () => {


  const a = 0;
  expect(a).toBeFalsy();  // passed,因为0 视为false
});
test('测试toBeFalsy', () => {


  const a = 0;
  expect(a).not.toBeFalsy();  // failed,因为0 视为false,但是匹配器要的是真
});
数字相关的匹配器
test('测试toBeGreaterThan', () => {


  const count = 10;
  expect(count).toBeGreaterThan(9);  // passed,表示希望count这个变量的值比9大
});

test('测试toBeLessThan', () => {


  const count = 10;
  expect(count).toBeLessThan(9);  // failed,表示希望count这个变量的值比9小
});

test('测试toBeGreaterThanOrEqual', () => {


  const count = 9;
  expect(count).toBeGreaterThanOrEqual(9);   // passed,表示希望count这个变量的值大于等于9
});

test('测试toBeLessThanOrEqual', () => {


  const count = 9;
  expect(count).toBeLessThanOrEqual(9);   // passed,表示希望count这个变量的值小于等于9
});


test('测试toBeCloseTo', () => {


  const firstNumber = 0.1;
  const secondNumber = 0.2;
  expect(firstNumber + secondNumber).toEqual(0.3);  // 结果是failed,因为js计算浮点数的时
  expect(value).toBe(0.3);          //  这句会报错,因为浮点数有舍入误差候,有可能会溢出或者说不准确,这种情况下最好用toBeCloseTo
});

test('测试toBeCloseTo', () => {


  const firstNumber = 0.3;
  const secondNumber = 0.4;
  expect(firstNumber + secondNumber).toBeCloseTo(0.7);   // passed
});
字符串相关的匹配器
test('测试toMatch', () => {


  const str = 'www.baidu.com';
  expect(str).toMatch('baidu');   // passed, 表示str字符串中是否包含baidu这个字符串,是返回passed
  expect(str).toMatch(/baidu/); //passed,这里还可以写正则表达式
});
数组相关的匹配器
test('测试toContain', () => {


  const arr = ['dee', 'lee'];
  expect(arr).toContain('dee');   // passed, 表示arr数组中是否包含dee这个字符串元素,是返回passed
});

test('测试toContain', () => {


  const arr = ['dee', 'lee'];
  const data = new Set(arr);
  expect(data).toContain('dee');   // passed, 表示arr数组中是否包含dee这个字符串元素,是返回passed
});
异常情况的匹配器
const throwNewErrorFunc =  () => {


  throw new Error('this is a new error');
}

test('测试toThrow', () => {


  expect(throwNewErrorFunc).toThrow();   // passed, 表示希望throwNewErrorFunc这个方法运行的时候能够抛出一个异常
});

test('测试toThrow', () => {


  expect(throwNewErrorFunc).not.toThrow();   // failed, 表示希望throwNewErrorFunc这个方法运行的时候不能够抛出异常
});

test('测试toThrow', () => {


  expect(throwNewErrorFunc).toThrow('this is a new error');   // passed, 表示希望throwNewErrorFunc这个方法运行的时候能够抛出一个异常,并且内容是'this is a new error'
  expect(throwNewErrorFunc).toThrow(/this is a new error/); // 也可以是正则表达式
});
更多的匹配器可以查看Jest官网:
6.Jest 命令行工具的使用
Ctrl + Shift + P 打开 vscode 的命令窗口,输入
install code command
会显示如下
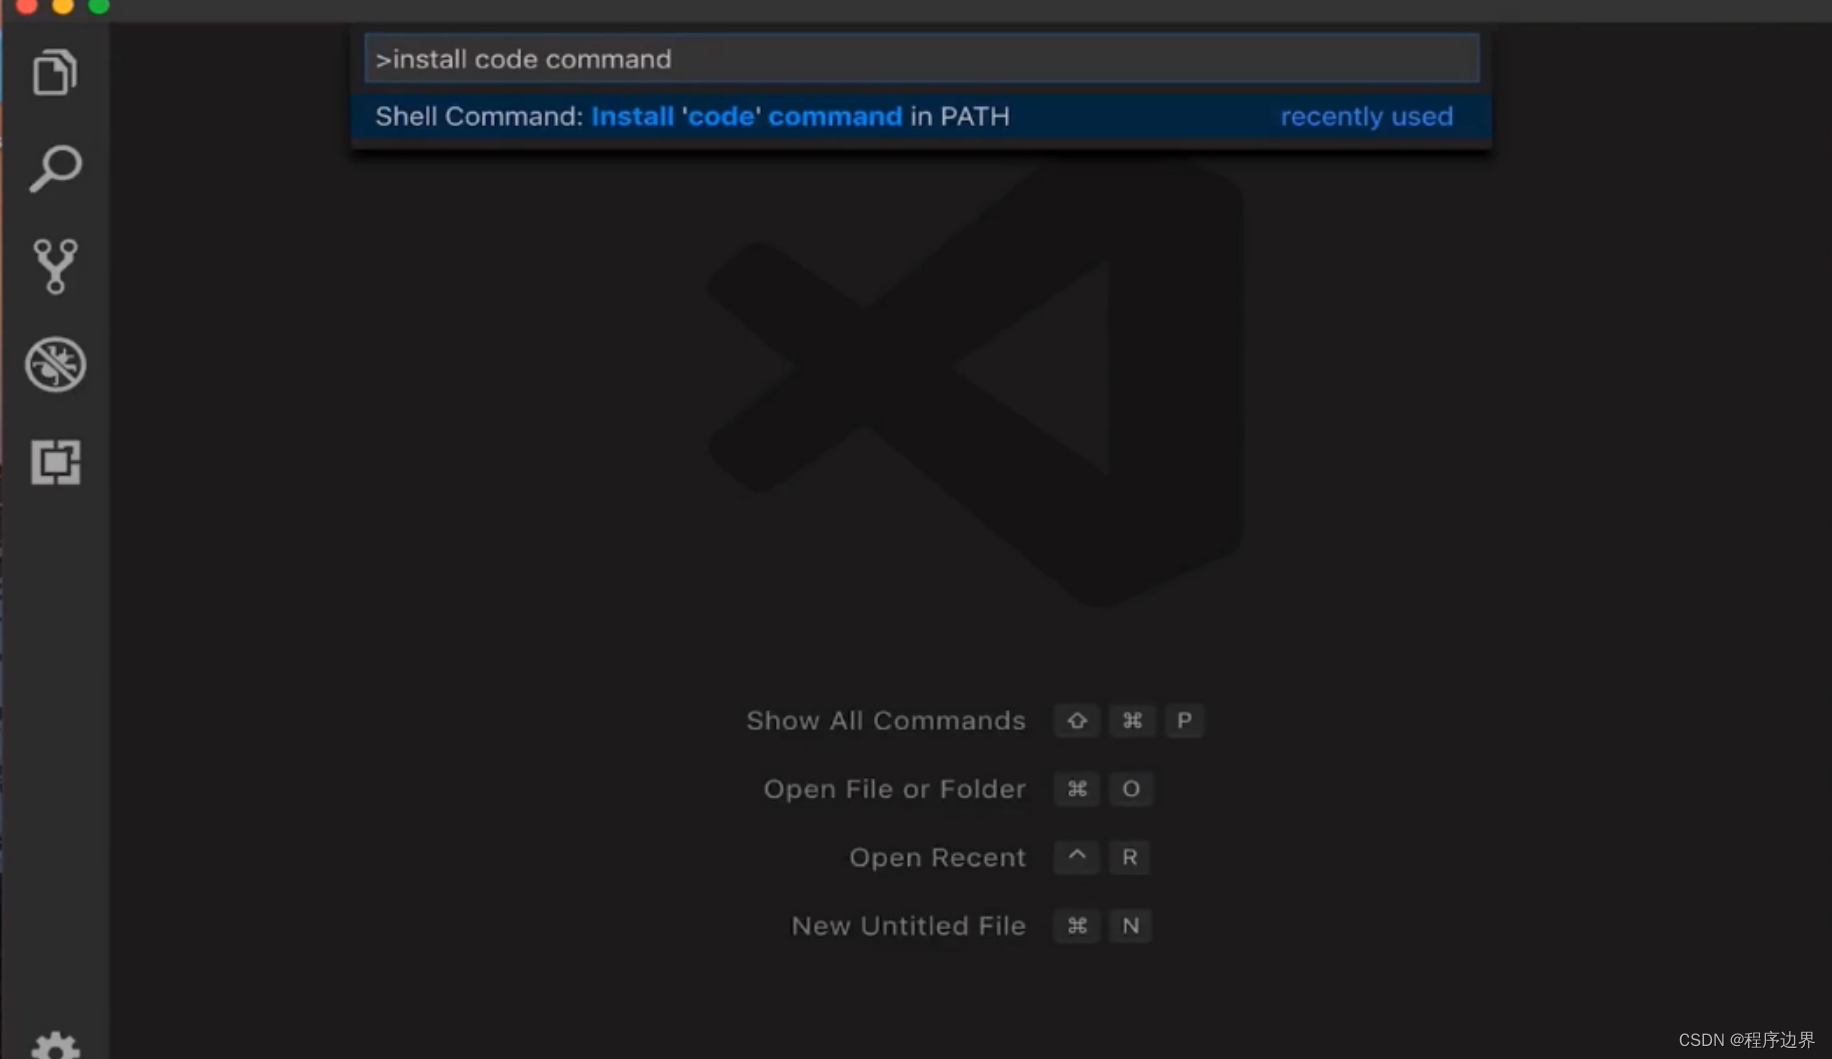
直接点击,code 命令会添加到系统 path 中
这样在随便一个命令行窗口输入 code 就可以打开 vscode,输入 code filePath/directoryPath 即可在 vscode 中打开对应文件或目录
目前在 windows 中安装 vscode 过程中该命令会自动添加到 path 中
接下来这节内容便是和这命令行有关啦
运行 npm run test 之后,jest 会运行所有测试用例,最后会显示这样一句:
Watch Usage: Press w to show more.
输入 w 后,显示:
Watch Usage
 › Press f to run only failed tests.
 › Press o to only run tests related to changed files.
 › Press p to filter by a filename regex pattern.
 › Press t to filter by a test name regex pattern.
 › Press q to quit watch mode.
 › Press Enter to trigger a test run.
模式 f
在修改测试用例所在文件后只运行上一次失败了的测试用例,其他跳过(skip)
PS:若是上一次运行成功,后面再改动也不会自动运行
模式 o
只运行与修改文件相关联的测试用例
需要借助 git 来获取文件变动记录,否则会报错
- 安装 git
- 项目根目录运行
git init初始化一个 git 仓库- 运行
git add .将项目下的所有文件添加到 git 仓库- 运行
git commit -m 'version 1'将文件变化提交并做备注(到了这一步就已经满足 o 模式的运行条件啦)- 运行
git push将已提交的文件变动推送到线上 git 仓库
之前配置 package.json:"test": "jest --watchAll" 默认会进入 a 模式,配置为 --watch 则会默认进入 o 模式:
{


  ...
  "scripts": {


    "test": "jest --watch"
  },
  ...
}
模式 t
通过正则表达式过滤,只运行通过过滤的测试用例
模式 p
类似模式 t, 通过正则表达式过滤,只运行通过过滤的测试文件
q : 退出监听模式
本文仅作记录, 实战要点待后续专文总结,敬请期待。。。