目录

一、今日目标
1.生命周期
- 生命周期介绍
- 生命周期的四个阶段
- 生命周期钩子
- 声明周期案例
2.综合案例-小黑记账清单
- 列表渲染
- 添加/删除
- 饼图渲染
二、Vue生命周期
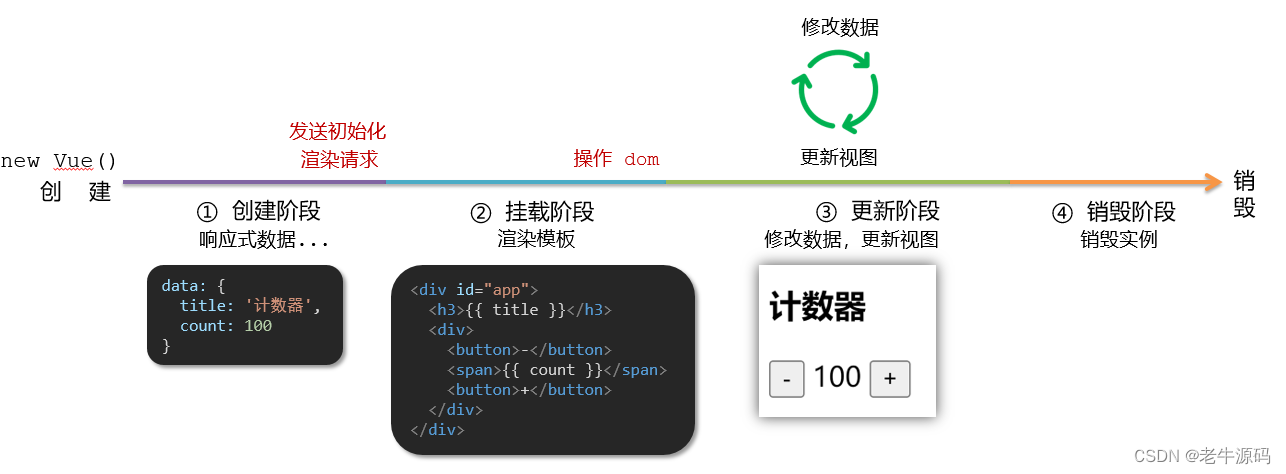
思考:什么时候可以发送初始化渲染请求?(越早越好)什么时候可以开始操作dom?(至少dom得渲染出来)
Vue生命周期:就是一个Vue实例从创建 到 销毁 的整个过程。
生命周期四个阶段:① 创建 ② 挂载 ③ 更新 ④ 销毁
1.创建阶段:创建响应式数据
2.挂载阶段:渲染模板
3.更新阶段:修改数据,更新视图
4.销毁阶段:销毁Vue实例
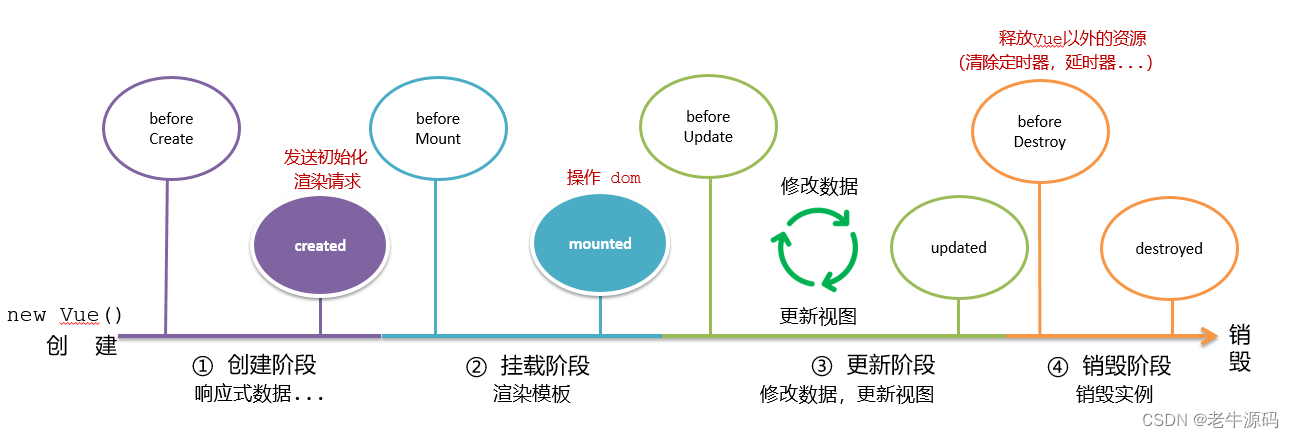
三、Vue生命周期钩子
Vue生命周期过程中,会自动运行一些函数,被称为【生命周期钩子】→ 让开发者可以在【特定阶段】运行自己的代码
<div id="app">
    <h3>{

   { title }}</h3>
    <div>
      <button @click="count--">-</button>
      <span>{

   { count }}</span>
      <button @click="count++">+</button>
    </div>
  </div>
  <script src="https://cdn.jsdelivr.net/npm/vue@2/dist/vue.js"></script>
  <script>
    const app = new Vue({


      el: '#app',
      data: {


        count: 100,
        title: '计数器'
      },
      // 1. 创建阶段(准备数据)


      // 2. 挂载阶段(渲染模板)


      // 3. 更新阶段(修改数据 → 更新视图)


      // 4. 卸载阶段

    })
  </script>
四、生命周期钩子小案例
1.在created中发送数据
 <style>
    * {


      margin: 0;
      padding: 0;
      list-style: none;
    }
    .news {


      display: flex;
      height: 120px;
      width: 600px;
      margin: 0 auto;
      padding: 20px 0;
      cursor: pointer;
    }
    .news .left {


      flex: 1;
      display: flex;
      flex-direction: column;
      justify-content: space-between;
      padding-right: 10px;
    }
    .news .left .title {


      font-size: 20px;
    }
    .news .left .info {


      color: #999999;
    }
    .news .left .info span {


      margin-right: 20px;
    }
    .news .right {


      width: 160px;
      height: 120px;
    }
    .news .right img {


      width: 100%;
      height: 100%;
      object-fit: cover;
    }
  </style>

 <div id="app">
    <ul>
      <li class="news">
        <div class="left">
          <div class="title">5G商用在即,三大运营商营收持续下降</div>
          <div class="info">
            <span>新京报经济新闻</span>
            <span>2222-10-28 11:50:28</span>
          </div>
        </div>
        <div class="right">
          <img src="http://ajax-api.itheima.net/public/images/0.webp" alt="">
        </div>
      </li>
    </ul>
  </div>
  <script src="https://cdn.jsdelivr.net/npm/vue@2/dist/vue.js"></script>
  <script src="https://cdn.jsdelivr.net/npm/axios/dist/axios.min.js"></script>
  <script>
    // 接口地址:http://hmajax.itheima.net/api/news
    // 请求方式:get
    const app = new Vue({


      el: '#app',
      data: {


        list: []
      }
    })
  </script>
2.在mounted中获取焦点
 <style>
    html,
    body {


      height: 100%;
    }
    .search-container {


      position: absolute;
      top: 30%;
      left: 50%;
      transform: translate(-50%, -50%);
      text-align: center;
    }
    .search-container .search-box {


      display: flex;
    }
    .search-container img {


      margin-bottom: 30px;
    }
    .search-container .search-box input {


      width: 512px;
      height: 16px;
      padding: 12px 16px;
      font-size: 16px;
      margin: 0;
      vertical-align: top;
      outline: 0;
      box-shadow: none;
      border-radius: 10px 0 0 10px;
      border: 2px solid #c4c7ce;
      background: #fff;
      color: #222;
      overflow: hidden;
      box-sizing: content-box;
      -webkit-tap-highlight-color: transparent;
    }
    .search-container .search-box button {


      cursor: pointer;
      width: 112px;
      height: 44px;
      line-height: 41px;
      line-height: 42px;
      background-color: #ad2a27;
      border-radius: 0 10px 10px 0;
      font-size: 17px;
      box-shadow: none;
      font-weight: 400;
      border: 0;
      outline: 0;
      letter-spacing: normal;
      color: white;
    }
    body {


      background: no-repeat center /cover;
      background-color: #edf0f5;
    }
  </style>

<div class="container" id="app">
  <div class="search-container">
    <img src="https://www.itheima.com/images/logo.png" alt="">
    <div class="search-box">
      <input type="text" v-model="words" id="inp">
      <button>搜索一下</button>
    </div>
  </div>
</div>

<script src="https://cdn.jsdelivr.net/npm/vue@2/dist/vue.js"></script>
<script>
  const app = new Vue({


    el: '#app',
    data: {


      words: ''
    }
  })
</script>
五、案例-小黑记账清单
1.需求图示:
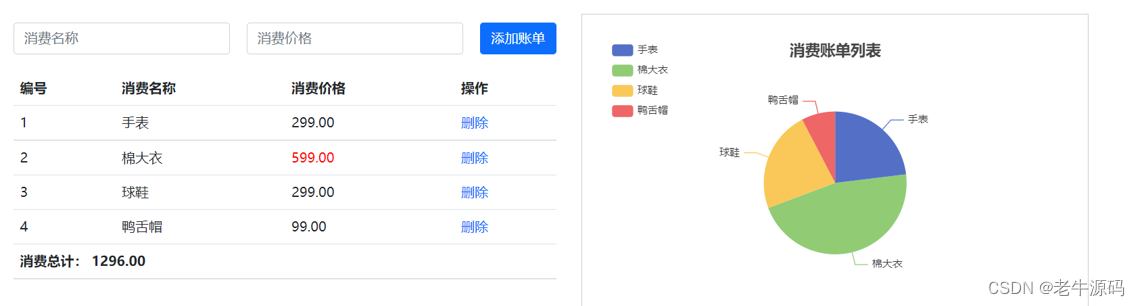
2.需求分析
1.基本渲染
2.添加功能
3.删除功能
4.饼图渲染
3.思路分析
1.基本渲染
- 立刻发送请求获取数据 created
- 拿到数据,存到data的响应式数据中
- 结合数据,进行渲染 v-for
- 消费统计 —> 计算属性
2.添加功能
- 收集表单数据 v-model,使用指令修饰符处理数据
- 给添加按钮注册点击事件,对输入的内容做非空判断,发送请求
- 请求成功后,对文本框内容进行清空
- 重新渲染列表
3.删除功能
- 注册点击事件,获取当前行的id
- 根据id发送删除请求
- 需要重新渲染
4.饼图渲染
- 初始化一个饼图 echarts.init(dom) mounted钩子中渲染
- 根据数据试试更新饼图 echarts.setOptions({…})
4.代码准备
 <!-- CSS only -->
    <link
      rel="stylesheet"
      href="https://cdn.jsdelivr.net/npm/[email protected]/dist/css/bootstrap.min.css"
    />
    <style>
      .red {


        color: red!important;
      }
      .search {


        width: 300px;
        margin: 20px 0;
      }
      .my-form {


        display: flex;
        margin: 20px 0;
      }
      .my-form input {


        flex: 1;
        margin-right: 20px;
      }
      .table > :not(:first-child) {


        border-top: none;
      }
      .contain {


        display: flex;
        padding: 10px;
      }
      .list-box {


        flex: 1;
        padding: 0 30px;
      }
      .list-box  a {


        text-decoration: none;
      }
      .echarts-box {


        width: 600px;
        height: 400px;
        padding: 30px;
        margin: 0 auto;
        border: 1px solid #ccc;
      }
      tfoot {


        font-weight: bold;
      }
      @media screen and (max-width: 1000px) {


        .contain {


          flex-wrap: wrap;
        }
        .list-box {


          width: 100%;
        }
        .echarts-box {


          margin-top: 30px;
        }
      }
    </style>


  <div id="app">
      <div class="contain">
        <!-- 左侧列表 -->
        <div class="list-box">

          <!-- 添加资产 -->
          <form class="my-form">
            <input type="text" class="form-control" placeholder="消费名称" />
            <input type="text" class="form-control" placeholder="消费价格" />
            <button type="button" class="btn btn-primary">添加账单</button>
          </form>

          <table class="table table-hover">
            <thead>
              <tr>
                <th>编号</th>
                <th>消费名称</th>
                <th>消费价格</th>
                <th>操作</th>
              </tr>
            </thead>
            <tbody>
              <tr>
                <td>1</td>
                <td>帽子</td>
                <td>99.00</td>
                <td><a href="javascript:;">删除</a></td>
              </tr>
              <tr>
                <td>2</td>
                <td>大衣</td>
                <td class="red">199.00</td>
                <td><a href="javascript:;">删除</a></td>
              </tr>
            </tbody>
            <tfoot>
              <tr>
                <td colspan="4">消费总计: 298.00</td>
              </tr>
            </tfoot>
          </table>
        </div>

        <!-- 右侧图表 -->
        <div class="echarts-box" id="main"></div>
      </div>
    </div>
    <script src="https://cdn.jsdelivr.net/npm/[email protected]/dist/echarts.min.js"></script>
    <script src="https://cdn.jsdelivr.net/npm/vue@2/dist/vue.js"></script>
    <script src="https://cdn.jsdelivr.net/npm/axios/dist/axios.min.js"></script>
    <script>
      /**
       * 接口文档地址:
       * https://www.apifox.cn/apidoc/shared-24459455-ebb1-4fdc-8df8-0aff8dc317a8/api-53371058
       *
       * 功能需求:
       * 1. 基本渲染
       * 2. 添加功能
       * 3. 删除功能
       * 4. 饼图渲染
       */
      const app = new Vue({


        el: '#app',
        data: {


        },
      })
    </script>
六 生命周期总结
Vue的生命周期主要分为创建阶段、挂载阶段、更新阶段和销毁阶段。
-
创建阶段:
- beforeCreate:实例刚在内存中被创建出来,此时还没有初始化好data和methods属性。
- created:实例已经在内存中创建完成,此时已经完成了data的初始化,但是还没有开始编译模板。
- beforeMount:此时已经完成了模板的编译,但是还没有挂载到页面中。
- mounted:此时,已经将编译好的模板挂载到了页面指定的位置,此时,页面中的元素已经可以进行交互了。
-
更新阶段:
- beforeUpdate:当data中的数据发生变化时,会触发beforeUpdate函数,但此时页面中的DOM并没有被重新渲染,只是数据已经更新了。
- updated:此时,页面中的DOM已经被重新渲染。
-
销毁阶段:
- beforeDestroy:在实例被销毁之前调用。可以在这一阶段进行一些清理工作。
- destroyed:实例被销毁之后调用。在这一阶段,Vue实例的所有事件监听器被移除,所有的子实例也都被销毁。
在每个生命周期函数中,我们可以执行一些自定义的操作,比如在created函数中,可以进行一些初始化工作,比如请求数据,绑定事件等。在beforeDestroy函数中,可以进行一些清理工作,比如取消事件监听,清除定时器等。