1,视频演示整个过程
https://www.bilibili.com/video/BV18H4y1273R/?vd_source=4b290247452adda4e56d84b659b0c8a2
在云主机上使用4090部署,使用fastchat框架成功部署Baichuan2-13B-Chat模型,8bit运行模式,可以进行问答啦!
2,关于fastchat项目和Baichuan2
FastChat是
一个用于训练、部署和评估基于大型语言模型的聊天机器人的开放平台。其核心功能包括:
•最先进模型的权重、训练代码和评估代码(例如Vicuna、FastChat-T5)。•基于分布式多模型的服务系统,具有Web界面和与OpenAI兼容的RESTful API。
https://github.com/baichuan-inc/Baichuan2
模型介绍
Baichuan 2 是百川智能推出的新一代开源大语言模型,采用 2.6 万亿 Tokens 的高质量语料训练。
Baichuan 2 在多个权威的中文、英文和多语言的通用、领域 benchmark 上取得同尺寸最佳的效果。
本次发布包含有 7B、13B 的 Base 和 Chat 版本,并提供了 Chat 版本的 4bits 量化。
所有版本对学术研究完全开放。同时,开发者通过邮件申请并获得官方商用许可后,即可免费商用,请参考协议章节。
fastchat 之后i从baichuan1 和 baichuan2。
关于 FaceBook的 xformers 库:
https://github.com/facebookresearch/xformers
xFormers是一个模块化和可编程的Transformer建模库,可以加速图像的生成。 这种优化仅适用于nvidia gpus,它加快了图像生成,并降低了vram的使用量,而成本产生了非确定性的结果。
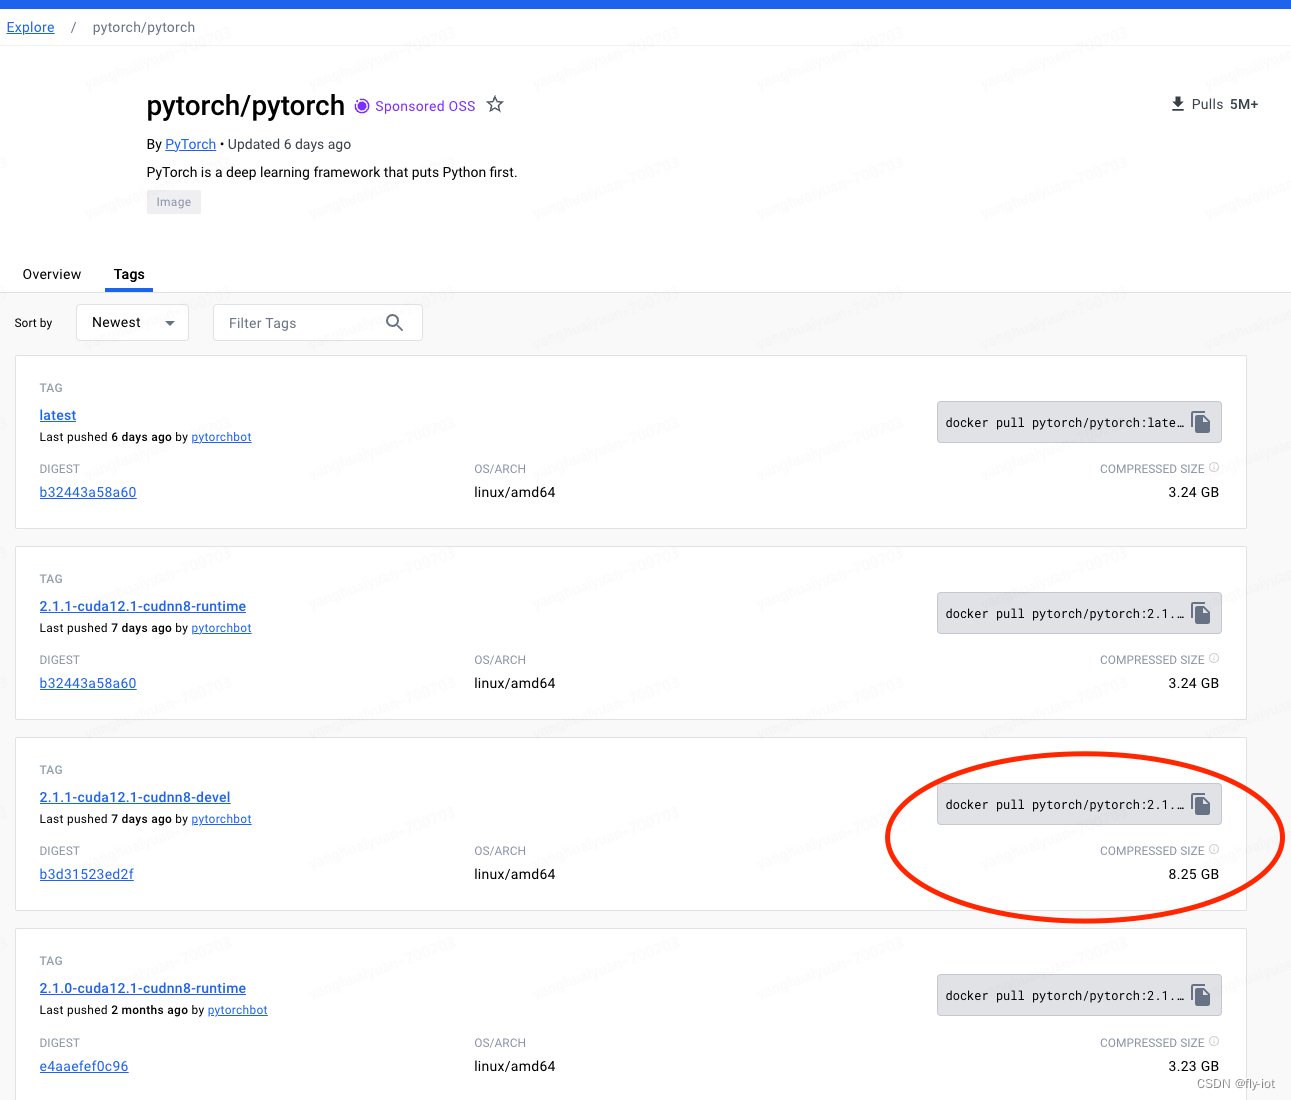
3,下载模型,准备镜像环境,特别注意nvidia版本选择!没有启动成功!
经过多次测试,需要使用新版本镜像,才可以跑起来baichuan2-13b-int4模型:
必须是 pytorch:2.1.0 因为 xformers 依赖这个版本的 pytorch。
pytorch/pytorch:2.1.0-cuda12.1-cudnn8-devel
需要python3的环境,因为启动模型,需要nvidia的镜像。
查看各个服务的命令:
python3 -m fastchat.serve.controller --help
python3 -m fastchat.serve.model_worker --help
python3 -m fastchat.serve.openai_api_server --help
python3 -m fastchat.serve.gradio_web_server --help
下载模型:
# 安装工具
apt install git-lfs
# 下载模型
git clone https://www.modelscope.cn/baichuan-inc/Baichuan2-13B-Chat-4bits.git
依赖新库
# 把 chatglm3 的模型放到 /data/models 目录下:
docker run -itd --name fastchat -v /data/models:/data/models --gpus=all \
-p 8000:8000 pytorch/pytorch:2.1.0-cuda12.1-cudnn8-devel

docker exec -it fastchat bash

# 速度快
pip3 config set global.index-url https://mirrors.huaweicloud.com/repository/pypi/simple
pip3 config set install.trusted-host mirrors.huaweicloud.com

# 安装依赖环境 先安装 xformers
pip3 install xformers transformers==4.33.1 and tokenizers==0.13.3  accelerate sentencepiece
# 再安装 fastchat, 就不会安装 pytroch 了,会使用 xformers 依赖的版本了。
pip3 install "fschat[model_worker,webui]"


# bitsandbytes 源码安装:
git clone https://github.com/timdettmers/bitsandbytes.git
cd bitsandbytes
# CUDA_VERSIONS in {110, 111, 112, 113, 114, 115, 116, 117, 118, 119, 120, 120}
# make argument in {cuda110, cuda11x, cuda12x}
#CUDA_VERSION=113 make cuda11x
#CUDA_VERSION=110 make cuda110
python3 setup.py install


#首先启动 controller :
python3 -m fastchat.serve.controller --host 172.17.0.2 --port 21001
# 然后启动模型: 说明,必须是本地ip --load-8bit 本身已经是int4了
python3 -m fastchat.serve.model_worker --load-8bit --model-names baichuan2-13b --model-path /data/models/Baichuan2-13B-Chat-4bits --controller-address http://172.17.0.2:21001 --worker-address http://172.17.0.2:8080 --host 0.0.0.0 --port 8080
# 最后启动 openapi的 兼容服务 地址 8000
python3 -m fastchat.serve.openai_api_server --controller-address http://172.17.0.2:21001 --host 0.0.0.0 --port 8000
4,关于本地报错,估计是显卡的硬件不支持
================================================================================
The following directories listed in your path were found to be non-existent: {

    PosixPath('/usr/local/nvidia/lib64'), PosixPath('/usr/local/nvidia/lib')}
/opt/conda/lib/python3.10/site-packages/bitsandbytes-0.41.2-py3.10.egg/bitsandbytes/cuda_setup/main.py:166: UserWarning: /usr/local/nvidia/lib:/usr/local/nvidia/lib64 did not contain ['libcudart.so', 'libcudart.so.11.0', 'libcudart.so.12.0'] as expected! Searching further paths...
  warn(msg)
CUDA_SETUP: WARNING! libcudart.so not found in any environmental path. Searching in backup paths...
DEBUG: Possible options found for libcudart.so: {

    PosixPath('/usr/local/cuda/lib64/libcudart.so')}
CUDA SETUP: PyTorch settings found: CUDA_VERSION=121, Highest Compute Capability: 6.1.
CUDA SETUP: To manually override the PyTorch CUDA version please see:https://github.com/TimDettmers/bitsandbytes/blob/main/how_to_use_nonpytorch_cuda.md
/opt/conda/lib/python3.10/site-packages/bitsandbytes-0.41.2-py3.10.egg/bitsandbytes/cuda_setup/main.py:166: UserWarning: WARNING: Compute capability < 7.5 detected! Only slow 8-bit matmul is supported for your GPU!                     If you run into issues with 8-bit matmul, you can try 4-bit quantization: https://huggingface.co/blog/4bit-transformers-bitsandbytes
  warn(msg)
CUDA SETUP: Required library version not found: libbitsandbytes_cuda121_nocublaslt.so. Maybe you need to compile it from source?
CUDA SETUP: Defaulting to libbitsandbytes_cpu.so...

================================================ERROR=====================================
CUDA SETUP: CUDA detection failed! Possible reasons:
1. You need to manually override the PyTorch CUDA version. Please see: "https://github.com/TimDettmers/bitsandbytes/blob/main/how_to_use_nonpytorch_cuda.md
2. CUDA driver not installed
3. CUDA not installed
4. You have multiple conflicting CUDA libraries
5. Required library not pre-compiled for this bitsandbytes release!
CUDA SETUP: If you compiled from source, try again with `make CUDA_VERSION=DETECTED_CUDA_VERSION` for example, `make CUDA_VERSION=113`.
CUDA SETUP: The CUDA version for the compile might depend on your conda install. Inspect CUDA version via `conda list | grep cuda`.
================================================================================
编译 bitsandbytes 报错,要选对版本。提示 使用 CUDA_VERSION=113 再试试。
docker run -itd --name fastchat -v /data/models:/data/models --gpus=all \
-p 8000:8000 pytorch/pytorch:2.1.0-cuda12.1-cudnn8-devel
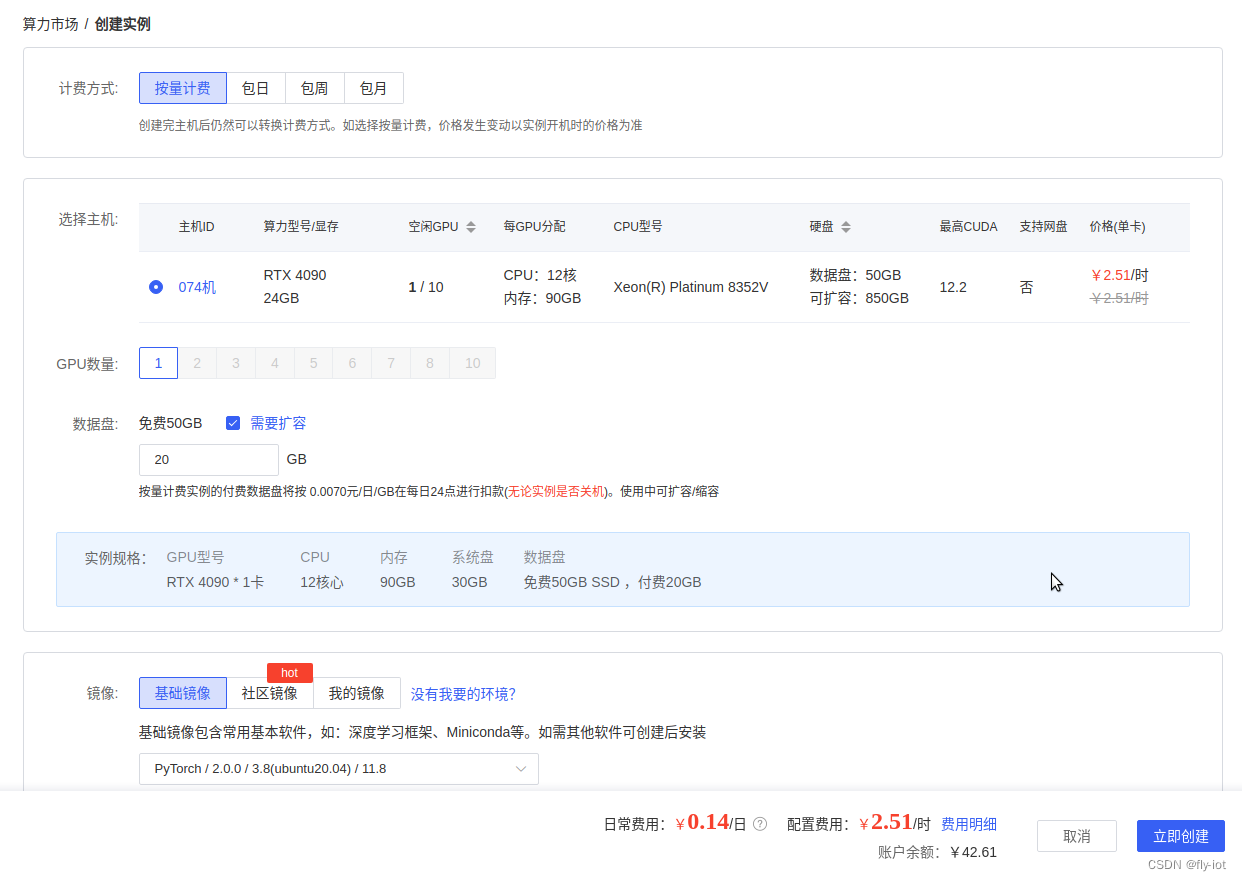
5,尝试使用autodl的机器进行测试,选择 4090 下启动成功!
硬盘多增加 10G,才可以下载模型,共 52 G。
升级 xformers 可以测试几个支持 pytorch 版本:
pip3 install  xformers
Looking in indexes: http://mirrors.aliyun.com/pypi/simple
Collecting xformers
  Downloading http://mirrors.aliyun.com/pypi/packages/56/5f/20481c8ccfbd2ac0f936908c9b0ff3e31380d8d186d7dabf34a941b3127f/xformers-0.0.22.post7-cp38-cp38-manylinux2014_x86_64.whl (211.8 MB)
     |████████████████████████████████| 211.8 MB 10.3 MB/s
Requirement already satisfied: numpy in ./miniconda3/lib/python3.8/site-packages (from xformers) (1.24.2)
Collecting torch==2.1.0
  Downloading http://mirrors.aliyun.com/pypi/packages/e1/24/f7fe3fe82583e6891cc3fceeb390f192f6c7f1d87e5a99a949ed33c96167/torch-2.1.0-cp38-cp38-manylinux1_x86_64.whl (670.2 MB)
     |█████████████▍                  | 280.0 MB 14.1 MB/s eta 0:00:28^C
ERROR: Operation cancelled by user
root@autodl-container-24624396c7-a00b514f:~# pip3 install  xformers==0.0.20
Looking in indexes: http://mirrors.aliyun.com/pypi/simple
Collecting xformers==0.0.20
  Downloading http://mirrors.aliyun.com/pypi/packages/c2/01/804708d257b95b5edbbac95238ba13ef8d31f085a53f0d3910d1e446e6ba/xformers-0.0.20-cp38-cp38-manylinux2014_x86_64.whl (109.1 MB)
     |████████████████████████████████| 109.1 MB 107.3 MB/s
Collecting torch==2.0.1
  Downloading http://mirrors.aliyun.com/pypi/packages/96/28/026dc037f177d53558477931677b120f649dd5a0dcdc4b44dc38b3d75711/torch-2.0.1-cp38-cp38-manylinux1_x86_64.whl (619.9 MB)
     |████                            | 79.6 MB 124.0 MB/s eta 0:00:05^C
ERROR: Operation cancelled by user
root@autodl-container-24624396c7-a00b514f:~# pip3 install  xformers==0.0.19
Looking in indexes: http://mirrors.aliyun.com/pypi/simple
Collecting xformers==0.0.19
  Downloading http://mirrors.aliyun.com/pypi/packages/6f/c7/5a74cfe8dedc1ff26a04ecef8f571ed7d495cf967ce10b8ea77895dbdf4f/xformers-0.0.19-cp38-cp38-manylinux2014_x86_64.whl (108.2 MB)
     |████████████████████████████████| 108.2 MB 10.6 MB/s
解决问题 got an unexpected keyword argument ‘enable’
https://github.com/baichuan-inc/Baichuan2/issues/251
pip3 uninstall transformers tokenizers
pip3 install transformers4.33.1 and tokenizers0.13.3
2023-11-25 12:56:59 | ERROR | stderr |     self.gradient_checkpointing_enable()
2023-11-25 12:56:59 | ERROR | stderr |   File "/root/miniconda3/lib/python3.8/site-packages/transformers/modeling_utils.py", line 1872, in gradient_checkpointing_enable
2023-11-25 12:56:59 | ERROR | stderr |     self._set_gradient_checkpointing(enable=True, gradient_checkpointing_func=gradient_checkpointing_func)
2023-11-25 12:56:59 | ERROR | stderr | TypeError: _set_gradient_checkpointing() got an unexpected keyword argument 'enable'
选择 4090 测试下
https://www.autodl.com/market/list
模型地址:
https://www.modelscope.cn/models/baichuan-inc/Baichuan2-13B-Chat/summary
apt update && apt install -y git-lfs net-tools
cd /root/autodl-tmp/
git clone https://www.modelscope.cn/baichuan-inc/Baichuan2-13B-Chat.git
执行命令:
# 速度快
pip3 config set global.index-url https://mirrors.huaweicloud.com/repository/pypi/simple
pip3 config set install.trusted-host mirrors.huaweicloud.com

# 安装依赖环境 先安装 xformers
pip3 install xformers transformers==4.33.1 and tokenizers==0.13.3  accelerate sentencepiece
pip3 install "fschat[model_worker,webui]"

#首先启动 controller :
IP_ADDR=`ifconfig -a | grep -oP '(?<=inet\s)\d+(\.\d+){3}' | head -n 1 `

python3 -m fastchat.serve.controller --host ${IP_ADDR} --port 21001
# 然后启动模型: 说明,必须是本地ip --load-8bit 本身已经是int4了
python3 -m fastchat.serve.model_worker --load-8bit --model-names baichuan2-13b --model-path /root/autodl-tmp/Baichuan2-13B-Chat --controller-address http://${IP_ADDR}:21001 --worker-address http://${IP_ADDR}:8080 --host 0.0.0.0 --port 8080
# 最后启动 openapi的 兼容服务 地址 8000
python3 -m fastchat.serve.openai_api_server --controller-address http://${IP_ADDR}:21001 --host 0.0.0.0 --port 8000
需要最新python 3.9 或者更高镜像:
2023-11-25 13:07:28 | ERROR | stderr | output = await asyncio.to_thread(worker.generate_gate, params)
2023-11-25 13:07:28 | ERROR | stderr | AttributeError: module ‘asyncio’ has no attribute ‘to_thread’
升级到 python 3.10 镜像解决启动成功:
172.17.0.9:21001', model_path='/root/autodl-tmp/Baichuan2-13B-Chat', revision='main', device='cuda', gpus=None, num_gpus=1, max_gpu_memory=None, dtype=None, load_8bit=True, cpu_offloading=False, gptq_ckpt=None, gptq_wbits=16, gptq_groupsize=-1, gptq_act_order=False, awq_ckpt=None, awq_wbits=16, awq_groupsize=-1, enable_exllama=False, exllama_max_seq_len=4096, exllama_gpu_split=None, enable_xft=False, xft_max_seq_len=4096, xft_dtype=None, model_names=['baichuan2-13b'], conv_template=None, embed_in_truncate=False, limit_worker_concurrency=5, stream_interval=2, no_register=False, seed=None, debug=False, ssl=False)
2023-11-25 13:59:10 | INFO | model_worker | Loading the model ['baichuan2-13b'] on worker 76a85f75 ...
  0%|                                                                                                                                | 0/3 [00:00<?, ?it/s]
 33%|████████████████████████████████████████                                                                                | 1/3 [00:19<00:39, 19.83s/it]
 67%|████████████████████████████████████████████████████████████████████████████████                                        | 2/3 [00:46<00:23, 23.98s/it]
100%|████████████████████████████████████████████████████████████████████████████████████████████████████████████████████████| 3/3 [01:16<00:00, 26.58s/it]
100%|████████████████████████████████████████████████████████████████████████████████████████████████████████████████████████| 3/3 [01:16<00:00, 25.47s/it]
2023-11-25 14:00:29 | ERROR | stderr |
2023-11-25 14:00:29 | INFO | model_worker | Register to controller
2023-11-25 14:00:29 | ERROR | stderr | INFO:     Started server process [2476]
2023-11-25 14:00:29 | ERROR | stderr | INFO:     Waiting for application startup.
2023-11-25 14:00:29 | ERROR | stderr | INFO:     Application startup complete.
2023-11-25 14:00:29 | ERROR | stderr | INFO:     Uvicorn running on http://0.0.0.0:8080 (Press CTRL+C to quit)
2023-11-25 14:00:33 | INFO | stdout | INFO:     172.17.0.9:39646 - "POST /worker_get_conv_template HTTP/1.1" 200 OK
2023-11-25 14:00:33 | INFO | stdout | INFO:     172.17.0.9:39652 - "POST /model_details HTTP/1.1" 200 OK
2023-11-25 14:00:33 | INFO | stdout | INFO:     172.17.0.9:39662 - "POST /count_token HTTP/1.1" 200 OK
6,测试接口:
curl http://localhost:8000/v1/chat/completions   -H "Content-Type: application/json"   -d '{
     "model": "baichuan2-13b",
     "messages": [{"role": "user", "content": "北京景点"}],
     "temperature": 0.7
   }'
调用成功:
{

    "id":"chatcmpl-3fuDn2MjLixtwdPkhXLxM4","object":"chat.completion","created":1700892068,"model":"baichuan2-13b","choices":[{

    "index":0,"message":{

    "role":"assistant","content":"北京有许多著名的景点,以下是一些值得一游的景点:\n\n1. 故宫博物院:位于北京市中心,是中国明清两代的皇家宫殿,也是世界上现存规模最大、保存最完整的木质结构古建筑之一。\n\n2. 颐和园:位于北京西郊,是清朝皇家园林,被誉为“皇家园林博物馆”,以保存中国古代园林艺术之精华而闻名于世。\n\n3. 天坛公园:位于北京市南部,是明清两代皇帝祭祀皇天、祈谷、祈雨的场所,是中国古代建筑艺术的瑰宝。\n\n4. 长城:位于北京市北部,是中国古代伟大的防御工程,被誉为“万里长城”,是世界文化遗产之一。\n\n5. 圆明园:位于北京市西北部,是清朝皇家园林,以西洋楼、大水法等著名景点为代表,是中西合璧的建筑艺术之典范。\n\n6. 北京动物园:位于北京市西部,是中国最大的动物园,拥有各种珍稀动物,是中国动物学研究的基地。\n\n7. 南锣鼓巷:位于北京市东城区,是北京著名的胡同文化街区,拥有众多特色小吃、手工艺品店和传统文化表演。\n\n8. 北京奥林匹克公园:位于北京市北部,是2008年北京奥运会的主会场所在地,包括鸟巢、水立方等著名建筑。\n\n9. 798艺术区:位于北京市东北部,是中国当代艺术的发源地,拥有众多画廊、艺术家工作室和艺术展览活动。\n\n10. 王府井步行街:位于北京市东城区,是北京最著名的商业街,汇集了各种品牌商店、特色小吃和传统手工艺品店。"},"finish_reason":"stop"}],"usage":{

    "prompt_tokens":3,"total_tokens":340,"completion_tokens":337}}
7,启动web 界面
pip3 install fschat[model_worker,webui]

IP_ADDR=`ifconfig -a | grep -oP '(?<=inet\s)\d+(\.\d+){3}' | head -n 1 `

python3 -m fastchat.serve.gradio_web_server --controller-url http://${IP_ADDR}:21001 --host 0.0.0.0 --port 8000
不能展示,需要认证。暂时不折腾了。
8,总结
量化前后显存占用对比 (GPU Mem in GB):
| Precision | Baichuan2-7B | Baichuan2-13B |
|---|---|---|
| bf16 / fp16 | 15.3 | 27.5 |
| 8bits | 8.0 | 16.1 |
| 4bits | 5.1 | 8.6 |
这边选取的是 8bit 使用的是 原始模型文件,增加 8bit参数。
和ChatGLM3不同,部署13B的百川需要硬件环境和软件环境更高:
python使用3.10版本,硬件设备使用4090有24G显存,最高占用21G。
解决部署遇到的各种问题。主要是软件匹配的问题。
特别注意python3.10 和软件的版本!
本文章地址:
https://blog.csdn.net/freewebsys/article/details/134567530
相关大模型地址:
https://blog.csdn.net/freewebsys/category_12270092.html