目录
第一章 效果展示

第二章 源代码(图片上传全部详细流程)
- 该组件是小编根据饿了么ui重新封装了一个针对图片上传的组件,可以通过子组件自定义按钮图片、图片上传数量限制、文本内容提示、是否支持拖拽、多个上传、上传文件类型等功能。小编为了针对身份证正反面上传,还加了type控制按钮背景图片展示
2.1 组件封装以及el-upload使用方法
- 父组件调用子组件
<image-upload
    v-model="params.deadFront" // 双向绑定的值
    :limit="1" // 限制数量
    tip="请上传正面的身份证照" // tip提示
    v-decorator="[ // 小编这里是个表单的添加,放了校验 -- > 可忽略
        'deadFront',
        {
            initialValue: params.deadFront,
        },
]"></image-upload>- main.js注册公共组件
import ImageUpload from '@/components/upload/ImageUpload' // 导入图片上传组件
Vue.component('ImageUpload', ImageUpload) // 注册图片上传组件- 子组件封装内容,包括Element组件的详细使用
- 具体参数还是需要看官网!!!
element官网: Element - The world's most popular Vue UI framework
// 子组件内容
<template>
<div class="image-upload-multiple">
<!-- 身份证上传组件 -->
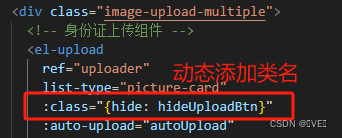
<el-upload // element组件
ref="uploader" // 命名
list-type="picture-card" // 文件列表的类型:text/picture/picture-card
:class="{hide: hideUploadBtn}" // 动态绑定了个类名,后面会说到
:auto-upload="autoUpload" // 是否在选取文件后立即进行上传
:disabled="disabled" // 是否禁用
:action="action" // 上传的地址
:name="name" // 上传的文件字段名
:data="data" // 上传时附带的额外参数
:http-request="request" // 覆盖默认的上传行为,可以自定义上传的实现
:file-list="defaultFileList" // 上传的文件列表
:show-file-list="showFileList" // 是否显示已上传文件列表
:accept="accept" // 接受上传的文件类型
:multiple="multiple" // 是否支持多选文件
:limit="limit" // 最大允许上传个数
:before-upload="before" // 上传文件之前的钩子
:before-remove = "beforeRemove" // 移除之前的钩子
:on-remove="remove" // 文件列表移除文件时的钩子
:on-success="success" // 文件上传成功时的钩子
:on-error="error" // 文件上传失败时的钩子
:on-preview="handlePreview" // 点击文件列表中已上传的文件时的钩子
:on-exceed="handleExceed" // 文件超出个数限制时的钩子
>
<img :src="img" alt="上传身份证图片" class="ident_img"> // 上传按钮的背景图片
<template #tip> // 上传图片的文字说明
<div v-if="tip" class="el-upload__tip">{
{ tip }}</div>
</template>
<template #file="{ file }">
<div class="image-upload-list-item">
<el-image
class="el-upload-list__item-thumbnail"
:src="file.url"
fit="cover"
:preview-src-list="preview" // 预览
:initial-index="preview.findIndex((n) => n == file.url)"
hide-on-click-modal
append-to-body
:z-index="9999"
> // 图片展示,正在展示加载中样式
<template #placeholder>
<div class="image-upload-multiple-image-slot">
Loading...
</div>
</template>
</el-image>
<div
v-if="!disabled && file.status == 'success'"
class="image-upload__item-actions"
> // 右上角的移除功能
<span class="del" @click="handleRemove(file)">
<i class="el-icon-delete"></i>
</span>
</div>
<div
v-if="file.status == 'ready' || file.status == 'uploading'"
class="image-upload__item-progress"
> // 正在上传的进度条
<el-progress
:percentage="file.percentage"
:text-inside="true"
:stroke-width="16"
/>
</div>
</div>
</template>
</el-upload>
<span style="display: none !important"> //这里展示的是上传成功后后端返路径名
<el-input v-model="value"></el-input>
</span>
</div>
</template>
<script>
import config from './config' // config配置文件,后面会给出
import Sortable from 'sortablejs' // 这是一个拖拽的插件库
export default {
props: { // 子组件接收参数
modelValue: { type: String, default: '' }, // 接收后端返回的文件路径名
tip: { type: String, default: '' }, // 接收提示
action: { type: String, default: '' }, // 接收上传的地址
apiObj: { type: Object, default: () => {} }, // 接收了api请求对象(后续会给出)
name: { type: String, default: config.filename }, // 接收文件名
data: { type: Object, default: () => {} }, // 接收上传时附带的额外参数
accept: { type: String, default: 'image/gif, image/jpeg, image/png' }, //文件类型
maxSize: { type: Number, default: config.maxSize }, // 接收最大上传文件大小
limit: { type: Number, default: 0 }, // 接收最大文件数量
autoUpload: { type: Boolean, default: true }, // 接收是否支持自动上传
showFileList: { type: Boolean, default: true }, // 接收展示的文件列表
multiple: { type: Boolean, default: true }, // 接收是否支持
disabled: { type: Boolean, default: false }, // 接收是否禁用
draggable: { type: Boolean, default: false }, //接收是否支持拖拽
onSuccess: { // 接收成功返回的函数
type: Function,
default: () => {
return true
}
},
type: { // 身份证正反面
type: String,
default: 'front'
}
},
data () {
return {
value: '', // 上传成功的路径名value存储
defaultFileList: [], // 首次渲染展示的图片列表
hideUploadBtn: false, // 是否展示按钮标记
img: '' // 按钮背景图片路径
}
},
// 超级牛
model: {
prop: 'modelValue',
event: 'change'
},
watch: {
modelValue (val) {
if (val !== this.toStr(this.defaultFileList)) {
this.defaultFileList = this.toArr(val)
this.value = val
}
},
defaultFileList: { // 监听图片列表
handler (val) {
this.$emit('change', this.toStr(val))
this.value = this.toStr(val)
},
deep: true
}
},
computed: {
preview () { // 预览图片路径
return this.defaultFileList.map((v) => v.url)
}
},
mounted () {
this.value = this.modelValue // 初始赋值图片路径
this.defaultFileList = this.toArr(this.modelValue)
if (!this.disabled && this.draggable) { // 是否配置拖拽
this.rowDrop()
}
if (this.type === 'front') { // 按钮背景图片正反面
this.img = require('../../assets/image/death/ident_front.png')
} else {
this.img = require('../../assets/image/death/ident_reverse.png')
}
},
methods: {
toArr (str) { // 将默认值转换为数组
var _arr = []
var arr = str.split(',')
arr.forEach((item) => {
if (item) {
var urlArr = item.split('&name=')
var fileName = urlArr[urlArr.length - 1]
_arr.push({
name: fileName,
url: item
})
}
})
this.hideUploadBtn = _arr.length >= this.limit // 该表达式给hideUploadBtn返回的布尔值目的是当上传文件超过限制时需要隐藏上传按钮
return _arr
},
toStr (arr) { // 将数组转换为原始值
return arr.map((v) => v.url).join(',')
},
rowDrop () { // 拖拽函数
const _this = this
const itemBox = this.$refs.uploader.$el.querySelector('.el-upload-list')
Sortable.create(itemBox, {
handle: '.el-upload-list__item',
animation: 200,
ghostClass: 'ghost',
onEnd ({ newIndex, oldIndex }) {
const tableData = _this.defaultFileList
const currRow = tableData.splice(oldIndex, 1)[0]
tableData.splice(newIndex, 0, currRow)
}
})
},
before (file) { // 上传文件之前,限制文件类型、大小
if (!['image/jpeg', 'image/png', 'image/gif'].includes(file.type)) {
this.$message.warning(`选择的文件类型 ${file.type} 非图像类文件`)
return false
}
const maxSize = file.size / 1024 / 1024 < this.maxSize
if (!maxSize) {
this.$message.warning(`上传文件大小不能超过 ${this.maxSize}MB!`)
return false
}
},
success (res, file, fileList) { // 上传文件成功后处理文件路径
var os = this.onSuccess(res, file)
if (os !== undefined && os === false) {
return false
}
var response = config.parseData(res)
file.url = response.src.data
this.defaultFileList = fileList
this.hideUploadBtn = fileList.length >= this.limit // 上传成功需要再次赋值,控制按钮的展示隐藏
},
remove (file, fileList) { // 移除成功时的函数
this.defaultFileList = fileList
this.hideUploadBtn = fileList.length >= this.limit // // 移除成功需要再次赋值,控制按钮的展示隐藏
},
error (err) { // 上传错误的信息
this.$notify.error({
title: '上传文件未成功',
message: err
})
},
beforeRemove (uploadFile) { // 移除之前弹窗是否确定移除
return this.$confirm(`是否移除 ${uploadFile.name} ?`, '提示', {
type: 'warning'
}).then(() => {
return true
}).catch(() => {
return false
})
},
handleRemove (file) { // 点击移除小图标调用的函数
this.$refs.uploader.handleRemove(file)
// this.defaultFileList.splice(this.defaultFileList.findIndex(item => item.uid===file.uid), 1)
},
handleExceed () { // 文件超出个数限制时的钩子
this.$message.warning(`当前设置最多上传 ${this.limit} 个文件,请移除后上传!`)
},
handlePreview (uploadFile) { // 文件预览
window.open(uploadFile.url) // 通过windows
},
request (param) { // 自定义上传的实现
var apiObj = config.apiObj //这里是配置的api上传方法
if (this.apiObj) {
apiObj = this.apiObj
}
const data = new FormData()
data.append(param.filename, param.file)
for (const key in param.data) {
data.append(key, param.data[key])
}
apiObj.upload(data, {onUploadProgress: (e) => {
const complete = parseInt(((e.loaded / e.total) * 100) | 0, 10)
param.onProgress({ percent: complete })
}
}).then((res) => {
param.onSuccess(res)
}).catch((err) => {
param.onError(err)
})
}
}
}
</script>
<style lang="less" scoped>
.hide { // 注意这里是控制按钮展示隐藏的
::v-deep .el-upload--picture-card {
display: none !important;
}
}
//----这里控制的按钮背景图片的样式
.ident_img{
width: 140px;
height: 88px;
background-color: #fff;
}
::v-deep .el-upload--picture-card{
border: none;
width: 140px;
height: 88px;
line-height: 88px;
padding: 0 !important;
}
::v-deep .el-upload-list--picture-card .el-upload-list__item{
width: 140px;
height: 88px;
line-height: 88px;
}
// ----到这
.el-form-item.is-error .image-upload-multiple:deep(.el-upload--picture-card) {
border-color: var(--el-color-danger);
}
:deep(.el-upload-list__item) {
transition: none;
border-radius: 0;
}
.image-upload-multiple:deep(.el-upload-list__item.el-list-leave-active) {
position: static !important;
}
.image-upload-multiple:deep(.el-upload--picture-card) {
border-radius: 0;
}
.image-upload-list-item {
width: 100%;
height: 100%;
position: relative;
}
.image-upload-multiple .el-image {
display: block;
}
.image-upload-multiple .el-image:deep(img) {
-webkit-user-drag: none;
}
.image-upload-multiple-image-slot {
display: flex;
justify-content: center;
align-items: center;
width: 100%;
height: 100%;
font-size: 12px;
}
.image-upload-multiple .el-upload-list__item:hover .image-upload__item-actions {
display: block;
}
.image-upload__item-actions {
position: absolute;
top: 0;
right: 0;
display: none;
}
.image-upload__item-actions span {
display: flex;
justify-content: center;
align-items: center;
width: 25px;
height: 25px;
cursor: pointer;
color: #fff;
}
.image-upload__item-actions span i {
font-size: 12px;
}
.image-upload__item-actions .del {
background: #f56c6c;
}
.image-upload__item-progress {
position: absolute;
width: 100%;
height: 100%;
top: 0;
left: 0;
background-color: var(--el-overlay-color-lighter);
}
</style>
2.2 文件配置说明
- sortablejs说明:这是一个拖拽插件,下面是它的官官网
- config文件配置
import fileService from '@/api/file/fileService' // api请求的文件路径

// 上传配置
export default {
  apiObj: fileService, // 上传请求API对象
  filename: 'file', // form请求时文件的key
  successCode: 200, // 请求完成代码
  maxSize: 10, // 最大文件大小 默认10MB
  parseData: function (res) {
    return {
      src: res // 分析图片远程地址结构
    }
  }
}
- api接口配置,注意这里怎么配置以及说明需要看我们前端axios二次封装是怎么处理的,一定要去官网看懂为什么这么配置的!!!还要跟后端商量好需要怎么发请求。
该部分:
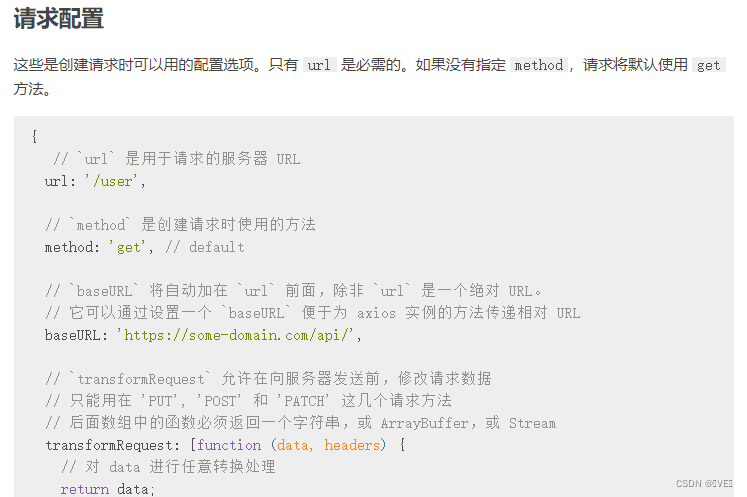
import request from '@/utils/httpRequest' // axios的二次封装基本请求

export default {
  upload: function (formData, config = {}) { // 上传函数封装并暴露
    return request({
      url: '/file/upload?uploadPath=userdir', // 请求路径
      method: 'post', // 请求方法 post
      config: config, // 请求config配置
      data: formData, // 请求参数 (该参数我们前端相当于放在请求体上让后端接收的)
      headers: { 'Content-Type': 'multipart/form-data' } // 请求头配置'Content-Type': 'multipart/form-data',formData的形式
    })
  },
  // 这里看一下下载请求
  downloadFile: function (params) {
    return request({
      url: '/file/downloadFile', // 请求路径
      method: 'get', // 请求方法 get
      params: params // 请求参数,该参数就放在了请求路径上
    })
  }
}
2.3 axios二次封装
- 请求方式,这个请求方式也是小编对axios的二次封装,用到的地方挺多的,不能全复制,但可以提供思路
axios官网:axios中文文档|axios中文网 | axios
还可以看小编的该文章,如何实现axios二次封装的:
import Vue from 'vue'
import axios from 'axios'
import router from '@/router'
import qs from 'qs'
import {
  Message,
  Loading
} from 'element-ui'

// 超时时间
axios.defaults.timeout = 100000
// 跨域请求,允许保存cookie
axios.defaults.withCredentials = true
axios.defaults.headers = {'Content-Type': 'application/json; charset=utf-8'}
// axios.defaults.headers['Content-Type'] = 'application/x-www-form-urlencoded; charset=utf-8'
// 非生产环境 && 开启代理, 接口前缀统一使用[/api]前缀做代理拦截!
const BASE_URL = process.env.NODE_ENV !== 'production' ? process.env.VUE_APP_BASE_API : process.env.VUE_APP_SERVER_URL
// 暴露的基础请求路径
axios.BASE_URL = BASE_URL

/**
 * 请求拦截
 */
let loading
axios.interceptors.request.use(config => { // axios固定的方法
  let showLoading = false
  if (config.loading === true) {
    showLoading = true
  }
  if (showLoading) {
    loading = Loading.service({
      text: config.loadingText || 'Loading...',
      spinner: 'el-icon-loading',
      background: 'rgba(0, 0, 0, 0.7)'
    })
  }
  // 请求头带上token
  if (Vue.cookie.get('token')) {
    config.headers.token = Vue.cookie.get('token')
  }
  // 请求地址处理
  if (!config.url.startsWith('http')) {
    config.url = BASE_URL + config.url
  }

  const type = config.method
  const arrayFormat = config.headers.arrayFormat || 'indices'
  if (type === 'post' && config.headers['Content-Type'] === 'application/x-www-form-urlencoded; charset=utf-8') {
    // post请求参数处理
    config.data = qs.stringify(config.data, { allowDots: true, arrayFormat: arrayFormat })
  } else if (type === 'get') {
    // get请求参数处理
    config.paramsSerializer = (params) => {
      return qs.stringify(params, {
        allowDots: true, arrayFormat: arrayFormat
      })
    }
  }
  return config
}, error => {
  return Promise.reject(error)
})

/**
 * 响应拦截
 */
axios.interceptors.response.use(response => {
  if (loading) {
    loading.close()
  }
  return response
}, error => {
  if (loading) {
    loading.close()
  }
  if (error.response.status === 408 || error.response.status === 401) { // 需要重新登录
    //1、---先清空登录信息
    清空了登录信息
    //2、--跳转登录页
    router.push({ name: 'login' })
    //3、弹窗报错信息
    Message({
      message: error.response.data,
      type: 'error',
      showClose: true,
      dangerouslyUseHTMLString: true,
      duration: 3000
    })
  } else if (error.response.status === 404) { // 路径找不到
    Message({
      message: '404 路径找不到' + ': ' + error.response.config.url,
      type: 'error',
      showClose: true,
      duration: 3000
    })
  } else if (error.response.status === 503) {
    Message({
      message: '503 服务不可用' + ': ' + error.response.config.url,
      type: 'error',
      showClose: true,
      dangerouslyUseHTMLString: true,
      duration: 3000
    })
  } else if (error.response.status === 504) {
    Message({
      message: '504 网络连接错误' + ': ' + error.response.data,
      type: 'error',
      showClose: true,
      dangerouslyUseHTMLString: true,
      duration: 3000
    })
  } else {
    Message({
      message: error.response.data || error.response || error,
      type: 'error',
      showClose: true,
      dangerouslyUseHTMLString: true,
      duration: 5000
    })
  }

  return Promise.reject(error)
})

// 配置axios
export default axios
- 至此所有源代码全部展示好了
2.4 上传限制数量且超出不显示上传按钮
- 小编已经在前面代码中详细说明了代码中对应的功能了
- 实现思路:通过控制台的'元素导航栏'一步一步的找到控制按钮样式的标签,通过添加类名从而控制该按钮的展示与隐藏
- HTML部分
- CSS部分

- JS部分


- 基本需求解决
第三章 总结
- 以上功能、逻辑都是小编总结出来的,实践过都没有问题的!!
- 延伸1:功能确实实现了,瑕疵在于添加成功后按钮有一个消失的过程,这里需要我们找到对应标签的动画,应该直接隐藏掉才是。
- 延伸2:按钮图片处理问题,小编通过require的静态路径方式得到路径的,可以试试动态展示,实现成父组件传什么图片,子组件用什么。
- 延伸3:对model更深理解理解
- ……
- 最后的最后,这只是小编遇到的需求,如果大家有不同的需要也能用在该内容里,欢迎大家评论区留言,再就是有用就留下个赞吧!!!