目录
一、前言
这其实就是一个简单的物联网小型实验,重要的是要理解其基本原理,如果不理解的话不清楚要从哪里下手。这个实验就是让APP和STM32实验板都连接网络的前提下,同时能连接到mqtt服务器,实现app远程控制实验板的状态。该实验可以实现以下内容:
- 实现STM32控制LED灯显示7种颜色显示。
- 实现STM32控制蜂鸣器响和停。
- 实现STM32通过NTC传感器测量温度。
- 实现STM32通过串口调试助手显示温度。
- 实现STM32控制ESP8266连接WIFI路由器
- 实现STM32成功连接MQTT服务器
- 实现STM32成功发布MQTT温度主题
- 实现STM32成功订阅MQTT控制量主题
- 实现手机APP显示温度。
- 实现手机APP控制LED灯显示不同颜色
首先就是要开发一个app,可以用很多语言写APP,我这里用的是Android语言(基础知识不牢的用Android studio写比较难,安卓代码简直就是又臭又长,学过前端的可以用HBuilder写),app里面添加相关的控件以及点击事件 。
再者就是用keil5写实验板的代码,单片机知识不硬的建议直接按照我下面提到的方法更改相关内容就可以了,因为实在太难啦!
二、实验工具
这里指的是我用到的实验用具,也可以灵活多变,不一定要跟我的一模一样。
1.野火F103开发板
这个板简直就是太适合嵌入式开发初学者
2.MQTT可视化工具mqtt.fx
三、安卓APP代码
1.建立工程
点击左上角File,然后new Project建立新工程

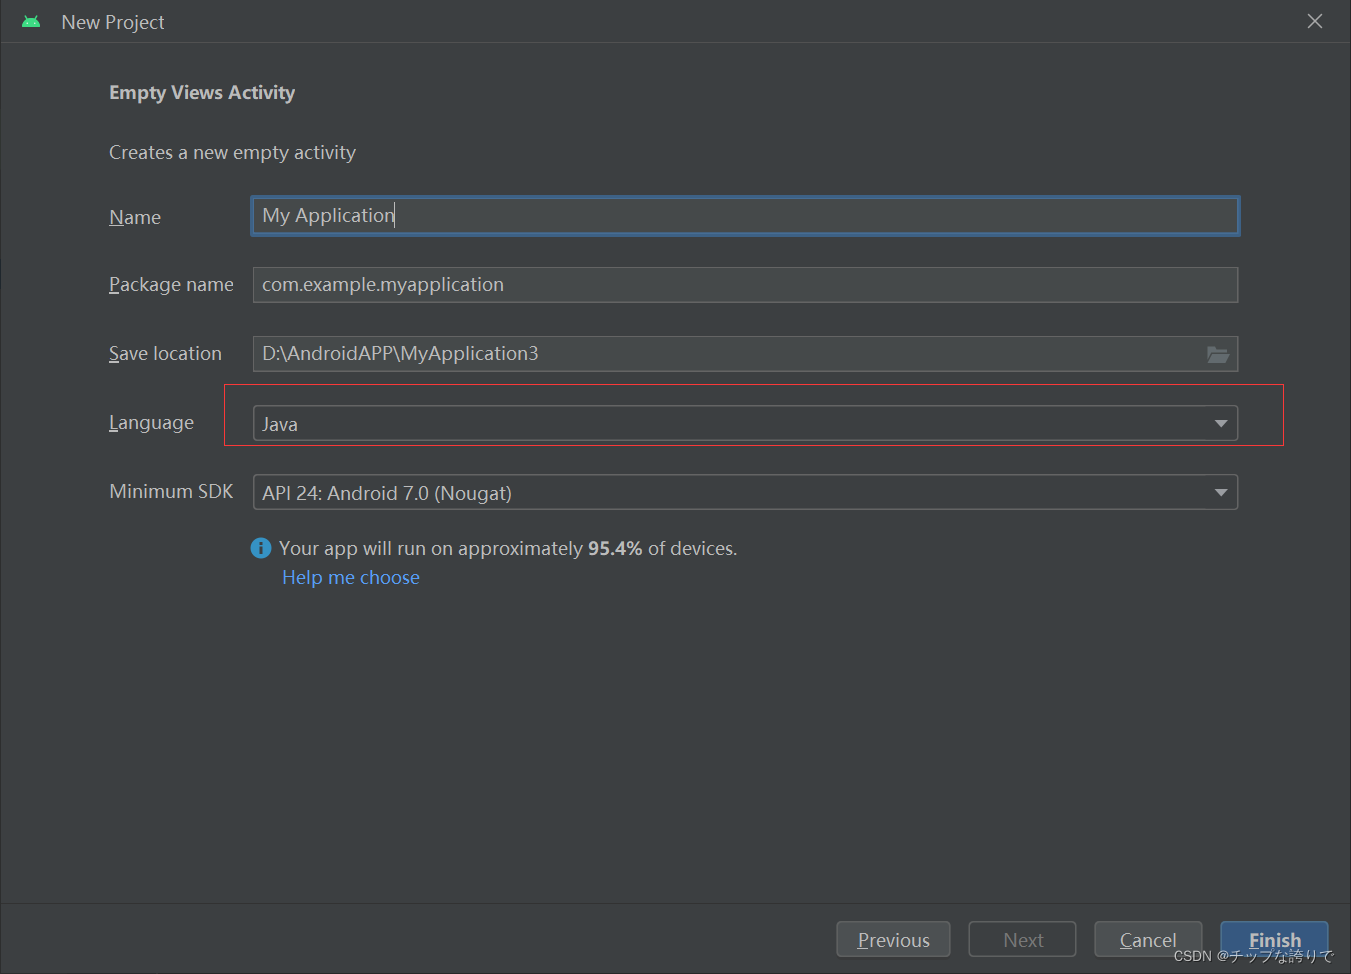
语言选择Java,不要选错了。
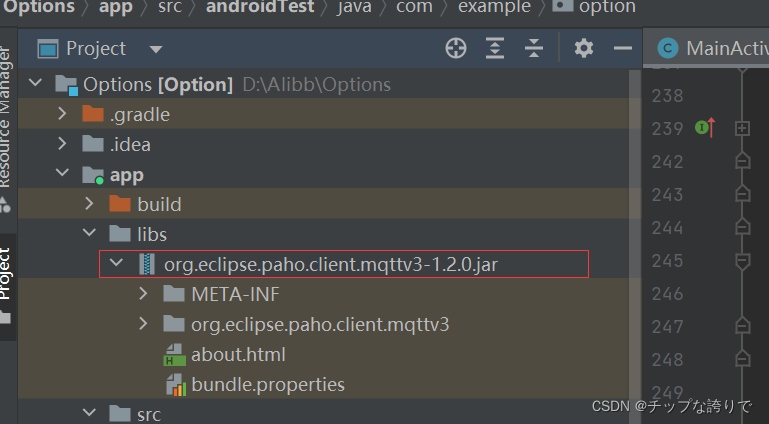
2.导入Java jar包
链接:百度网盘 请输入提取码
方法自己去百度一下,网上的教程很详细。
3.布局文件activity_main
<?xml version="1.0" encoding="utf-8"?>
<LinearLayout xmlns:android="http://schemas.android.com/apk/res/android"
xmlns:app="http://schemas.android.com/apk/res-auto"
xmlns:tools="http://schemas.android.com/tools"
android:layout_width="match_parent"
android:layout_height="match_parent"
android:orientation="vertical"
tools:context=".MainActivity"
android:background="@drawable/cxk"
>
<LinearLayout
android:layout_width="match_parent"
android:layout_height="wrap_content"
android:orientation="horizontal"
android:layout_marginTop="10dp">
<TextView
android:id="@+id/m_temp"
android:layout_width="wrap_content"
android:layout_height="wrap_content"
android:text="当前温度:"
android:textColor="@color/black"
android:textSize="20sp"
android:layout_marginLeft="25dp"/>
<TextView
android:id="@+id/temp_tv"
android:layout_width="wrap_content"
android:layout_height="wrap_content"
android:text=""
android:textSize="20sp"
android:textColor="@color/black"/>
</LinearLayout>
<LinearLayout
android:layout_width="match_parent"
android:layout_height="wrap_content"
android:padding="5dp"
android:layout_marginTop="10dp"
android:layout_marginLeft="25dp">
<TextView
android:layout_width="wrap_content"
android:layout_height="wrap_content"
android:text="MQTT连接状态:"
android:textColor="@color/black"
android:textSize="20sp" />
<TextView
android:id="@+id/m_mqtt"
android:layout_width="wrap_content"
android:layout_height="wrap_content"
android:text=""
android:textColor="@color/black"
android:textSize="20sp" />
</LinearLayout>
<LinearLayout
android:layout_width="match_parent"
android:layout_height="wrap_content"
android:padding="5dp"
android:layout_marginTop="10dp"
android:layout_marginLeft="25dp">
<TextView
android:layout_width="wrap_content"
android:layout_height="wrap_content"
android:text="实验板状态:"
android:textColor="@color/black"
android:textSize="20sp" />
<TextView
android:id="@+id/Light_status"
android:layout_width="wrap_content"
android:layout_height="wrap_content"
android:text=""
android:textColor="@color/橙红色"
android:textSize="20sp" />
</LinearLayout>
<LinearLayout
android:layout_width="match_parent"
android:layout_height="460dp"
android:layout_marginLeft="25dp"
android:layout_marginRight="25dp"
android:orientation="horizontal">
<LinearLayout
android:layout_width="match_parent"
android:layout_height="392dp"
android:layout_marginTop="60dp"
android:orientation="vertical">
<LinearLayout
android:layout_width="match_parent"
android:layout_height="30dp">
<TextView
android:layout_width="wrap_content"
android:layout_height="wrap_content"
android:text="灯按钮"
android:textSize="20sp" />
</LinearLayout>
<LinearLayout
android:layout_width="match_parent"
android:layout_height="60dp"
android:layout_marginTop="5dp">
<Button
android:id="@+id/off"
android:layout_width="wrap_content"
android:layout_height="match_parent"
android:layout_weight="1"
android:text="关灯" />
<Button
android:id="@+id/red"
android:layout_width="wrap_content"
android:layout_height="match_parent"
android:layout_weight="1"
android:text="红灯" />
</LinearLayout>
<LinearLayout
android:layout_width="match_parent"
android:layout_height="60dp"
android:layout_marginTop="5dp">
<Button
android:id="@+id/lv"
android:layout_width="wrap_content"
android:layout_height="match_parent"
android:layout_weight="1"
android:text="绿灯" />
<Button
android:id="@+id/blue"
android:layout_width="wrap_content"
android:layout_height="match_parent"
android:layout_weight="1"
android:text="蓝灯" />
</LinearLayout>
<LinearLayout
android:layout_width="match_parent"
android:layout_height="60dp"
android:layout_marginTop="5dp">
<Button
android:id="@+id/red_blue"
android:layout_width="wrap_content"
android:layout_height="match_parent"
android:layout_weight="1"
android:text="紫灯" />
<Button
android:id="@+id/red_lv"
android:layout_width="wrap_content"
android:layout_height="match_parent"
android:layout_weight="1"
android:text="黄灯" />
</LinearLayout>
<LinearLayout
android:layout_width="match_parent"
android:layout_height="60dp"
android:layout_marginTop="5dp">
<Button
android:id="@+id/lv_blue"
android:layout_width="wrap_content"
android:layout_height="match_parent"
android:layout_weight="1"
android:text="青灯" />
<Button
android:id="@+id/red_lv_blue"
android:layout_width="wrap_content"
android:layout_height="match_parent"
android:layout_weight="1"
android:text="橙灯" />
</LinearLayout>
<LinearLayout
android:layout_width="150dp"
android:layout_height="30dp"
android:layout_marginTop="5dp">
<TextView
android:layout_width="wrap_content"
android:layout_height="wrap_content"
android:text="蜂鸣器开关按钮"
android:textSize="20sp" />
</LinearLayout>
<LinearLayout
android:layout_width="match_parent"
android:layout_height="60dp"
android:layout_marginTop="5dp">
<Button
android:id="@+id/fmq_on"
android:layout_width="wrap_content"
android:layout_height="match_parent"
android:layout_weight="1"
android:text="开启" />
<Button
android:id="@+id/fmq_off"
android:layout_width="wrap_content"
android:layout_height="match_parent"
android:layout_weight="1"
android:text="关闭" />
</LinearLayout>
</LinearLayout>
</LinearLayout>
<LinearLayout
android:layout_width="match_parent"
android:layout_height="wrap_content"
android:orientation="horizontal"
android:layout_marginTop="2dp"
android:layout_marginLeft="25dp"
android:layout_marginRight="25dp"
>
<TextView
android:id="@+id/New"
android:layout_width="match_parent"
android:layout_height="40dp"
android:layout_marginTop="5dp"
android:textColor="@color/紫罗兰"
android:textSize="30dp"
/>
</LinearLayout>
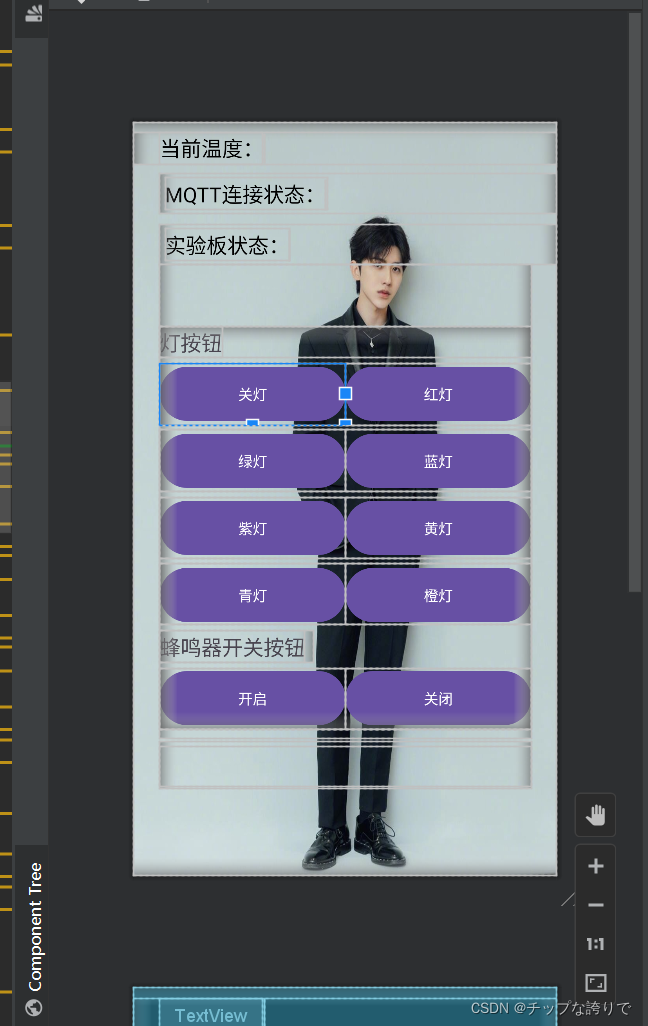
</LinearLayout>布局文件效果图:

别说了,我是ikun!!!!!!其实当时想放打篮球的。
如果在布局文件里不更改themes.xml模块代码的话,这些按键的颜色只能是紫色,像下面这样子,所以很影响各位家人的才华发展,起码需要涂个黑色背带裤。
所以我们需要打开项目下的values里面的themes.xml
把 parent="Theme.MaterialComponents.DayNight.DarkActionBar"最后的DarkActionBar换成NoActionBar.Bridge,即parent="Theme.MaterialComponents.DayNight.NoActionBar.Bridge"
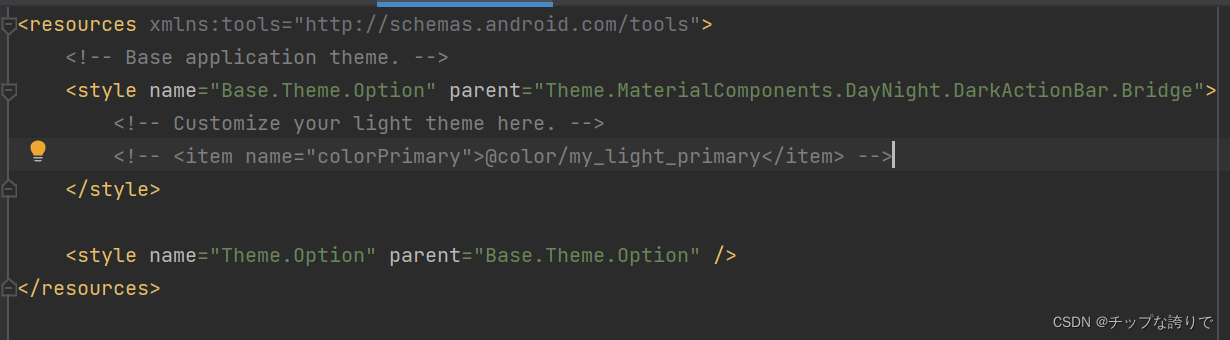
这样就可以随意修改按钮的背景颜色啦!
最后给大家个福利,就是几个常用颜色的代码,把这段代码复制到valus文件下的colors.xml

代码如下:
<?xml version="1.0" encoding="utf-8"?>
<resources>
    <color name="black">#FF000000</color>
    <color name="white">#FFFFFFFF</color>
    <color name="粉色">#FFC0CB</color>
    <color name="紫罗兰">#EE82EE</color>
    <color name="靛青">#4B0082</color>
    <color name="矢车菊的蓝色">#6495ED</color>
    <color name="适中的蓝色">#0000CD</color>
    <color name="深蓝色">#00008B</color>
    <color name="石板灰">#708090</color>
    <color name="青色">#00FFFF</color>
    <color name="猩红">#DC143C</color>
    <color name="军校蓝">#5F9EA0</color>
    <color name="蓝色">#0000FF</color>
    <color name="水绿色">#00FFFF</color>
    <color name="绿玉">#7FFFAA</color>
    <color name="绿色">#00FF00</color>
    <color name="黄色">#FFFF00</color>
    <color name="橙红色">#FF4500</color>
    <color name="棕色">#A52A2A</color>
</resources>
4.Mainactivity
代码如下:这是Mainactivity里面的全部代码,建议不要全部复制进去,会出错,按下面的方法慢慢敲,写完感觉自己就懂得差不多,之所以发是因为下面的方法写得有点乱了,所以发全部代码出来。
package com.example.option;

import androidx.appcompat.app.AppCompatActivity;

import android.annotation.SuppressLint;
import android.os.Bundle;
import android.os.Handler;
import android.os.Looper;
import android.os.Message;
import android.text.Html;
import android.text.TextUtils;
import android.text.method.LinkMovementMethod;
import android.view.View;
import android.widget.Button;
import android.widget.TextView;
import android.widget.Toast;

import org.eclipse.paho.client.mqttv3.IMqttDeliveryToken;
import org.eclipse.paho.client.mqttv3.MqttCallback;
import org.eclipse.paho.client.mqttv3.MqttClient;
import org.eclipse.paho.client.mqttv3.MqttConnectOptions;
import org.eclipse.paho.client.mqttv3.MqttException;
import org.eclipse.paho.client.mqttv3.MqttMessage;
import org.eclipse.paho.client.mqttv3.persist.MemoryPersistence;

import java.util.concurrent.Executors;
import java.util.concurrent.ScheduledExecutorService;
import java.util.concurrent.TimeUnit;

public class MainActivity extends AppCompatActivity {
    public static MqttClient mMqClint;
    private ScheduledExecutorService scheduler;
    private MqttClient client;
    private Handler handler;
    private TextView temp_show;
    private TextView mqtt_show;
    private TextView led_show;
    private TextView textView;
    private String host = "tcp://mqtt.qzyuehua.cn";     // TCP协议
    private String userName = "daluo";
    private String passWord = "daluo1";
    private String mqtt_id = "daluo2";
    private String mqtt_sub_topic = "123456/stm32";
    private String mqtt_pub_topic = "123456/app";
    @Override
    protected void onCreate(Bundle savedInstanceState) {
        super.onCreate(savedInstanceState);
        setContentView(R.layout.activity_main);
        Mqtt_init();
        startReconnect();
        temp_show = findViewById(R.id.temp_tv);
        mqtt_show = findViewById(R.id.m_mqtt);
        led_show =findViewById(R.id.Light_status);
        textView = (TextView)this.findViewById(R.id.New);
        String html = "全民制作人们,大家好,我是练习时长两年半的个人练习生蔡徐坤,喜欢唱、跳、rap、篮球,\n" +
                "                music!";
        CharSequence charSequence = Html.fromHtml(html);
        textView.setText(charSequence);
        textView.setMovementMethod(LinkMovementMethod.getInstance());
        textView.setEllipsize(TextUtils.TruncateAt.MARQUEE);
        textView.setSingleLine(true);
        textView.setSelected(true);
        textView.setFocusable(true);
        textView.setFocusableInTouchMode(true);
        Button button_off = (Button) findViewById(R.id.off);
        button_off.setOnClickListener(new View.OnClickListener() {
            @Override
            public void onClick(View view) {
                Toast.makeText(MainActivity.this, "关灯", Toast.LENGTH_SHORT).show();
                publishmessageplus(mqtt_pub_topic, "L0");
                led_show.setText("已关闭LED灯");
            }
        });
        Button button_red = (Button) findViewById(R.id.red);
        button_red.setOnClickListener(new View.OnClickListener() {
            @Override
            public void onClick(View view) {
                Toast.makeText(MainActivity.this, "红灯", Toast.LENGTH_SHORT).show();
                Delay();
                publishmessageplus(mqtt_pub_topic, "L1");
                led_show.setText("红灯");
            }
        });
        Button button_lv = (Button) findViewById(R.id.lv);
        button_lv.setOnClickListener(new View.OnClickListener() {

            @Override
            public void onClick(View view) {
                Toast.makeText(MainActivity.this, "绿灯", Toast.LENGTH_SHORT).show();
                Delay();
                publishmessageplus(mqtt_pub_topic, "L2");
                led_show.setText("绿灯");
            }
        });
        Button button_blue = (Button) findViewById(R.id.blue);
        button_blue.setOnClickListener(new View.OnClickListener() {

            @Override
            public void onClick(View view) {
                Toast.makeText(MainActivity.this, "蓝灯", Toast.LENGTH_SHORT).show();
                Delay();
                publishmessageplus(mqtt_pub_topic, "L3");
                led_show.setText("蓝灯");
            }
        });
        Button button_red_blue = (Button) findViewById(R.id.red_blue);
        button_red_blue.setOnClickListener(new View.OnClickListener() {
            @Override
            public void onClick(View view) {
                Toast.makeText(MainActivity.this, "紫灯", Toast.LENGTH_SHORT).show();
                Delay();
                publishmessageplus(mqtt_pub_topic, "L4");
                led_show.setText("紫灯");
            }
        });
        Button button_red_lv = (Button) findViewById(R.id.red_lv);
        button_red_lv.setOnClickListener(new View.OnClickListener() {
            @Override
            public void onClick(View v) {
                Toast.makeText(MainActivity.this, "黄灯", Toast.LENGTH_SHORT).show();
                Delay();
                publishmessageplus(mqtt_pub_topic, "L5");
                led_show.setText("黄灯");
            }
        });
        Button button_lv_blue = (Button) findViewById(R.id.lv_blue);
        button_lv_blue.setOnClickListener(new View.OnClickListener() {
            @Override
            public void onClick(View view) {
                Toast.makeText(MainActivity.this, "青灯", Toast.LENGTH_SHORT).show();
                Delay();
                publishmessageplus(mqtt_pub_topic, "L6");
                led_show.setText("青灯");
            }
        });
        Button button_red_lv_blue = (Button) findViewById(R.id.red_lv_blue);
        button_red_lv_blue.setOnClickListener(new View.OnClickListener() {
            @Override
            public void onClick(View view) {
                Toast.makeText(MainActivity.this, "橙灯", Toast.LENGTH_SHORT).show();
                Delay();
                publishmessageplus(mqtt_pub_topic, "L7");
                led_show.setText("橙灯");
            }
        });
        Button fmq_ON = (Button) findViewById(R.id.fmq_on);
        fmq_ON.setOnClickListener(new View.OnClickListener() {
            @Override
            public void onClick(View view) {
                Toast.makeText(MainActivity.this, "打开蜂鸣器", Toast.LENGTH_SHORT).show();
                publishmessageplus(mqtt_pub_topic, "L8");
                led_show.setText("蜂鸣器已打开");
            }
        });
        Button fmq_OFF = (Button) findViewById(R.id.fmq_off);
        fmq_OFF.setOnClickListener(new View.OnClickListener() {
            @Override
            public void onClick(View v) {
                Toast.makeText(MainActivity.this, "关闭蜂鸣器", Toast.LENGTH_SHORT).show();
                publishmessageplus(mqtt_pub_topic, "L9");
                led_show.setText("蜂鸣器已关闭");
            }
        });
        handler = new Handler(Looper.myLooper()) {
            @SuppressLint("SetTextI18n")
            public void handleMessage(Message msg) {
                super.handleMessage(msg);
                switch (msg.what) {
                    case 1: //开机校验更新回传
                        break;
                    case 2:  // 反馈回传
                        break;
                    case 3:  //MQTT 收到消息回传   UTF8Buffer msg=new UTF8Buffer(object.toString());
                        System.out.println(msg.obj.toString());   // 显示MQTT数据
                        break;
                    case 30:  //连接失败
                        //Toast.makeText(MainActivity.this, "连接成功", Toast.LENGTH_SHORT).
                                //show();
                        mqtt_show.setText("连接失败!");
                        break;
                    case 31:   //连接成功
                        Toast.makeText(MainActivity.this, "连接成功", Toast.LENGTH_SHORT).
                                show();
                        mqtt_show.setText("连接成功!");
                        try {
                            client.subscribe(mqtt_sub_topic, 1);
                        } catch (MqttException e) {
                            e.printStackTrace();
                        }
                        break;
                    default:
                        break;
                }
            }
        };
    }
    //mqtt初始化
    private void Mqtt_init() {
        try {
            client = new MqttClient(host, mqtt_id,
                    new MemoryPersistence());
            //MQTT的连接设置
            MqttConnectOptions options = new MqttConnectOptions();
            //设置是否清空session,这里如果设置为false表示服务器会保留客户端的连接记录,
            // 这里设置为true表示每次连接到服务器都以新的身份连接
            options.setCleanSession(false);
            //设置连接的用户名
            options.setUserName(userName);
            //设置连接的密码
            options.setPassword(passWord.toCharArray());
            // 设置超时时间 单位为秒
            options.setConnectionTimeout(10);
            // 设置会话心跳时间 单位为秒 服务器会每隔1.5*20秒的时间向客户端发送个消息判断客户端是否在线,
            // 但这个方法并没有重连的机制
            options.setKeepAliveInterval(20);
            client.setCallback(new MqttCallback() {
                @Override
                public void connectionLost(Throwable cause) {
                    System.out.println("connectionLost----------");
                }
                @Override
                public void deliveryComplete(IMqttDeliveryToken iMqttDeliveryToken) {
                    System.out.println("deliveryComplete---------"
                            + iMqttDeliveryToken.isComplete());
                }
                @Override
                public void messageArrived(String topicName, MqttMessage mqttMessage)
                        throws Exception {
                    final String payload = new String(mqttMessage.getPayload());
                    runOnUiThread(new Runnable() {
                        @Override
                        public void run() {
                            temp_show.setText(payload+"℃");
                        }
                    });
                }
            });
        } catch (Exception e) {
            e.printStackTrace();
        }
    }
    //MQTT连接函数
    private void startReconnect() {
        scheduler = Executors.newSingleThreadScheduledExecutor();
        scheduler.scheduleAtFixedRate(new Runnable(){
            @Override
            public void run() {
                if (!client.isConnected()) {
                    Mqtt_connect();
                }
            }
        },0*1000,10*1000, TimeUnit.MICROSECONDS);
    }

    //MQTT重新连接函数
    private void Mqtt_connect() {
        new Thread(new Runnable(){

            @Override
            public void run() {
                try {
                    if(!(client.isConnected()) )  //如果还未连接
                    {
                        MqttConnectOptions options = null;
                        client.connect(options);
                        Message msg = new Message();
                        msg.what = 31;
                        handler.sendMessage(msg);
                    }
                } catch (Exception e) {
                    e.printStackTrace();
                    Message msg = new Message();
                    msg.what = 30;
                    handler.sendMessage(msg);
                }
            }
        }).start();
    }
    //mqtt初始化
    //订阅函数
    private void publishmessageplus(String topic,String message2)
    {
        if (client == null || !client.isConnected()) {
            return;
        }
        MqttMessage message = new MqttMessage();
        message.setPayload(message2.getBytes());
        try {
            client.publish(topic,message);
        } catch (MqttException e) {

            e.printStackTrace();
        }
    }
    private void Delay(){
        if(mqtt_pub_topic!="L0"){
            publishmessageplus(mqtt_pub_topic,"L0");
        }

    }
}
Mainactivity主要由以下几个方法内容组成:

onCreate里面主要是实现布局页面按钮的回调方法,这里也是比较容易犯错的,手敲比较好。
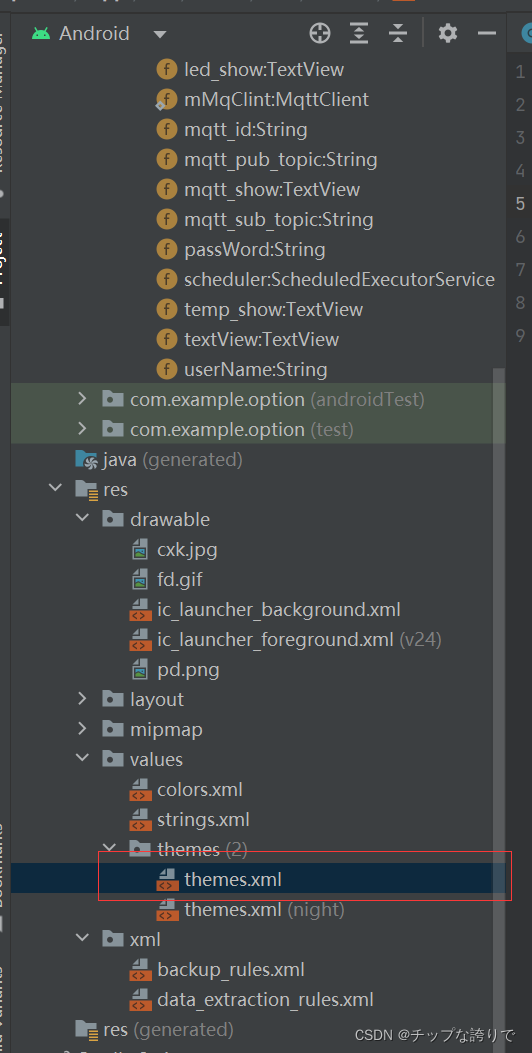
(1)先写需要用到的变量,代码如下:
    public static MqttClient mMqClint;
    private MqttClient client;
    private ScheduledExecutorService scheduler;
    private Handler handler;
    private TextView temp_show;
    private TextView mqtt_show;
    private TextView led_show;
    private TextView textView;
然后就会报错,把光标方到报红的地方按住“Ait+回车”进行导包


(2)mqtt配置代码如下:
    private String host = "tcp://mqtt.qzyuehua.cn";     // TCP协议,没有的话也可以用我这个
    private String userName = "admin";
    private String passWord = "123456";
    private String mqtt_id = "230722";
    private String mqtt_sub_topic = "123456/stm32";  //发送方
    private String mqtt_pub_topic = "123456/app";    //接收方
TCP协议的话大家也可以用我这个,是老师给的要是大家有自己的可以改。userName和passWord就是给mqtt.fx调试用的,但是我做实验的时候压根用不到,大家可写进去也可不写。剩下的三个都很重要的,尤其去发送方和接收方必须跟实验板那边的代码一样。
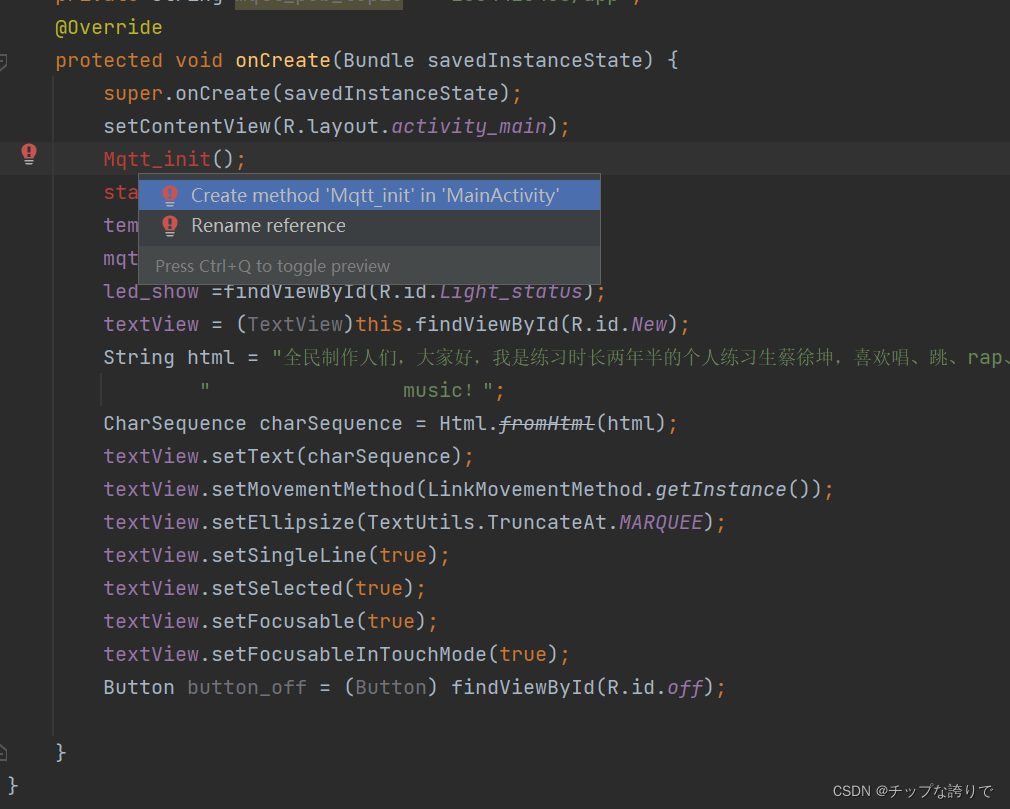
(3)OnCreate
先把下面这段代码复制到OnCreate里面,代码如下:
        Mqtt_init();
        startReconnect();
        temp_show = findViewById(R.id.temp_tv);
        mqtt_show = findViewById(R.id.m_mqtt);
        led_show =findViewById(R.id.Light_status);
        textView = (TextView)this.findViewById(R.id.New);
        String html = "全民制作人们,大家好,我是练习时长两年半的个人练习生蔡徐坤,喜欢唱、跳、rap、篮球\n" + "music!";
        CharSequence charSequence = Html.fromHtml(html);
        textView.setText(charSequence);
        textView.setMovementMethod(LinkMovementMethod.getInstance());
        textView.setEllipsize(TextUtils.TruncateAt.MARQUEE);
        textView.setSingleLine(true);
        textView.setSelected(true);
        textView.setFocusable(true);
        textView.setFocusableInTouchMode(true);
然后有两处需要加入两个方法

像上面一样把光标放在报红的代码上,按住“AIT+回车”加入两个方法:

我们如果要写实现点击布局文件的按钮,就有相应的变化,那么就要写这些按钮的点击事件,我的布局页面有很多个按钮,所以相应点击事件也很多,想看懂的记得结合一下布局文件各个按钮的ID,这样子就可以理解某个点击事件所对应按钮,也方便各位家人的自由发挥。
先把这段代码复制粘贴进去:
        Button button_off = (Button) findViewById(R.id.off);
        button_off.setOnClickListener(new View.OnClickListener()
然后把光标放在报错的地方按住“AIT+回车”加入方法。
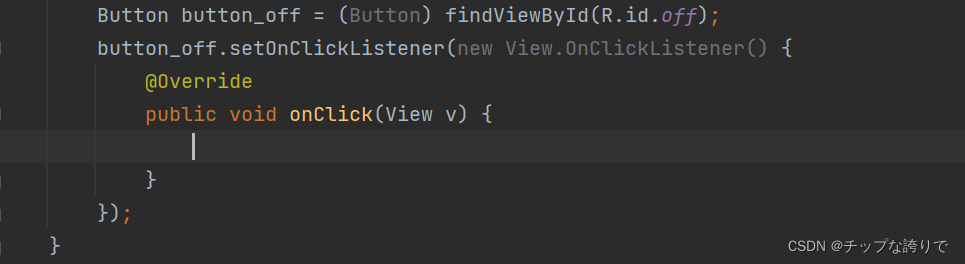
然后再把下面的代码复制粘贴到onClick里面:
Toast.makeText(MainActivity.this, "关灯", Toast.LENGTH_SHORT).show();
publishmessageplus(mqtt_pub_topic, "L0");
led_show.setText("已关闭LED灯");
这是关灯按钮的点击事件,我这么写主要是为了让大家知道怎么写,如果全部复制进去就会报错,方法必须手动建立。这里那个"publishmessageplus"会报错,那是因为没有建立这个方法,这个方法在最下面,这里没有写上,大家也不要理照样写下去,等到下面把publishmessageplus写上去就不会报错了。
其他按钮的点击事件的写法也跟这个一模一样,我就不赘述了,代码如下:
 Button button_red = (Button) findViewById(R.id.red);
        button_red.setOnClickListener(new View.OnClickListener() {
            @Override
            public void onClick(View view) {
                Toast.makeText(MainActivity.this, "红灯", Toast.LENGTH_SHORT).show();
                Delay();
                publishmessageplus(mqtt_pub_topic, "L1");
                led_show.setText("红灯");
            }
        });
        Button button_lv = (Button) findViewById(R.id.lv);
        button_lv.setOnClickListener(new View.OnClickListener() {

            @Override
            public void onClick(View view) {
                Toast.makeText(MainActivity.this, "绿灯", Toast.LENGTH_SHORT).show();
                Delay();
                publishmessageplus(mqtt_pub_topic, "L2");
                led_show.setText("绿灯");
            }
        });
        Button button_blue = (Button) findViewById(R.id.blue);
        button_blue.setOnClickListener(new View.OnClickListener() {

            @Override
            public void onClick(View view) {
                Toast.makeText(MainActivity.this, "蓝灯", Toast.LENGTH_SHORT).show();
                Delay();
                publishmessageplus(mqtt_pub_topic, "L3");
                led_show.setText("蓝灯");
            }
        });
        Button button_red_blue = (Button) findViewById(R.id.red_blue);
        button_red_blue.setOnClickListener(new View.OnClickListener() {
            @Override
            public void onClick(View view) {
                Toast.makeText(MainActivity.this, "紫灯", Toast.LENGTH_SHORT).show();
                Delay();
                publishmessageplus(mqtt_pub_topic, "L4");
                led_show.setText("紫灯");
            }
        });
        Button button_red_lv = (Button) findViewById(R.id.red_lv);
        button_red_lv.setOnClickListener(new View.OnClickListener() {

            @Override
            public void onClick(View v) {
                Toast.makeText(MainActivity.this, "黄灯", Toast.LENGTH_SHORT).show();
                Delay();
                publishmessageplus(mqtt_pub_topic, "L5");
                led_show.setText("黄灯");
            }
        });
        Button button_lv_blue = (Button) findViewById(R.id.lv_blue);
        button_lv_blue.setOnClickListener(new View.OnClickListener() {

            @Override
            public void onClick(View view) {
                Toast.makeText(MainActivity.this, "青灯", Toast.LENGTH_SHORT).show();
                Delay();
                publishmessageplus(mqtt_pub_topic, "L6");
                led_show.setText("青灯");
            }
        });
        Button button_red_lv_blue = (Button) findViewById(R.id.red_lv_blue);
        button_red_lv_blue.setOnClickListener(new View.OnClickListener() {

            @Override
            public void onClick(View view) {
                Toast.makeText(MainActivity.this, "橙灯", Toast.LENGTH_SHORT).show();
                Delay();
                publishmessageplus(mqtt_pub_topic, "L7");
                led_show.setText("橙灯");
            }
        });
        Button fmq_ON = (Button) findViewById(R.id.fmq_on);
        fmq_ON.setOnClickListener(new View.OnClickListener() {

            @Override
            public void onClick(View view) {
                Toast.makeText(MainActivity.this, "打开蜂鸣器", Toast.LENGTH_SHORT).show();
                publishmessageplus(mqtt_pub_topic, "L8");
                led_show.setText("蜂鸣器已打开");
            }
        });
        Button fmq_OFF = (Button) findViewById(R.id.fmq_off);
        fmq_OFF.setOnClickListener(new View.OnClickListener() {

            @Override
            public void onClick(View v) {
                Toast.makeText(MainActivity.this, "关闭蜂鸣器", Toast.LENGTH_SHORT).show();
                publishmessageplus(mqtt_pub_topic, "L9");
                led_show.setText("蜂鸣器已关闭");
            }
        });
        handler = new Handler(Looper.myLooper()) {
            @SuppressLint("SetTextI18n")
            public void handleMessage(Message msg) {
                super.handleMessage(msg);
                switch (msg.what) {
                    case 1: //开机校验更新回传
                        break;
                    case 2:  // 反馈回传
                        break;
                    case 3:  //MQTT 收到消息回传   UTF8Buffer msg=new UTF8Buffer(object.toString());
                        System.out.println(msg.obj.toString());   // 显示MQTT数据
                        break;
                    case 30:  //连接失败
                        //Toast.makeText(MainActivity.this, "连接成功", Toast.LENGTH_SHORT).
                                //show();
                        mqtt_show.setText("连接失败!");
                        break;
                    case 31:   //连接成功
                        Toast.makeText(MainActivity.this, "连接成功", Toast.LENGTH_SHORT).
                                show();
                        mqtt_show.setText("连接成功!");
                        try {
                            client.subscribe(mqtt_sub_topic, 1);
                        } catch (MqttException e) {
                            e.printStackTrace();
                        }
                        break;
                    default:
                        break;
                }
            }
        };
记住这些代码全部写在OnCreate()里面哦,不要写在public class MainActivity extends AppCompatActivity{ }里面。
(4)Mqtt_init方法
代码如下:
//mqtt初始化
private void Mqtt_init() {
        try {
            client = new MqttClient(host, mqtt_id,
                    new MemoryPersistence());
            //MQTT的连接设置
            MqttConnectOptions options = new MqttConnectOptions();
            //设置是否清空session,这里如果设置为false表示服务器会保留客户端的连接记录,
            // 这里设置为true表示每次连接到服务器都以新的身份连接
            options.setCleanSession(false);
            //设置连接的用户名
            options.setUserName(userName);
            //设置连接的密码
            options.setPassword(passWord.toCharArray());
            // 设置超时时间 单位为秒
            options.setConnectionTimeout(10);
            // 设置会话心跳时间 单位为秒 服务器会每隔1.5*20秒的时间向客户端发送个消息判断客户端是否在线,
            // 但这个方法并没有重连的机制
            options.setKeepAliveInterval(20);
            client.setCallback(new MqttCallback() {
                @Override
                public void connectionLost(Throwable cause) {
                    System.out.println("connectionLost----------");
                }
                @Override
                public void deliveryComplete(IMqttDeliveryToken iMqttDeliveryToken) {
                    System.out.println("deliveryComplete---------"
                            + iMqttDeliveryToken.isComplete());
                }
                @Override
                public void messageArrived(String topicName, MqttMessage mqttMessage)
                        throws Exception {
                    final String payload = new String(mqttMessage.getPayload());
                    runOnUiThread(new Runnable() {
                        @Override
                        public void run() {
                            temp_show.setText(payload+"℃");
                        }
                    });
                }
            });
        } catch (Exception e) {
            e.printStackTrace();
        }
    }
(5)startReconnect方法
代码如下:
//MQTT连接函数
private void startReconnect() {
        scheduler = Executors.newSingleThreadScheduledExecutor();
        scheduler.scheduleAtFixedRate(new Runnable(){
            @Override
            public void run() {
                if (!client.isConnected()) {
                    Mqtt_connect();
                }
            }
        },0*1000,10*1000, TimeUnit.MICROSECONDS);
    }
(6)Mqtt_connect
代码如下:
//MQTT重新连接函数
    private void Mqtt_connect() {
        new Thread(new Runnable(){

            @Override
            public void run() {
                try {
                    if(!(client.isConnected()) )  //如果还未连接
                    {
                        MqttConnectOptions options = null;
                        client.connect(options);
                        Message msg = new Message();
                        msg.what = 31;
                        handler.sendMessage(msg);
                    }
                } catch (Exception e) {
                    e.printStackTrace();
                    Message msg = new Message();
                    msg.what = 30;
                    handler.sendMessage(msg);
                }
            }
        }).start();
    }
(6)publishmessageplus方法
代码如下:
//订阅函数
    private void publishmessageplus(String topic,String message2)
    {
        if (client == null || !client.isConnected()) {
            return;
        }
        MqttMessage message = new MqttMessage();
        message.setPayload(message2.getBytes());
        try {
            client.publish(topic,message);
        } catch (MqttException e) {

            e.printStackTrace();
        }
    }
(7)Delay()方法
这个方法就是让本次开灯时把上次开的灯关掉,如果不关的话就会串颜色,比如我第一次开的是红灯,当我第二次按蓝灯时,红灯是不会自动关掉的,那么现在灯的状态就是红+蓝的状态,所以每次都需要按关灯按钮才可以打开其他灯,要不然会串颜色。因此我把关灯指令加在每个颜色灯指令前面,想开灯就先执行关灯指令,其实这个方法很不好,大家用的时候就知道了,每次按颜色灯按钮,都要发送两个指令,如果stm32实验板不好的话,只会接受到一个指令,也就是第一个关灯指令,所以要多按几次,所以各位家人有好方法可以自己改改,并写在评论区里面给大伙分享。
代码如下:
    private void Delay(){
        if(mqtt_pub_topic!="L0"){
            publishmessageplus(mqtt_pub_topic,"L0");
        }

    }
5、配置联网权限
配置联网权限很重要,一定要记得这串代码写进去,这个是决定APP能不能成功连接到mqtt服务器的关键
步骤:
(1)打开清单文件

(2)把这串代码粘贴进去manifest里面,代码如下:
    <uses-permission android:name="android.permission.WAKE_LOCK" />
    <uses-permission android:name="android.permission.WRITE_EXTERNAL_STORAGE" />
    <uses-permission android:name="android.permission.ACCESS_NETWORK_STATE" />
    <!--允许程序打开网络套接字-->
    <uses-permission android:name="android.permission.INTERNET" />
    <!--允许程序获取网络状态-->
    <uses-permission android:name="android.permission.ACCESS_NETWORK_STATE" />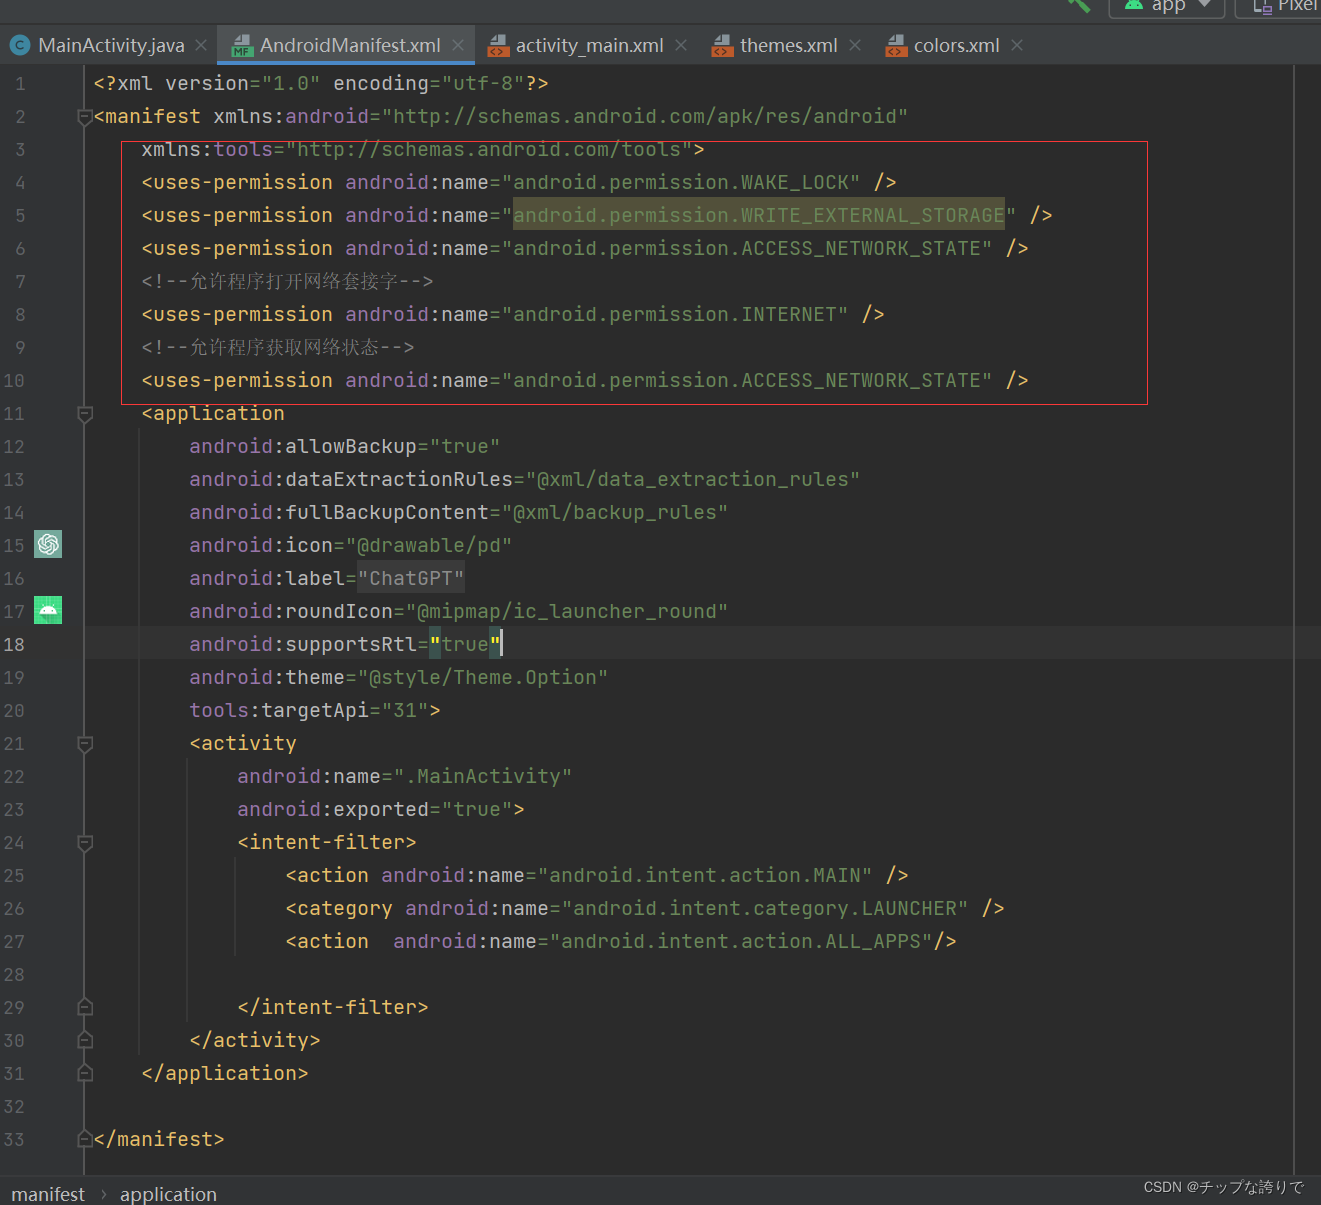
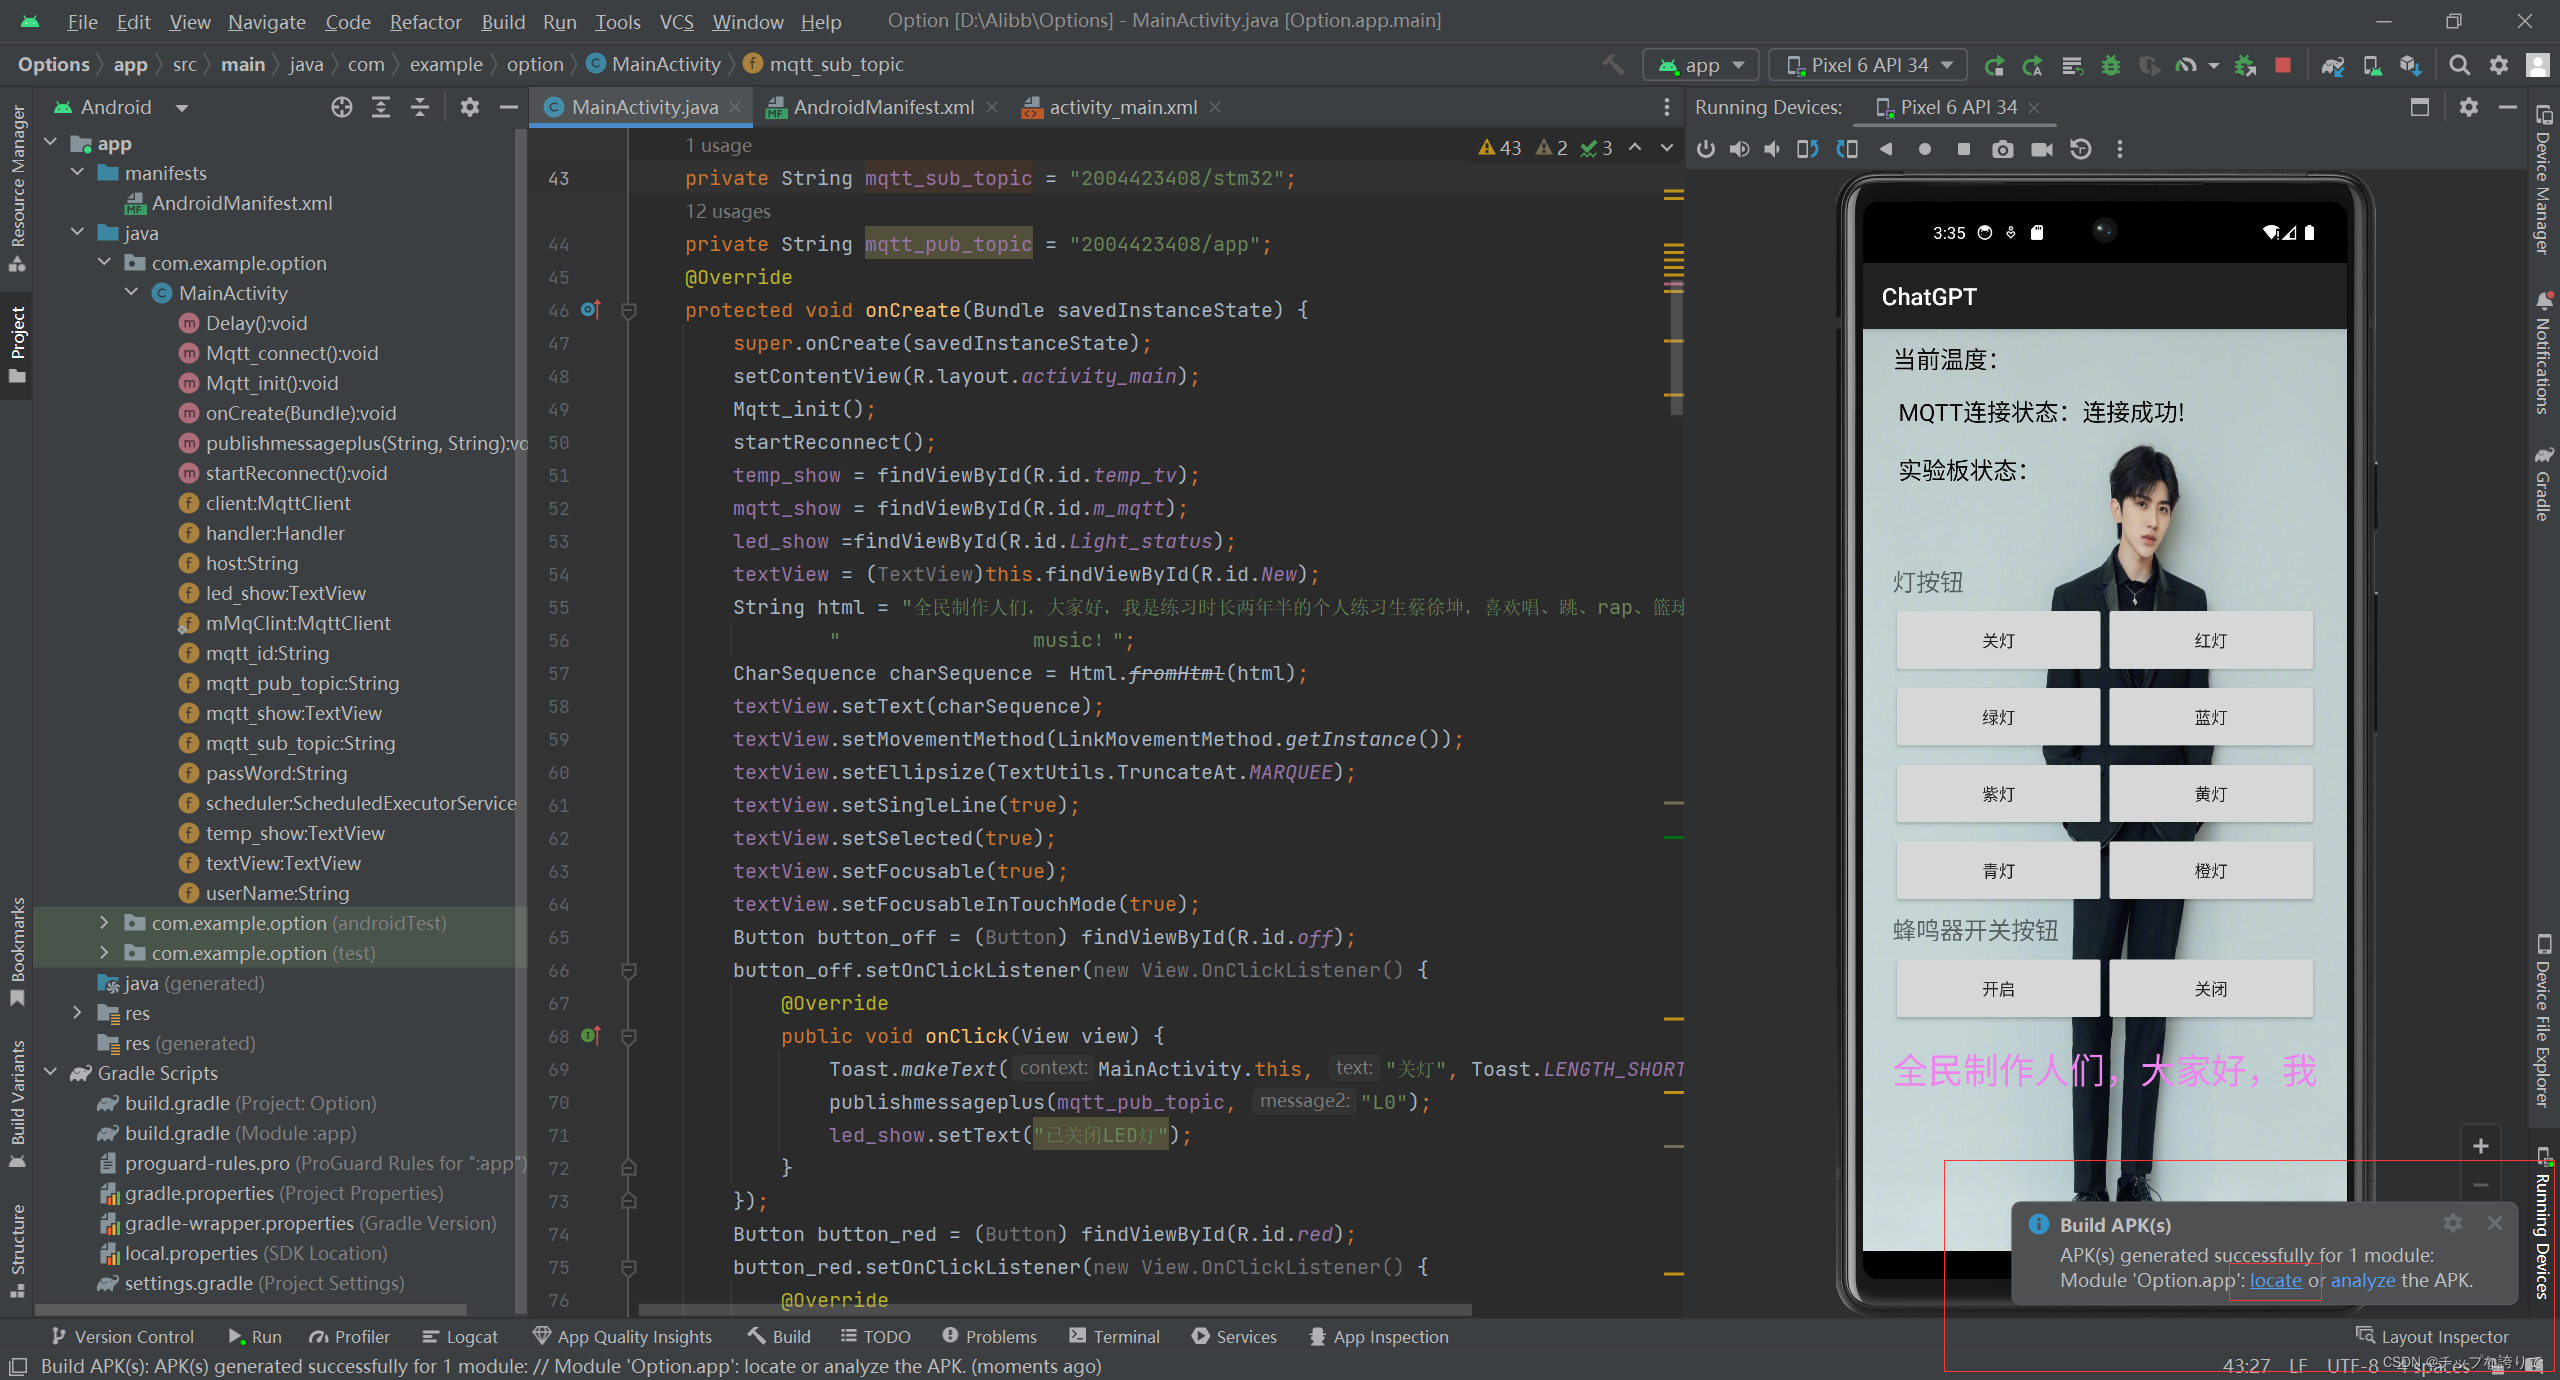
6.测试APP
到这里APP所有代码都写完成了,如果不报错的话可以运行测试啦,出现以下界面证明运行成功。

7.导出apk安装包
如果想把APP安装在手机上,那我们就要导出apk包
步骤:
(1)在菜单栏点击Build,然后选择Build Bundle/apk,最后点击Build APK(s)。

然后右下角会出现提示,我们点击locate打开文件的保存地址
进入文件管理页面后,把apk安装包发到手机进行安装

四、STM32实验板代码
stm32代码太复杂了,整个代码我也不是很理解,我是直接拿野火的实验模版过来改一下,把要用到的user文件全部导进去,所以我直接把keil5代码整个打包放在百度网盘里面,你们自行下载然后在keil5打开就可以了,下面我就介绍几个需要用到的地方和可以更改的地方,以及某个代码块是干什么的,有什么作用,也方便各位的使用。
链接:https://pan.baidu.com/s/1J5rJXD4bAuc6kYcv961fmg?pwd=rps1
提取码:rps1
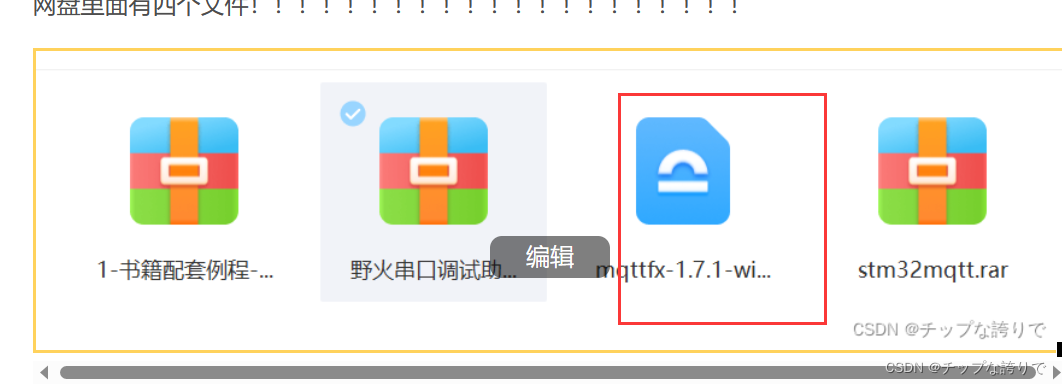
网盘里面有四个文件!!!!!!!!!!!!!!!!!!!!!
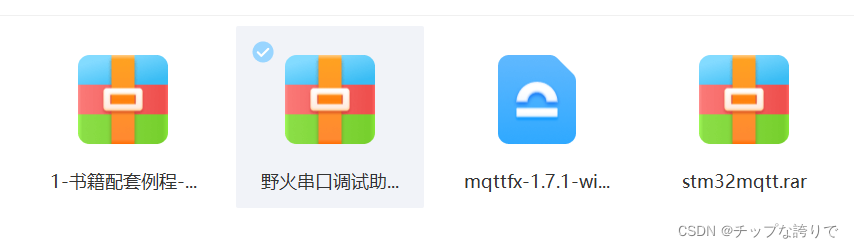
第一个文件有野火的很多实验案列,对于想学习STM32的同学可以打开试试,现在说的是第四个,它就是stm32的实验板代码,下载解压然后在keil5 MDK直接打开就可以用了。以下我逐个介绍用到的代码:
1.main函数
main函数里面值得改的就是我圈的这里,这里就是发送者和接收者,这里要跟app里面的一致,其他的大家感兴趣的话看着来慢慢研究。


2.esp8266
这个函数主要用于给实验板连接手机热点和mqtt服务器!!!!!!!
想实现物联网的话, STM32实验班和APP都必须同时连上网,所以实验板必须要连接我们自己的手机热点或者其他可以上网的网络。把第一个define里面的“WIFI Name ”改成自己手机的热点名,“WIFI password”改成热点密码,到时候把代码写进去STM32实验板后会自动连接手机热点。

3.onenet
这个函数主要是负责的接收APP那边发送来的指令然后发送给实验板做出相应反应,上面我们写那个安卓APP的时候,你们可以看到每个按钮的点击事件里面有L0,L1,L2等就是对应这里,L0对应的是三个基色等全部关闭,三基色灯不同打开方式的组合形成了另外四种灯,有什么新的指令大家就在这里加,这个函数主要是负责接收APP那边发送过来的指令。

4.小总结
五、测试
1.测试app与mqtt的连接状态
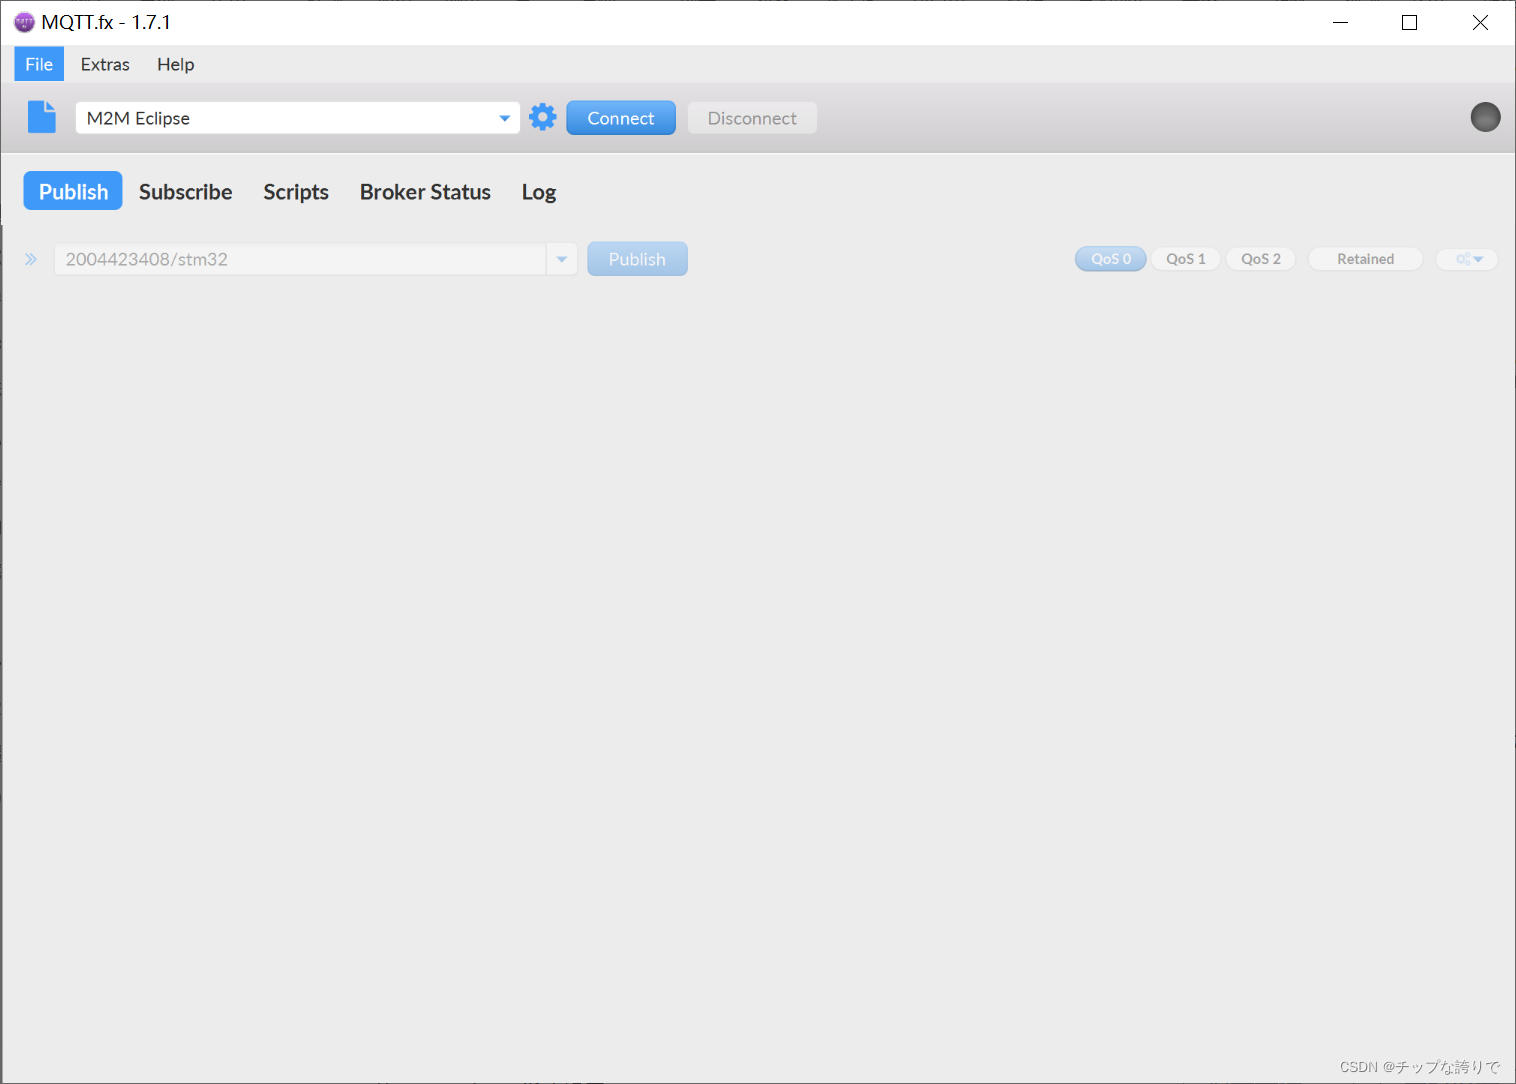
(1)安装mqtt.fx并打开
打开后是以下界面,Publish是发送方,Subscribe订阅方,如果想知道其他用法大家自己去百度吧,我也不想赘述了,这里我就讲这这个实验用到的内容。刚刚开始可以有点不理解,但是用久了自然就明白,这个其实就是测试APP能否连接到mqtt服务器,以及检查指令是否发送到mqtt服务器。
(2) 配置mqtt.fx的参数
点击设置进去配置页面

配置情况如下:
确定后回到主页面,点击Connect进行连接

右上角出现绿灯说明连接成功连接成功

在发布选项框下输入“123456/stm32”,然后在下面的空白框中输入温度发送给app进行显示。
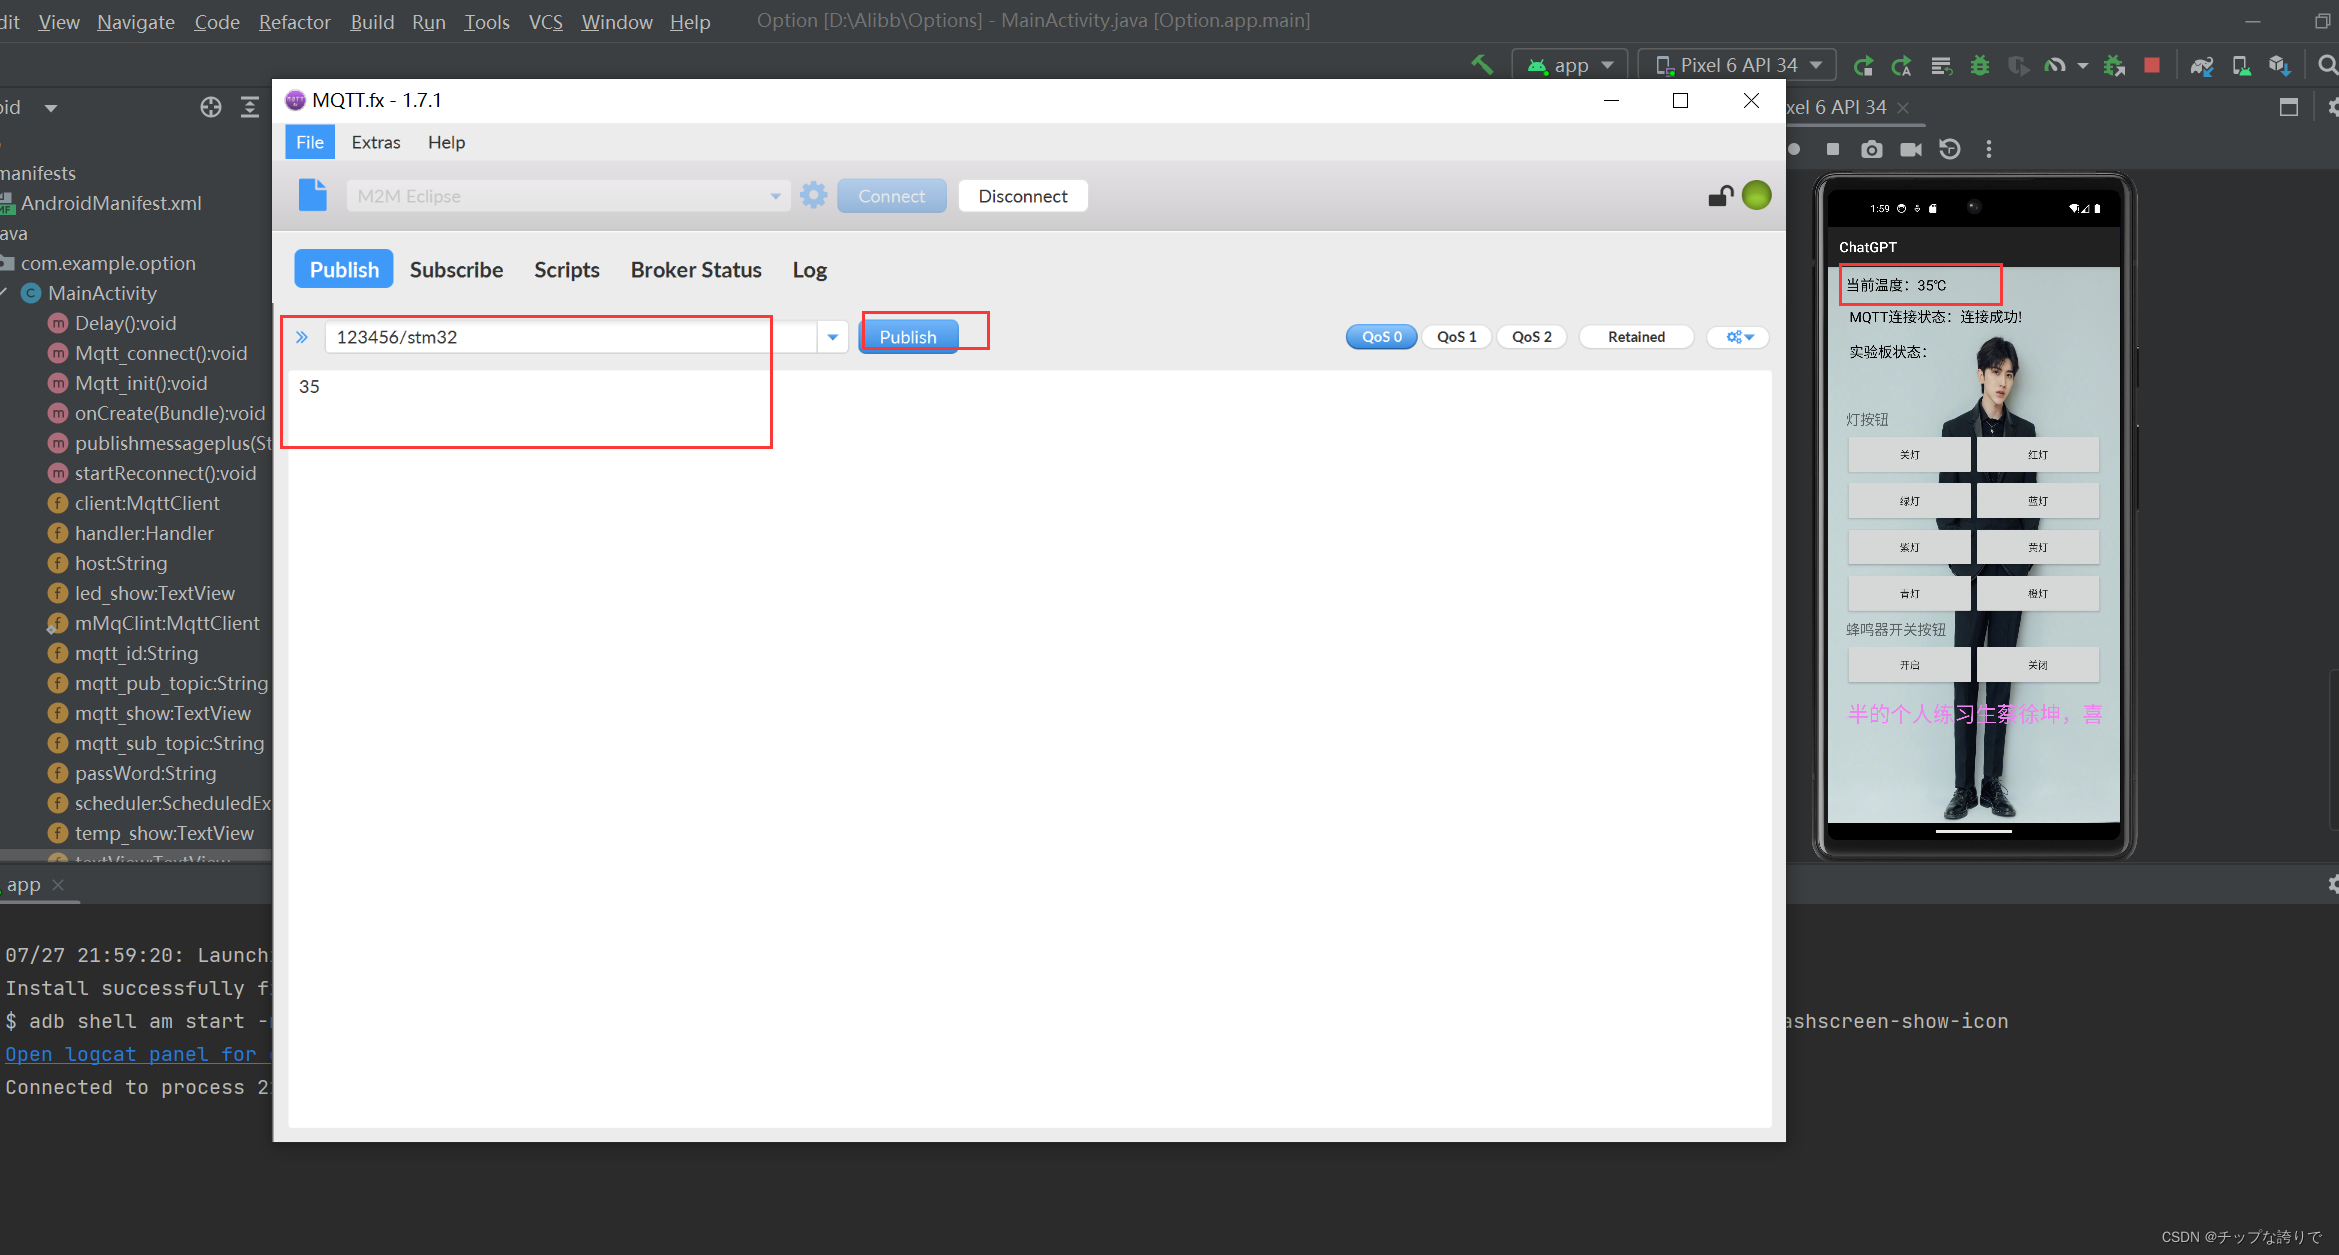
如下图,我发送了一个为数值为35的温度主题,可以看到app订阅到了。
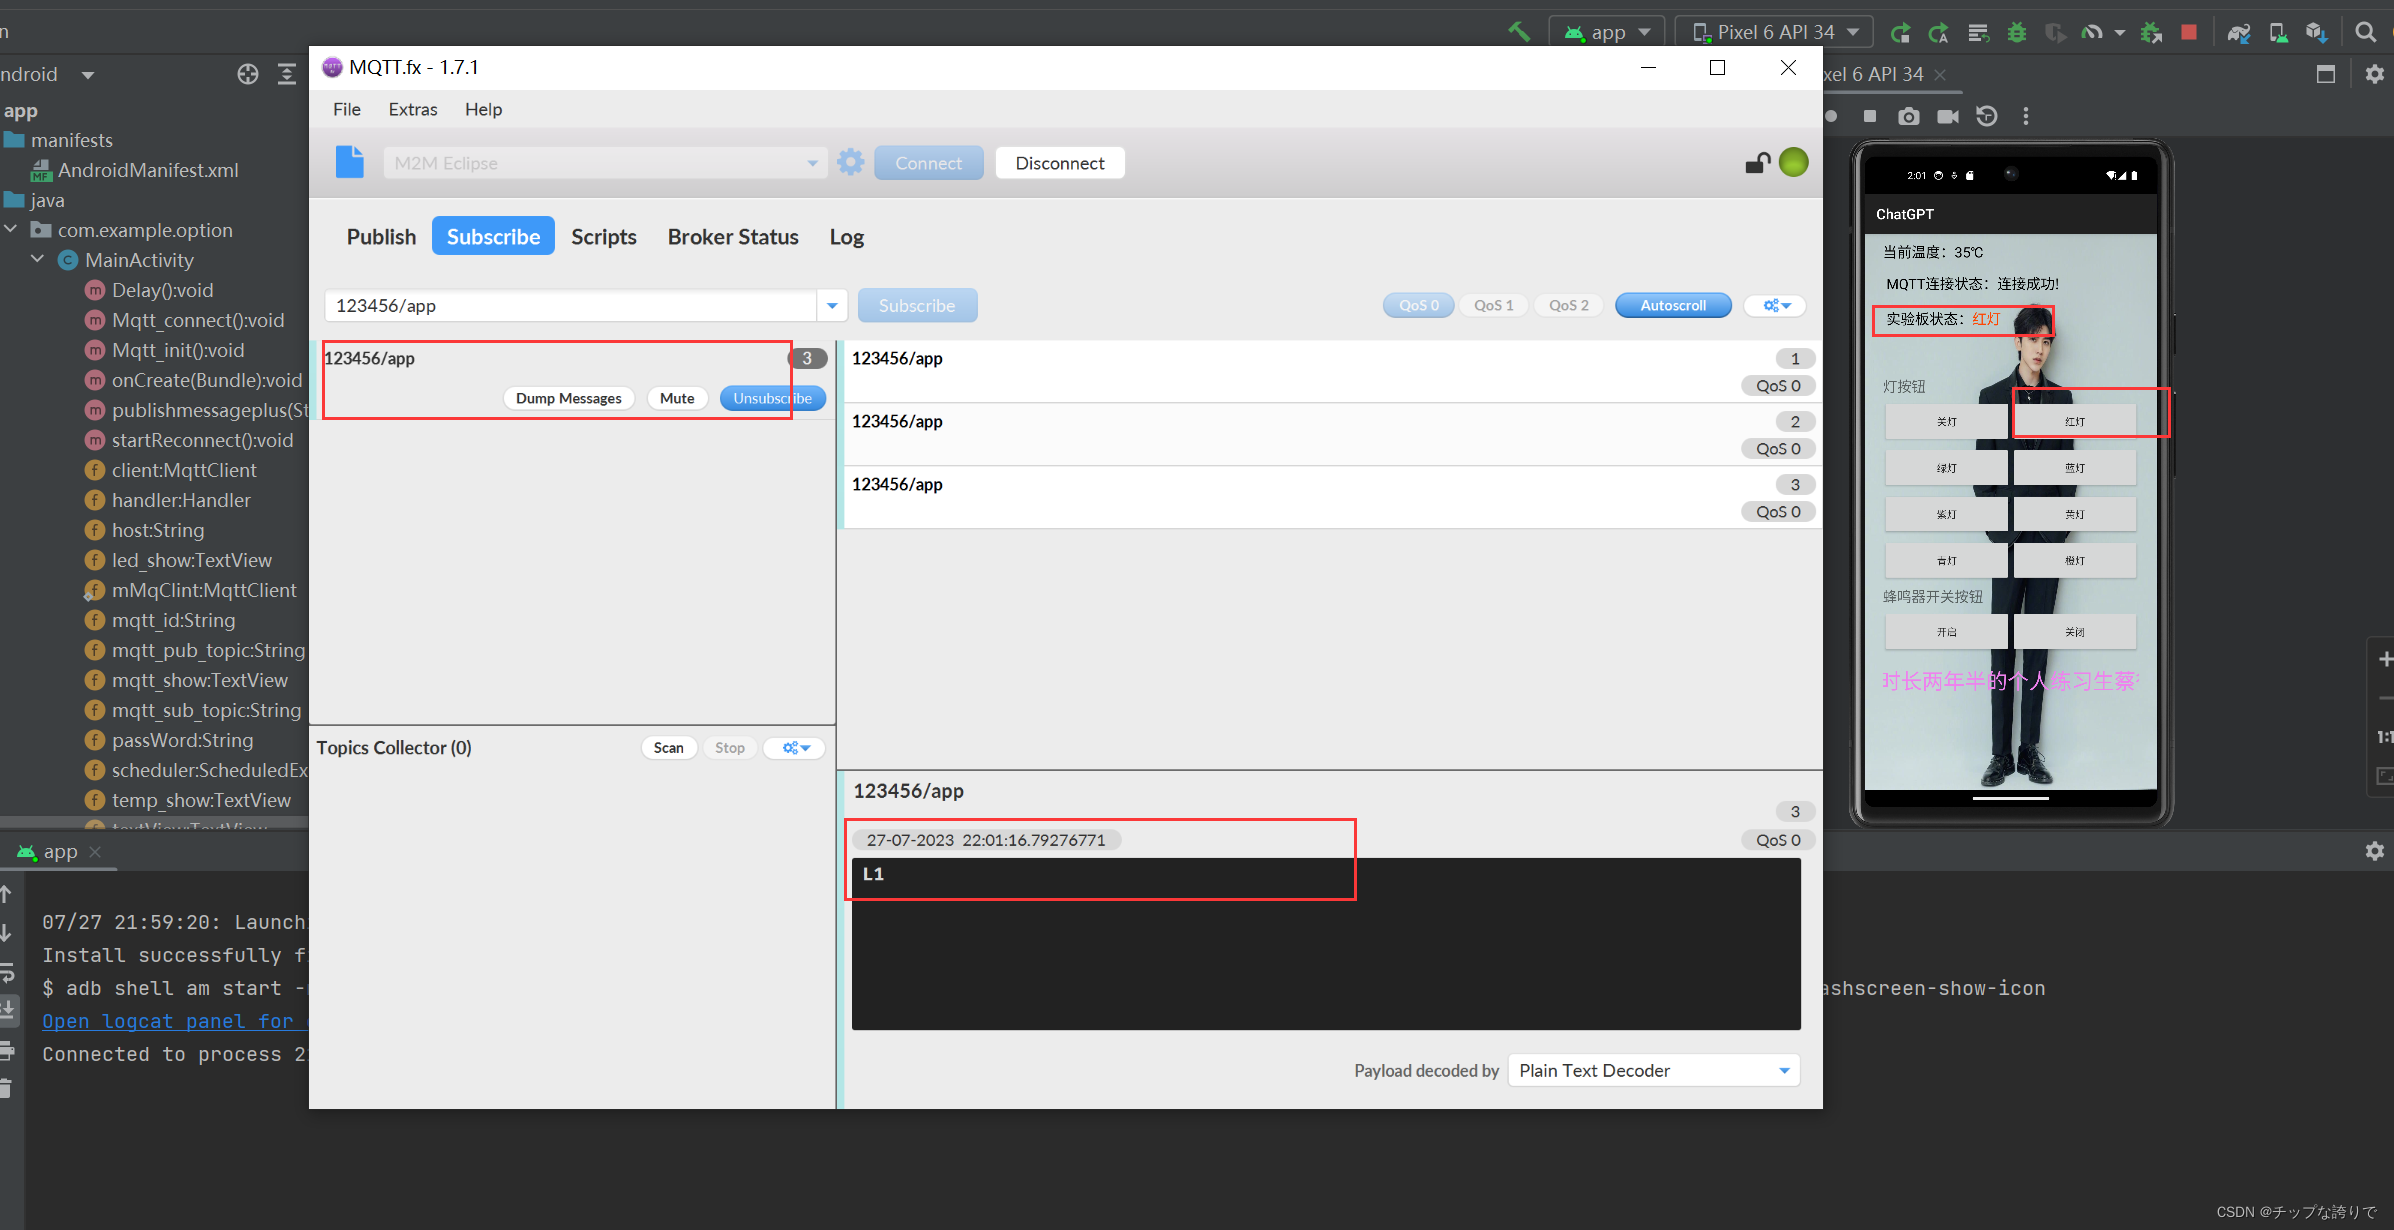
在Sublime输入123456/app, 点击app的容易一个按钮,123456/app也订阅到了app发送过来的指令,到了这一步,证明app已经完成了。
2.将app与实验板同时连接mqtt服务器,实现远程控制
因为这个文章我是在宿舍写的,也没有那个实验板,所以这里我就没有图片展示了,大家多多见谅。
步骤:
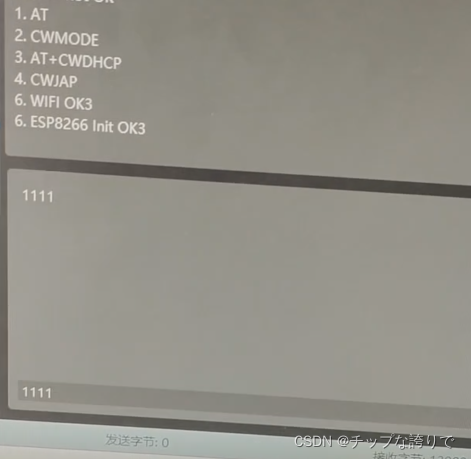
(1)在keil上把代码写入实验板,并打开app和串口调试助手(网盘第二个文件),选择好端口然后打开串口调试,记得打开WIFI给实验进行连接。
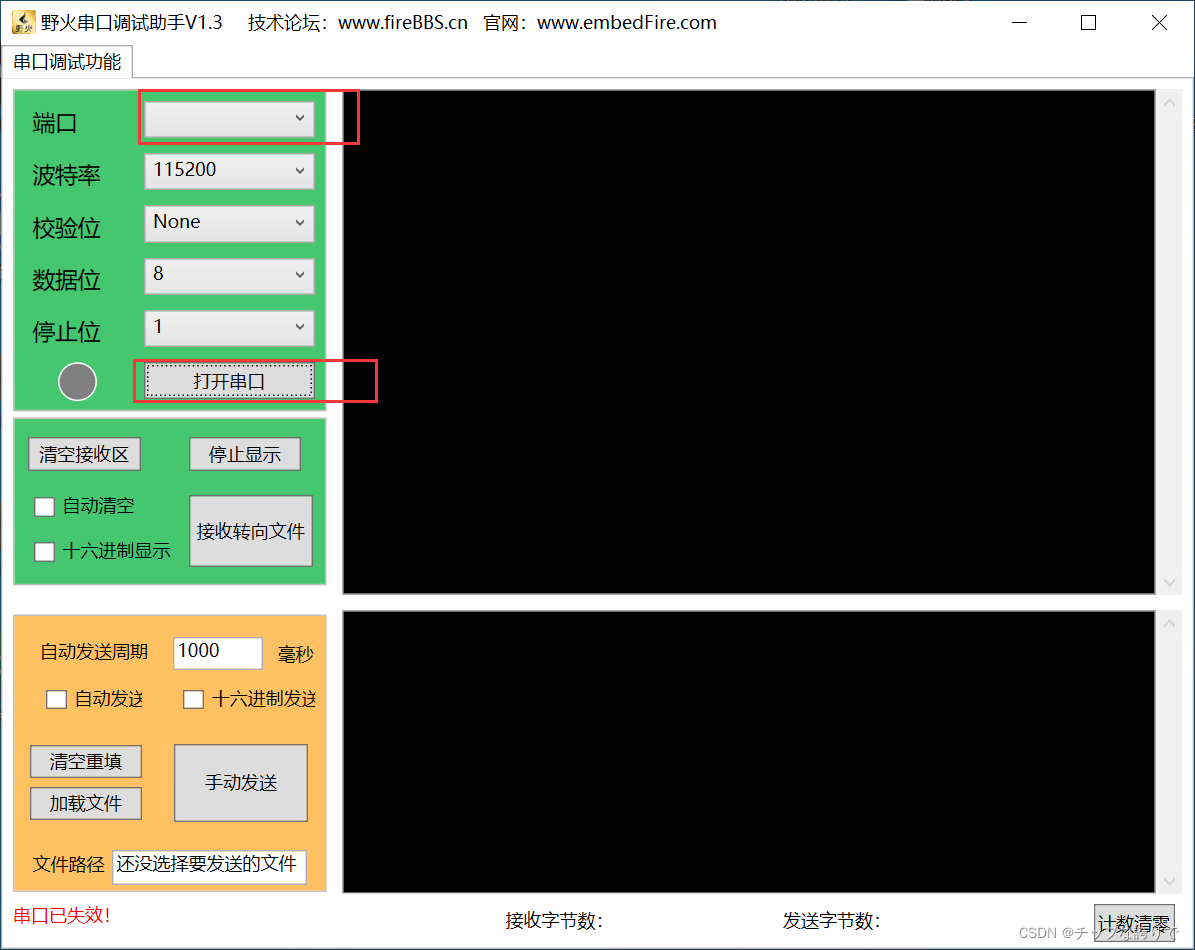
出现以下界面,证明连接成功!!!!!
开始进行我们的第一个物联网实验吧!!!!!

视频解析:
视频解析
六、总结
这个实验就是让开发的app和F103实验板通过mqtt的IP协议同时连接上mqtt服务器实现远程控制,app先把指令发送到mqtt服务器,mqtt服务器接到指令再发送给实验板,实验板也通过mqtt服务器将温度发送给APP,这期间mqtt充当着中介的角色。我的专业发展主要是往Java方向,所以对硬件方面也不是很懂,这个实验也是做得稀里糊涂,如果大家有不明白的,可以把问题写在评论区,我看到会回复,但不敢保证所有问题都能解决,毕竟我也是个二把刀。也要感谢CSDN的这位作者:
 我app的代码,大部分也都是参考他的,你们要是看不懂我写的,可以去看看他的,他写得比较详细,也解释得清楚点。