系列文章目录
基于CNN+数据增强+残差网络Resnet50的少样本高准确度猫咪种类识别—深度学习算法应用(含全部工程源码)+数据集+模型(一)
基于CNN+数据增强+残差网络Resnet50的少样本高准确度猫咪种类识别—深度学习算法应用(含全部工程源码)+数据集+模型(二)
基于CNN+数据增强+残差网络Resnet50的少样本高准确度猫咪种类识别—深度学习算法应用(含全部工程源码)+数据集+模型(三)
基于CNN+数据增强+残差网络Resnet50的少样本高准确度猫咪种类识别—深度学习算法应用(含全部工程源码)+数据集+模型(四)
基于CNN+数据增强+残差网络Resnet50的少样本高准确度猫咪种类识别—深度学习算法应用(含全部工程源码)+数据集+模型(五)
基于CNN+数据增强+残差网络Resnet50的少样本高准确度猫咪种类识别—深度学习算法应用(含全部工程源码)+数据集+模型(六)
目录

前言
本项目以卷积神经网络(CNN)模型为基础,对收集到的猫咪图像数据进行训练。通过采用数据增强技术和结合残差网络的方法,旨在提高模型的性能,以实现对不同猫的种类进行准确识别。
首先,项目利用CNN模型,这是一种专门用于图像识别任务的深度学习模型。该模型通过多个卷积和池化层,能够有效地捕捉图像中的特征,为猫的种类识别提供强大的学习能力。
其次,通过对收集到的数据进行训练,本项目致力于建立一个能够准确辨识猫的种类的模型。包括各种猫的图像,以确保模型能够泛化到不同的种类和场景。
为了进一步提高模型性能,采用了数据增强技术。数据增强通过对训练集中的图像进行旋转、翻转、缩放等操作,生成更多的变体,有助于模型更好地适应不同的视角和条件。
同时,引入残差网络的思想,有助于解决深层网络训练中的梯度消失问题,提高模型的训练效果。这种结合方法使得模型更具鲁棒性和准确性。
最终,通过本项目,实现了对猫的种类进行精准识别的目标。这对于宠物领域、动物学研究等方面都具有实际应用的潜力,为相关领域提供了一种高效而可靠的工具。
总体设计
本部分包括系统整体结构图和系统流程图。
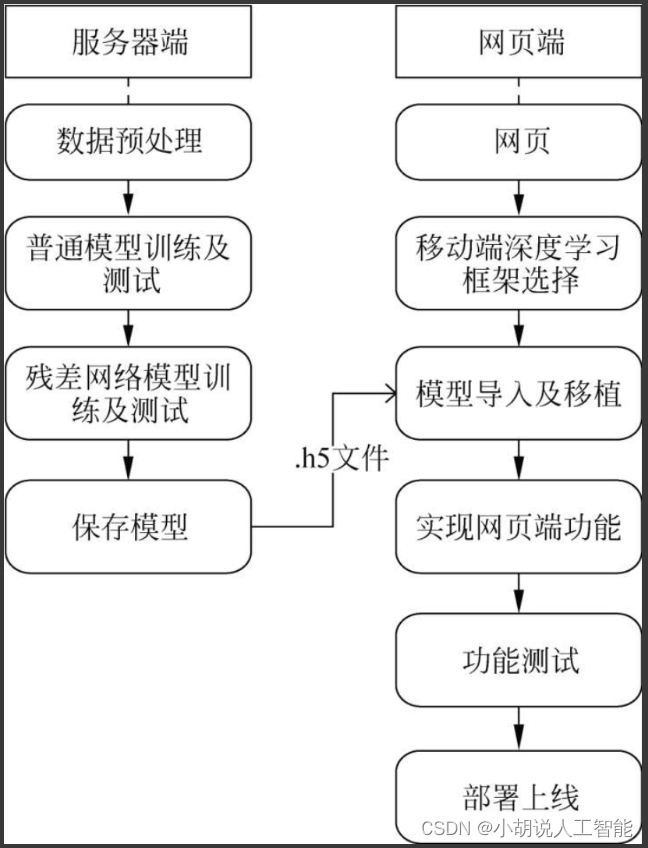
系统整体结构图
系统整体结构如图所示。
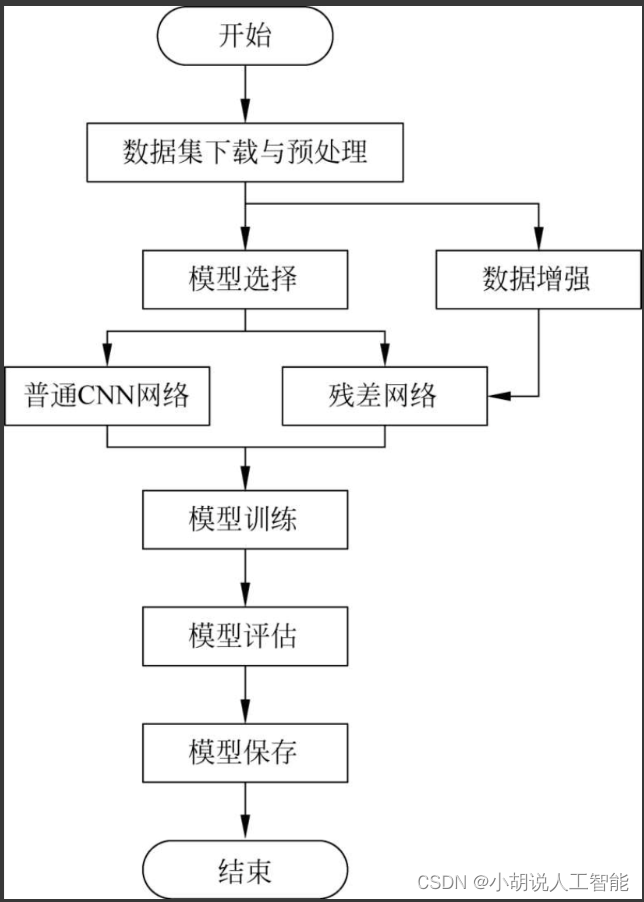
系统流程图
系统流程如图所示。
运行环境
本部分包括计算型云服务器、Python环境、TensorFlow环境和MySQL环境。
详见博客。
模块实现
本项目包括5个模块:数据预处理、数据增强、普通CNN模型、残差网络模型、模型生成。下面分别给出各模块的功能介绍及相关代码。
1. 数据预处理
打开浏览器,分别搜索布偶猫、孟买猫、暹罗猫和英国短毛猫的图片。用批量下载器下载图片,筛选出特征明显的图片作为数据集。使用的图片包含101张布偶猫、97张孟买猫、101张逼罗猫以及85张英国短毛猫,共计384张图片。(其中在工程代码中/cat_kind_model/cat_data_100与/cat_kind_model/cat_data_224也可下载)
详见博客。
2. 数据增强
所谓数据增强,是通过翻转、旋转、比例缩放、随机裁剪、移位、添加噪声等操作对现有数据集进行拓展。本项目中数据量较小,无法提取图片的深层特征,使用深层的残差网络时易造成模型过拟合。
详见博客。
3. 普通CNN模型
处理图片数据格式后,转换为数组作为模型的输入,并根据文件名提取标签,定义模型结构、优化器、损失函数和性能指标。本项目使用Keras提供类似VGG的卷积神经网络。
1)模型结构
详见博客。
2)模型优化
详见博客。
3)模型训练
详见博客。
4)模型保存
详见博客。
4. 残差网络模型
本部分包括残差网络的介绍、模型结构以及模型训练。
1)残差网络的介绍
详见博客。
2)模型结构
详见博客。
3)模型训练
详见博客。
4)模型保存
详见博客。
5. 模型生成
模型应用主要有3部分:一是从本地相册输入猫的图片;二是把输入的图片转换成数据,在输入训练好的模型中进行预测;三是根据预测结果输出数据库中预存的相关信息。
1)搭建Django项目
使用快捷键win+R,输入cmd后回车,打开命令行。
进入虚拟环境:
cd H: # anaconda的安装路径
cd ProgramData\Anaconda3\Scripts
activate tensorflow
创建Django项目:
django-admin startproject cat_kind_view
进入项目目录,创建一个名为cat的应用:
cd cat_kind_view
python manage.py startapp cat
用PyCharm打开创建的项目,如图所示。
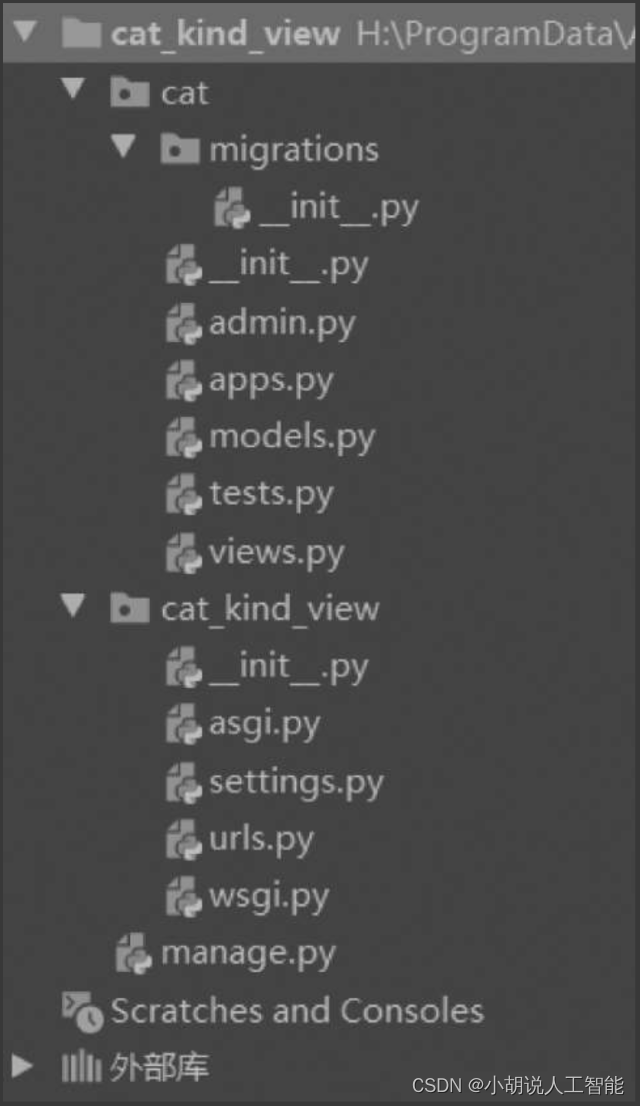
在cat_kind_view/cat/views.py文件中添加网页想要展示的内容,相关代码如下:
from django.shortcuts import render  #导入各种模块
from django.http import HttpResponse
from catclass import settings
from . import models
from .prediction import testcat
import json
#创建视图
def index(request):
    return render(request, 'index.html')
def catinfo(request):
    if request.method == "POST":
        f1 = request.FILES['pic1']
        #用于识别
        fname = '%s/pic/%s' % (settings.MEDIA_ROOT, f1.name)
        with open(fname, 'wb') as pic:
            for c in f1.chunks():
                pic.write(c)
        #用于显示
        fname1 = './static/img/%s' % f1.name
        with open(fname1, 'wb') as pic:
            for c in f1.chunks():
                pic.write(c)
        num = testcat(f1.name)
        if(num == 0):
            num = 4
        #通过ID获取猫的信息
        name = models.Catinfo.objects.get(id = num)
        return render(request, 'info.html', {

    'nameinfo': name.nameinfo, 'feature': name.feature, 'livemethod': name.livemethod, 'feednn': name.feednn, 'feedmethod': name.feedmethod, 'picname': f1.name})
    else:
        return HttpResponse("上传失败!")
def appupload(request):
    if request.method == "POST":
        f1 = request.FILES['pic1']
        #用于识别
        fname = '%s/pic/%s' % (settings.MEDIA_ROOT, f1.name)
        with open(fname, 'wb') as pic:
            for c in f1.chunks():
                pic.write(c)
        #用于显示
        fname1 = './static/img/%s' % f1.name
        with open(fname1, 'wb') as pic:
            for c in f1.chunks():
                pic.write(c)
        num = testcat(f1.name)
        if (num == 0):
            num = 4
        #通过ID获取猫的信息
        name = models.Catinfo.objects.get(id = num)
        return render(request, 'app.html', {

    'nameinfo': name.nameinfo, 'feature': name.feature, 'livemethod': name.livemethod, 'feednn': name.feednn, 'feedmethod': name.feedmethod, 'picname': f1.name})
    else:
        return HttpResponse("上传失败!")
#在cat_kind_view/cat目录下新建urls.py
from django.conf.urls import url
from . import views
urlpatterns = [
    url(r'^$', views.index),
    url(r'^info/', views.catinfo),
    url(r'^appupload/', views.appupload)
]
#在cat_kind_view/ cat_kind_view/urls.py文件中加上新建的urls
from django.conf.urls import include, url
from django.contrib import admin
urlpatterns = [
    url(r'^admin/', include(admin.site.urls)),
    url(r'^', include('cat.urls')),  #连接到cat/urls
]
#在cat_kind_view/cat_kind_view/settings.py中做如下改动
#定义应用
INSTALLED_APPS = [
    'django.contrib.admin',
    'django.contrib.auth',
    'django.contrib.contenttypes',
    'django.contrib.sessions',
    'django.contrib.messages',
    'django.contrib.staticfiles',
    'cat'  # 加上自己的APP
]
#LANGUAGE_CODE = 'en-us'
LANGUAGE_CODE = 'zh-Hans'    #修改语言为汉语
# TIME_ZONE = 'UTC'
TIME_ZONE = 'Asia/Shanghai'  #修改时区为上海
2)输入图片并预测
创建保存输入图片的文件夹在cat_kind_view/cat目录下添加prediction.py。此文件的功能是处理输入的图片,并用训练好的模型进行预测。
import os  #导入各种模块
from PIL import Image
import numpy as np
import keras
from keras.models import Sequential
from keras.layers.core import Dense, Dropout, Flatten
from keras.optimizers import SGD
from keras.layers import Conv2D, MaxPooling2D
def prepicture(picname):  #定义预处理
    img = Image.open('./media/pic/' + picname)
    new_img = img.resize((100, 100), Image.BILINEAR)
    new_img.save(os.path.join('./media/pic/', os.path.basename(picname)))
def read_image2(filename):
    img = Image.open('./media/pic/' + filename).convert('RGB')
    return np.array(img)
def testcat(picname):
    #预处理图片变成100*100
    prepicture(picname)
    x_test = []
    x_test.append(read_image2(picname))
    x_test = np.array(x_test)
    x_test = x_test.astype('float32')
    x_test /= 255
    keras.backend.clear_session()
    model = Sequential()
    #输入为三通道的100*100图像
    #应用32个卷积滤波器,每个大小为3*3
    model.add(Conv2D(32,(3,3),activation='relu',input_shape=(100,100,3)))
    model.add(Conv2D(32, (3, 3), activation='relu'))
    model.add(MaxPooling2D(pool_size=(2, 2)))
    model.add(Dropout(0.25))
    model.add(Conv2D(64, (3, 3), activation='relu'))
    model.add(Conv2D(64, (3, 3), activation='relu'))
    model.add(MaxPooling2D(pool_size=(2, 2)))
    model.add(Dropout(0.25))
    model.add(Flatten())
    model.add(Dense(256, activation='relu'))
    model.add(Dropout(0.5))
    model.add(Dense(4, activation='softmax'))
    sgd = SGD(lr=0.01, decay=1e-6, momentum=0.9, nesterov=True)
    model.compile(loss='categorical_crossentropy', optimizer=sgd, metrics=['accuracy'])
    model.load_weights('./cat/cat_weight.h5')    #使用训练好的模型预测
    classes = model.predict_classes(x_test)[0]
    #target = ['布偶猫', '孟买猫', '暹罗猫', '英国短毛猫']
    #print(target[classes])
    return classes
3)链接数据库
本部分相关代码如下:
#在cat_kind_view/cat_kind_view/settings.py
DATABASES = {


    'default': {


        'ENGINE': 'django.db.backends.mysql',
        'NAME': 'catkind',     #数据库名
        'USER': 'root',         #用户名
        'PASSWORD': 'root',    #密码
        'HOST': '127.0.0.1',
        'PORT': '3306',
    }
}
#在cat_kind_view/cat /__init__.py中引入数据库
import pymysql
pymysql.version_info = (1, 3, 13, "final", 0)
pymysql.install_as_MySQLdb()
#在cat_kind_view/cat /__init__.py中写入数据库中的名称和格式
from django.db import models
#创建模型
class Catinfo(models.Model):
    name = models.CharField(max_length=10)
    nameinfo = models.CharField(max_length=1000)
    feature = models.CharField(max_length=1000)
    livemethod = models.CharField(max_length=1000)
    feednn = models.CharField(max_length=1000)
    feedmethod = models.CharField(max_length=1000)
在命令行终端输入以下命令,生成迁移文件0001_initial.py。
python manage.py makemigrations
在命令行终端输入以下命令执行迁移,在数据库中生成对应表。
python manage.py migrate
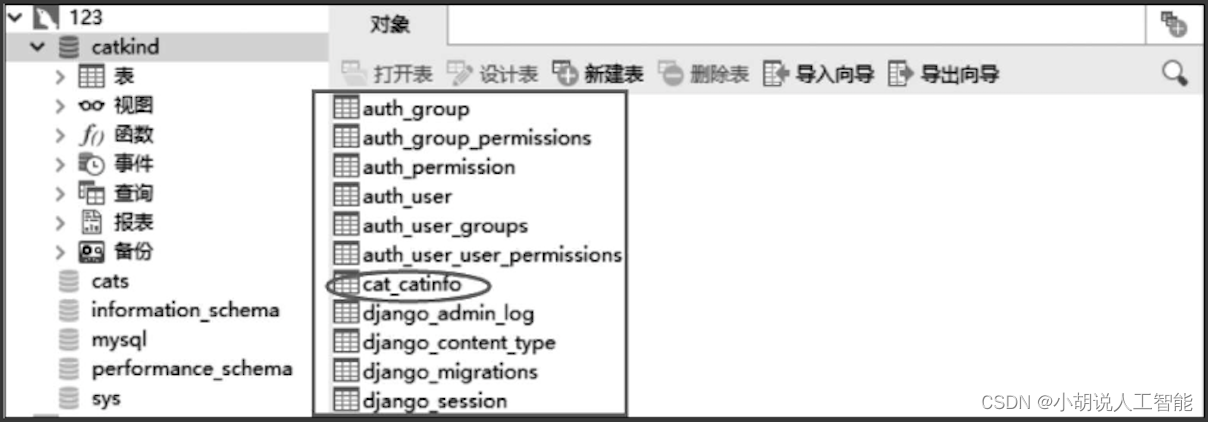
在Navicat for MySQL中打开数据库,发现由Django生成一些列表,如图所示,cat_catinfo是在应用cat中由catinfo类生成的表。
在cat_catinfo表中添加不同种类猫的相关信息,如图所示。

这些信息根据预测结果(标签)与主键ID一一对应,把表中的信息显示在网页上。
4)美化网页
本部分相关代码如下:
#在cat_kind_view/cat_kind_view/settings.py
TEMPLATES = [
    {


        'BACKEND': 'django.template.backends.django.DjangoTemplates',
        'DIRS': [os.path.join(BASE_DIR, 'templates')],  #加入模板路径
        'APP_DIRS': True,
        'OPTIONS': {


            'context_processors': [
                'django.template.context_processors.debug',
                'django.template.context_processors.request',
                'django.contrib.auth.context_processors.auth',
                'django.contrib.messages.context_processors.messages',
            ],
        },
    },
]
#静态文件(CSS, JavaScript, Images)
#参考https://docs.djangoproject.com/en/3.0/howto/static-files/
STATIC_URL = '/static/'
STATICFILES_DIRS = [
    os.path.join(BASE_DIR, 'static')  #加上static路径,界面美化
]
MEDIA_ROOT = os.path.join(BASE_DIR, "./media") #加上media路径,界面美化
美化网页部分代码目录如图所示。

static/css/style.css设置首页格式,如背景、字体、各部件的类型、颜色等。
body,ul,li,dl,dt,dd,p,ol,h1,h2,h3,h4,h5,h6,form,img,table,fieldset,legend {


	margin: 0;
	padding: 0;
}
html,body {


	height: 100%;
	width: 100%;
}
ul,li,ol {


	list-style: none;
}
img,fieldset {


	border: 0;
}
img {


	display: block;
}
a {


	text-decoration: none;
	color: #333;
}
h1,h2,h3,h4,h5,h6 {


	font-weight: 100;
}
body {


	font-size: 12px;
	font-family: "微软雅黑";
}
input,a {


	outline: none;
}
* {


	box-sizing: border-box;
}
.bc {


	background: url(../img/image001.jpg) no-repeat;
	background-size: 100% 100%;
}
.main1 {


	width: 100%;
	height: 100%;
	padding-top: 100px;
	padding-left: 100px;
}
.main {


	width: 600px;
	height: 500px;
	background-color: rgba(255,255,255,0.3);
	box-shadow: 0px 0px 5px 5px #888888;
}
.title {


	width: 100%;
	height: 55px;
	padding-top: 20px;
}
.title p {


	font-size: 30px;
	text-align: center;
}
.select {


	width: 100%;
	height: 200px;
}
.xfile {


	width: 200px;
	height: 100px;
	display: none;
	border: 0px;
}
.xxfile,.xxsub {


	width: 300px;
	height: 60px;
	background-color: rgba(0,0,0,0.5);
	margin-top: 50px;
	margin-left: 150px;
	font-size: 25px;
	border-radius: 10px;
	border: 0px;
	color: white;
	font-family: "微软雅黑";
	transition: linear 0.2s;
}
.xxfile:hover,.xxsub:hover {


	color: black;
	background-color: rgba(255,255,255,0.5);
}
.select .xxsub {


	margin-top: 30px;
}
.foot {


	width: 100%;
	height: 245px;
	padding-top: 30px;
}
.foot ul {


	display: flex;
	justify-content: space-around;
}
.foot dl {


	height: 30px;
	font-size: 16px;
	line-height: 30px;
}
.foot dd {


	height: 40px;
	font-size: 26px;
	line-height: 40px;
}
static/css/info.css设置信息页格式,如背景、字体、各部件的类型、颜色等。
body,ul,li,dl,dt,dd,p,ol,h1,h2,h3,h4,h5,h6,form,img,table,fieldset,legend {


	margin: 0;
	padding: 0;
}
ul,li,ol {


	list-style: none;
}
img,fieldset {


	border: 0;
}
img {


	display: block;
}
a {


	text-decoration: none;
	color: #333;
}
h1,h2,h3,h4,h5,h6 {


	font-weight: 100;
}
body {


	font-size: 12px;
	font-family: "微软雅黑";
	color: black;
}
input,a {


	outline: none;
}
* {


	box-sizing: border-box;
}
body {


	background: url(../img/lianzhengaijiujiu003.jpg) no-repeat;
	background-size: cover;
}
.top {


	width: 1000px;
	height: 40px;
	background-color: cornflowerblue;
	margin: 0 auto;
	line-height: 40px;
	font-size: 24px;
	color: white;
	padding-left: 20px;
}
.m1 {


	width: 1000px;
	height: 210px;
	margin: 0 auto;
	margin-top: 20px;
	display: flex;
	justify-content: space-between;
}
.catlogo {


	width: 210px;
	height: 210px;
	padding: 4px;
	border: 1px solid gray;
}
.catlogo img {


	width: 200px;
	height: 200px;
}
.catname {


	width: 770px;
	font-size: 18px;
	padding: 10px;
	text-align: justify;
	background: rgba(255,255,255,0.7);
	border-radius: 10px;
}
.m2,.m3 {


	width: 1000px;
	height: 400px;
	display: flex;
	justify-content: space-between;
	margin: 0 auto;
	margin-top: 10px;
}
.feature {


	width: 400px;
	height: 400px;
	text-align: justify;
	background: rgba(255,255,255,0.7);
	border-radius: 10px;
}
.live {


	width: 560px;
	height: 400px;
	text-align: justify;
	background: rgba(255,255,255,0.7);
	border-radius: 10px;
}
.featt,.maintitle,.methodtitle {


	width: 100%;
	height: 40px;
	line-height: 40px;
	font-size: 24px;
	color: white;
	padding-left: 20px;
	background: cornflowerblue;
}
.nn {


	font-size: 18px;
	margin: 8px;
}
.m3 {


	height: 450px;
}
.feedmethod {


	width: 510px;
	height: 440px;
	text-align: justify;
	background: rgba(255,255,255,0.7);
	border-radius: 10px;
}
.feedmain {


	width: 450px;
	height: 440px;
	text-align: justify;
	background: rgba(255,255,255,0.7);
	border-radius: 10px;
}
.footcat {


	position: fixed;
	right: 0;
	bottom: 0;
	width: 200px;
	height: 300px;
}
static/templates/index.html首页显示的内容:
<!DOCTYPE html>
<html>
<head>
<meta charset="utf-8" />
<link rel="stylesheet" href="/static/css/style.css" />
<script type="text/javascript" src="/static/js/cat.js" ></script>
<title>猫的种类识别</title>
</head>
<body class="bc">
<div class="main1">
<div class="main">
<div class="title">
<p>The Kinds Of Cats Identification</p>
</div>
<div class="select">
<form action="/info/" method="post" enctype="multipart/form-data">
{% csrf_token %}
<input type="file" class="xfile" id="btn_file" name="pic1"/>
<button type="button" onclick="F_Open_dialog()" class="xxfile">选择图片</button>
<br />
<input type="submit" class="xxsub" value="种类识别"/>
</form>
</div>
<div class="foot">
<ul>
<li>
<ol>
<dd>识别的种类</dd>
<dl>布偶猫</dl>
<dl>孟买猫</dl>
<dl>暹罗猫</dl>
<dl>英国短毛猫</dl>
</ol>
</li>
<li>
<ol>
<dd>应用说明</dd>
<dl>上传图片均为jpg</dl>
<dl>识别精度大约90%以上</dl>
</ol>
</li>
</ul>
</div>
</div>
</div>
</body>
</html>
static/templates/app.html信息页显示的内容:
<!DOCTYPE html>
<html lang="en">
<head>
<meta name="viewport" content="width=device-width,initial-scale=1,minimum-scale=1,maximum-scale=1,user-scalable=no" />
<title></title>
<script src="/static/js/mui.min.js"></script>
<link href="/static/css/mui.min.css" rel="stylesheet"/>
<link rel="stylesheet" type="text/css" href="/static/css/appinfo.css"/>
</head>
<body>
<header class="mui-bar mui-bar-nav ihead">
<a class="mui-action-back mui-icon mui-icon-left-nav mui-pull-left iha"></a>
<h1 class="mui-title">识别结果</h1>
</header>
<div class="mui-scroll-wrapper">
<div class="mui-scroll">
<div class="ifhead ihh">种类</div>
<div class="ipic">
<img src="/static/img/{
{ picname }}" />
<div class="iname">
<p> {
{ nameinfo }}</p>
</div>
</div>
<div class="ifhead">外形特征</div>
<div class="ifeature">
<p> {
{ feature }}</p>
</div>
<div class="ifhead">生活习性</div>
<div class="ifeature">
<p> {
{ livemethod }}</p>
</div>
<div class="ifhead">饲养须知</div>
<div class="ifeature">
<p> {
{ feednn }}</p>
</div>
<div class="ifhead">饲养方法</div>
<div class="ifeature">
<p> {
{ feedmethod }}</p>
</div>
</div>
</div>
<script type="text/javascript" charset="utf-8">
mui.init();
mui('.mui-scroll-wrapper').scroll({
deceleration: 0.0005 //flick 减速系数,系数越大,滚动速度越慢,滚动距离越小,默认值0.0006
});
</script>
</body>
</html>
其他相关博客
基于CNN+数据增强+残差网络Resnet50的少样本高准确度猫咪种类识别—深度学习算法应用(含全部工程源码)+数据集+模型(一)
基于CNN+数据增强+残差网络Resnet50的少样本高准确度猫咪种类识别—深度学习算法应用(含全部工程源码)+数据集+模型(二)
基于CNN+数据增强+残差网络Resnet50的少样本高准确度猫咪种类识别—深度学习算法应用(含全部工程源码)+数据集+模型(三)
基于CNN+数据增强+残差网络Resnet50的少样本高准确度猫咪种类识别—深度学习算法应用(含全部工程源码)+数据集+模型(四)
基于CNN+数据增强+残差网络Resnet50的少样本高准确度猫咪种类识别—深度学习算法应用(含全部工程源码)+数据集+模型(六)
工程源代码下载
其它资料下载
如果大家想继续了解人工智能相关学习路线和知识体系,欢迎大家翻阅我的另外一篇博客《重磅 | 完备的人工智能AI 学习——基础知识学习路线,所有资料免关注免套路直接网盘下载》
这篇博客参考了Github知名开源平台,AI技术平台以及相关领域专家:Datawhale,ApacheCN,AI有道和黄海广博士等约有近100G相关资料,希望能帮助到所有小伙伴们。