1.点击某一条待办事项,出现编辑界面,可对待办事项的文本进行修改.
不重新设计界面,而是将新增页面进行修改复用.
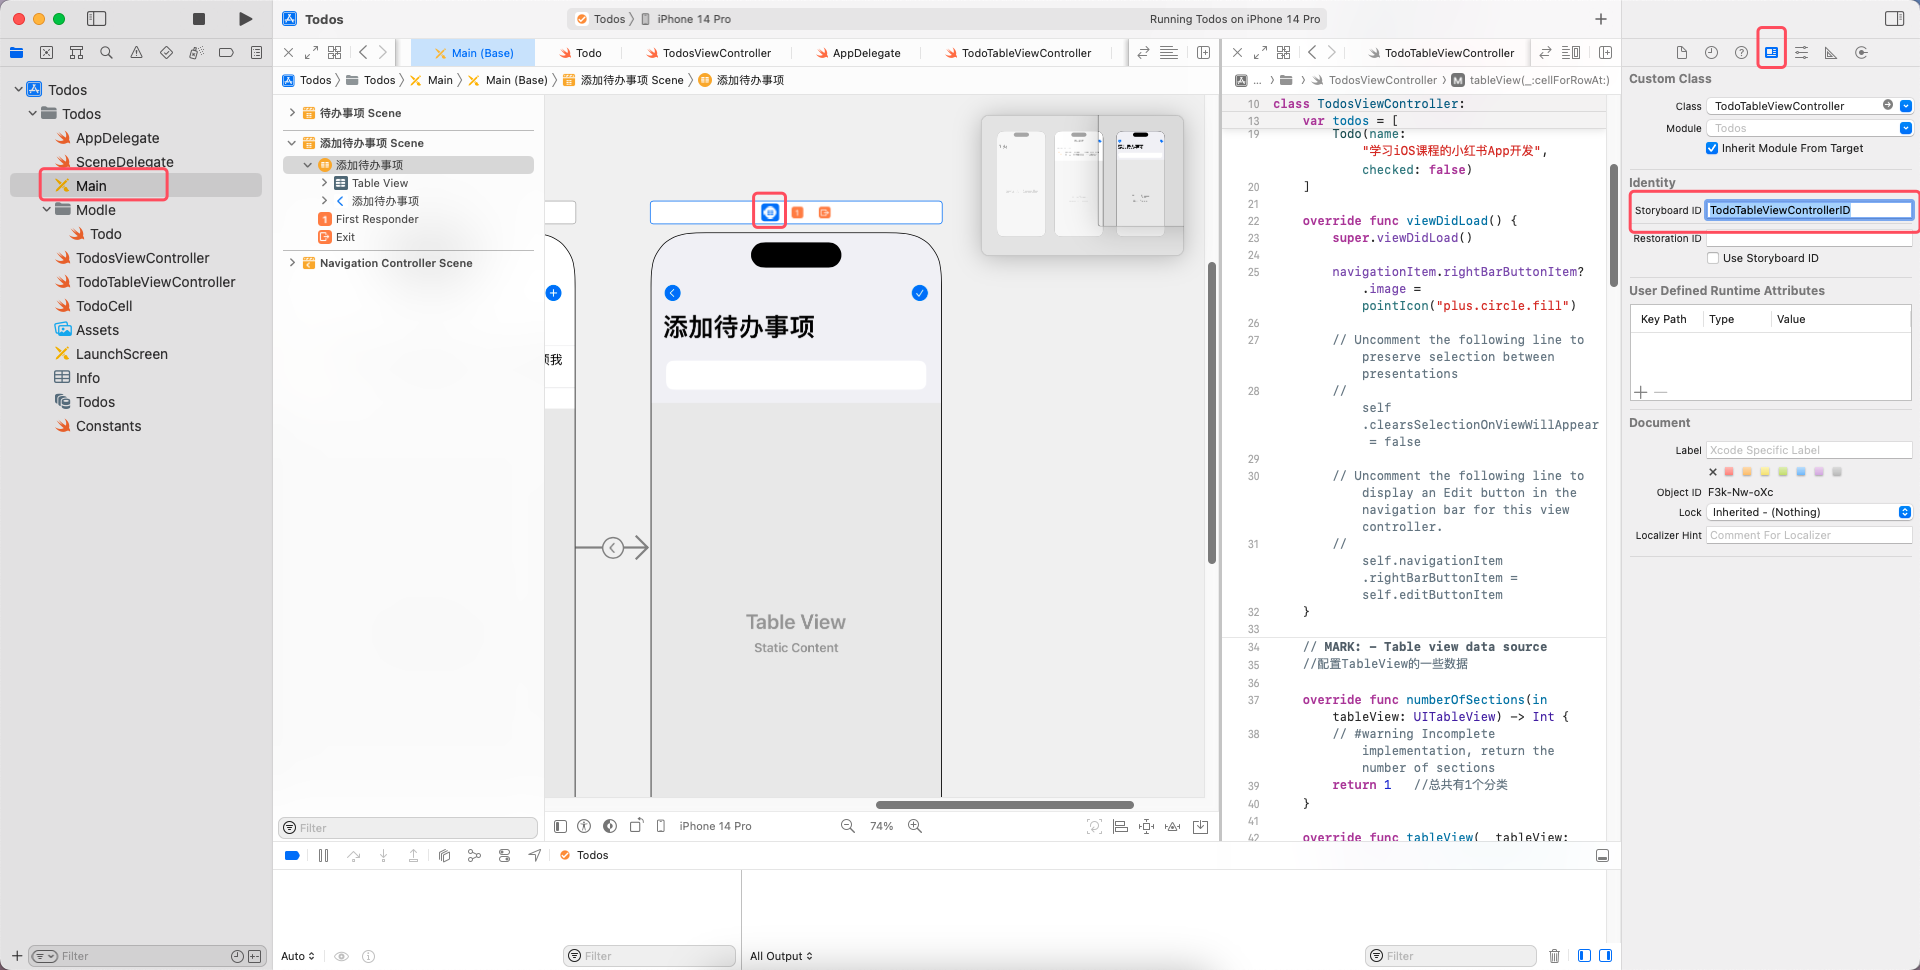
2.为新增页面取Storyboard ID为TodoTableViewControllerID.
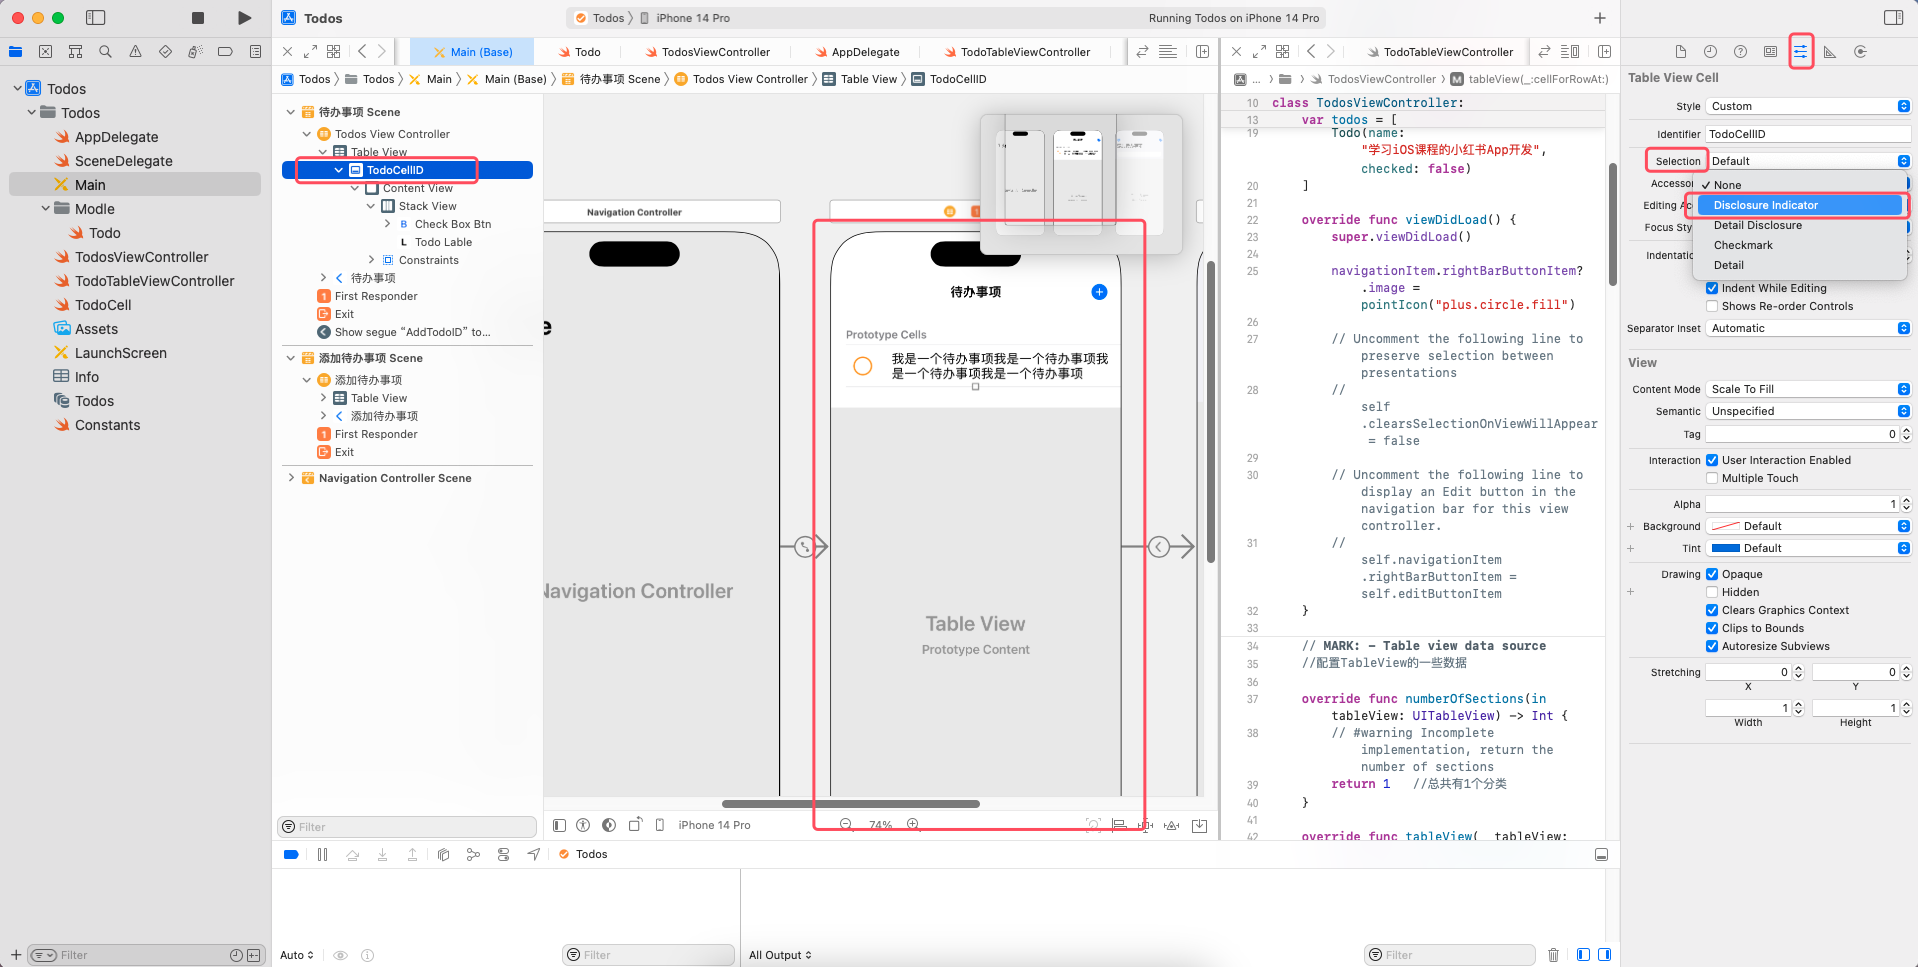
3.为列表最右边加一个小箭头.选中TodoCellID,将属性中的Selection修改为Disclosure Indicator.
4.将TodoCell,Ctrl加拖拽到新增页面.

点击第二个箭头.将他的ID取名为EditTodoID.

5.当用户通过点击想要修改的待办事项,进入编辑待办事项的界面时,把当前界面的标题改为"编辑待办事项".
TodoTableViewController:
import UIKit

protocol TodoTableViewControllerDelegate{
    func didAdd(name: String)
}

class TodoTableViewController: UITableViewController {

    var delegate: TodoTableViewControllerDelegate?
    var name: String?

    @IBOutlet weak var todoTextView: UITextView!

    override func viewDidLoad() {
        super.viewDidLoad()

        todoTextView.becomeFirstResponder()
        todoTextView.text = name

        if name != nil{
            navigationItem.title = "编辑待办事项"
        }

        navigationItem.leftBarButtonItem?.image = pointIcon("chevron.left.circle.fill")
        navigationItem.rightBarButtonItem?.image = pointIcon("checkmark.circle.fill")

    }

    @IBAction func back(_ sender: Any) {
        navigationController?.popViewController(animated: true)
    }

    @IBAction func done(_ sender: Any) {

        if !todoTextView.text.trimmingCharacters(in: .whitespacesAndNewlines).isEmpty{
            delegate?.didAdd(name: todoTextView.text)
        }

        navigationController?.popViewController(animated: true)
    }

}


extension TodoTableViewController: UITextViewDelegate{
    func textViewDidChange(_ textView: UITextView) {
        //将Table View重新布局
        tableView.performBatchUpdates {
            //不需要放任何东西就可以自动刷新布局
        }
    }
}
6.当修改需要编辑的待办事项后点击完成,返回主界面并完成修改.
反向传值将用户编辑过的待办事项传回首页对应栏.
Constants:
import Foundation
import UIKit

let kTodoCellID = "TodoCellID"
let kAddTodoID = "AddTodoID"
let kTodoTableViewControllerID = "TodoTableViewControllerID"
let kEditTodoID = "EditTodoID"

//将图标变大的方法
func pointIcon(_ iconName: String, _ pointSize: CGFloat = 22) -> UIImage{
    let config = UIImage.SymbolConfiguration(pointSize: pointSize)
    return UIImage(systemName:iconName, withConfiguration: config)!
}
TodoTableViewController:
import UIKit

protocol TodoTableViewControllerDelegate{
    func didAdd(name: String)
    func didEdit(name: String)
}


class TodoTableViewController: UITableViewController {

    var delegate: TodoTableViewControllerDelegate?
    var name: String?

    @IBOutlet weak var todoTextView: UITextView!

    override func viewDidLoad() {
        super.viewDidLoad()

        todoTextView.becomeFirstResponder()
        todoTextView.text = name

        if name != nil{
            navigationItem.title = "编辑待办事项"
        }

        navigationItem.leftBarButtonItem?.image = pointIcon("chevron.left.circle.fill")
        navigationItem.rightBarButtonItem?.image = pointIcon("checkmark.circle.fill")

    }

    @IBAction func back(_ sender: Any) {
        navigationController?.popViewController(animated: true)
    }

    @IBAction func done(_ sender: Any) {

        if !todoTextView.text.trimmingCharacters(in: .whitespacesAndNewlines).isEmpty{
            let name = todoTextView.text!
            //如果name不等于nil则编辑待办事项
            if self.name != nil{
                delegate?.didEdit(name: name)
            }else{
                //如果name为nil时说明用户在新增待办事项
                delegate?.didAdd(name: name)
            }

        }

        navigationController?.popViewController(animated: true)
    }

}


extension TodoTableViewController: UITextViewDelegate{
    func textViewDidChange(_ textView: UITextView) {
        //将Table View重新布局
        tableView.performBatchUpdates {
            //不需要放任何东西就可以自动刷新布局
        }
    }
}
TodosViewController:
import UIKit

class TodosViewController: UITableViewController {


    var todos = [
        Todo(name: "学习iOS课程的基础课", checked: false),
        Todo(name: "学习iOS课程的零基础赏月App开发", checked: true),
        Todo(name: "学习iOS课程的零基础木琴App开发", checked: false),
        Todo(name: "学习iOS课程的零基础和风天气App开发", checked: false),
        Todo(name: "学习iOS课程的零基础待办事项App开发", checked: false),
        Todo(name: "学习iOS课程的小红书App开发", checked: false)
    ]
    var row = 0

    override func viewDidLoad() {
        super.viewDidLoad()

        navigationItem.rightBarButtonItem?.image = pointIcon("plus.circle.fill")

        // Uncomment the following line to preserve selection between presentations
        // self.clearsSelectionOnViewWillAppear = false

        // Uncomment the following line to display an Edit button in the navigation bar for this view controller.
        // self.navigationItem.rightBarButtonItem = self.editButtonItem
    }

    // MARK: - Table view data source
    //配置TableView的一些数据

    override func numberOfSections(in tableView: UITableView) -> Int {
        // #warning Incomplete implementation, return the number of sections
        return 1   //总共有1个分类
    }

    override func tableView(_ tableView: UITableView, numberOfRowsInSection section: Int) -> Int {
        // #warning Incomplete implementation, return the number of rows
        return todos.count   //总共有10个待办事项
    }


    override func tableView(_ tableView: UITableView, cellForRowAt indexPath: IndexPath) -> UITableViewCell {  //此函数会根据上面两个函数(总共分类数和总共待办事项数)返回的内容多次执行
        let cell = tableView.dequeueReusableCell(withIdentifier: kTodoCellID , for: indexPath) as! TodoCell
        let checkBoxBtn = cell.checkBoxBtn!
        let todoLabel = cell.todoLable!
        let initSelected = todos[indexPath.row].checked

//        // Configure the cell...
//        //配置主标题的文本
//        var contentConfiguration = cell.defaultContentConfiguration()
//        contentConfiguration.text = "昵称"   //主标题
//        contentConfiguration.secondaryText = "个性签名"    //副标题
//        contentConfiguration.image = UIImage(systemName: "star")  //图片
//        cell.contentConfiguration = contentConfiguration


        checkBoxBtn.isSelected = initSelected  //将cell的是否被选中属性改为todos的当前行的checked属性
        todoLabel.text = todos[indexPath.row].name
        todoLabel.textColor = initSelected ? .tertiaryLabel : .label   //三元运算符.根据是否被选中进行判断,如果被选中的话变成浅色,未被选中就是原来的Lable Color.

        cell.checkBoxBtn.addAction(UIAction(handler: { action in
            self.todos[indexPath.row].checked.toggle()    //如果check原来是true,被点击之后就进行取反,变成false.
            let checked = self.todos[indexPath.row].checked
            checkBoxBtn.isSelected = checked
            todoLabel.textColor = checked ? .tertiaryLabel : .label

        }), for: .touchUpInside)
        return cell
    }

    //在用户选择cell之后进行跳转
    override func tableView(_ tableView: UITableView, didSelectRowAt indexPath: IndexPath) {
        //将点击效果修改为点击之后背景变灰色一闪而过
        tableView.deselectRow(at: indexPath, animated: true)
        //跳转到编辑页面(不重新设计界面,而是将新增页面进行修改复用.)
//        let vc = storyboard?.instantiateViewController(identifier: kTodoTableViewControllerID) as! TodoTableViewController //找到一个id为TodoTableViewController的ViewController
//
//        navigationController?.pushViewController(vc, animated: true)
    }

    /*
    // Override to support conditional editing of the table view.
    override func tableView(_ tableView: UITableView, canEditRowAt indexPath: IndexPath) -> Bool {
        // Return false if you do not want the specified item to be editable.
        return true
    }
    */

    /*
    // Override to support editing the table view.
    override func tableView(_ tableView: UITableView, commit editingStyle: UITableViewCell.EditingStyle, forRowAt indexPath: IndexPath) {
        if editingStyle == .delete {
            // Delete the row from the data source
            tableView.deleteRows(at: [indexPath], with: .fade)
        } else if editingStyle == .insert {
            // Create a new instance of the appropriate class, insert it into the array, and add a new row to the table view
        }
    }
    */
    //事件函数
    //当对每一行进行排序时需要调用的方法
    override func tableView(_ tableView: UITableView, moveRowAt fromIndexPath: IndexPath, to: IndexPath) {

    }


    /*
    // Override to support conditional rearranging of the table view.
    override func tableView(_ tableView: UITableView, canMoveRowAt indexPath: IndexPath) -> Bool {
        // Return false if you do not want the item to be re-orderable.
        return true
    }
    */


    // MARK: - Navigation

    // In a storyboard-based application, you will often want to do a little preparation before navigation
    override func prepare(for segue: UIStoryboardSegue, sender: Any?) {
        let vc = segue.destination as! TodoTableViewController
        vc.delegate = self
        if segue.identifier == kEditTodoID{
            //正向传值
            let cell = sender as! TodoCell
            vc.delegate = self
            //通过cell找indexPath
            row = tableView.indexPath(for: cell)!.row
            vc.name = todos[row].name
        }
    }


}

extension TodosViewController: TodoTableViewControllerDelegate{
    func didAdd(name: String){
        todos.append(Todo(name: name, checked: false))
        tableView.insertRows(at: [IndexPath(row: todos.count - 1, section: 0)], with: .automatic)

    }
    func didEdit(name: String) {
        todos[row].name = name

//        let indexPath = IndexPath(row: row, section: 0)
//        let cell = tableView.cellForRow(at: indexPath) as! TodoCell
//        cell.todoLable.text = todos[row].name
        tableView.reloadData()
    }
}
7.右滑删除
TodosViewController:
import UIKit

class TodosViewController: UITableViewController {


    var todos = [
        Todo(name: "学习iOS课程的基础课", checked: false),
        Todo(name: "学习iOS课程的零基础赏月App开发", checked: true),
        Todo(name: "学习iOS课程的零基础木琴App开发", checked: false),
        Todo(name: "学习iOS课程的零基础和风天气App开发", checked: false),
        Todo(name: "学习iOS课程的零基础待办事项App开发", checked: false),
        Todo(name: "学习iOS课程的小红书App开发", checked: false)
    ]
    var row = 0

    override func viewDidLoad() {
        super.viewDidLoad()

        navigationItem.rightBarButtonItem?.image = pointIcon("plus.circle.fill")

        // Uncomment the following line to preserve selection between presentations
        // self.clearsSelectionOnViewWillAppear = false

        // Uncomment the following line to display an Edit button in the navigation bar for this view controller.
        // self.navigationItem.rightBarButtonItem = self.editButtonItem
    }

    // MARK: - Table view data source
    //配置TableView的一些数据

    override func numberOfSections(in tableView: UITableView) -> Int {
        // #warning Incomplete implementation, return the number of sections
        return 1   //总共有1个分类
    }

    override func tableView(_ tableView: UITableView, numberOfRowsInSection section: Int) -> Int {
        // #warning Incomplete implementation, return the number of rows
        return todos.count   //总共有10个待办事项
    }


    override func tableView(_ tableView: UITableView, cellForRowAt indexPath: IndexPath) -> UITableViewCell {  //此函数会根据上面两个函数(总共分类数和总共待办事项数)返回的内容多次执行
        let cell = tableView.dequeueReusableCell(withIdentifier: kTodoCellID , for: indexPath) as! TodoCell
        let checkBoxBtn = cell.checkBoxBtn!
        let todoLabel = cell.todoLable!
        let initSelected = todos[indexPath.row].checked

//        // Configure the cell...
//        //配置主标题的文本
//        var contentConfiguration = cell.defaultContentConfiguration()
//        contentConfiguration.text = "昵称"   //主标题
//        contentConfiguration.secondaryText = "个性签名"    //副标题
//        contentConfiguration.image = UIImage(systemName: "star")  //图片
//        cell.contentConfiguration = contentConfiguration


        checkBoxBtn.isSelected = initSelected  //将cell的是否被选中属性改为todos的当前行的checked属性
        todoLabel.text = todos[indexPath.row].name
        todoLabel.textColor = initSelected ? .tertiaryLabel : .label   //三元运算符.根据是否被选中进行判断,如果被选中的话变成浅色,未被选中就是原来的Lable Color.

        cell.checkBoxBtn.addAction(UIAction(handler: { action in
            self.todos[indexPath.row].checked.toggle()    //如果check原来是true,被点击之后就进行取反,变成false.
            let checked = self.todos[indexPath.row].checked
            checkBoxBtn.isSelected = checked
            todoLabel.textColor = checked ? .tertiaryLabel : .label

        }), for: .touchUpInside)
        return cell
    }

    //在用户选择cell之后进行跳转
    override func tableView(_ tableView: UITableView, didSelectRowAt indexPath: IndexPath) {
        //将点击效果修改为点击之后背景变灰色一闪而过
        tableView.deselectRow(at: indexPath, animated: true)
        //跳转到编辑页面(不重新设计界面,而是将新增页面进行修改复用.)
//        let vc = storyboard?.instantiateViewController(identifier: kTodoTableViewControllerID) as! TodoTableViewController //找到一个id为TodoTableViewController的ViewController
//
//        navigationController?.pushViewController(vc, animated: true)
    }

    /*
    // Override to support conditional editing of the table view.
    override func tableView(_ tableView: UITableView, canEditRowAt indexPath: IndexPath) -> Bool {
        // Return false if you do not want the specified item to be editable.
        return true
    }
    */


    // 删除函数
    override func tableView(_ tableView: UITableView, commit editingStyle: UITableViewCell.EditingStyle, forRowAt indexPath: IndexPath) {
        if editingStyle == .delete {
            // 实现这个方法后即出现左滑删除框
            todos.remove(at: indexPath.row)
            //更新视图
            tableView.deleteRows(at: [indexPath], with: .fade)
        } else if editingStyle == .insert {
            // Create a new instance of the appropriate class, insert it into the array, and add a new row to the table view
        }
    }

    //事件函数
    //当对每一行进行排序时需要调用的方法
    override func tableView(_ tableView: UITableView, moveRowAt fromIndexPath: IndexPath, to: IndexPath) {

    }


    /*
    // Override to support conditional rearranging of the table view.
    override func tableView(_ tableView: UITableView, canMoveRowAt indexPath: IndexPath) -> Bool {
        // Return false if you do not want the item to be re-orderable.
        return true
    }
    */


    // MARK: - Navigation

    // In a storyboard-based application, you will often want to do a little preparation before navigation
    override func prepare(for segue: UIStoryboardSegue, sender: Any?) {
        let vc = segue.destination as! TodoTableViewController
        vc.delegate = self
        if segue.identifier == kEditTodoID{
            //正向传值
            let cell = sender as! TodoCell
            vc.delegate = self
            //通过cell找indexPath
            row = tableView.indexPath(for: cell)!.row
            vc.name = todos[row].name
        }
    }


}

extension TodosViewController: TodoTableViewControllerDelegate{
    func didAdd(name: String){
        todos.append(Todo(name: name, checked: false))
        tableView.insertRows(at: [IndexPath(row: todos.count - 1, section: 0)], with: .automatic)

    }
    func didEdit(name: String) {
        todos[row].name = name

//        let indexPath = IndexPath(row: row, section: 0)
//        let cell = tableView.cellForRow(at: indexPath) as! TodoCell
//        cell.todoLable.text = todos[row].name
        tableView.reloadData()
    }
}
启动测试:


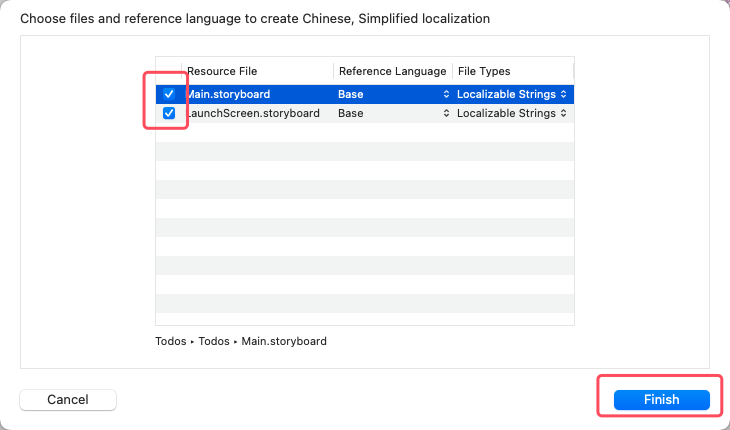
8.删除框本地化,随着用户所在的地区切换不同语言.如果在中国的话就英文改中文.
在项目中添加简体中文.

运行查看效果:

方法二:代码
    override func tableView(_ tableView: UITableView, titleForDeleteConfirmationButtonForRowAt indexPath: IndexPath) -> String? {
        return "点击以删除"
    }
9.整理TodosViewController的代码.新建TodosViewController-DataSource和TodosViewController-Delegate.
TodosViewController:
import UIKit

class TodosViewController: UITableViewController {


    var todos = [
        Todo(name: "学习iOS课程的基础课", checked: false),
        Todo(name: "学习iOS课程的零基础赏月App开发", checked: true),
        Todo(name: "学习iOS课程的零基础木琴App开发", checked: false),
        Todo(name: "学习iOS课程的零基础和风天气App开发", checked: false),
        Todo(name: "学习iOS课程的零基础待办事项App开发", checked: false),
        Todo(name: "学习iOS课程的小红书App开发", checked: false)
    ]
    var row = 0

    override func viewDidLoad() {
        super.viewDidLoad()

        navigationItem.rightBarButtonItem?.image = pointIcon("plus.circle.fill")

        // Uncomment the following line to preserve selection between presentations
        // self.clearsSelectionOnViewWillAppear = false

        // Uncomment the following line to display an Edit button in the navigation bar for this view controller.
        // self.navigationItem.rightBarButtonItem = self.editButtonItem
    }


    /*
    // Override to support conditional editing of the table view.
    override func tableView(_ tableView: UITableView, canEditRowAt indexPath: IndexPath) -> Bool {
        // Return false if you do not want the specified item to be editable.
        return true
    }
    */


    //事件函数
    //当对每一行进行排序时需要调用的方法
    override func tableView(_ tableView: UITableView, moveRowAt fromIndexPath: IndexPath, to: IndexPath) {

    }


    /*
    // Override to support conditional rearranging of the table view.
    override func tableView(_ tableView: UITableView, canMoveRowAt indexPath: IndexPath) -> Bool {
        // Return false if you do not want the item to be re-orderable.
        return true
    }
    */


    // MARK: - Navigation

    // In a storyboard-based application, you will often want to do a little preparation before navigation
    override func prepare(for segue: UIStoryboardSegue, sender: Any?) {
        let vc = segue.destination as! TodoTableViewController
        vc.delegate = self
        if segue.identifier == kEditTodoID{
            //正向传值
            let cell = sender as! TodoCell
            vc.delegate = self
            //通过cell找indexPath
            row = tableView.indexPath(for: cell)!.row
            vc.name = todos[row].name
        }
    }


}
TodosViewController-DataSource:
import Foundation
import UIKit

extension TodosViewController{
    // MARK: - Table view data source
    //配置TableView的一些数据

    override func numberOfSections(in tableView: UITableView) -> Int {
        // #warning Incomplete implementation, return the number of sections
        return 1   //总共有1个分类
    }

    override func tableView(_ tableView: UITableView, numberOfRowsInSection section: Int) -> Int {
        // #warning Incomplete implementation, return the number of rows
        return todos.count   //总共有10个待办事项
    }


    override func tableView(_ tableView: UITableView, cellForRowAt indexPath: IndexPath) -> UITableViewCell {  //此函数会根据上面两个函数(总共分类数和总共待办事项数)返回的内容多次执行
        let cell = tableView.dequeueReusableCell(withIdentifier: kTodoCellID , for: indexPath) as! TodoCell
        let checkBoxBtn = cell.checkBoxBtn!
        let todoLabel = cell.todoLable!
        let initSelected = todos[indexPath.row].checked

//        // Configure the cell...
//        //配置主标题的文本
//        var contentConfiguration = cell.defaultContentConfiguration()
//        contentConfiguration.text = "昵称"   //主标题
//        contentConfiguration.secondaryText = "个性签名"    //副标题
//        contentConfiguration.image = UIImage(systemName: "star")  //图片
//        cell.contentConfiguration = contentConfiguration


        checkBoxBtn.isSelected = initSelected  //将cell的是否被选中属性改为todos的当前行的checked属性
        todoLabel.text = todos[indexPath.row].name
        todoLabel.textColor = initSelected ? .tertiaryLabel : .label   //三元运算符.根据是否被选中进行判断,如果被选中的话变成浅色,未被选中就是原来的Lable Color.

        cell.checkBoxBtn.addAction(UIAction(handler: { action in
            self.todos[indexPath.row].checked.toggle()    //如果check原来是true,被点击之后就进行取反,变成false.
            let checked = self.todos[indexPath.row].checked
            checkBoxBtn.isSelected = checked
            todoLabel.textColor = checked ? .tertiaryLabel : .label

        }), for: .touchUpInside)
        return cell
    }


    // 删除函数
    override func tableView(_ tableView: UITableView, commit editingStyle: UITableViewCell.EditingStyle, forRowAt indexPath: IndexPath) {
        if editingStyle == .delete {
            // 实现这个方法后即出现左滑删除框
            todos.remove(at: indexPath.row)
            //更新视图
            tableView.deleteRows(at: [indexPath], with: .fade)
        } else if editingStyle == .insert {
            // Create a new instance of the appropriate class, insert it into the array, and add a new row to the table view
        }
    }
}
TodosViewController-Delegate:
import Foundation
import UIKit

extension TodosViewController{
    //在用户选择cell之后进行跳转
    override func tableView(_ tableView: UITableView, didSelectRowAt indexPath: IndexPath) {
        //将点击效果修改为点击之后背景变灰色一闪而过
        tableView.deselectRow(at: indexPath, animated: true)
        //跳转到编辑页面(不重新设计界面,而是将新增页面进行修改复用.)
//        let vc = storyboard?.instantiateViewController(identifier: kTodoTableViewControllerID) as! TodoTableViewController //找到一个id为TodoTableViewController的ViewController
//
//        navigationController?.pushViewController(vc, animated: true)
    }

    override func tableView(_ tableView: UITableView, titleForDeleteConfirmationButtonForRowAt indexPath: IndexPath) -> String? {
        return "点击以删除"
    }
}

extension TodosViewController: TodoTableViewControllerDelegate{
    func didAdd(name: String){
        todos.append(Todo(name: name, checked: false))
        tableView.insertRows(at: [IndexPath(row: todos.count - 1, section: 0)], with: .automatic)

    }
    func didEdit(name: String) {
        todos[row].name = name

//        let indexPath = IndexPath(row: row, section: 0)
//        let cell = tableView.cellForRow(at: indexPath) as! TodoCell
//        cell.todoLable.text = todos[row].name
        tableView.reloadData()
    }
}
10.制作编辑按钮,使item的左边展示编辑按钮.点击编辑按钮之后每个列表左边会出现删除按钮,右边会出现换顺序按钮.
TodosViewController:
import UIKit

class TodosViewController: UITableViewController {


    var todos = [
        Todo(name: "学习iOS课程的基础课", checked: false),
        Todo(name: "学习iOS课程的零基础赏月App开发", checked: true),
        Todo(name: "学习iOS课程的零基础木琴App开发", checked: false),
        Todo(name: "学习iOS课程的零基础和风天气App开发", checked: false),
        Todo(name: "学习iOS课程的零基础待办事项App开发", checked: false),
        Todo(name: "学习iOS课程的小红书App开发", checked: false)
    ]
    var row = 0

    override func viewDidLoad() {
        super.viewDidLoad()


        // Uncomment the following line to display an Edit button in the navigation bar for this view controller.
        navigationItem.leftBarButtonItem = editButtonItem //在item的左边展示编辑按钮.点击编辑按钮之后每个列表左边会出现删除按钮,右边会出现换顺序按钮.

        navigationItem.rightBarButtonItem?.image = pointIcon("plus.circle.fill")
    }


    /*
    // Override to support conditional editing of the table view.
    override func tableView(_ tableView: UITableView, canEditRowAt indexPath: IndexPath) -> Bool {
        // Return false if you do not want the specified item to be editable.
        return true
    }
    */


    //事件函数
    //当对每一行进行排序时需要调用的方法
    override func tableView(_ tableView: UITableView, moveRowAt fromIndexPath: IndexPath, to: IndexPath) {

    }


    /*
    // Override to support conditional rearranging of the table view.
    override func tableView(_ tableView: UITableView, canMoveRowAt indexPath: IndexPath) -> Bool {
        // Return false if you do not want the item to be re-orderable.
        return true
    }
    */


    // MARK: - Navigation

    // In a storyboard-based application, you will often want to do a little preparation before navigation
    override func prepare(for segue: UIStoryboardSegue, sender: Any?) {
        let vc = segue.destination as! TodoTableViewController
        vc.delegate = self
        if segue.identifier == kEditTodoID{
            //正向传值
            let cell = sender as! TodoCell
            vc.delegate = self
            //通过cell找indexPath
            row = tableView.indexPath(for: cell)!.row
            vc.name = todos[row].name
        }
    }


}
启动测试:


11.将"编辑"字样修改为编辑的图片.
TodosViewController:
import UIKit

class TodosViewController: UITableViewController {


    var todos = [
        Todo(name: "学习iOS课程的基础课", checked: false),
        Todo(name: "学习iOS课程的零基础赏月App开发", checked: true),
        Todo(name: "学习iOS课程的零基础木琴App开发", checked: false),
        Todo(name: "学习iOS课程的零基础和风天气App开发", checked: false),
        Todo(name: "学习iOS课程的零基础待办事项App开发", checked: false),
        Todo(name: "学习iOS课程的小红书App开发", checked: false)
    ]
    var row = 0

    override func viewDidLoad() {
        super.viewDidLoad()

        editButtonItem.image = pointIcon("arrow.up.arrow.down.circle.fill")
        // Uncomment the following line to display an Edit button in the navigation bar for this view controller.
        navigationItem.leftBarButtonItem = editButtonItem //在item的左边展示编辑按钮.点击编辑按钮之后每个列表左边会出现删除按钮,右边会出现换顺序按钮.

        navigationItem.rightBarButtonItem?.image = pointIcon("plus.circle.fill")
    }


    /*
    // Override to support conditional editing of the table view.
    override func tableView(_ tableView: UITableView, canEditRowAt indexPath: IndexPath) -> Bool {
        // Return false if you do not want the specified item to be editable.
        return true
    }
    */


    //事件函数
    //当对每一行进行排序时需要调用的方法
    override func tableView(_ tableView: UITableView, moveRowAt fromIndexPath: IndexPath, to: IndexPath) {

    }


    /*
    // Override to support conditional rearranging of the table view.
    override func tableView(_ tableView: UITableView, canMoveRowAt indexPath: IndexPath) -> Bool {
        // Return false if you do not want the item to be re-orderable.
        return true
    }
    */


    // MARK: - Navigation

    // In a storyboard-based application, you will often want to do a little preparation before navigation
    override func prepare(for segue: UIStoryboardSegue, sender: Any?) {
        let vc = segue.destination as! TodoTableViewController
        vc.delegate = self
        if segue.identifier == kEditTodoID{
            //正向传值
            let cell = sender as! TodoCell
            vc.delegate = self
            //通过cell找indexPath
            row = tableView.indexPath(for: cell)!.row
            vc.name = todos[row].name
        }
    }


}
将点击"编辑"之后的编辑按钮修改为"完成".
TodosViewController:
import UIKit

class TodosViewController: UITableViewController {


    var todos = [
        Todo(name: "学习iOS课程的基础课", checked: false),
        Todo(name: "学习iOS课程的零基础赏月App开发", checked: true),
        Todo(name: "学习iOS课程的零基础木琴App开发", checked: false),
        Todo(name: "学习iOS课程的零基础和风天气App开发", checked: false),
        Todo(name: "学习iOS课程的零基础待办事项App开发", checked: false),
        Todo(name: "学习iOS课程的小红书App开发", checked: false)
    ]
    var row = 0

    override func viewDidLoad() {
        super.viewDidLoad()
        //编辑按钮样式修改
        editButtonItem.image = pointIcon("arrow.up.arrow.down.circle.fill")
        navigationItem.leftBarButtonItem = editButtonItem //在item的左边展示编辑按钮.点击编辑按钮之后每个列表左边会出现删除按钮,右边会出现换顺序按钮.
        //加号按钮样式修改
        navigationItem.rightBarButtonItem?.image = pointIcon("plus.circle.fill")
    }

    //将点击"编辑"按钮之后的编辑按钮修改为"完成"按钮
    override func setEditing(_ editing: Bool, animated: Bool) {
        super.setEditing(editing, animated: animated)
        //当用户点击"编辑"时,isEditing变成true,此时需要将编辑按钮修改为完成按钮.
        if isEditing{
            editButtonItem.image = nil
            editButtonItem.title = "完成"
        }else{
            editButtonItem.title = nil
            editButtonItem.image = pointIcon("arrow.up.arrow.down.circle.fill")
        }
    }


    // MARK: - Navigation

    // In a storyboard-based application, you will often want to do a little preparation before navigation
    override func prepare(for segue: UIStoryboardSegue, sender: Any?) {
        let vc = segue.destination as! TodoTableViewController
        vc.delegate = self
        if segue.identifier == kEditTodoID{
            //正向传值
            let cell = sender as! TodoCell
            vc.delegate = self
            //通过cell找indexPath
            row = tableView.indexPath(for: cell)!.row
            vc.name = todos[row].name
        }
    }


}
12.使用函数编辑只是改变了前端UI.编辑代码使数组顺序发生变化.
TodosViewController-DataSource:
import Foundation
import UIKit

extension TodosViewController{
    // MARK: - Table view data source
    //配置TableView的一些数据

    override func numberOfSections(in tableView: UITableView) -> Int {
        // #warning Incomplete implementation, return the number of sections
        return 1   //总共有1个分类
    }

    override func tableView(_ tableView: UITableView, numberOfRowsInSection section: Int) -> Int {
        // #warning Incomplete implementation, return the number of rows
        return todos.count   //总共有10个待办事项
    }


    override func tableView(_ tableView: UITableView, cellForRowAt indexPath: IndexPath) -> UITableViewCell {  //此函数会根据上面两个函数(总共分类数和总共待办事项数)返回的内容多次执行
        let cell = tableView.dequeueReusableCell(withIdentifier: kTodoCellID , for: indexPath) as! TodoCell
        let checkBoxBtn = cell.checkBoxBtn!
        let todoLabel = cell.todoLable!
        let initSelected = todos[indexPath.row].checked

//        // Configure the cell...
//        //配置主标题的文本
//        var contentConfiguration = cell.defaultContentConfiguration()
//        contentConfiguration.text = "昵称"   //主标题
//        contentConfiguration.secondaryText = "个性签名"    //副标题
//        contentConfiguration.image = UIImage(systemName: "star")  //图片
//        cell.contentConfiguration = contentConfiguration


        checkBoxBtn.isSelected = initSelected  //将cell的是否被选中属性改为todos的当前行的checked属性
        todoLabel.text = todos[indexPath.row].name
        todoLabel.textColor = initSelected ? .tertiaryLabel : .label   //三元运算符.根据是否被选中进行判断,如果被选中的话变成浅色,未被选中就是原来的Lable Color.

        cell.checkBoxBtn.addAction(UIAction(handler: { action in
            self.todos[indexPath.row].checked.toggle()    //如果check原来是true,被点击之后就进行取反,变成false.
            let checked = self.todos[indexPath.row].checked
            checkBoxBtn.isSelected = checked
            todoLabel.textColor = checked ? .tertiaryLabel : .label

        }), for: .touchUpInside)
        return cell
    }


    // 删除函数
    override func tableView(_ tableView: UITableView, commit editingStyle: UITableViewCell.EditingStyle, forRowAt indexPath: IndexPath) {
        if editingStyle == .delete {
            // 实现这个方法后即出现左滑删除框
            todos.remove(at: indexPath.row)
            //更新视图
            tableView.deleteRows(at: [indexPath], with: .fade)
        } else if editingStyle == .insert {
            // Create a new instance of the appropriate class, insert it into the array, and add a new row to the table view
        }
    }

    //事件函数
    //当对每一行进行排序时需要调用的方法
    override func tableView(_ tableView: UITableView, moveRowAt fromIndexPath: IndexPath, to: IndexPath) {
        //在进行拖动后,对todos的文本内容进行重新排序.
        let todoToRemove = todos[fromIndexPath.row]
        todos.remove(at: fromIndexPath.row)
        todos.insert(todoToRemove, at: to.row)

    }

}
13.去除编辑状态下的删除功能.
TodosViewController-Delegate:
import Foundation
import UIKit

extension TodosViewController{
    //在用户选择cell之后进行跳转
    override func tableView(_ tableView: UITableView, didSelectRowAt indexPath: IndexPath) {
        //将点击效果修改为点击之后背景变灰色一闪而过
        tableView.deselectRow(at: indexPath, animated: true)
        //跳转到编辑页面(不重新设计界面,而是将新增页面进行修改复用.)
//        let vc = storyboard?.instantiateViewController(identifier: kTodoTableViewControllerID) as! TodoTableViewController //找到一个id为TodoTableViewController的ViewController
//
//        navigationController?.pushViewController(vc, animated: true)
    }

//    override func tableView(_ tableView: UITableView, titleForDeleteConfirmationButtonForRowAt indexPath: IndexPath) -> String? {
//        return "点击以删除"
//    }
    override func tableView(_ tableView: UITableView, editingStyleForRowAt indexPath: IndexPath) -> UITableViewCell.EditingStyle {
        //retuen了none之后编辑界面前面的删除标志会消失,但是还是会缩进一部分.所以还需要取消缩进.
        return .none
    }
}

extension TodosViewController: TodoTableViewControllerDelegate{
    func didAdd(name: String){
        todos.append(Todo(name: name, checked: false))
        tableView.insertRows(at: [IndexPath(row: todos.count - 1, section: 0)], with: .automatic)

    }
    func didEdit(name: String) {
        todos[row].name = name

//        let indexPath = IndexPath(row: row, section: 0)
//        let cell = tableView.cellForRow(at: indexPath) as! TodoCell
//        cell.todoLable.text = todos[row].name
        tableView.reloadData()
    }
}
retuen了none之后编辑界面前面的删除标志会消失,但是还是会缩进一部分.所以还需要取消缩进.
TodosViewController-Delegate:
import Foundation
import UIKit

extension TodosViewController{
    //在用户选择cell之后进行跳转
    override func tableView(_ tableView: UITableView, didSelectRowAt indexPath: IndexPath) {
        //将点击效果修改为点击之后背景变灰色一闪而过
        tableView.deselectRow(at: indexPath, animated: true)
        //跳转到编辑页面(不重新设计界面,而是将新增页面进行修改复用.)
//        let vc = storyboard?.instantiateViewController(identifier: kTodoTableViewControllerID) as! TodoTableViewController //找到一个id为TodoTableViewController的ViewController
//
//        navigationController?.pushViewController(vc, animated: true)
    }

//    override func tableView(_ tableView: UITableView, titleForDeleteConfirmationButtonForRowAt indexPath: IndexPath) -> String? {
//        return "点击以删除"
//    }
    override func tableView(_ tableView: UITableView, editingStyleForRowAt indexPath: IndexPath) -> UITableViewCell.EditingStyle {
        //retuen了none之后编辑界面前面的删除标志会消失,但是还是会缩进一部分.所以还需要取消缩进.
        return .none
    }
    //取消点击编辑后的缩进
    override func tableView(_ tableView: UITableView, shouldIndentWhileEditingRowAt indexPath: IndexPath) -> Bool {
        return false
    }
}

extension TodosViewController: TodoTableViewControllerDelegate{
    func didAdd(name: String){
        todos.append(Todo(name: name, checked: false))
        tableView.insertRows(at: [IndexPath(row: todos.count - 1, section: 0)], with: .automatic)

    }
    func didEdit(name: String) {
        todos[row].name = name

//        let indexPath = IndexPath(row: row, section: 0)
//        let cell = tableView.cellForRow(at: indexPath) as! TodoCell
//        cell.todoLable.text = todos[row].name
        tableView.reloadData()
    }
}
14.测试之后发现因为tableView(_ tableView: UITableView, editingStyleForRowAt indexPath: IndexPath) -> UITableViewCell.EditingStyle函数返回了一个.none,所以左滑删除功能没了.
TodosViewController-Delegate:
import Foundation
import UIKit

extension TodosViewController{
    //在用户选择cell之后进行跳转
    override func tableView(_ tableView: UITableView, didSelectRowAt indexPath: IndexPath) {
        //将点击效果修改为点击之后背景变灰色一闪而过
        tableView.deselectRow(at: indexPath, animated: true)
        //跳转到编辑页面(不重新设计界面,而是将新增页面进行修改复用.)
//        let vc = storyboard?.instantiateViewController(identifier: kTodoTableViewControllerID) as! TodoTableViewController //找到一个id为TodoTableViewController的ViewController
//
//        navigationController?.pushViewController(vc, animated: true)
    }

//    override func tableView(_ tableView: UITableView, titleForDeleteConfirmationButtonForRowAt indexPath: IndexPath) -> String? {
//        return "点击以删除"
//    }
    override func tableView(_ tableView: UITableView, editingStyleForRowAt indexPath: IndexPath) -> UITableViewCell.EditingStyle {
        if !isEditing{
            //如果没有被点击,没有进入编辑页面,则返回一个delete,使左滑删除功能正常使用
            return .delete
        }else{
            //如果已经被点击,则返回none.
            //retuen了none之后编辑界面前面的删除标志会消失,但是还是会缩进一部分.所以还需要取消缩进.
            return .none
        }
    }
    //取消点击编辑后的缩进
    override func tableView(_ tableView: UITableView, shouldIndentWhileEditingRowAt indexPath: IndexPath) -> Bool {
        return false
    }
}

extension TodosViewController: TodoTableViewControllerDelegate{
    func didAdd(name: String){
        todos.append(Todo(name: name, checked: false))
        tableView.insertRows(at: [IndexPath(row: todos.count - 1, section: 0)], with: .automatic)

    }
    func didEdit(name: String) {
        todos[row].name = name

//        let indexPath = IndexPath(row: row, section: 0)
//        let cell = tableView.cellForRow(at: indexPath) as! TodoCell
//        cell.todoLable.text = todos[row].name
        tableView.reloadData()
    }
}
15.测试之后发现点击编辑,进行移动待办事项之后,被移动的那个待办事项点击选择框一次,并没有被选择.第二次点击之后才被选择.
所以移动完之后需要手动更新视图防止数组顺序变化了但是视图没有发生变化.
TodosViewController-DataSource:
import Foundation
import UIKit

extension TodosViewController{
    // MARK: - Table view data source
    //配置TableView的一些数据

    override func numberOfSections(in tableView: UITableView) -> Int {
        // #warning Incomplete implementation, return the number of sections
        return 1   //总共有1个分类
    }

    override func tableView(_ tableView: UITableView, numberOfRowsInSection section: Int) -> Int {
        // #warning Incomplete implementation, return the number of rows
        return todos.count   //总共有10个待办事项
    }


    override func tableView(_ tableView: UITableView, cellForRowAt indexPath: IndexPath) -> UITableViewCell {  //此函数会根据上面两个函数(总共分类数和总共待办事项数)返回的内容多次执行
        let cell = tableView.dequeueReusableCell(withIdentifier: kTodoCellID , for: indexPath) as! TodoCell
        let checkBoxBtn = cell.checkBoxBtn!
        let todoLabel = cell.todoLable!
        let initSelected = todos[indexPath.row].checked

//        // Configure the cell...
//        //配置主标题的文本
//        var contentConfiguration = cell.defaultContentConfiguration()
//        contentConfiguration.text = "昵称"   //主标题
//        contentConfiguration.secondaryText = "个性签名"    //副标题
//        contentConfiguration.image = UIImage(systemName: "star")  //图片
//        cell.contentConfiguration = contentConfiguration


        checkBoxBtn.isSelected = initSelected  //将cell的是否被选中属性改为todos的当前行的checked属性
        todoLabel.text = todos[indexPath.row].name
        todoLabel.textColor = initSelected ? .tertiaryLabel : .label   //三元运算符.根据是否被选中进行判断,如果被选中的话变成浅色,未被选中就是原来的Lable Color.

        cell.checkBoxBtn.addAction(UIAction(handler: { action in
            self.todos[indexPath.row].checked.toggle()    //如果check原来是true,被点击之后就进行取反,变成false.
            let checked = self.todos[indexPath.row].checked
            checkBoxBtn.isSelected = checked
            todoLabel.textColor = checked ? .tertiaryLabel : .label

        }), for: .touchUpInside)
        return cell
    }


    // 删除函数
    override func tableView(_ tableView: UITableView, commit editingStyle: UITableViewCell.EditingStyle, forRowAt indexPath: IndexPath) {
        if editingStyle == .delete {
            // 实现这个方法后即出现左滑删除框
            todos.remove(at: indexPath.row)
            //更新视图
            tableView.deleteRows(at: [indexPath], with: .fade)
        } else if editingStyle == .insert {
            // Create a new instance of the appropriate class, insert it into the array, and add a new row to the table view
        }
    }

    //事件函数
    //当对每一行进行排序时需要调用的方法
    override func tableView(_ tableView: UITableView, moveRowAt fromIndexPath: IndexPath, to: IndexPath) {
        //在进行拖动后,对todos的文本内容进行重新排序.
        let todoToRemove = todos[fromIndexPath.row]
        todos.remove(at: fromIndexPath.row)
        todos.insert(todoToRemove, at: to.row)

        //移动完之后需要手动更新视图防止数组顺序变化了但是视图没有发生变化.
        tableView.reloadData()

    }

}
16.测试之后发现调用了两次addAction.所以添加一个判断:只有在非编辑状态下才给checkBoxButton添加点击事件.
TodosViewController-DataSource:
import Foundation
import UIKit

extension TodosViewController{
    // MARK: - Table view data source
    //配置TableView的一些数据

    override func numberOfSections(in tableView: UITableView) -> Int {
        // #warning Incomplete implementation, return the number of sections
        return 1   //总共有1个分类
    }

    override func tableView(_ tableView: UITableView, numberOfRowsInSection section: Int) -> Int {
        // #warning Incomplete implementation, return the number of rows
        return todos.count   //总共有10个待办事项
    }


    override func tableView(_ tableView: UITableView, cellForRowAt indexPath: IndexPath) -> UITableViewCell {  //此函数会根据上面两个函数(总共分类数和总共待办事项数)返回的内容多次执行
        let cell = tableView.dequeueReusableCell(withIdentifier: kTodoCellID , for: indexPath) as! TodoCell
        let checkBoxBtn = cell.checkBoxBtn!
        let todoLabel = cell.todoLable!
        let initSelected = todos[indexPath.row].checked

//        // Configure the cell...
//        //配置主标题的文本
//        var contentConfiguration = cell.defaultContentConfiguration()
//        contentConfiguration.text = "昵称"   //主标题
//        contentConfiguration.secondaryText = "个性签名"    //副标题
//        contentConfiguration.image = UIImage(systemName: "star")  //图片
//        cell.contentConfiguration = contentConfiguration


        checkBoxBtn.isSelected = initSelected  //将cell的是否被选中属性改为todos的当前行的checked属性
        todoLabel.text = todos[indexPath.row].name
        todoLabel.textColor = initSelected ? .tertiaryLabel : .label   //三元运算符.根据是否被选中进行判断,如果被选中的话变成浅色,未被选中就是原来的Lable Color.

        if !isEditing{   //只有在非编辑状态下才给checkBoxButton添加点击事件.
            cell.checkBoxBtn.addAction(UIAction(handler: { action in
                self.todos[indexPath.row].checked.toggle()    //如果check原来是true,被点击之后就进行取反,变成false.
                let checked = self.todos[indexPath.row].checked
                checkBoxBtn.isSelected = checked
                todoLabel.textColor = checked ? .tertiaryLabel : .label

            }), for: .touchUpInside)
        }
        return cell
    }


    // 删除函数
    override func tableView(_ tableView: UITableView, commit editingStyle: UITableViewCell.EditingStyle, forRowAt indexPath: IndexPath) {
        if editingStyle == .delete {
            // 实现这个方法后即出现左滑删除框
            todos.remove(at: indexPath.row)
            //更新视图
            tableView.deleteRows(at: [indexPath], with: .fade)
        } else if editingStyle == .insert {
            // Create a new instance of the appropriate class, insert it into the array, and add a new row to the table view
        }
    }

    //事件函数
    //当对每一行进行排序时需要调用的方法
    override func tableView(_ tableView: UITableView, moveRowAt fromIndexPath: IndexPath, to: IndexPath) {
        //在进行拖动后,对todos的文本内容进行重新排序.
        let todoToRemove = todos[fromIndexPath.row]
        todos.remove(at: fromIndexPath.row)
        todos.insert(todoToRemove, at: to.row)

        //移动完之后需要手动更新视图防止数组顺序变化了但是视图没有发生变化.
        tableView.reloadData()

    }

}
17.由于addAction可能有bug,所以使用addTarget替换addAction以减少逻辑复杂度及Bug.
TodosViewController-DataSource:
import Foundation
import UIKit

extension TodosViewController{
    // MARK: - Table view data source
    //配置TableView的一些数据

    override func numberOfSections(in tableView: UITableView) -> Int {
        // #warning Incomplete implementation, return the number of sections
        return 1   //总共有1个分类
    }

    override func tableView(_ tableView: UITableView, numberOfRowsInSection section: Int) -> Int {
        // #warning Incomplete implementation, return the number of rows
        return todos.count   //总共有10个待办事项
    }


    override func tableView(_ tableView: UITableView, cellForRowAt indexPath: IndexPath) -> UITableViewCell {  //此函数会根据上面两个函数(总共分类数和总共待办事项数)返回的内容多次执行
        let cell = tableView.dequeueReusableCell(withIdentifier: kTodoCellID , for: indexPath) as! TodoCell
        let checkBoxBtn = cell.checkBoxBtn!
        let todoLabel = cell.todoLable!
        let initSelected = todos[indexPath.row].checked

//        // Configure the cell...
//        //配置主标题的文本
//        var contentConfiguration = cell.defaultContentConfiguration()
//        contentConfiguration.text = "昵称"   //主标题
//        contentConfiguration.secondaryText = "个性签名"    //副标题
//        contentConfiguration.image = UIImage(systemName: "star")  //图片
//        cell.contentConfiguration = contentConfiguration


        checkBoxBtn.isSelected = initSelected  //将cell的是否被选中属性改为todos的当前行的checked属性
        todoLabel.text = todos[indexPath.row].name
        todoLabel.textColor = initSelected ? .tertiaryLabel : .label   //三元运算符.根据是否被选中进行判断,如果被选中的话变成浅色,未被选中就是原来的Lable Color.

//        if !isEditing{   //只有在非编辑状态下才给checkBoxButton添加点击事件.
//            cell.checkBoxBtn.addAction(UIAction(handler: { action in
//                self.todos[indexPath.row].checked.toggle()    //如果check原来是true,被点击之后就进行取反,变成false.
//                let checked = self.todos[indexPath.row].checked
//                checkBoxBtn.isSelected = checked
//                todoLabel.textColor = checked ? .tertiaryLabel : .label
//
//            }), for: .touchUpInside)
//        }
        checkBoxBtn.tag = indexPath.row
        checkBoxBtn.addTarget(self, action: #selector(toggleCheck), for: .touchUpInside)

        return cell
    }


    // 删除函数
    override func tableView(_ tableView: UITableView, commit editingStyle: UITableViewCell.EditingStyle, forRowAt indexPath: IndexPath) {
        if editingStyle == .delete {
            // 实现这个方法后即出现左滑删除框
            todos.remove(at: indexPath.row)
            //更新视图
            tableView.reloadData()
        } else if editingStyle == .insert {
            // Create a new instance of the appropriate class, insert it into the array, and add a new row to the table view
        }
    }

    //事件函数
    //当对每一行进行排序时需要调用的方法
    override func tableView(_ tableView: UITableView, moveRowAt fromIndexPath: IndexPath, to: IndexPath) {
        //在进行拖动后,对todos的文本内容进行重新排序.
        let todoToRemove = todos[fromIndexPath.row]
        todos.remove(at: fromIndexPath.row)
        todos.insert(todoToRemove, at: to.row)

        //移动完之后需要手动更新视图防止数组顺序变化了但是视图没有发生变化.
        tableView.reloadData()

    }

}

//监听函数
extension TodosViewController{
    @objc func toggleCheck(checkBoxBtn: UIButton){
        let row = checkBoxBtn.tag
        //修改数据
        todos[row].checked.toggle()    //如果check原来是true,被点击之后就进行取反,变成false.
        let checked = todos[row].checked
        checkBoxBtn.isSelected = checked
        let cell = tableView.cellForRow(at: IndexPath(row: row, section: 0)) as! TodoCell
        cell.todoLable.textColor = checked ? .tertiaryLabel : .label
    }
}
18.项目分析
不足:当用户对待办事项进行增,删,改,然后关闭程序,重新打开时,编辑的待办事项不会保留,而是重新加载了预设的数据.没有进行本地存储.
所以之后我们会进行本地存储的学习.