目录

前言
这个项目利用了网络开源平台Face++ API,并结合了Python网络爬虫技术,以实现自动化的流程,来帮助用户找到最适合他们的发型。具体步骤如下:
首先,项目利用Face++ API来分析用户的脸型特征。Face++是一项强大的人脸识别和分析工具,能够识别脸部轮廓、五官特征以及脸部的形状。通过这个API,项目可以准确地获取用户的脸型信息。
接着,项目结合了Python网络爬虫技术,自动爬取了匹配用户脸型的发型模板,这涉及到从互联网上的发型图片库中获取各种不同风格和长度的发型图片。
一旦项目获得了这些发型图片,它可以分析每个发型的特点,包括发型的长度、卷度、颜色等。然后,它将用户的脸型特征与这些发型特点进行比对,找到与用户脸型最匹配的发型模板。
最后,项目会将这些匹配的发型模板呈现给用户,作为造型参考。这些发型模板可以包括图片、描述和建议,以帮助用户更好地选择适合他们脸型和个人风格的发型。
总的来说,这个项目结合了人脸分析和网络爬虫技术,为用户提供了一个个性化的发型推荐系统。用户可以根据他们的脸型和偏好来寻找最适合的发型,从而更好地满足他们的美容需求。这种项目在美容和时尚领域具有广泛的应用潜力。
总体设计
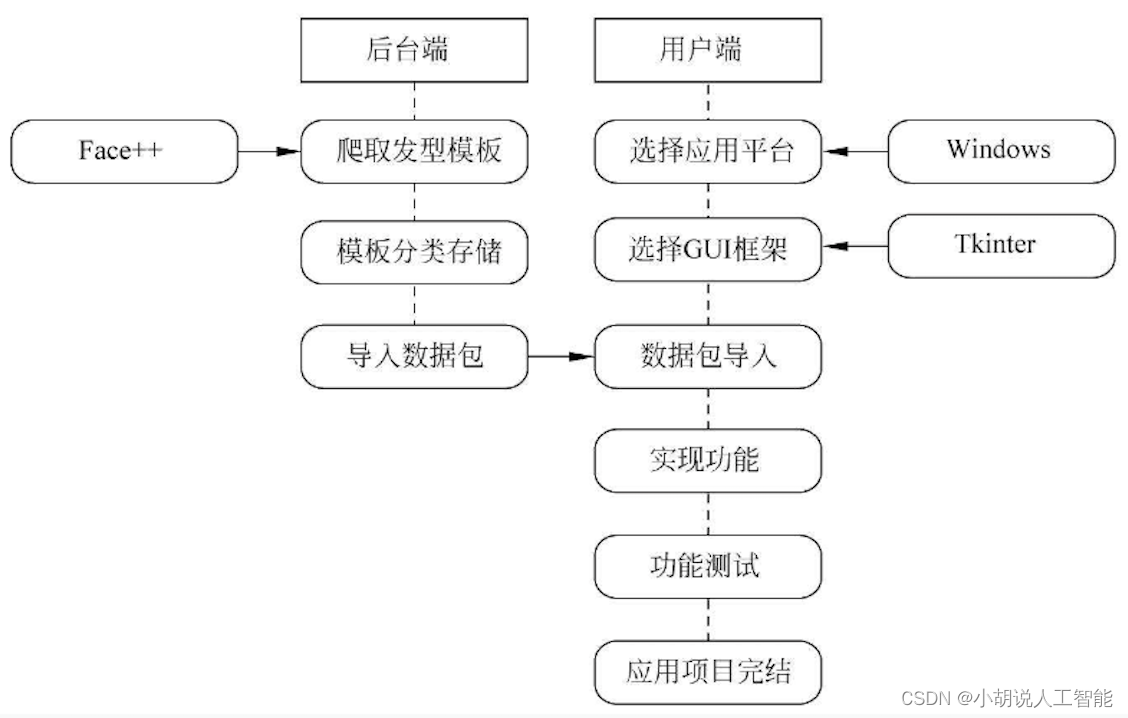
本部分包括系统整体结构图和系统流程图。
系统整体结构图
系统整体结构如图所示。
系统流程图
系统流程如图所示。
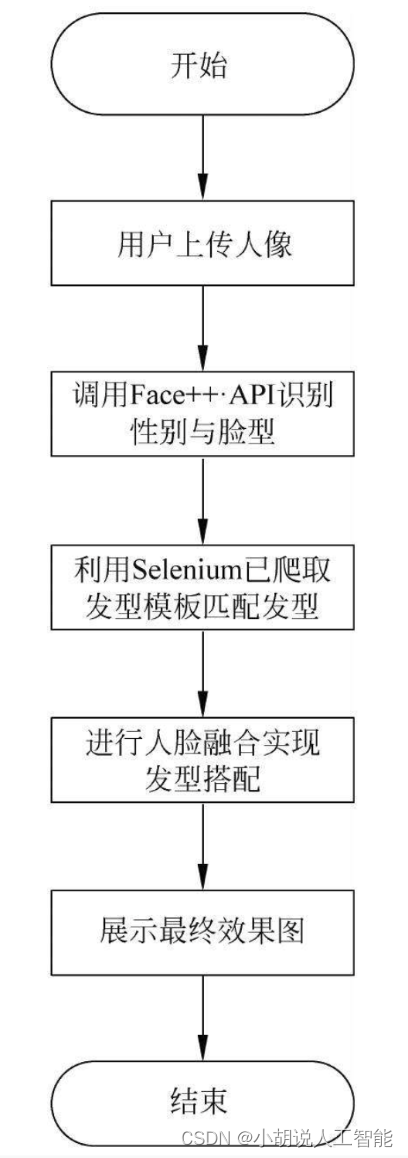
用户流程如图所示。
运行环境
本部分包括 Python 环境和Pycharm环境。
Python环境
需要Python 3.6及以上配置,在Windows环境下推荐下载Anaconda完成Python所需环境的配置,下载地址为https://www.anaconda.com/,也可下载虚拟机在Linux环境下运行代码。
鼠标右击“我的电脑”,单击“属性”,选择高级系统设置。单击“环境变量”,找到系统变量中的Path,单击“编辑”然后新建,将Python解释器所在路径粘贴并确定。
Pycharm 环境
PyCharm下载地址为http://www.jetbrains.com/pycharm/download/#section=windows,进入网站后单击Comminity版本下的DOWNLOAD下载安装包,下载完成后安装。单击Create New Project创建新的项目文件,Location为存放工程的路径,单击project附近的三角符号,可以看到PyCharm已经自动获取Python 3.6,单击create完成。
模块实现
本项目包括4个模块: Face++ . API调用、数据爬取、模型构建、用户界面设计,下面分别给出各模块的功能介绍及相关代码。
1. Face++.APl调用
本部分包括Face++ . API介绍和调用API具体实现。
1)Face++.APl介绍
Face++ . API可检测并定位图片中的人脸,返回高精度的人脸框坐标。只要注册便可获取试用版的API Key,方便调用。
- Detect API
调用URL https://api-cn.faceplusplus.com/facepp/v3/detect,检测图片内的所有人脸,对于每张检测出的人脸,给出其唯一标识face_token, 可用于后续分析、比对等操作。
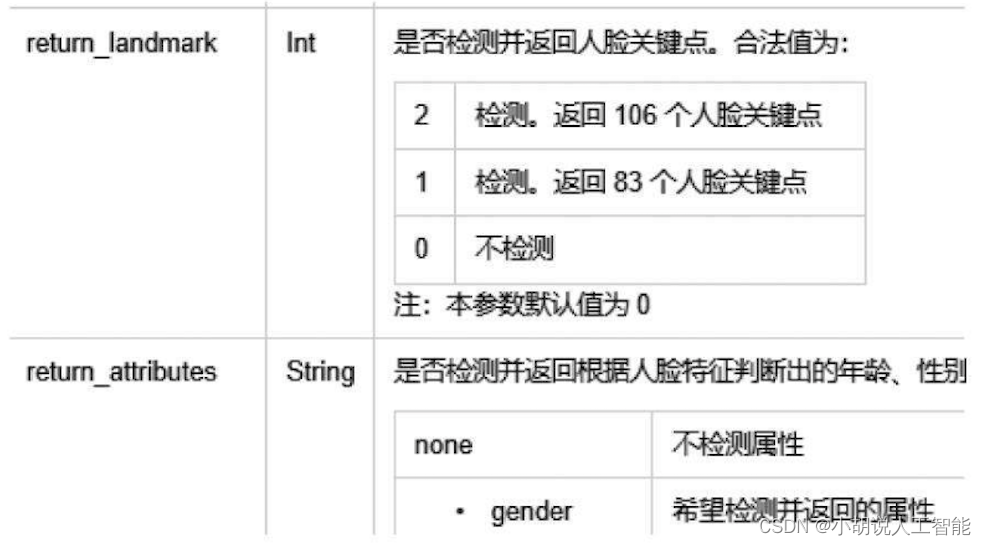
该API支持对检测到的人脸直接分析,获得关键点和各类属性信息。对于试用API Key,只对人脸框面积最大的5个人脸进行分析,其他可以使用Face Analyze API进行。
本文使用API Key为试用版Key,对于正式的API Key,支持指定图片的某一区域进行检测并分析所有检测到的人脸。
此接口用于识别人脸106个关键点信息,判断用户性别,如图所示。
- 面部特征分析
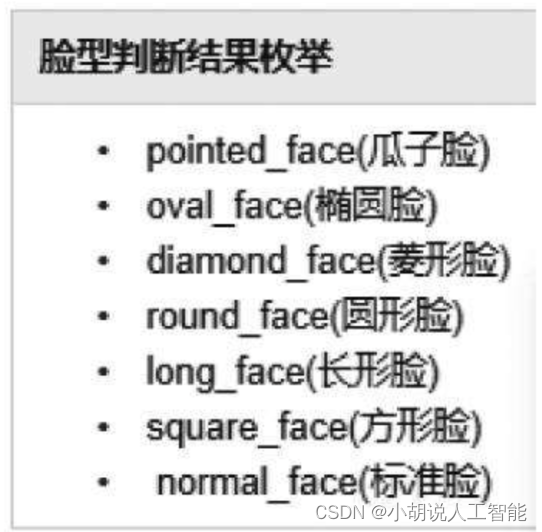
调用URL https://api-cn.faceplusplus.com/facepp/v1/facialfeatures,根据单张正面人脸图片,分析面部特征。此接口用于判断脸型,为用户推荐发型,如图所示。
- 人脸融合
调用URL https://api-cn.faceplusplus.com/imagepp/v1/mergeface,使用API,可以对模板图和图中的人脸进行融合操作。融合后的图片中包含人脸特征、模板图中的其他外貌特征与内容。返回值是一段JSON, 包含融合完成后图片的Base64编码。
2)调用API
相关步骤如下:
- 原理
Face++人工智能开放平台API是HTTP API。使用者向Face++服务器发起请求,并加上合适参数,服务器会对请求进行处理,得到结果返回给使用者。
- 鉴权
账号下每创建一个应用就会生成一组对应的api key和api secret, 用以识别用户是否有权调用API,所有的API调用必须提供对应的api key和api secret参数。
- 需要调用的库文件
相关代码如下:
#导入相应库文件
import requests
from json import JSONDecoder
import urllib.error
import base64
import os
import time
- 性别检测函数
相关代码如下:
#用户性别,参数为图片路径
def detect_gender(filepath):
#URL
    http_url1 = 'https://api-cn.faceplusplus.com/facepp/v3/detect'
#账号密码
    key = "CNsZZXKA4M2qzlz8lKw5ML0BRSitwHfW"
    secret = "c8udJa_mDz_KIRAhrvxV9w5PbrrVtTM0"
#数据提交
    data1= {

    'api_key': key, 'api_secret': secret, 'return_attributes': "gender"}
    files1 = {

    "image_file": open(filepath, "rb")}
#数据获取
    response1 = requests.post(http_url1, data=data1, files=files1)
#数据进行utf-8编译后解码处理
    req_con1 = response1.content.decode('utf-8')
    req_dict1 = JSONDecoder().decode(req_con1)
#网络状态
#判断获取到的数据是否为正确数据
    if response1.status_code == requests.codes.ok:
#提取正确数据的性别相关内容
        sex = req_dict1["faces"][0]['attributes']['gender']['value']
        print(req_dict1["faces"][0]['attributes']['gender']['value'])
        return sex
    else:
#数据错误则打印性别识别失败,返回空值
        print('faile to detect_gender')
        return None
- 脸型检测函数
相关代码如下:
#用户脸型
def detect_face_type(filepath):
    http_url2 = 'https://api-cn.faceplusplus.com/facepp/v1/facialfeatures'
    key = "CNsZZXKA4M2qzlz8lKw5ML0BRSitwHfW"
    secret = "c8udJa_mDz_KIRAhrvxV9w5PbrrVtTM0"
    data2 = {

    'api_key': key, 'api_secret': secret}
    files2 = {

    "image_file": open(filepath, "rb")}
    response2 = requests.post(http_url2, data=data2, files=files2)
    req_con2 = response2.content.decode('utf-8')
    req_dict2 = JSONDecoder().decode(req_con2)
    if response2.status_code == requests.codes.ok:
#提取正确数据的脸型相关内容
        face_type = req_dict2["result"]["face"]["face_type"]
        print(req_dict2["result"]["face"]["face_type"])
        return face_type
    else:
#数据错误则打印脸型识别失败,返回空值
        print('faile to detect_face_type')
        return None
- 人脸融合主函数
相关代码如下:
#识别人脸关键点信息
def find_face(imgpath):
    http_url1 = 'https://api-cn.faceplusplus.com/facepp/v3/detect'
    key = "CNsZZXKA4M2qzlz8lKw5ML0BRSitwHfW"
    secret = "c8udJa_mDz_KIRAhrvxV9w5PbrrVtTM0"
#"return_landmark": 2表示获取106个人脸关键点信息
    data1 = {

    'api_key': key, 'api_secret': secret, "return_landmark": 2}
#判断路径图片是否存在
    if os.path.isfile(imgpath)==False:
         return None
    files = {

    "image_file": open(imgpath, "rb")}
    response1 = requests.post(http_url1, data=data1, files=files)
    req_con1 = response1.content.decode('utf-8')
    req_dict1 = JSONDecoder().decode(req_con1)
    if response1.status_code == requests.codes.ok:
#获取人脸关键点信息
        face_rectangle = req_dict1["faces"][0]['face_rectangle']
        return face_rectangle
    else:
        print('faile to find_face')
    #number表示换脸的相似度
    #将上述关键点信息调用,实现人脸融合
#参数为用户人像路径、模型发型路径、生成效果图路径
#number表示人脸融合相似度范围为0~100
def merge_face(image_url_1, image_url_2, image_url, number):
    ff1 = find_face(image_url_1)
    ff2 = find_face(image_url_2)
    if ff1 and ff2:
        rectangle1 = str(str(ff1['top']) + "," + str(ff1['left']) + "," + str(ff1['width']) + "," + str(ff1['height']))
        rectangle2 = str(ff2['top']) + "," + str(ff2['left']) + "," + str(ff2['width']) + "," + str(ff2['height'])
        url_add = "https://api-cn.faceplusplus.com/imagepp/v1/mergeface"
        f1 = open(image_url_1, 'rb')
        f1_64 = base64.b64encode(f1.read())
        f1.close()
        f2 = open(image_url_2, 'rb')
        f2_64 = base64.b64encode(f2.read())
        f2.close()
        data = {

    "api_key": "CNsZZXKA4M2qzlz8lKw5ML0BRSitwHfW", "api_secret": "c8udJa_mDz_KIRAhrvxV9w5PbrrVtTM0",
                "template_base64": f1_64, "template_rectangle": rectangle1,
                "merge_base64": f2_64, "merge_rectangle": rectangle2, "merge_rate": number}
        response = requests.post(url_add, data=data)
        req_con = response.content.decode('utf-8')
        req_dict = JSONDecoder().decode(req_con)
        #判断网络状态
        if response.status_code == requests.codes.ok:
            result = req_dict['result']
            imgdata = base64.b64decode(result)
            file = open(image_url, 'wb')
#图片保存到相应路径
            file.write(imgdata)
            file.close()
        else:
            print('faile to merge_face')
            return None
2. 数据爬取
本部分包括网络数据爬取步骤和爬虫具体实现。
1)网络数据爬取步骤
通过Selenium+Chrome无头浏览器形式自动滚动爬取网络图片。通过Face++性别识别与脸型检测筛选出用发型模板。图片自动存储指定位置并按性别、脸型序号形式命名。
2)爬虫实现
本部分包括引入库文件、爬虫初始化。
#引入库文件
from selenium import webdriver
import urllib.request
import re
import requests
from json import JSONDecoder
import urllib.error
import base64
import time
from selenium.webdriver.chrome.options import Options
#爬虫初始化,浏览器初始化并模拟滚动条向下滚动
word ="男生发型"
#创建一个参数对象,用来控制chrome以无界面模式打开
chrome_options = Options()
chrome_options.add_argument('--headless')
chrome_options.add_argument('--disable-gpu')
#驱动路径
path = r'C:\Users\ZBLi\Desktop\1801\day05\ziliao\chromedriver.exe'
#创建浏览器对象
browser = webdriver.Chrome(executable_path="C:\Program Files (x86)\Google\chromedriver.exe", chrome_options=chrome_options)
#参数添加
browser.maximize_window()  #最大化
#地址加入关键词实现网址获取
browser.get('http://image.baidu.com/search/index?tn=baiduimage&ps=1&ct=201326592&lm=-1&cl=2&nc=1&ie=utf-8&word='+word)
js = 'var action=document.documentElement.scrollTop=10001'
#设置滚动条距离顶部的位置为 10000, 超过10000就是最底部
for i in range(5):#共执行5次脚本 实现滑轮向下滚动5次
   browser.execute_script(js)  #执行脚本
   time.sleep(2)  #休眠2s
#读取源代码
data=browser.page_source
#爬虫
k = re.split(r'\s+',data)
s = []
sp = []
#进行正则表达式匹配
for i in k :
    if re.match(r'data-objurl=',i) :
        if re.match(r'.*?jpg"', i)or re.match(r'.*?png"', i):
            s.append(i)
for it in s :
    if (re.match(r'.*?png"',it) or re.match(r'.*?jpg"',it) ):
        sp.append(it)
#将匹配到的多余部分进行删减精准定位URL信息
for it in sp:
    m = re.search(r'data-objurl="(.*?)"',it)
    iturl =m.group(1)
    #url
    print(iturl)
    itdata = None
#避免出现数据读取过慢而导致超时问题
#如果规定时间内无法识别则跳过并睡眠0.1s
    try:
        itdata = urllib.request.urlopen(iturl,data=None,timeout=1).read()
    except:
        time.sleep(0.1)
#itdata为爬取图片的URL
    if itdata==None:
        continue
图片分类存储,采用Face++ 爬取图片的性别与脸型信息并存储(存储图片类型共分为14种:两种性别、七种脸型),以瓜子脸为例 ,相关代码如下:
#判断脸型是否存在并将其导入变量
if (detect_face_type(itdata) and detect_gender(itdata)):
    sex = detect_gender(itdata)
    face_type = detect_face_type(itdata)
     #瓜子脸
#判断脸型与性别,符合则存储至相应位置并重命名为Male_ pointed_faceNUM
    if sex == 'Male' and face_type == 'pointed_face':
#存储到指定区域并分类别命名
        f = open('E:\BeautifulPicture\\' + sex + '_' + face_type + str(Male_pointed_num) + '.jpg', "wb")
#序号逐渐增加代表每一种脸型的总数不断增加
        Male_pointed_num += 1
        f.write(itdata)
        f.close()
    if sex == 'Female' and face_type == 'pointed_face':
        f = open('E:\BeautifulPicture\\' + sex + '_' + face_type + str(Female_pointed_num) + '.jpg', "wb")
        Female_pointed_num += 1
        f.write(itdata)
        f.close()
#最后退出终止浏览器
browser.execute_script(js)
browser.quit()
3. 模型构建
本部分包括库函数调用、模拟用户面部图片并设定路径、人脸融合。
库函数调用,相关代码如下:
#调用相应库实现功能
#-*- coding: utf-8 -*-
import requests
from json import JSONDecoder
import urllib.error
import base64
import os
import time
#模拟用户面部图片并设定路径,后面GUI调试将变为可视化打开图片形式
filepath = r"E:/new/Female_oval_face9.jpg"
sex = detect_gender(filepath)
face_type = detect_face_type(filepath)
#人脸融合-核心函数core()
#以瓜子脸为例,假设模板最多25种发型推荐
number = 25
Male_pointed_num = 1
Female_pointed_num = 1
if sex == 'Male' and face_type == 'pointed_face':
#i从1~25进行循环
    for i in range(number):
#判断是否存在该图片路径,存在则进行人脸融合
        if os.path.isfile(r"E:\app\picture\Male_pointed_face" + str(Male_pointed_num) + ".jpg"):
        exm=r"E:\app\picture\Male_pointed_face" + str(Male_pointed_num)+".jpg"
            result = r"E:\app\picture1\\" + str(Male_pointed_num) + ".jpg"
#人脸融合更加真实,设定相似度为90/100
            merge_face(exm, filepath, result, 90)
#成功则进行下一部分循环
            Male_pointed_num += 1
            print("人脸融合成功")
#女性瓜子脸效果同上
#Female_pointed_face(瓜子脸)
if sex == 'Female' and face_type == 'pointed_face':
    for i in range(number):
#每次循环计数加一判断发型模板是否存在,存在则进行人脸融合
        if os.path.isfile(r"E:\app\picture\Female_pointed_face" + str(Female_pointed_num) + ".jpg"):
            exm = r"E:\app\picture\Female_pointed_face" + str(Female_pointed_num) + ".jpg"
            result = r"E:\app\picture1\\" + str(Female_pointed_num) + ".jpg"
            merge_face(exm, filepath, result, 90)
            Female_pointed_num += 1
            print("人脸融合成功")
4. 用户界面设计
该设计采用Python自带的Tkinter作为用户操作GUI,同时引入PI便于图片操作。界面设计分三个阶段:
- ①用户可视化选择文件所在目录,并确定;
- ②判断是否可以找到合适的发型图片,如果可以则继续,否则退出;
- ③找到合适的图片进行人脸融合,待所有融合成功后,展示用户脸型与推荐发型,多种效果图供用户选择。
相关代码如下:
1)需要调用的库文件
相关代码如下:
#-*- coding:utf-8 -*-
from tkinter import *
from PIL import Image,ImageTk
from tkinter.filedialog import askopenfilename
import requests
from json import JSONDecoder
import urllib.error
import base64
import os
2)读取用户人脸图片位置
相关代码如下:
#获取可视化打开的文件路径
def getpathfile():
    root = Tk()
#GUI界面图标设置
root.iconbitmap(r'e:\app\ling.ico')
    width = 500
    height = 500
#界面居中显示
    screenwidth = root.winfo_screenwidth()
    screenheight = root.winfo_screenheight()
    alignstr = '%dx%d+%d+%d' % (width, height, (screenwidth - width) / 2, (screenheight - height) / 2)
    root.geometry(alignstr)
    def choosepic():
        global filepath
        path_ = askopenfilename()
        path.set(path_)
       img_open=Image.open(file_entry.get()).resize((350,400),Image.ANTIALIAS)
        img = ImageTk.PhotoImage(img_open)
        image_label.config(image=img)
        image_label.image = img
        filepath = path_
    path = StringVar()
    Button(root, text='选择图片',font=('Arial', 15),bg="yellow",command=choosepic).pack()
    Button(root, text='ok',font=('Arial', 15), command=root.destroy).pack()
    file_entry = Entry(root, state='readonly', text=path)
    image_label = Label(root)
    image_label.pack()
    root.mainloop()
3)判断用户人脸图片是否能成功识别函数
相关代码如下:
#用户人脸图片识别成功显示GUI界面
def yes():
     root = Tk()
#GUI界面图标设置
root.iconbitmap(r'e:\app\ling.ico')
    width = 500
    height = 100
#界面居中显示
    screenwidth = root.winfo_screenwidth()
    screenheight = root.winfo_screenheight()
    alignstr = '%dx%d+%d+%d' % (width, height, (screenwidth - width) / 2, (screenheight - height) / 2)
    root.geometry(alignstr)
    root.title('识别成功')
    #text = StringVar()
    #text.set("已为您搜索"+str(num)+"种合适的发型。。。")
    Label(root, text='识别成功,请稍后', font=('Arial', 20)).pack()
    Button(root, text='继续', command=root.destroy).pack()
    #Label(root, textvariable=text, font=('Arial', 20)).pack()
    root.mainloop()
#用户人脸图片识别失败显示GUI界面
def no():
    root = Tk()
#GUI界面图标设置
root.iconbitmap(r'e:\app\ling.ico')
    width = 500
    height = 100
    screenwidth = root.winfo_screenwidth()
    screenheight = root.winfo_screenheight()
    alignstr = '%dx%d+%d+%d' % (width, height, (screenwidth - width) / 2, (screenheight - height) / 2)
    root.geometry(alignstr)
    root.title('识别失败')
    Label(root, text='识别失败,建议您重新选择合适图片!',font=('Arial', 20)).pack()
    Button(root, text='结束', command=root.destroy).pack()
    #Button(root, text='返回上一步', command=getpathfile).pack()
    frm = Frame(root).pack()
    root.mainloop()
4)最终效果图展示函数
相关代码如下:
def show(sex,face_type):
    root1 = Tk()
#GUI界面图标设置
root1.iconbitmap(r'e:\app\ling.ico')
     #设置窗口居中
    width = 500
    height = 500
#界面居中显示
    screenwidth = root1.winfo_screenwidth()
    screenheight = root1.winfo_screenheight()
    alignstr = '%dx%d+%d+%d' % (width, height, (screenwidth - width) / 2, (screenheight - height) / 2)
    root1.geometry(alignstr)
    root1.title('效果展示')
#实现动态参数替换
#即每次改变图片,编号实时更新
    text = StringVar()
    image_label = Label(root1)
     #默认展示第一张图片
    pilImage_pre1 = Image.open(r"E:\app\picture1\\" + str(cou) + ".jpg")
    pilImage1 = pilImage_pre1.resize((350, 400), Image.ANTIALIAS)
    tkImage1 = ImageTk.PhotoImage(image=pilImage1)
    image_label.config(image=tkImage1)
    image_label.image = tkImage1
    root1.update_idletasks()  #更新图片,必须update
text.set(str(cou) + "/" + str(num))#更新图片编号
#下一张功能实现
    def change_next():
        global cou
#cou为当前展示图片编号
#num为用户搜索到的所有图片数量
        if cou<num:
            cou = cou + 1
            pilImage_pre = Image.open(r"E:\app\picture1\\" + str(cou) + ".jpg")
            pilImage = pilImage_pre.resize((350, 400), Image.ANTIALIAS)
            tkImage = ImageTk.PhotoImage(image=pilImage)
            image_label.config(image=tkImage)
            image_label.image = tkImage  #保持参考点
            root1.update_idletasks()  #更新图片,必须update
            text.set(str(cou)+"/"+str(num)) #更新图片编号
else:
#达到下限
            print("error")
#上一张功能实现
def change_prior():
        global cou
        if cou > 1:
            cou = cou - 1
            pilImage_pre = Image.open(r"E:\app\picture1\\" + str(cou) + ".jpg")
            pilImage = pilImage_pre.resize((350, 400), Image.ANTIALIAS)
            tkImage = ImageTk.PhotoImage(image=pilImage)
            image_label.config(image=tkImage)
            image_label.image = tkImage  #保持参考点
            root1.update_idletasks()  #更新图片,必须update
            text.set(str(cou)+"/"+str(num)) #更新图片编号
        else:  #达到上限
            print("error")
    Button(root1, text='下一张', command=change_next).pack(side=RIGHT)
    Button(root1, text='上一张', command=change_prior).pack(side=LEFT)
    #Label(root1, text="您的脸型为"+face_type, font=('Arial', 20)).pack(side=TOP)
    if face_type=="long_face":
    Label(root1, text="您的脸型为长脸" , font=('Arial', 20)).pack(side=TOP)
       if sex == "Female":
          Label(root1, text="长脸的你适合俏皮花苞头、蝴蝶结的发箍配上梨花头", font=('Arial', 15)).pack(side=TOP)
       if sex == "Male":
          Label(root1, text="长脸的你适合中分刘海的顺直短发发型", font=('Arial', 15)).pack(side=TOP)
Label(root1, text="生产发型已为您自动保存到E\APP\picture1 文件夹", font=('Arial', 10)).pack(side=BOTTOM)
    Label(root1, textvariable=text, font=('Arial', 20)).pack(side=BOTTOM)
    Frame(root1).pack()
    image_label.pack()
    root1.mainloop()
5)模块拼接
将之前提到的用户体验模型(core ()函数)与所有函数界面连接。
def main():
#得到图片路径
    getpathfile()
    print(filepath)
#得到用户性别与脸型
    sex = detect_gender(filepath)
    print(sex)
    face_type = detect_face_type(filepath)
    print(face_type)
#判断是否可以进行发型推荐
    if (sex and face_type):
#继续
        yes()
        print("yes")
    else:
#失败提示
        no()
        print("no")
#传递脸型与性别进行人脸融合
    core(sex,face_type)
#num变量作为全局参数记录所有推荐发型总和
    print("共" + str(num) + "张图片可供选择")
#推荐发型数量大于0则进行展示
    if num > 0:
        show(sex, face_type)
    else:
        print("查找失败")
6)应用打包
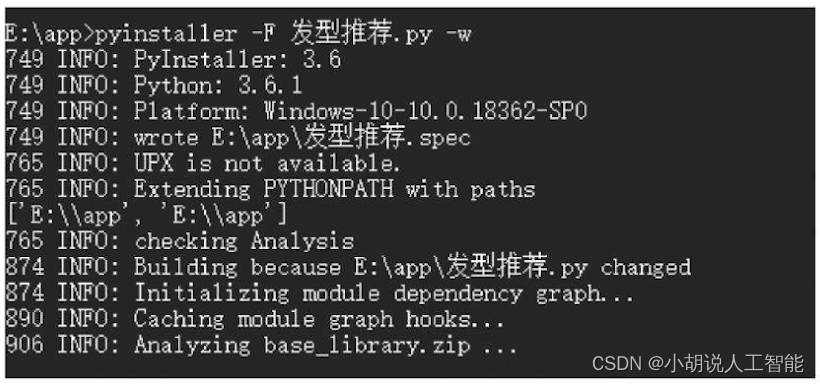
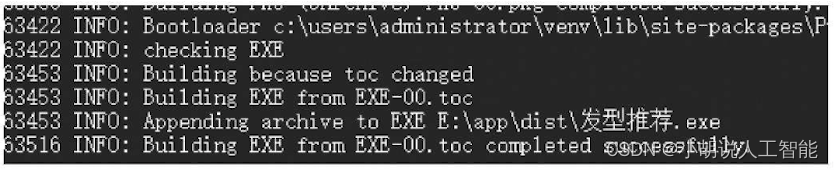
使用pyinstaller将程序打包成可执行的.exe文件,将.py文件转换应用命令pyinstaller -F 文件名.py (-w) 。-w代表不显示控制台,如下两图所示。
系统测试
本部分包括测试效果和用户界面。
1. 测试效果
本部分包括控制台效果和融合效果。
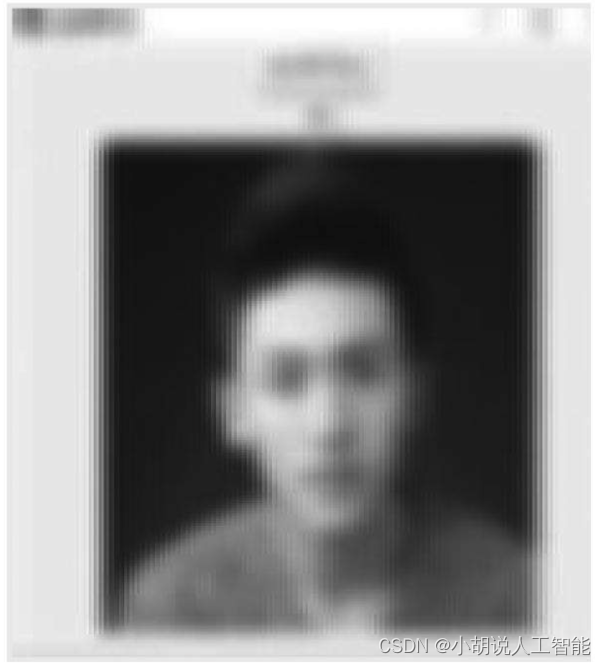
1)控制台效果
输出用户性别与脸型判断是否可以融合,如图所示。
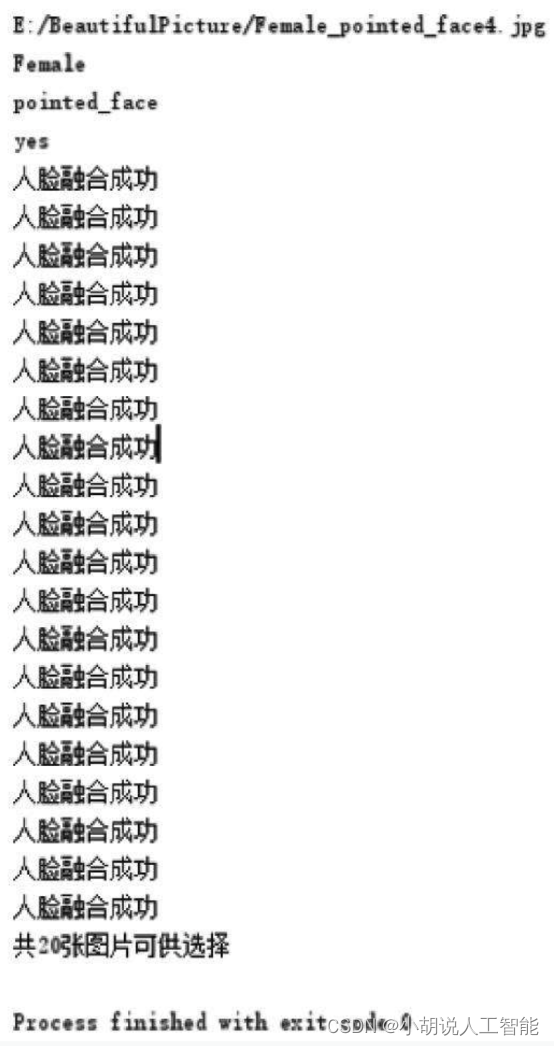
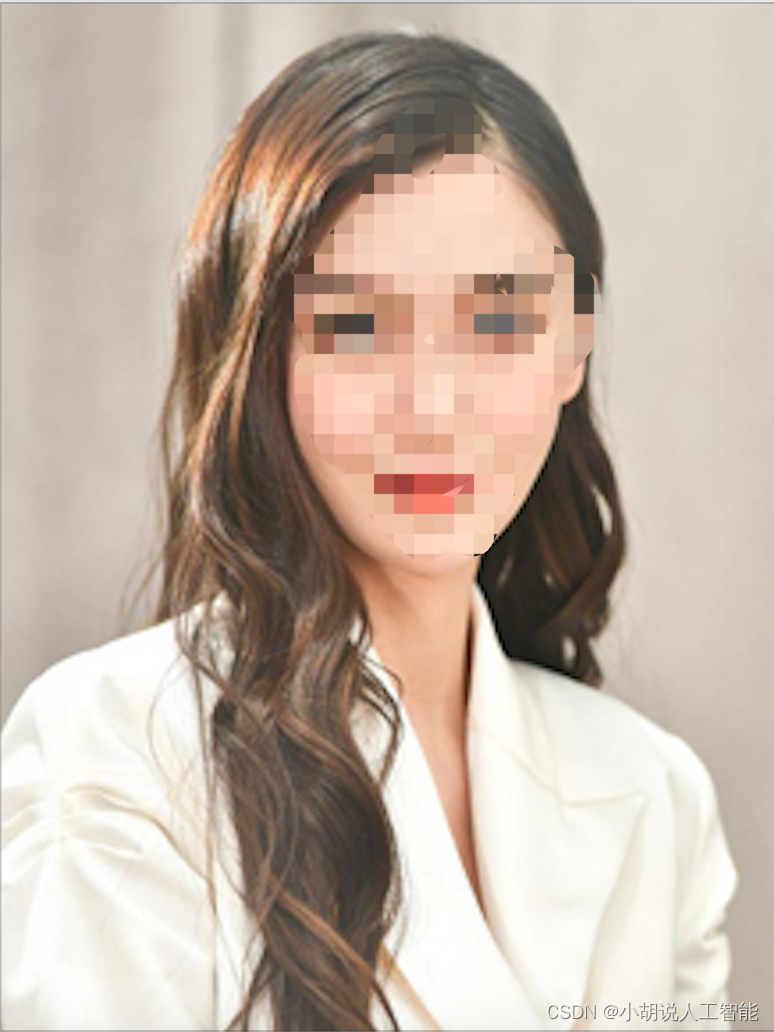
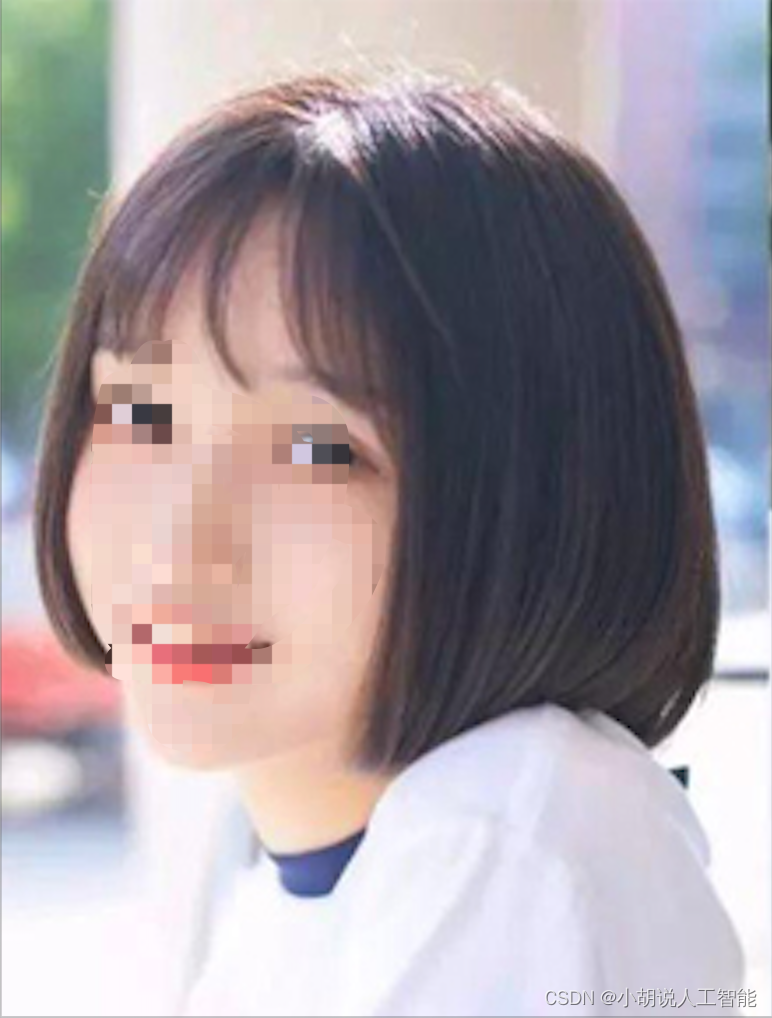
2)融合效果
图1为换脸原图,换脸完成,选取如图2作为样例。有着较为理想的换脸效果,并给出了具有可行性的发型建议。
2. 用户界面
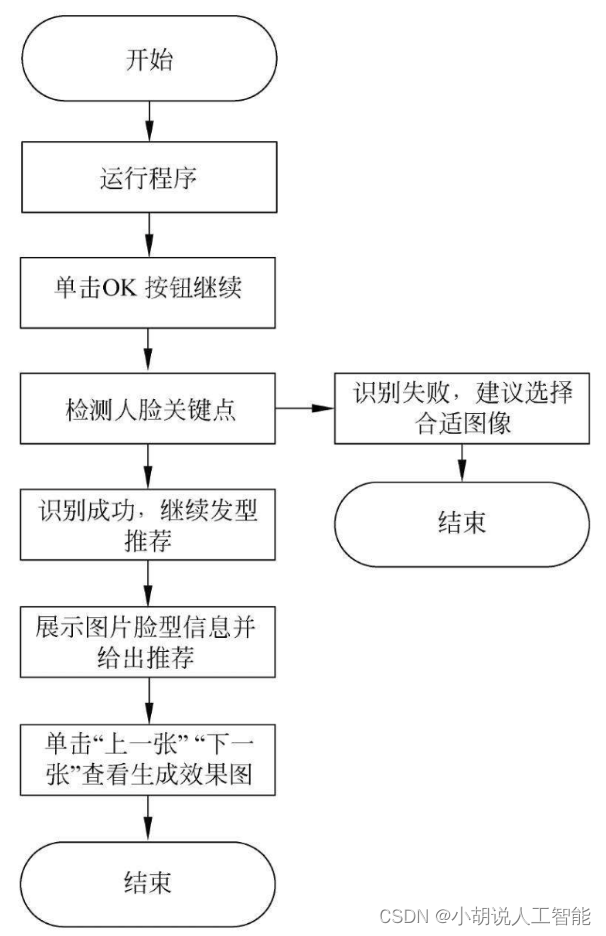
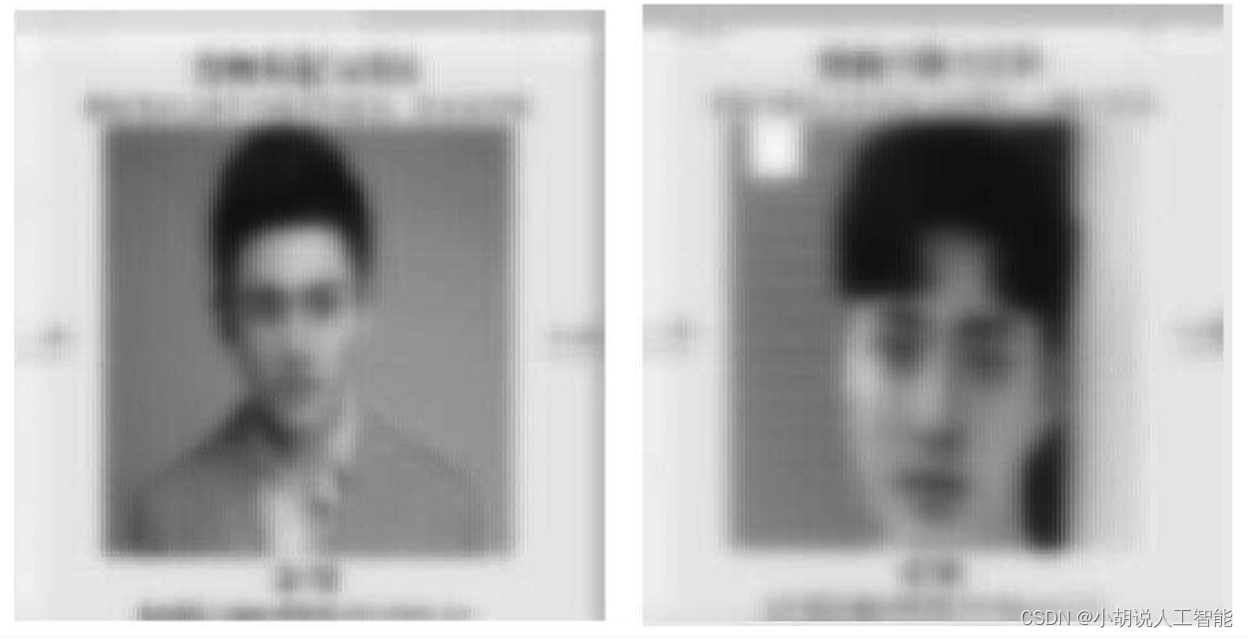
将压缩包直接解压,打开/dist文件夹,运行发型推荐.exe文件,如图所示。
单击ok按钮会显示如图所示,给出推荐发型样式以及保存图片。
工程源代码下载
其它资料下载
如果大家想继续了解人工智能相关学习路线和知识体系,欢迎大家翻阅我的另外一篇博客《重磅 | 完备的人工智能AI 学习——基础知识学习路线,所有资料免关注免套路直接网盘下载》
这篇博客参考了Github知名开源平台,AI技术平台以及相关领域专家:Datawhale,ApacheCN,AI有道和黄海广博士等约有近100G相关资料,希望能帮助到所有小伙伴们。