在x86_64架构+VMware16.2.3 Pro+openEuler20.3-LTS上快速部署(一键安装)openGauss 3.1.1企业版数据库指导手册
以下所用命令的使用参考openGauss学习中常用的linux和数据库命令
0. 前言
openGauss是关系型数据库,采用客户端/服务器,单进程多线程架构,支持单机和一主多备部署方式,备机可读,支持双机高可用和读扩展。但openGauss 部署对于进一步学习带来了困难。通过学习并参考整理一份快速部署指导手册,以方便大家进一步学习与提高。
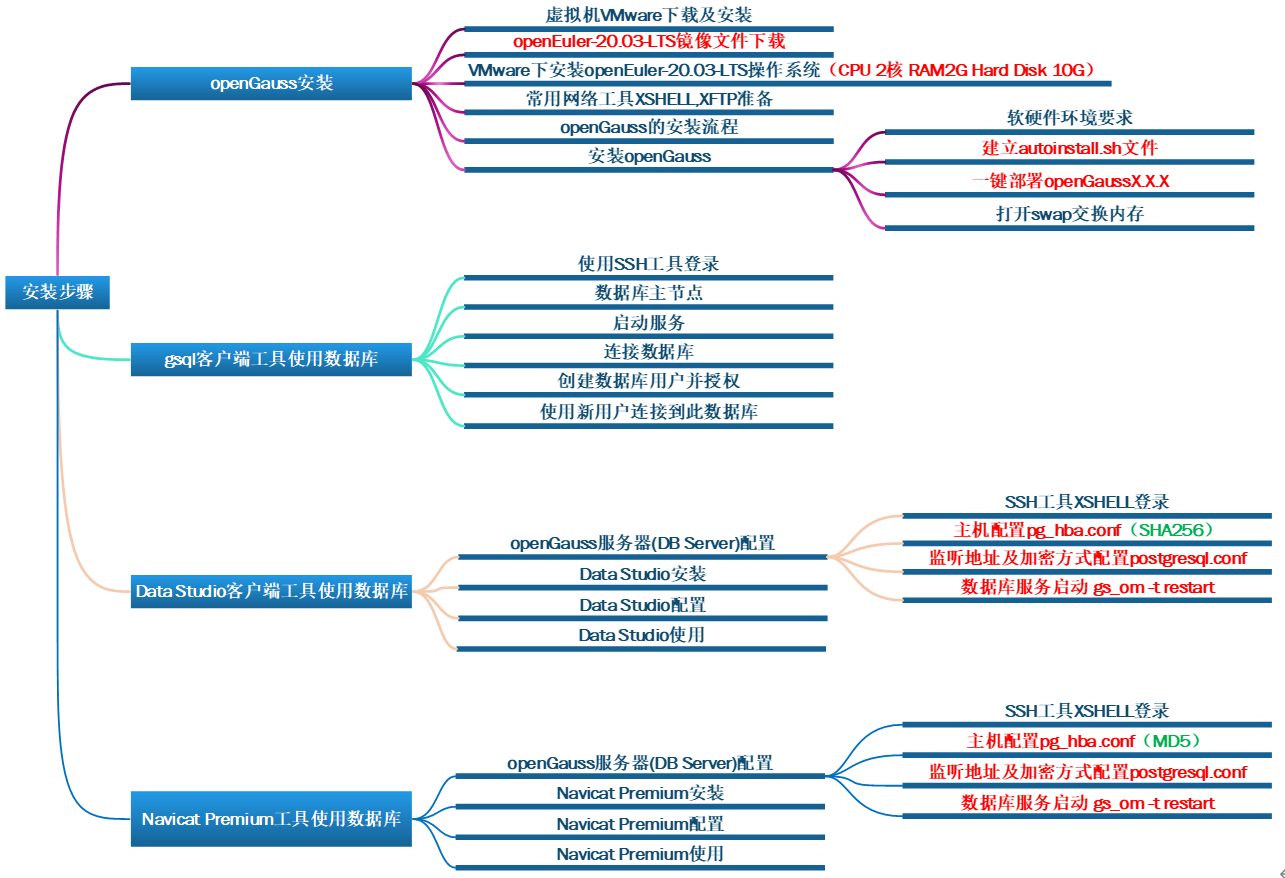
1. openGauss企业版数据库安装
1.1~1.6请参考在 x86_64 架构 + VMware16.2.3 Pro+openEuler20.3-LTS 上安装部署 openGauss 3.1.1 企业版数据库指导手册之一 --openGauss 3.1.1 企业版安装对应的1.1~1.6部分。
1.7 openGauss的安装
步骤1、软硬件环境要求。
(1)硬件环境要求
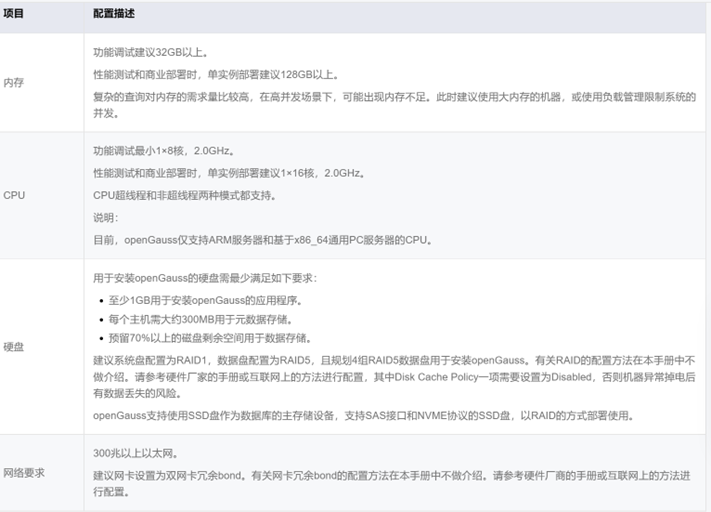
(2)软件环境要求

●openEuler-20.03-LTS操作系统
为了操作方便,可以使用SSH工具(比如:XSHELL或PuTTY等)从本地电脑通过配置ens33网卡的IP地址(如:192.168.138.152)来连接虚拟机,并使用ROOT用户来登录。Xshell工具中通过uname -r查看系统内核版本,通过cat /etc/os-release查看openEuler版本信息,执行“hostname”确认服务器用户名(本案例为host1),执行“ip addr”确认IP地址(本案例为192.168.138.152)。
[root@host1 ~]# cat /etc/os-release
NAME="openEuler"
VERSION="20.03 (LTS)"
ID="openEuler"
VERSION_ID="20.03"
PRETTY_NAME="openEuler 20.03 (LTS)"
ANSI_COLOR="0;31"
[root@host1 ~]# uname -r
4.19.90-2003.4.0.0036.oe1.x86_64
[root@host1 ~]# hostname
host1
[root@host1 ~]# ip addr
1: lo: <LOOPBACK,UP,LOWER_UP> mtu 65536 qdisc noqueue state UNKNOWN group default qlen 1000
  …….
2: ens33: <BROADCAST,MULTICAST,UP,LOWER_UP> mtu 1500 qdisc fq_codel state UP group default qlen 1000
    link/ether 00:0c:29:69:41:4b brd ff:ff:ff:ff:ff:ff
    inet 192.168.138.152/24 brd 192.168.138.255 scope global dynamic noprefixroute ens33
       valid_lft 1556sec preferred_lft 1556sec
    inet6 fe80::511c:27eb:97cd:4298/64 scope link noprefixroute
       valid_lft forever preferred_lft forever
………
[root@host1 ~]# ifconfig
ens33: flags=4163<UP,BROADCAST,RUNNING,MULTICAST>  mtu 1500
        inet 192.168.138.152  netmask 255.255.255.0  broadcast 192.168.138.255
        inet6 fe80::511c:27eb:97cd:4298  prefixlen 64  scopeid 0x20<link>
       …………
lo: flags=73<UP,LOOPBACK,RUNNING>  mtu 65536
        inet 127.0.0.1  netmask 255.0.0.0
        inet6 ::1  prefixlen 128  scopeid 0x10<host>
        loop  txqueuelen 1000  (Local Loopback)
        RX packets 0  bytes 0 (0.0 B)
步骤2、建立autoinstall.sh文件。
用Vi在/root目录下建立autoinstall.sh文件
首先下载autoinstall.sh,然后在windows下用记事本打开如下。
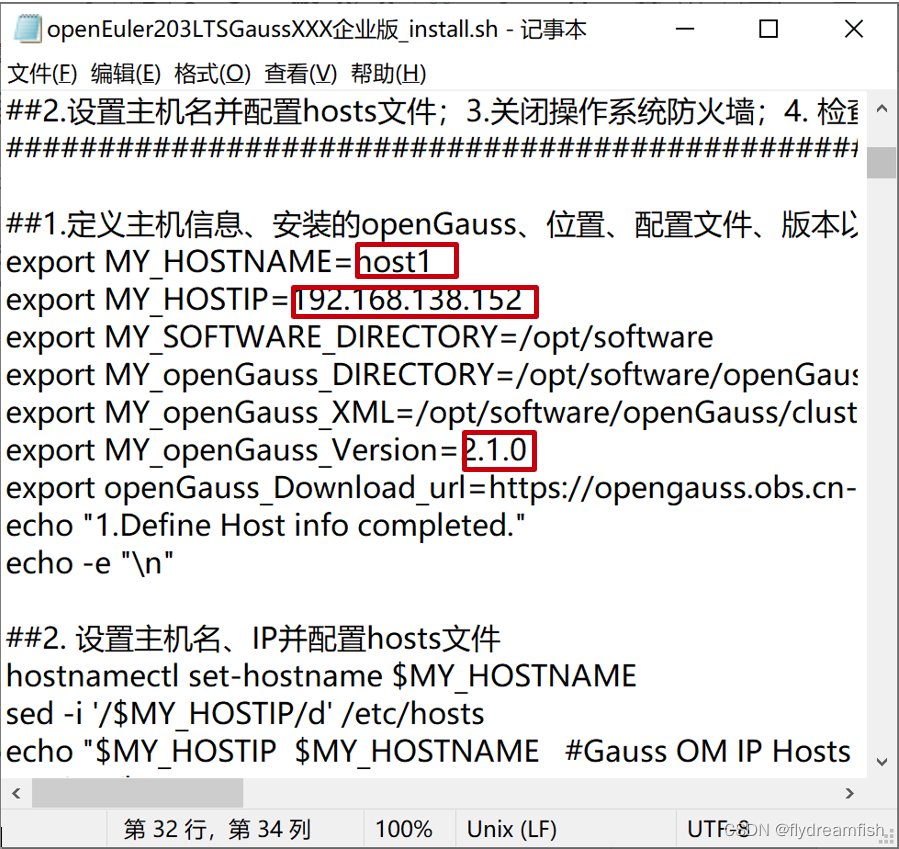
然后全文copy,在 Xshell工具中执行“ vi /root/autoinstall.sh”,输入“i”切换到INSERT模式,右击粘贴到终端,粘贴完成后,按上一步查到的主机名、IP和想要安装的openGauss版本【如修改为3.1.1。从测试来看,目前可以安装发布以来到3.1.1的任何版本】进行三项(host1、192.168.138.152,2.1.0)修改,然后按下ESC键退出INSERT模式,输入“:wq”保存并退出文档。
[root@host1 ~]#vi  /root/autoinstall.sh
.....
##1.定义主机信息、安装的openGauss、位置、配置文件、版本以及要安装的openGauss下载URL【请根据实际情况修改】
export MY_HOSTNAME=host1
export MY_HOSTIP=192.168.138.152
export MY_SOFTWARE_DIRECTORY=/opt/software
export MY_openGauss_DIRECTORY=/opt/software/openGauss
export MY_openGauss_XML=/opt/software/openGauss/clusterconfig.xml
export MY_openGauss_Version=2.1.0
export openGauss_Download_url=https://opengauss.obs.cn-south-1.myhuaweicloud.com/$MY_openGauss_Version/x86_openEuler/openGauss-$MY_openGauss_Version-openEuler-64bit-all.tar.gz
echo "1.Define Host info completed."
echo -e "\n"
......
## 安装完毕!
echo "openGauss Install completed congratulations"
echo "Congratulations!!!"
步骤3、一键部署openGauss3.1.1。
运行“autoinstall.sh” 文件,完成一键部署openGauss3.1.1。在执行过程中,用户根据提示选择是否创建互信,并输入操作系统omm用户的密码。
[root@ host1 ~]# sh /root/autoinstall.sh
…..
Parsing the configuration file.
Successfully parsed the configuration file.
Installing the tools on the local node.
Successfully installed the tools on the local node.
Setting pssh path
Successfully set core path.
Are you sure you want to create the user[omm] and create trust for it (yes/no)? yes
Please enter password for cluster user.
Password:
Please enter password for cluster user again.
Password:
Successfully created [omm] user on all nodes.
Preparing SSH service.
Successfully prepared SSH service.
Please enter password for database:
Please repeat for database:
………..
25.Clear the openGauss installation package completed.
openGauss Install completed congratulations
Congratulations!!!"
期间需要创建操作系统omm用户及设置密码(如密码:openGauss@123),输入操作数据库的omm密码(如密码:openGauss@123)。
步骤4、打开swap交换内存。
[对于2G内存的设备,建议待安装完毕后再打开SWAP以间接 “扩容内存容量”]
关闭swap交换内存是为了保障数据库的访问性能,避免把数据库的缓冲区内存淘汰到磁盘上。 如果服务器内存比较小,内存过载时,可打开swap交换内存保障正常运行。
[root@host1 ~]# swapon -a
数据库安装结束。
2. 3. 4.参考在 x86_64 架构 + VMware16.2.3 Pro+openEuler20.3-LTS 上安装部署 openGauss 3.1.1 企业版数据库指导手册之二 – 客户端工具的使用。
5.卸载openGauss
卸载openGauss的过程包含卸载openGauss和对openGauss服务器的环境做清理。
5.1 执行卸载
openGauss提供了卸载脚本帮助用户完整的卸载openGauss,使用gs_uninstall卸载openGauss。
5.2 操作步骤
以操作系统用户omm登录数据库主节点,使用gs_uninstall卸载openGauss。
(1)、卸载openGauss
[root@host1 ~]# su – omm
[omm@host1 ~]$ gs_uninstall --delete-data # 卸载集群所有数据库
[omm@host1 ~]$ gs_uninstall --delete-data -L # 仅卸载本地数据库
# 如果卸载失败请根据“$GAUSSLOG/om/gs_uninstall-YYYY-MM-DD_HHMMSS.log”中的日志信息排查错误。
[omm@host1 ~]#exit
(2)、清理环境
在openGauss卸载完成后,如果不需要在环境上重新部署openGauss,可以运行脚本gs_postuninstall对openGauss服务器上环境信息做清理。openGauss环境清理是对环境准备脚本gs_preinstall所做设置的清理。
前提条件:openGauss卸载执行成功;root用户互信可用
操作步骤:
<1> 确保 root 用户 SSH 互信
<2> 执行清理脚本,如下:
[root@host1 ~]$ cd /opt/software/openGauss/script
[root@host1 ~]$./gs_postuninstall -U omm -X /opt/software/open.xml --delete-user --delete-group
[root@host1 ~]$../gs_postuninstall -U omm -X /opt/software/openGauss/clusterconfig.xml --delete-user --delete-group -L   ## 仅清理本地环境
## 若为环境变量分离的模式安装的集群需删除之前source的环境变量分离的env参数
<3> 删除 root 的 SSH 互信,并删除 ENVFILE 环境变量:```
unset MPPDB_ENV_SEPARATE_PATH
注意:若是共用的环境,需要加入–sep-env-file
参考资料:
[1]、openGauss
openGauss https://www.opengauss.org/zh
[2]、一键部署openGauss2.0.0-贾军锋
https://www.opengauss.org/zh/blogs/jiajunfeng/%E4%B8%80%E9%94%AE%E9%83%A8%E7%BD%B2openGauss2-0-0.html
[3]、猿创征文|国产数据库-基于openEuler环境的opengauss企业版安装以及安装警告解决
https://blog.csdn.net/xust_Hankey/article/details/127153396
[4]、手把手教你安装openGauss 3.1.0
https://cdn.modb.pro/db/545504#2_399