环境贴图作用测试
MeshPhysicalMaterial清漆层
MeshPhysicalMaterial和MeshStandarMaterial都是拥有金属度metalness、粗糙度roughness属性的PBR材质,MeshPhysicalMaterial是MeshStandarMaterial的子集,除了继承了他的这些属性以外,还新增了清漆、透光率、反射率、光泽、折射率等等
清漆层属性.clearcoat
清漆层属性.clearcoat可以用来模拟物体表面刷了一层透明的模.clearcoat的范围0到1,默认0。
const material = new THREE.MeshPhysicalMaterial( {


	clearcoat: 1.0,//物体表面清漆层或者说透明涂层的厚度
} );
关于MeshPhysicalMaterial材质
MeshPhysicalMaterial是Three.js中的一种材质类型,它是基于物理的渲染(PBR)材质,可以模拟真实世界中的光照和材质反射。它支持金属和非金属材质,可以设置粗糙度、金属度、环境光遮蔽、法线贴图、位移贴图等属性,以实现更真实的渲染效果。MeshPhysicalMaterial还支持高光反射和透明度,可以用于创建逼真的玻璃、水、金属等材质。在使用MeshPhysicalMaterial时,需要注意其计算量较大,可能会影响性能,因此需要根据实际情况进行优化。
清漆层粗糙度.clearcoatRoughness
是指表面透明图层的粗糙程度范围是0-1。
使用场景
这种效果可以用来做车子的模型,比如车窗,外壳,玻璃等。
车外壳油漆效果,你可以通过PBR材质的清漆层属性.clearcoat和清漆层粗糙度.clearcoatRoughness属性模拟。
const mesh = gltf.scene.getObjectByName('外壳');
mesh.material = new THREE.MeshPhysicalMaterial( {


	clearcoat: 1.0,//物体表面清漆层或者说透明涂层的厚度
	clearcoatRoughness: 0.1,//透明涂层表面的粗糙度
} );
实际情况可以根据模型进行调整。调整可以通过GUI进行调试,实际调试效果可以在上一章中查看。
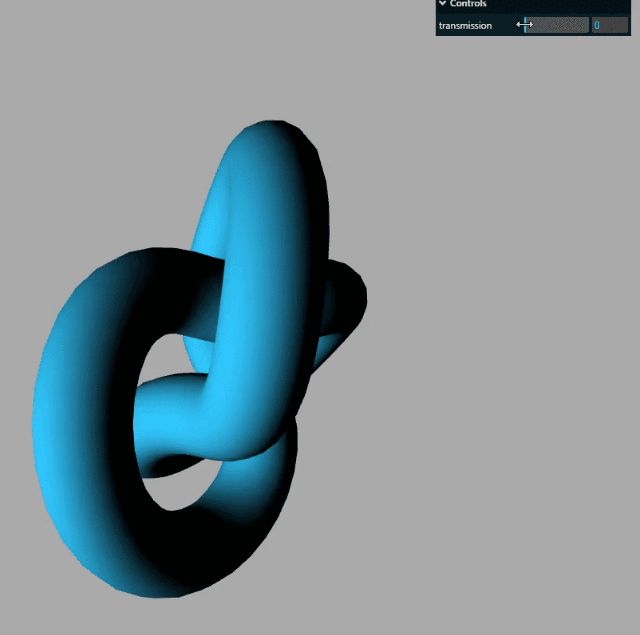
物理材质透光率
为了更好的模拟玻璃、半透明塑料一类的视觉效果,可以使用此属性来代替普通透明属性.opacity
使用.transmission属性设置Mesh透明度,即便完全透射的情况下仍可保持高反射率。
使用方式:
    const geometry = new THREE.TorusKnotGeometry(10, 3, 100, 16);
    const material = new THREE.MeshPhysicalMaterial({


      color: 0x30cff8,
      transmission: 1,
    });
    const torusKnot = new THREE.Mesh(geometry, material);
    scene.add(torusKnot);
效果:
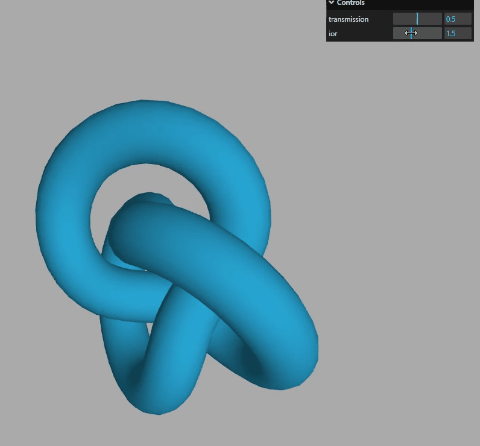
折射率.ior
非金属材料的折射率从1.0到2.333。默认值为1.5。
  const geometry = new THREE.TorusKnotGeometry(10, 3, 100, 16);
    const material = new THREE.MeshPhysicalMaterial({


      color: 0x30cff8,
      transmission: 1,
       ior:1.5,
    });
    const torusKnot = new THREE.Mesh(geometry, material);
    scene.add(torusKnot);
解析gltf材质
一般默认使用标准网格材质MeshStandardMaterial,如果gltf有的材质具有.clearcoat、.transmission等属性,标准网格材质MeshStandardMaterial无法表达的时候,会用物理网格材质MeshPhysicalMaterial来解析gltf材质。
gltf.scene.traverse(function(obj) {


    if (obj.isMesh) {


        console.log('obj.material',obj.material);
    }
});
console.log('外壳',mesh1.material);
console.log('玻璃',mesh2.material);
完整代码:
/*
 * @Author: SouthernWind
 * @Date: 2023-06-14 16:38:59
 * @Last Modified by: SouthernWind
 * @Last Modified time: 2023-06-14 16:39:32
 */
<template>
  <div class="container" ref="container"></div>
</template>

<script setup>
import * as THREE from "three";
// 轨道
import {

       OrbitControls } from "three/examples/jsm/controls/OrbitControls";
import {

       GLTFLoader } from "three/addons/loaders/GLTFLoader.js";
import {

       GUI } from "three/addons/libs/lil-gui.module.min.js";

import {

       ref, reactive, onMounted } from "vue";
// 三个必备的参数
let scene,camera,renderer,controls,mesh,material,group,texture,gui,textureCube;

onMounted(() => {


  // 外层需要获取到dom元素以及浏览器宽高,来对画布设置长宽
  // clientWidth等同于container.value.clientWidth
  let container = document.querySelector(".container");
  const {

       clientWidth, clientHeight } = container;
  console.log(clientHeight);

  // 首先需要获取场景,这里公共方法放在init函数中
  const init = () => {


    scene = new THREE.Scene();
    // 给相机设置一个背景
    scene.background = new THREE.Color(0xaaaaaa);
    // 透视投影相机PerspectiveCamera
    // 支持的参数:fov, aspect, near, far
    camera = new THREE.PerspectiveCamera(60,clientWidth / clientHeight,0.001,6000);
    // 相机坐标
    camera.position.set(30, 30, 30);

    // 相机观察目标
    camera.lookAt(scene.position);
    // 渲染器
    renderer = new THREE.WebGLRenderer({


      antialias: true,
    });
    renderer.shadowMap.enabled = true;
    renderer.shadowMap.type = THREE.PCFSoftShadowMap;
    // 渲染多大的地方
    renderer.setSize(clientWidth, clientHeight);
    /* renderer.outputEncoding = THREE.sRGBEncoding; */
    // const axesHelper = new THREE.AxesHelper(150);
    // scene.add(axesHelper);
    container.appendChild(renderer.domElement);
    addBox();
    console.log("查看当前屏幕设备像素比", window.devicePixelRatio);
  };
  init();
  function addBox() {


    gui = new GUI();
    const geometry = new THREE.TorusKnotGeometry(10, 3, 100, 16);
    const material = new THREE.MeshPhysicalMaterial({


      color: 0x30cff8,
      metalness: 0,
      roughness: 0,
      transmission: 0.5,
      ior: 1.5,
    });
    const torusKnot = new THREE.Mesh(geometry, material);
    scene.add(torusKnot);
    gui.add(material, "transmission", 0, 1);
    gui.add(material, "ior", 1, 2.333);
  }

  // 相机控件
  const control = () => {


    controls = new OrbitControls(camera, renderer.domElement);
    controls.addEventListener("change", function () {

      });
  };
  control();

  // 光源
  const linght = () => {


    const pointLight = new THREE.PointLight(0xffffff, 1.0);
    // pointLight.position.set(400, 0, 0);//点光源放在x轴上
    pointLight.position.set(100, 60, 50); //设置光源的位置
    // 光源和网格模型Mesh对应一样是三维场景的一部分,自然需要添加到三维场景中才能起作用。
    scene.add(pointLight); // 添加光源到场景中

    /*  const pointLight = new THREE.AmbientLight(0xffffff, 1.0);
    pointLight.position.set(150, 150, 150);
        scene.add(pointLight); */
    const pointLightHelper = new THREE.PointLightHelper(pointLight, 1);
    scene.add(pointLightHelper);
  };
  linght();
  const render = () => {


    renderer.render(scene, camera);
    requestAnimationFrame(render);
  };
  render();
  window.addEventListener("resize", () => {


    // 更新摄像头
    camera.aspect = window.innerWidth / window.innerHeight;
    camera.updateProjectionMatrix();
    renderer.setSize(window.innerWidth, window.innerHeight);
  });
});
</script>

<style>
.container {


  width: 100%;
  height: 100vh;
  position: relative;
  z-index: 1;
}
</style>