

目录
使用 Two Phase Termination 完成通信资源关闭
多线程上下文设计模式
关于上下文(Context),我们在开发的过程中经常会遇到,比如开发 Struts2 的 ActionContext、 Spring 中的 ApplicationContext,上下文是贯穿整个系统或阶段生 命周期的对象,其中包含了系统全局的一些信息,比如登录之后的用户信息、账号信息,以及在程序每一个阶段运行时的数据。
具体的代码业务逻辑图:

Balking 设计模式
什么是 Balking 设计
多个线程监控某个共享变量,A 线程监控到共享变量发生变化后即将触发某个动作,但 是此时发现有另外一个线程 B 已经针对该变量的变化开始了行动,因此 A 便放弃了准备开始的工作,我们把这样的线程间交互称为 Balking(犹豫)设计模式。其实这样的场景在生活中很常见,比如你去饭店吃饭,吃到途中想要再点一个小菜,于是你举起手示意服务 员,其中一个服务员看到了你举手正准备走过来的时候,发现距离你比较近的服务员已经准备要受理你的请求于是中途放弃了。
再比如,我们在用 word 编写文档的时候,每次的文字编辑都代表着文档的状态发生了 改变,除了我们可以使用 ctrl+s 快捷键手动保存以外,word 软件本身也会定期触发自动 保存,如果 word 自动保存文档的线程在准备执行保存动作的时候,恰巧我们进行了主动保 存,那么自动保存文档的线程将会放弃此次的保存动作。 看了以上两个例子的说明,想必大家已经清楚了 Balking 设计模式要解决的问题了吧, 简短截说就是某个线程因为发现其他线程正在进行相同的工作而放弃即将开始的任务,在 本章中,我们将通过模拟 word 文档自动保存与手动保存的功能讲解 Balking 模式的设计与应用。
Balking 模式之文档编辑
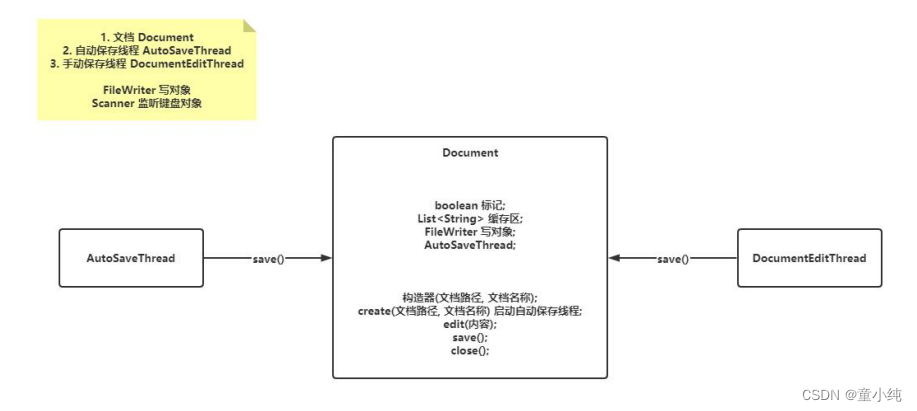
Document
在代码中,设计了Document 类代表文档本身,在 Document 中有两个主要法 save 和 edit 分别用于保存文档和编辑文档。
package com.tong.chapter20;
import java.io.File;
import java.io.FileWriter;
import java.io.IOException;
import java.util.ArrayList;
import java.util.List;

   // 代表正在编辑的文档
      public class Document {
        // 如果文档发生改变,changed 会被设置为 true
        private boolean changed;
        // 一次需要保存的内容
        private List<String> content = new ArrayList<>();
        // 写对象
        private final FileWriter fileWriter;
        // 自动保存文档的对象
        private static AutoSaveThread autoSaveThread;
        // 构造函数需要传入文档保存的路径和文档名称
        public Document(String documentPath, String documentName) throws IOException {
            this.fileWriter = new FileWriter(new File(documentPath, documentName));
        }
       // 静态方法,主要用于创建文档,顺便启动自动保存文档的线程
      public static Document create(String documentPath, String documentName) throws
IOException {
           Document document = new Document(documentPath, documentName);
           autoSaveThread = new AutoSaveThread(document);
           autoSaveThread.start();
           return document;
}
       // 文档的编辑,其实就是往 content 队列中提交字符串
      public void edit(String content) {
            synchronized (this) {
                this.content.add(content);
               // 文档改变 changed 会变为 true
               this.changed = true;
      }
}
     // 文档关闭的时候首先中断自动保存线程,然后关闭 writer 释放资源
     public void close() throws IOException {
            autoSaveThread.interrupt();
            fileWriter.close();
}
     // save 方法用于为外部显示进行文档保存
    public void save() throws IOException {
         synchronized (this) {
         // 如果文档已经保存了,则直接返回
         if (!changed)
              return;
         for (String cache : content) {
              this.fileWriter.write(cache);
              this.fileWriter.write("\r\n");
          }
             this.fileWriter.flush();
     System.out.println(Thread.currentThread().getName() + " 保存成功,保存内容为:" + this.content);
       // 将 changed 修改为 false,表明此刻再没有新的内容编辑
       this.changed = false;
      // 清空缓存数据
       this.content.clear();
     }
   }
}
在上述代码中: edit 方法和 save 方法进行方法同步,其目的在于防止当文档在保存的过程中如果遇 到新的内容被编辑时引起的共享资源冲突问题。 changed 在默认情况下为 false,当有新的内容被编辑的时候将被修改为 true。 在进行文档保存的时候,首先查看 changed 是否为 true,如果文档发生过编辑则在档中保存新的内容,否则就会放弃此次保存动作,changed 是 balking pattern 关注的 状态,当 changed 为 tue 的时候就像远处的服务员看到客户的请求被另外一个服务员接管 了一样,于是放弃了任务的执行。 在创建 Document 的时候,顺便还会启动自动保存文档的线程,该线程的主要目的在于在固定时间里执行一次文档保存动作。
AutoSaveThread
与平日里编写 word 文档一样,word 会定期自动保存我们编辑的文档,如果在电脑出 现故障重启之时,没有来得及对文档保存,也不至于损失太多劳动成果,它甚至能够百分 之百的恢复, AutoSaveThread 类扮演的角色便在于此
package com.tong.chapter20;
import java.io.IOException;
import java.util.concurrent.TimeUnit;

public class AutoSaveThread extends Thread {
     private final Document document;

     public AutoSaveThread(Document document) {
             super("AutoSaveThread");
             this.document = document;
  }
   @Override
   public void run() {
      while (true) {
        try {
           // 每隔 1 秒自动保存一次文档
           document.save();
           TimeUnit.SECONDS.sleep(1);
       } catch (IOException | InterruptedException ioException) {
          ioException.printStackTrace();
          break;
       }
    }
  }
}
AutoSaveThread 比较简单,其主要的工作就是每隔一秒的时间调用一次 Document 的 save 方法。
DocumentEditThread
AutoSaveThread 线程用于文档自动保存,那么 DocumentEditThread 线程则类似于 主动编辑文档的作者,在 DocumentEditThread 中除了对文档进行修改编辑之外,还会同时按下 Ctrl+S 组合键(调用 save 方法)主动保存
   package com.tong.chapter20;

   import java.io.IOException;
   import java.util.Scanner;
   // 该线程代表的是主动进行文档编辑的线程,为了增加交互性,我们使用 Scanner
   public class DocumentEditThread extends Thread {
           private final String documentPath;
           private final String documentName;
           private final static Scanner SCANNER = new Scanner(System.in);
       public DocumentEditThread(String documentPath, String documentName) {
              super("DocumentEditThread");
              this.documentPath = documentPath;
              this.documentName = documentName;
      }
     @Override
    public void run() {
          int times = 0;
         try {
             Document document = Document.create(documentPath, documentName);
            while (true) {
          // 获取用户的键盘输入
          String text = SCANNER.next();
          if ("exit".equals(text)) {
               document.close();
               break;
          }
          // 将内容编辑到 document 中
          document.edit(text);
         if (times == 5) {
         // 用户再输入了 5 次以后进行文档保存
          document.save();
          times = 0;
      }
          times++;
     }
    } catch (IOException ioException) {
            ioException.printStackTrace();
    }
  }
}
DocumentEditThread 类代表了主动编辑文档的线程,在该线程中,我们使用 Scanner 交互的方式,每一次对文档的修改都不可能直接保存(Ctl+S),因此在程序中约定了五次以后主动执行保存动作,当输入 exit 时,表示要退出此次文档编辑,测试代码如下:
package com.tong.chapter20;

public class BalkingTest {
      public static void main(String[] args) {
           new DocumentEditThread("D:\\", "balking.txt").start();
    }
}
Guarded Suspension 设计模式
什么是 Guarded Suspension 设计模式
Suspension 是“挂起”、“暂停”的意思,而 Guarded 则是“担保”的意思,连在一起 就是确保挂起。当线程在访问某个对象时,发现条件不满足,就暂时挂起等待条件满足时 再次访问。 Guarded Suspension 设计模式是很多设计模式的基础,比如生产者消费者模式,同样在 Java 并发包中的 BlockingQueue 中也大量使用到了 Guarded Suspension 设计模式。
Guarded Suspension 的示例
package com.tong.chapter21;
import java.util.LinkedList;

public class GuardedSuspensionQueue {

      // 定义存放 Integer 类型的 queue
      private final LinkedList<Integer> QUEUE = new LinkedList<>();

     // 定义 queue 的最大容量
      private final int LIMIT;

      public GuardedSuspensionQueue(int limit) {
           LIMIT = limit;
   }

// 往队列中插入数据,如果 queue 中的元素超过了最大容量,则会陷入阻塞
public void offer(Integer data) throws InterruptedException {
      synchronized (this) {
     // 判断 queue 的当前元素是否超过了 LIMIT
         while (QUEUE.size() >= LIMIT) {
              System.out.println("----------队列已满----------");
              this.wait();// 挂起当前线程
      }
      // 插入元素并且唤醒 take 线程
      QUEUE.addLast(data);
      System.out.println("插入成功,插入的元素为:" + data);
      this.notifyAll();
    }
}
// 从队列中获取元素,如果队列此时为空,则会使当前线程阻塞
public Integer take() throws InterruptedException {
       synchronized (this) {
       // 如果队列为空
          while (QUEUE.isEmpty()) {
              System.out.println("----------队列已空----------");
              this.wait();// 挂起当前线程
     }
       // 通过 offer 线程可以继续插入数据
       this.notifyAll();
       return QUEUE.removeFirst();
     }
   }
}
在 GuardedSuspensionQueue 中,我们需要保证线程安全的是 queue,分别在 take 和offer方法中对应的临界值是 queue为空和 queue的数量>=100,当 queue中的数据已 经满时,如果有线程调用 offer 方法则会被挂起( Suspension),同样,当 queue 没有数 据的时候,调用 take 方法也会被挂起。 Guarded Suspension 模式是一个非常基础的设计模式,它主要关注的是当某个条件 (临界值)不满足时将操作的线程正确地挂起,以防止出现数据不一致或者操作超过临界值的控制范围。
Latch 设计模式
Latch(阀门)设计模式也叫做 Count Down 设计模式。当若干个线程并发执行完某个特 定的任务,然后等到所有的子任务都执行结束之后再统一汇总。 CountDownLatch 能够使一个线程在等待另外一些线程完成各自工作之后,再继续执 行。使用一个计数器进行实现。计数器初始值为线程的数量。当每一个线程完成自己任务后, 计数器的值就会减一。当计数器的值为 0 时,表示所有的线程都已经完成了任务,然后在 CountDownLatch 上等待的线程就可以恢复执行任务。示例代码如下:
package com.tong.chapter22;

/**
* 自定义 CountDownLatch
*/
public class CustomCountDownLatch {

    // 阀门值
    private final int latchNum;

    // 计数器
    private int count;

    public CustomCountDownLatch(int latch_num) {
       this.latchNum = latch_num;
       this.count = latch_num;
    }
    public void countDown() {
         synchronized (this) {
              this.count--;
              this.notifyAll();
     }
}

public void await() {
       synchronized (this) {
           if (count != 0) {
                 try {
                      this.wait();
                 } catch (InterruptedException e) {
                         e.printStackTrace();
                }
             }
          }
     }
}
其实 JDK 的 JUC 包下已经有对应的类存在了,叫做 CountDownLatch,具体使用如下:
package com.tong.chapter22;
import java.util.concurrent.CountDownLatch;
import java.util.concurrent.TimeUnit;

   public class Main {
         public static void main(String[] args) throws InterruptedException {
              System.out.println("第一阶段开始工作。");

              int count = 5;

              // 自定义 CountDownLatch
              // CustomCountDownLatch latch = new CustomCountDownLatch(count);

              // JDK CountDownLatch
              CountDownLatch latch = new CountDownLatch(count);

              for (int i = 0; i < count; i++) {
                  new Thread(() -> {
                    try {
                         System.out.println(Thread.currentThread().getName());
                         TimeUnit.SECONDS.sleep(2);
                         // 每一个线程完成自己任务后,计数器减一
                         latch.countDown();
                       } catch (InterruptedException e) {
                             e.printStackTrace();
                    }
                  }).start();
             }
             latch.await();
             System.out.println("阶段一全部完成,第二阶段开始工作。");
        }
}
Two Phase Termination 设计模式
什么是 Two Phase Termination 模式
当一个线程正常结束,或者因被打断而结束,或者因出现异常而结束时,我们需要考虑 如何同时释放线程中资源,比如文件句柄、 Socket 套接字句柄、数据库连接等比较稀缺的 资源。 Two Phase Termination 设计模式可以帮助我们实现,如图所示。

如图所示,我们使用“作业中”表示线程的执行状态,当希望结束这个线程时,发出线 程结束请求,接下来线程不会立即结束,而是会执行相应的资源释放动作直到真正的结束, 在终止处理状态时,线程虽然还在运行,但是进行的是终止处理工作,因此终止处理又称为 线程结束的第二个阶段,而受理终止要求则被称为线程结束的第一个阶段。 在进行线程两阶段终结的时候需要考虑如下几个问题。
第二阶段的终止保证安全性,比如涉及对共享资源的操作。
要百分之百地确保线程结東,假设在第二个阶段出现了死循环、阻塞等异常导致无法结 束
对资源的释放时间要控制在一个可控的范围之内。
Two Phase Termination 的示例
package com.tong.chapter23;
import java.util.concurrent.ThreadLocalRandom;
import java.util.concurrent.TimeUnit;

public class CounterIncrement extends Thread {
    private volatile boolean terminated = false;
    private int counter = 0;

    @Override
    public void run() {
        try {
              while (!terminated) {
                    System.out.println(Thread.currentThread().getName() + " " + counter++);
TimeUnit.MILLISECONDS.sleep(ThreadLocalRandom.current().nextInt(1000));
     }
   } catch (InterruptedException e) {
     // e.printStackTrace();
   } finally {
      this.clean();
  }
}
      private void clean() {
             System.out.println("二阶段终止操作被执行。" + counter);
     }

      public void close() {
            this.terminated = true;
            this.interrupt();
   }
}
使用 Two Phase Termination 完成通信资源关闭
服务端代码
package com.tong.chapter23.demo02;

import java.io.IOException;
import java.net.ServerSocket;
import java.net.Socket;
import java.util.ArrayList;
import java.util.List;
import java.util.concurrent.ExecutorService;
import java.util.concurrent.Executors;
/**
* 服务端
*/
public class AppServer extends Thread {
      // 端口
      private int port;
      // 静态端口
      private final static int DEFAULT_PORT = 12722;
      // 是否启动服务标记
      private volatile boolean isRunning = true;
      // 服务端
      private ServerSocket server;
      // 客户端集合
      private List<ClientHandler> clientHandlers = new ArrayList<>();
      // 线程池
      private final ExecutorService threadPool = Executors.newFixedThreadPool(10);

      public AppServer() {
             this(DEFAULT_PORT);
      }

      public AppServer(int port) {
           this.port = port;
      }

      @Override
      public void run() {
          System.out.println("服务端已启动,启动端口为:" + this.port);
      try {
           server = new ServerSocket(port);
           while (isRunning) {
               Socket client = this.server.accept();
               ClientHandler clientHandler = new ClientHandler(client);
               threadPool.submit(clientHandler);
               this.clientHandlers.add(clientHandler);
                System.out.println(client.getLocalAddress() + " 客户端已成功接入服务端。
");
     }
} catch (IOException ioException) {
      // ioException.printStackTrace();
      this.isRunning = false;
} finally {
     // 二阶段处理
     this.dispose();
   }
}
   // 二阶段处理的业务
   private void dispose() {
      // 关闭所有的客户端
      clientHandlers.stream().forEach(ClientHandler::stop);
     // 关闭线程池
     this.threadPool.shutdown();
     System.out.println("服务端二阶段终止操作被执行。");
}
     // 对外显示声明的关闭方法
    public void shutdown() throws IOException {
    // 如果已经停止则 return
    if (!isRunning)
        return;
         this.isRunning = false
         this.interrupt();
         this.server.close();
         System.out.println("服务端已关闭。");
   }
}
客户端代码
package com.tong.chapter23.demo02;
import java.io.*;
import java.net.Socket;
/**
* 客户端
*/
public class ClientHandler implements Runnable {
     private final Socket socket;
     // 是否运行标记

     private volatile boolean isRunning = true;

     public ClientHandler(Socket socket) {
         this.socket = socket;
    }
    @Override
    public void run() {
           try (InputStream is = socket.getInputStream();
                 OutputStream os = socket.getOutputStream();
                 BufferedReader br = new BufferedReader(new InputStreamReader(is));
                 PrintWriter pw = new PrintWriter(os)) {
                 while (isRunning) {
                     String message = br.readLine();
                     if (null == message)
                         break;
                     System.out.println("收到客户端的消息为:" + message);
                     pw.write("ehco message: " + message + "\r\n");
                     pw.flush();
    }
  } catch (IOException ioException) {
          // ioException.printStackTrace();
          this.isRunning = false;
    } finally {
       // 二阶段处理
        this.stop();
        System.out.println("客户端二阶段终止操作被执行。");
    }
}
public void stop() {
       // 如果已经停止则 return
       if (!isRunning)
               return;
        // 说明正在运行,调用 stop 后修改为 false
             this.isRunning = false;
        try {
             this.socket.close();
          } catch (IOException ioException) {
              ioException.printStackTrace();
          }
              System.out.println("客户端已退出。");
      }
}
测试类
package com.tong.chapter23.demo02;

import java.io.IOException;
import java.util.concurrent.TimeUnit;

public class AppServerClient {
     public static void main(String[] args) throws InterruptedException, IOException {
           AppServer appServer = new AppServer(13345);
           appServer.start();

           TimeUnit.SECONDS.sleep(20);
           appServer.shutdown();
    }
}