

目录
Spring整合MyBatis_编写持久层接口和service类
Spring整合MyBatis_Spring整合Junit进行单元测试
Spring整合MyBatis_准备数据库和实体类
准备数据库
CREATE DATABASE `student`;
USE `student`;
DROP TABLE IF EXISTS `student`;
CREATE TABLE `student` (
  `id` int(11) NOT NULL AUTO_INCREMENT,
  `name` varchar(255) DEFAULT NULL,
  `sex` varchar(10) DEFAULT NULL,
  `address` varchar(255) DEFAULT NULL,
  PRIMARY KEY (`id`)
) ENGINE=InnoDB AUTO_INCREMENT=3 DEFAULT
CHARSET=utf8;
insert  into
`student`(`id`,`name`,`sex`,`address`)
values (1,'程序员','男','北京'),(2,'程序媛','女','北京');
准备实体类
public class Student {
    private int id;
    private String name;
    private String sex;
    private String address;

    // 省略构造方法/getter/setter/tostring
}
Spring整合MyBatis_编写持久层接口和service类
编写持久层接口
@Repository
public interface StudentDao {
    // 查询所有学生
    @Select("select * from student")
    List<Student> findAll();
    // 添加学生
    @Insert("insert into student values(null,#{name},#{sex},#{address})")
    void add(Student student);
}
编写service类
@Service
public class StudentService {
    // SqlSession对象
    @Autowired
    private SqlSessionTemplate sqlSession;
    // 使用SqlSession获取代理对象
    public List<Student> findAllStudent(){
        StudentDao studentDao = sqlSession.getMapper(StudentDao.class);
        return studentDao.findAll();
   }
}
Spring整合MyBatis_Spring整合Junit进行单元测试
之前进行单元测试时都需要手动创建Spring容器,能否在测试时让 Spring自动创建容器呢?
1 、引入Junit和Spring整合Junit依赖
<!-- junit,如果Spring5整合junit,则junit版本
至少在4.12以上 -->
<dependency>
    <groupId>junit</groupId>
    <artifactId>junit</artifactId>
    <version>4.12</version>
    <scope>test</scope>
</dependency>
<!-- spring整合测试模块 -->
<dependency>
    <groupId>org.springframework</groupId>
    <artifactId>spring-test</artifactId>
    <version>5.3.13</version>
</dependency>
2 、编写测试类
// JUnit使用Spring方式运行代码,即自动创建spring容器。
@RunWith(SpringJUnit4ClassRunner.class)
// 告知创建spring容器时读取哪个配置类或配置文件
// 配置类写法:
@ContextConfiguration(classes=配置类.class)
@ContextConfiguration(locations="classpath:applicationContext.xml")
public class StudentServiceTest {
    @Autowired
    private StudentService studentService;

    @Test
    public void testFindAll(){
        List<Student> allStudent = studentService.findAllStudent();
        allStudent.forEach(System.out::println);
   }
}
注:使用SqlSessionTemplate创建代理对象还是需要注册接口 或者映射文件的。
1、在MyBatis配置文件注册接口
<configuration>
    <mappers>
        <mapper class="com.tong.dao.StudentDao"></mapper>
    </mappers>
</configuration>
2、创建sqlSessionFactory时指定MyBatis配置文件
<!-- 创建Spring封装过的SqlSessionFactory -->
<bean id="sqlSessionFactory" class="org.mybatis.spring.SqlSessionFactoryBean">
    <property name="dataSource" ref="dataSource"></property>
    <property name="configLocation" value="classpath:SqlMapConfig.xml"></property>
</bean>
Spring整合MyBatis_自动创建代理对象
Spring提供了MapperScannerConfigurer对象,该对象可以自动扫 描包创建代理对象,并将代理对象放入容器中,此时不需要使用 SqlSession手动创建代理对象。
1、创建MapperScannerConfigurer对象
<!-- 该对象可以自动扫描持久层接口,并为接口创建代理对象 -->
<bean id="mapperScanner" class="org.mybatis.spring.mapper.MapperScannerConfigurer">
    <!-- 配置扫描的接口包 -->
    <property name="basePackage" value="com.tong.dao"></property>
</bean>
2、Service类直接使用代理对象即可
@Service
public class StudentService {
    // 直接注入代理对象
    @Autowired
    private StudentDao studentDao;

    // 直接使用代理对象
    public void addStudent(Student student){
        studentDao.add(student);
   }
}
3、测试
@RunWith(SpringJUnit4ClassRunner.class)
@ContextConfiguration(locations="classpath :applicationContext.xml")
public class StudentServiceTest {
    @Autowired
    private StudentService studentService;

    @Test
    public void testAdd(){
        Student student = new Student(0, "童小纯", "男", "上海");
        studentService.addStudent(student);
   }
}
SpringAOP_AOP简介
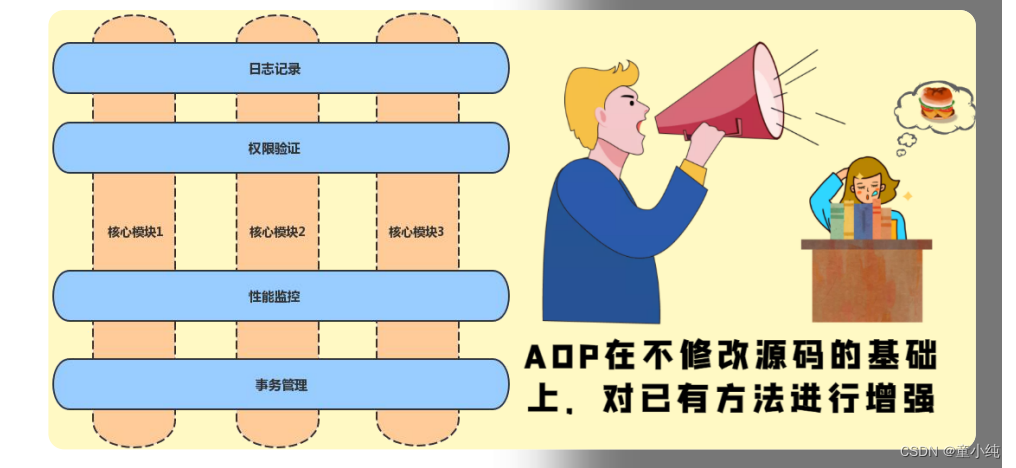
AOP的全称是Aspect Oriented Programming,即面向切面编程。 是实现功能统一维护的一种技术,它将业务逻辑的各个部分进行隔 离,使开发人员在编写业务逻辑时可以专心于核心业务,从而提高 了开发效率。
作用:在不修改源码的基础上,对已有方法进行增强。
实现原理:动态代理技术。
优势:减少重复代码、提高开发效率、维护方便
应用场景:事务处理、日志管理、权限控制、异常处理等方面。
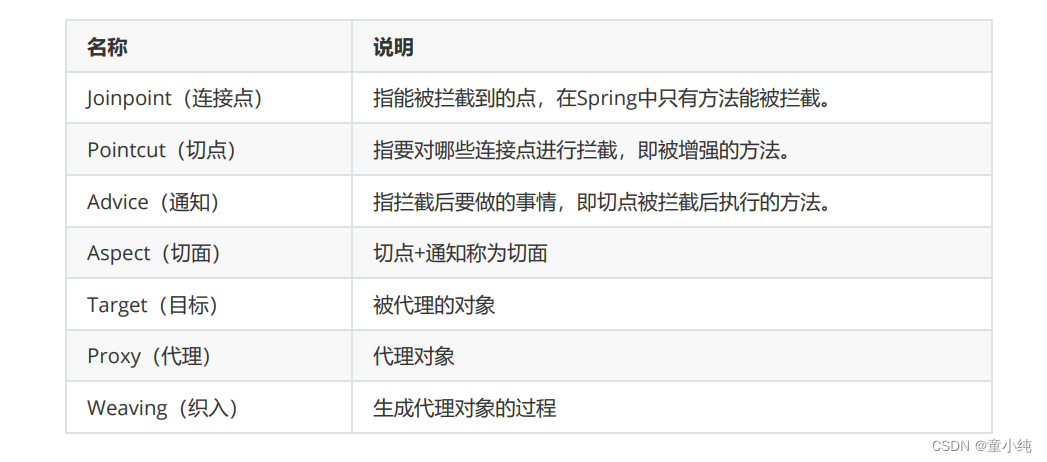
SpringAOP_AOP相关术语
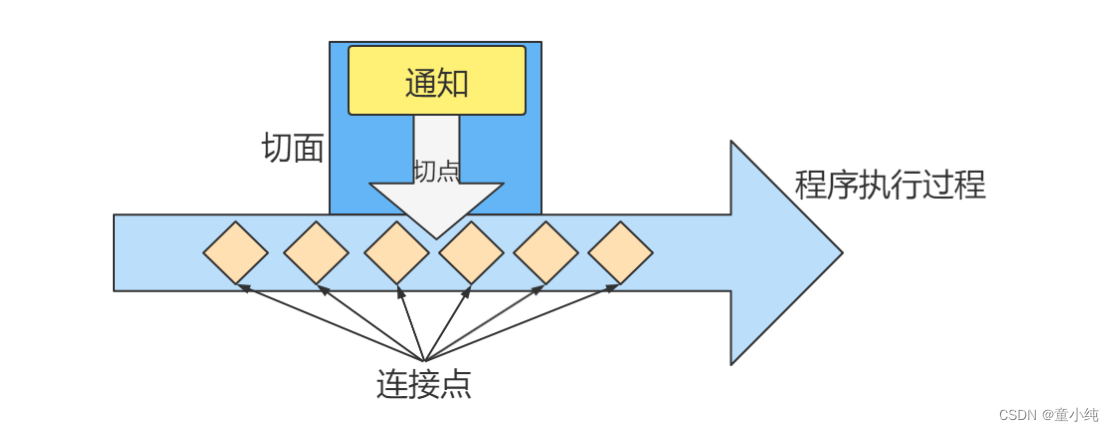
为了更好地理解AOP,就需要对AOP的相关术语有一些了解
SpringAOP_AOP入门
AspectJ是一个基于Java语言的AOP框架,在Spring框架中建议使用 AspectJ实现AOP。
接下来我们写一个AOP入门案例:dao层的每个方法结束后都可以 打印一条日志:
1、引入依赖
<!-- spring -->
<dependency>
    <groupId>org.springframework</groupId>
    <artifactId>spring-context</artifactId>
    <version>5.3.13</version>
</dependency>

<!-- AspectJ -->
<dependency>
    <groupId>org.aspectj</groupId>
    <artifactId>aspectjweaver</artifactId>
    <version>1.8.7</version>
</dependency>

<!-- junit -->
<dependency>
    <groupId>junit</groupId>
    <artifactId>junit</artifactId>
    <version>4.12</version>
    <scope>test</scope>
</dependency>
2、编写连接点
@Repository
public class UserDao {
    public void add(){
        System.out.println("用户新增");
   }
    public void delete(){
        System.out.println("用户删除");
   }
    public void update(){
        System.out.println("用户修改");
   }
}
3、编写通知类
public class MyAspectJAdvice {
    // 后置通知
    public void myAfterReturning() {
        System.out.println("打印日志...");
   }
}
4、配置切面
<?xml version="1.0" encoding="UTF-8"?>
<beans xmlns="http://www.springframework.org/schema/beans"
      xmlns:context="http://www.springframework.org/schema/context"
      xmlns:aop="http://www.springframework.org/schema/aop"
      xmlns:xsi="http://www.w3.org/2001/XMLSchema-instance"
      xsi:schemaLocation="http://www.springframework.org/schema/beans
        http://www.springframework.org/schema/beans/spring-beans.xsd
        http://www.springframework.org/schema/context
        http://www.springframework.org/schema/context/spring-context.xsd
        http://www.springframework.org/schema/aop
        http://www.springframework.org/schema/aop/spring-aop.xsd">
    <context:component-scan base-package="com.tong"></context:component-scan>
    <!-- 通知对象 -->
    <bean id="myAspectJAdvice" class="com.tong.advice.MyAspectAdvice"></bean>
    <!-- 配置AOP -->
    <aop:config>
    <!-- 配置切面 -->
        <aop:aspect ref="myAspectJAdvice">
            <!-- 配置切点 -->
            <aop:pointcut id="myPointcut" expression="execution(* com.tong.dao.UserDao.*(..))"/>
            <!-- 配置通知 -->
            <aop:after-returning method="myAfterReturning" pointcutref="myPointcut"/>
        </aop:aspect>
    </aop:config>
</beans>
5、测试
public class UserDaoTest {
    @Test
    public void testAdd(){
        ApplicationContext ac = new ClassPathXmlApplicationContext("bean.xml");
        UserDao userDao = (UserDao) ac.getBean("userDao");
        userDao.add();
   }
    @Test
    public void testDelete(){
        ApplicationContext ac = new ClassPathXmlApplicationContext("bean.xml");
        UserDao userDao = (UserDao)ac.getBean("userDao");
        userDao.delete();
   }
    @Test
    public void testUpdate(){
        ApplicationContext ac = new ClassPathXmlApplicationContext("bean.xml");
        UserDao userDao = (UserDao) ac.getBean("userDao");
        userDao.update();
   }
}
复习:
Spring简介
Spring是一个开源框架,为简化企业级开发而生。它以IOC(控制 反转)和AOP(面向切面)为思想内核,提供了控制层 SpringMVC、数据层SpringData、服务层事务管理等众多技术,并 可以整合众多第三方框架。 Spring将很多复杂的代码变得优雅简洁,有效的降低代码的耦合 度,极大的方便项目的后期维护、升级和扩展。
Spring官网地址:https://spring.io/
Spring体系结构
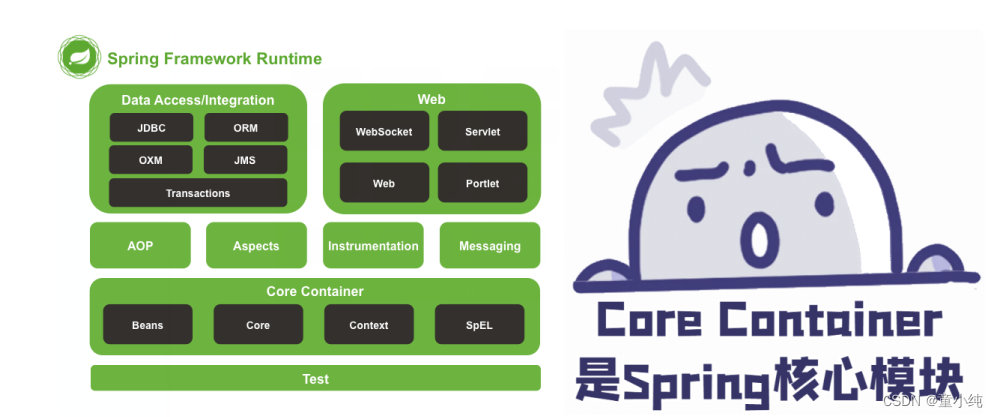
Spring框架根据不同的功能被划分成了多个模块,这些模块可以满 足一切企业级应用开发的需求,在开发过程中可以根据需求有选择 性地使用所需要的模块。
1、Core Container:Spring核心模块,任何功能的使用都离不开该模块,是其他模块建立的基础。
2、Data Access/Integration:该模块提供了数据持久化的相应功能。
3、Web:该模块提供了web开发的相应功能。
4、AOP:提供了面向切面编程实现
5、Aspects:提供与AspectJ框架的集成,该框架是一个面向切面编程框架。
6、Instrumentation:提供了类工具的支持和类加载器的实现,可以在特定的应用服务器中使 用。
7、Messaging:为Spring框架集成一些基础的报文传送应用
8、Test:提供与测试框架的集成
IOC_控制反转思想

IOC(Inversion of Control) :程序将创建对象的权利交给框架。 之前在开发过程中,对象实例的创建是由调用者管理的,代码如下:
public interface StudentDao {
    // 根据id查询学生
    Student findById(int id);
}
public class StudentDaoImpl implements StudentDao{
    @Override
    public Student findById(int id) {
        // 模拟从数据库查找出学生
        return new Student(1,"程序员","北京");
   }
}
public class StudentService {
    public Student findStudentById(int id){
        // 此处就是调用者在创建对象
        StudentDao studentDao = new StudentDaoImpl();
        return studentDao.findById(1);
   }
}
这种写法有两个缺点:
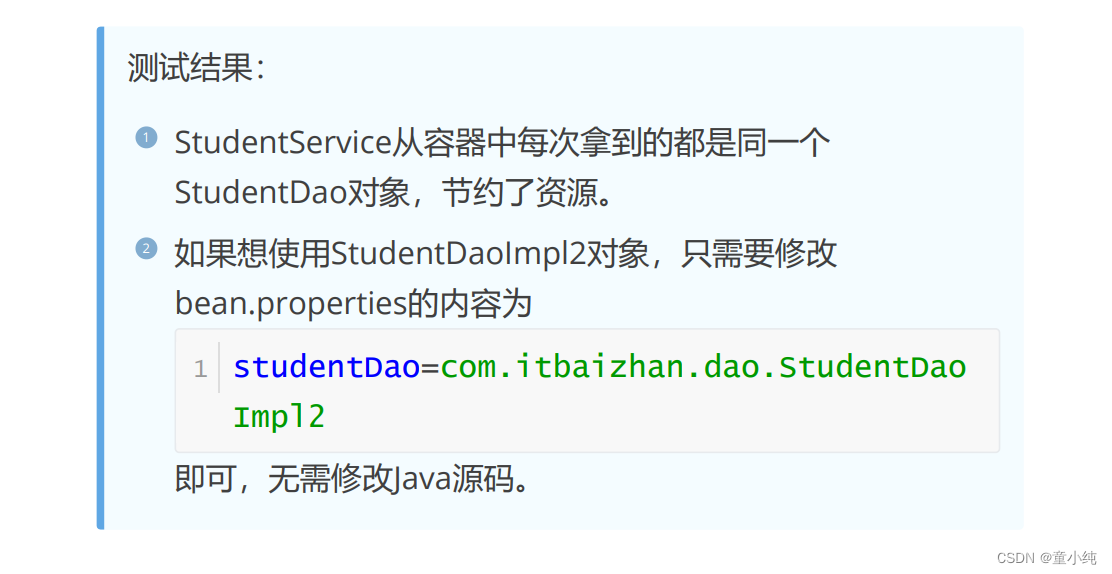
1 浪费资源:StudentService调用方法时即会创建一个对象,如果 不断调用方法则会创建大量StudentDao对象。
2 代码耦合度高:假设随着开发,我们创建了StudentDao另一个 更加完善的实现类StudentDaoImpl2,如果在StudentService 中想使用StudentDaoImpl2,则必须修改源码。
而IOC思想是将创建对象的权利交给框架,框架会帮助我们创建对 象,分配对象的使用,控制权由程序代码转移到了框架中,控制权 发生了反转,这就是Spring的IOC思想。而IOC思想可以完美的解决以上两个问题。
IOC_自定义对象容器
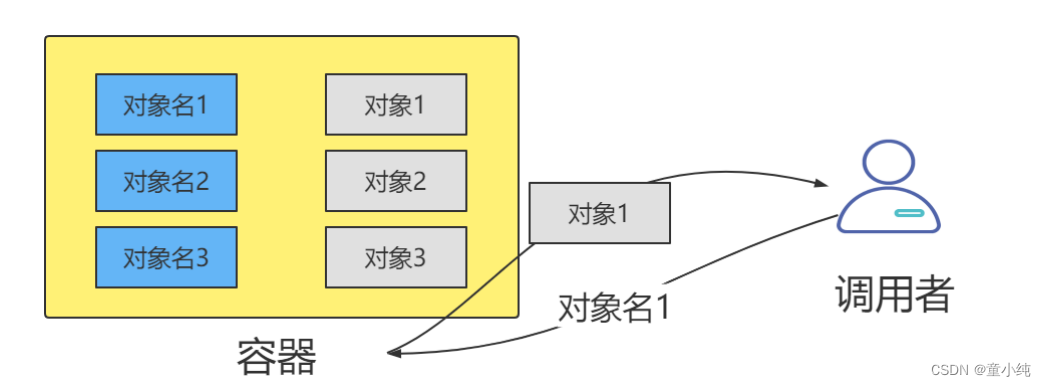
接下来我们通过一段代码模拟IOC思想。创建一个集合容器,先将 对象创建出来放到容器中,需要使用对象时,只需要从容器中获取 对象即可,而不需要重新创建,此时容器就是对象的管理者。
创建实体类
public class Student {
    private int id;
    private String name;
    private String address;
 // 省略getter/setter/构造方法/tostring
}
创建Dao接口和实现类
public interface StudentDao {
    // 根据id查询学生
    Student findById(int id);
}
public class StudentDaoImpl implements StudentDao{
    @Override
    public Student findById(int id) {
        // 模拟从数据库查找出学生
        return new Student(1,"程序员","北京");
   }
}
public class StudentDaoImpl2 implements StudentDao{
    @Override
    public Student findById(int id) {
        // 模拟根据id查询学生
        System.out.println("新方法!!!");
        return new Student(1,"程序员","北京");
   }
}
创建配置文件bean.properties,该文件中定义管理的对象
studentDao=com.tong.dao.StudentDaoImpl创建容器管理类,该类在类加载时读取配置文件,将配置文件中 配置的对象全部创建并放入容器中。
public class Container {
    static Map<String,Object> map = new HashMap();
    static {
        // 读取配置文件
        InputStream is = Container.class.getClassLoader().getResourceAsStream("bean.properties");
        Properties properties = new Properties();
        try {
            properties.load(is);
       } catch (IOException e) {
            e.printStackTrace();
       }
        // 遍历配置文件的所有配置
        Enumeration<Object> keys = properties.keys();
        while (keys.hasMoreElements()){
            String key = keys.nextElement().toString();
            String value = properties.getProperty(key);
            try {
                // 创建对象
                Object o = Class.forName(value).newInstance();
                // 将对象放入集合中
                map.put(key,o);
           } catch (Exception e) {
                e.printStackTrace();
           }
       }
   }
    // 从容器中获取对象
 public static Object getBean(String key){
        return map.get(key);
   }
}
创建Dao对象的调用者StudentService
public class StudentService {
    public Student findStudentById(int id)
     {
        // 从容器中获取对象
        StudentDao studentDao = (StudentDao) Container.getBean("studentDao");
        System.out.println(studentDao.hashCode());
        return studentDao.findById(id);
   }
}
测试StudentService
public class Test {
    public static void main(String[] args)
    {
      StudentService studentService = new StudentService();
      System.out.println(studentService.findStudentById(1));
      System.out.println(studentService.findStudentById(1));
   }
}
IOC_Spring实现IOC
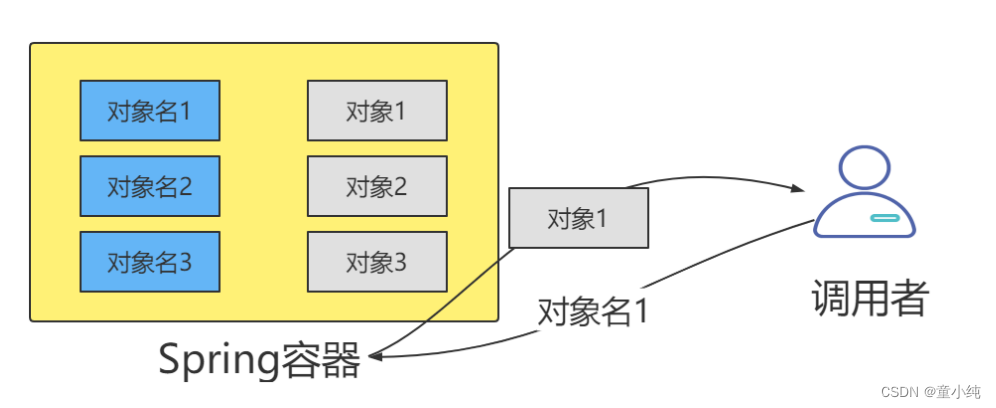
接下来我们使用Spring实现IOC,Spring内部也有一个容器用来管 理对象。
创建Maven工程,引入依赖
<dependencies>
    <dependency>
        <groupId>org.springframework</groupId>
        <artifactId>spring-context</artifactId>
        <version>5.3.13</version>
    </dependency>
    <dependency>
        <groupId>junit</groupId>
        <artifactId>junit</artifactId>
        <version>4.12</version>
        <scope>test</scope>
    </dependency>
</dependencies>
创建POJO类、Dao类和接口
public class Student {
    private int id;
    private String name;
    private String address;
  // 省略getter/setter/构造方法/tostring
}
public interface StudentDao {
    // 根据id查询学生
    Student findById(int id);
}
public class StudentDaoImpl implements StudentDao{
    @Override
    public Student findById(int id) {
        // 模拟从数据库查找出学生
        return new Student(1,"程序员","北京");
   }
}
编写xml配置文件,配置文件中配置需要Spring帮我们创建的对象。
<?xml version="1.0" encoding="UTF-8"?>
<beans xmlns="http://www.springframework.org/schema/beans"
      xmlns:xsi="http://www.w3.org/2001/XMLSchema-instance"
      xsi:schemaLocation="http://www.springframework.org/schema/beans
      http://www.springframework.org/schema/beans/spring-beans.xsd">
    <bean id="studentDao" class="com.tong.dao.StudentDaoImpl"></bean>
</beans>
测试从Spring容器中获取对象。
public class TestContainer {
    @Test
    public void t1(){
        // 创建Spring容器
        ApplicationContext ac = new ClassPathXmlApplicationContext("bean.xml");
        // 从容器获取对象
        StudentDao studentDao1 = (StudentDao) ac.getBean("studentDao");
        StudentDao studentDao2 = (StudentDao) ac.getBean("studentDao");
        System.out.println(studentDao1.hashCode());
        System.out.println(studentDao2.hashCode());
        System.out.println(studentDao1.findById(1));
   }
}
IOC_Spring容器类型 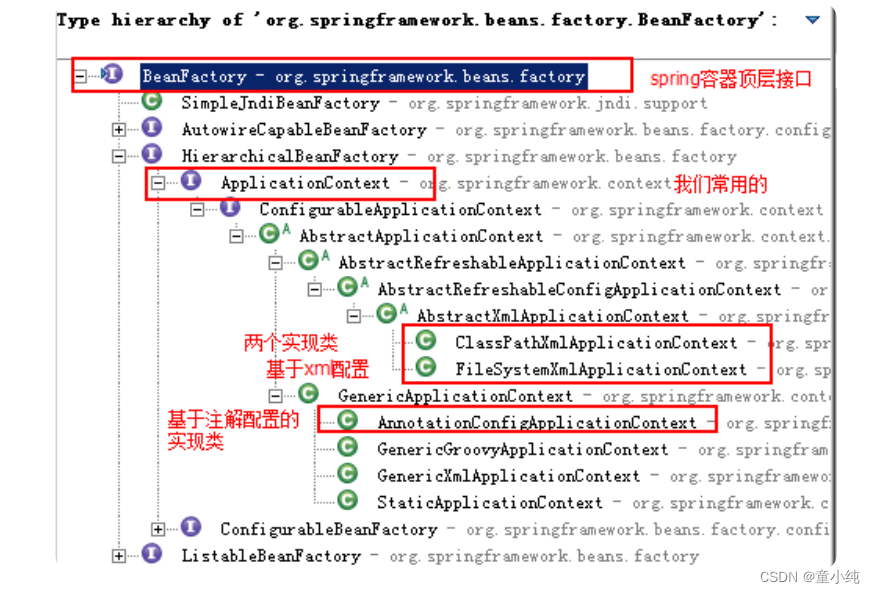 容器接口
容器接口
1、BeanFactory:BeanFactory是Spring容器中的顶层接口,它可 以对Bean对象进行管理。
2、ApplicationContext:ApplicationContext是BeanFactory的子 接口。它除了继承 BeanFactory的所有功能外,还添加了对国际 化、资源访问、事件传播等方面的良好支持。
ApplicationContext有以下三个常用实现类:、
容器实现类
1、ClassPathXmlApplicationContext:该类可以从项目中读取配置文件
2、FileSystemXmlApplicationContext:该类从磁盘中读取配置文件
3、AnnotationConfigApplicationContext:使用该类不读取配置文件,而是会读取注解
@Test
public void t2(){
    // 创建spring容器
    //       ApplicationContext ac = new ClassPathXmlApplicationContext("bean.xml");
    ApplicationContext ac = new FileSystemXmlApplicationContext("C:\\Users\\a\\IdeaProjects\\spring_demo\\src\\main\\resources\\bean.xml");

    // 从容器中获取对象
    StudentDao userDao = (StudentDao)ac.getBean("studentDao");
    System.out.println(userDao);
    System.out.println(userDao.findById(1));
}