已经做了四张图片的标注,很复杂,但遇到两个问题:
labelimg2无法对边界处的目标进行标注,导致标注不完全;
后续的算法是基于正方形的图片进行训练的,虽然可以训练矩形,但要多一步,不如在标注前就处理好图片。
结合以上两个问题,下面分享解决思路与代码。
1. 图片遍历/读取/裁剪/填充/无损保存:

都是opencv的基础操作,不展开介绍。代码如下:
import os
import os.path
import cv2

def cv_show(name, img, pause = False):
    cv2.imshow(name, img)
    key = cv2.waitKey(0 if pause == True else 1) & 0xFF
    if key == 27:       # keycode 27 = Escape
        cv2.destroyAllWindows()
    else:
        cv2.destroyAllWindows()
        return 1

if __name__ == "__main__":
    path_origin = 'image_1280-800'      # 输入原文件夹地址
    path_crop = 'image'                 # 输入原文件夹地址
    files = os.listdir(path_origin)     # 读入文件夹
    num_bub = len(files)                # 统计文件夹中的文件个数

    # 检查path_crop文件夹是否存在,不存在则创建
    if not os.path.exists(path_crop):
        os.makedirs(path_crop)
    # 1. 图片遍历
    for file in files:
        # 2. 读取图像
        img = cv2.imread(path_origin + '\\' + file)
        flow_img = img.copy()
        # 显示读取到的图像
        # if cv_show(file, flow_img, True) is None:
        #     break

        #3. 切割图片
        #截取的左上坐标
        left_top = (128, 0)
        #截取的右下坐标
        right_bottom = (1152, 800)
        # 裁剪坐标为[y0:y1, x0:x1]
        flow_img_cut = flow_img[left_top[1]:right_bottom[1],left_top[0]:right_bottom[0]]

        # 4. 常数值填充, 需要设置一个value值
        flow_img_bord = cv2.copyMakeBorder(flow_img_cut, 112, 112, 0, 0, cv2.BORDER_CONSTANT, value = (255, 255, 255))

        # 5. 无损保存
        # 0代表图片保存时的压缩程度,有0-9这个范围的10个等级,数字越大表示压缩程度越高。
        cv2.imwrite(path_crop + '\\' + file, flow_img_bord, [cv2.IMWRITE_PNG_COMPRESSION, 0])

        # 显示处理后的图像
        # if cv_show('flow_img_bord', flow_img_bord, True) is None:
        #     break
2. XML文件读取/修改/保存
图片经过裁剪填充后,由(1280*800)变为(1024*1024),但之前标注过的xml文件中的目标框会偏移,要修正偏移有两步:1、计算偏移量;2、读取/修改/保存xml文件。
2.1. 计算偏移量
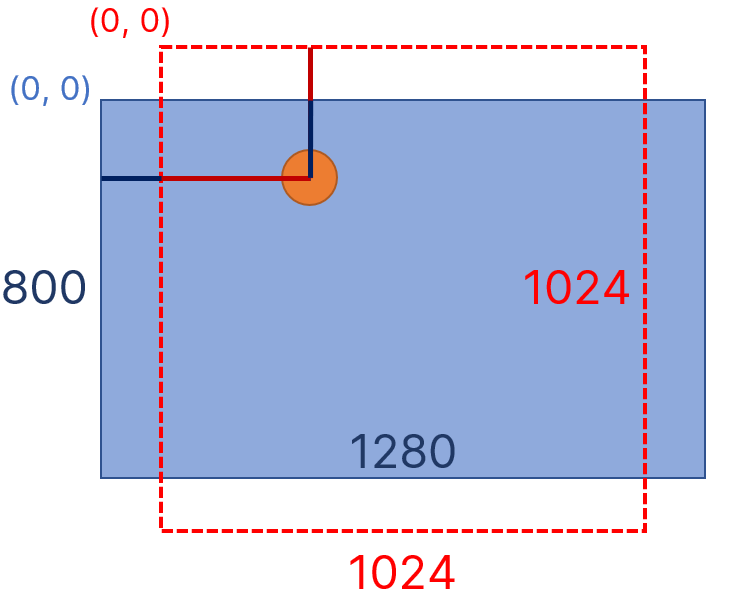
偏移量的计算比较简单,opencv的坐标原点在左上角,如图所示,横坐标需要减去 ,纵坐标需要加上
 ,体现在2.2.代码中。
2.2. 读取/修改/保存xml文件
节点的查找有两种方法,一是逐级节点查找,二是全部节点查找。
节点结构如下:
<annotation verified="yes">
    <folder>image</folder>
    <filename>images1_0000.png</filename>
    <path>C:\Users\glanc\Desktop\flow_dataset\image\images1_0000.png</path>
    <source>
        <database>Unknown</database>
    </source>
    <size>
        <width>1024</width>
        <height>1024</height>
        <depth>1</depth>
    </size>
    <segmented>0</segmented>
    <object>
        <name>single</name>
        <pose>Unspecified</pose>
        <truncated>0</truncated>
        <difficult>0</difficult>
        <robndbox>
            <cx>250.5867</cx>
            <cy>336.501</cy>
            <w>72.8736</w>
            <h>49.5941</h>
            <angle>3.041593</angle>
        </robndbox>
        <extra/>
    </object>
    <object>
        <name>single</name>
        <pose>Unspecified</pose>
        <truncated>0</truncated>
        <difficult>0</difficult>
        <robndbox>
            <cx>330.6097</cx>
            <cy>183.8053</cy>
            <w>70.3055</w>
            <h>41.3395</h>
            <angle>0.17</angle>
        </robndbox>
        <extra/>
    </object>
</annotation>
节点结构如下:
<annotation verified="yes">一级节点;
<folder>、<filename>、<path>、...、<object>、<object>等为二级节点;
<object>下的<name>、<pose>、...、<robndbox>等为三级节点;
<robndbox>下的<cx>、<cy>、<w>、<h>、<angle>五项为四级节点,其中<cx>、<cy>是需要修改的数值。
步骤都在注释里,代码如下,需要注意的一点是cx.text得到的是str,需要转换为浮点数才可以计算,计算完成后转换为字符串才可以保存。
import os
import xml.etree.ElementTree as ET

path = 'label_1280-800'      # 输入原文件夹地址
sv_path = 'label'  # 修改后的xml文件存放路径
files = os.listdir(path)

for xmlFile in files:
    tree = ET.parse(os.path.join(path, xmlFile))
    root = tree.getroot()  # 得到根节点
    # 方法一
    # https://blog.csdn.net/weixin_39580041/article/details/113581299
    # 查找二级节点object
    nodes = root.findall('object')
    for node in nodes:
        # object节点没有属性值
        # print('节点名称:', node.tag)
        # print('节点属性:', node.attrib)

        # 继续往下找三级节点:robndbox
        robndbox = node.find('robndbox')

        # 继续往下找四级节点:cx,cy
        cx = robndbox.find('cx')
        cx_new = str(float(cx.text) - 256 / 2)
        cx.text = cx_new
        cy = robndbox.find('cy')
        cy_new = str(float(cy.text) + 224 / 2)
        cy.text = cy_new
        # print(cx, cy)
    tree.write(os.path.join(sv_path, xmlFile))

    # 方法二:直接定位节点位置
    # https://blog.csdn.net/u013996948/article/details/79157795
    # print(root.text)
    # #遍历文件所有的tag 为目标的值得标签
    # for elem in root.iter('cx'):
    #     cx_new = float(elem.text) - 256 / 2
    #     elem.text = str(cx_new)
    # for elem in root.iter('cy'):
    #     cy_new = float(elem.text) + 224 / 2
    #     elem.text = str(cy_new)
    # tree.write(os.path.join(sv_path, xmlFile))
参考文章:
https://blog.csdn.net/weixin_39580041/article/details/113581299