文件上传功能(upload)+文件删除功能+配置spring cloud文件上传路径
问题描述
最近项目中遇到了文件上传功能,首次接触vue element,纪念一下开发的过程和踩得小坑
话不多说,代码已备好,转载请注明出处。
vue前端控件代码
div代码 文件上传+删除
<div style="width: 15%;height:10%;marging-top:-15px">
<el-col span="3">
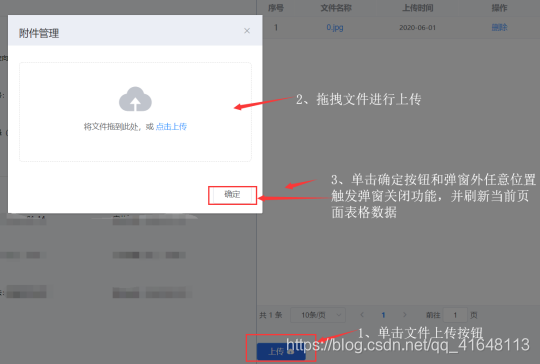
<el-button size='small' type="primary" @click="file">文件上传<i class="el-icon-upload el-icon--right"></i></el-button>
</el-col>
<el-dialog
title="附件管理"
:visible.sync="fileupload"
width="30%"
:before-close="handleClose"
>
<span>
<el-upload
class="upload-demo"
drag
multiple
:on-remove="handleRemove"
:before-remove="beforeRemove"
:http-request="uploadSectionFile"
>
<i class="el-icon-upload"></i>
<div class="el-upload__text">
将文件拖到此处,或
<em>点击上传</em>
</div>
</el-upload>
</span>
<span slot="footer" class="dialog-footer">
<el-button @click="handleClose">确定</el-button>
</span>
</el-dialog>
</div>
js代码
//定义弹窗的是否展示
 data() {


    return {


      fileupload: false
      }
 }
//单击文件上传按钮时,展示弹窗
file() {


  this.fileupload = true;
},
//文件上传具体过程,通过form表单提交
uploadSectionFile: function(param) {


  let file = param.file;
  //通过路径访问本地的文件下载方法
  let controller = "http://localhost:1111/upload/uploadFile";
  let form = new FormData();
  form.append("file", file);
  form.append("id", param.file.uid);
  let xhr = new XMLHttpRequest();
  xhr.open("post", controller, true);
  xhr.send(form);
},
//单击确定按钮或单击弹窗外的部分后弹窗隐藏,并自动刷新当前页
handleClose(done) {


  this.fileupload=false;
  this.loadFileTalbe();//该方法为页面初始化时数据表格查询展示的功能,不做过多赘述,理解为表格页面刷新功能。
},
//弹窗内删除文件时的提示确认功能
beforeRemove(file, fileList) {


  return this.$confirm(`确定移除 ${

      file.name}?`);
},
//删除功能的具体展示
handleRemove(file, fileList) {


	//removeFile为访问java端的api链接,参数uid为element上传控件自带的 id
  removeFile({

    id:file.uid}).then(resp => {


    if (resp && resp.data) {


      if (resp.data == true) {


        this.$message({


          showClose: true,
          message: "删除成功!",
          type: "success"
        });
      } else {


        this.$message({


          showClose: true,
          message: "删除失败!",
          type: "error"
        });
      }
    }
  }).catch(error => {


    console.log("error", error.message);
  })
}
//vue界面书写完成
java端spring cloud 文件代码
java 端代码
@Controller
@RequestMapping("/upload")
public class UploadController {


    @Autowired
    private UploadService uploadService;
    //保存路径为D盘fj文件夹下
    public static  String STATIC_PATH = "D:/fj/";
    @CrossOrigin
    @RequestMapping(value = "/uploadFile", method = RequestMethod.POST)
    @ResponseBody
    public String uploadFile(@RequestBody MultipartFile file,
                             @RequestParam(value = "id", required = false) String id) {


        if (file.isEmpty()) {


            return "文件为空";
        }
        // 获取文件名
        Date date = new Date();
        SimpleDateFormat dateFormat = new SimpleDateFormat("yyyyMMddHHmmss");
        String sj=dateFormat.format(date);
        //原文件名
        String fileName = file.getOriginalFilename();
        // 获取文件的后缀名
        String suffixName = fileName.substring(fileName.lastIndexOf("."));
        //新名字(重复文件名问题)格式为:时间+原名文件名称
        String newname=sj+fileName;
        // 文件上传路径
        String filePath = STATIC_PATH +newname;
        //创建文件夹
        File dest = new File(filePath);
        // 检测是否存在目录
        if (!dest.getParentFile().exists()) {


            dest.getParentFile().mkdirs();
        }
        try {


        	//文件保存到本地
            file.transferTo(dest);
            Map param = new HashMap();
            param.put("id", id);
            param.put("newname", newname);
            param.put("foldername", fileName);
            //数据库中保存需要的参数,具体流程不做赘述,根据业务需求自行实现
            uploadService.fjgl(param);
            return "上传成功";
            } catch (IllegalStateException e) {


                e.printStackTrace();
            } catch (IOException e) {


                e.printStackTrace();
            }
            return "上传失败";
    }
至此,保存文件到本地和保存文件名到数据库的功能已经完全实现
效果展示
弹窗内文件删除功能展示(删除功能根据插件自动生成的uid实现)


配置spring cloud文件上传路径
上文示例中我们用的static静态常量定义文件保存的绝对路径
还可以修改配置文件来改变文件的上传路径,方法如下
1、bootstrap.yml配置文件书写内容如下
ws:
  excelTemplateDpwloadPath: D:\fj\
2、新增配置路径类
@Component
@ConfigurationProperties(prefix = ConfigProperties.PREFIX)
public class ConfigProperties {


    public static final String PREFIX = "ws";

    private String excelTemplateDpwloadPath;

    public String getExcelTemplateDpwloadPath() {


        return excelTemplateDpwloadPath;
    }

    public void setExcelTemplateDpwloadPath(String excelTemplateDpwloadPath) {


        this.excelTemplateDpwloadPath = excelTemplateDpwloadPath;
    }
}
3、调用路径
 @Autowired
 private ConfigProperties configProperties;
 //设置文件路径
 String realPath = configProperties.getExcelTemplateDpwloadPath();//这里使用配置类配置文件路径
写在最后
作者新接触vue element框架,目前还是面向百度编程开发阶段。
为实现本文的文件上传功能,参考了不少博主的博客,在此向前辈们表示衷心的感谢。
附参考文献链接,如有侵权内容,请及时联系作者删除
参考文献
使用element的upload组件实现一个完整的文件上传功能(上)
SpringBoot中使用yml配置文件以及配置类实现文件上传下载路径的修改