目录

前言
本项目目标是利用pywin32来获取游戏图像信息,并利用OpenCV进行识别和处理,从而实现QQ连连看游戏中相同图形的连通。
QQ连连看是一款非常受欢迎的游戏,通过连接相同花色的两张牌来消除它们,规则简单易懂。在我上大学的时候,QQ连连看风靡一时,我也是其中的狂热玩家之一。如果当时我会这个项目,我相信我早就成为了神眼 4000000级别的高手了!
这个项目不仅可以帮助玩家提高连连看的技能,还可以作为一个有趣的学习项目,深入研究图像处理和计算机视觉的应用。无论是解锁更高级别的成就,还是探索图像处理的奥秘,这个项目都将给你带来无尽的乐趣和挑战!
总体设计
本部分包括系统整体结构图和系统流程图。
系统整体结构图
系统整体结构如图所示。
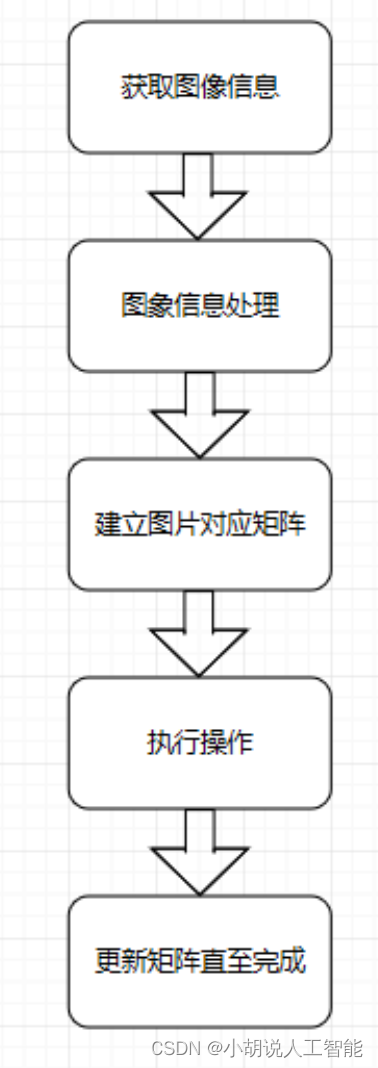
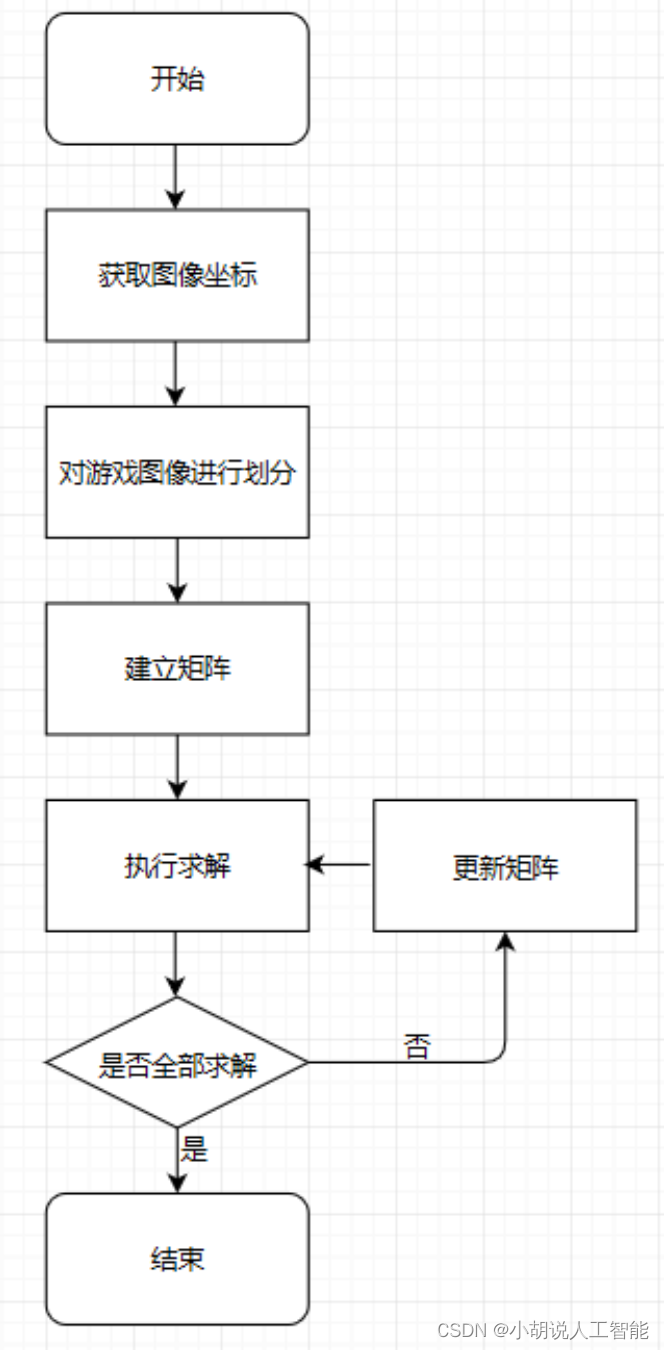
系统流程图
系统流程如图所示。
运行环境
本部分包括 Python 环境、Pycharm 环境配置和 安装相关库。
Python 环境
需要 Python 3.6 及以上配置
Pycharm 环境
通过 https://pypi.tuna.tsinghua.edu.cn/simple/ 下载pywin32、matplotlib、numpy、OpenCV、Pillow。
进入相关环境后,可使用如下模版进行库的安装:
pip install -i https://pypi.tuna.tsinghua.edu.cn/simple/ 相关库名
模块实现
本项目包括本项目包括 4 个模块:获取句柄、图像划分、建立矩阵,矩阵求解,下面分别给出各模块的功能介绍及相关代码。
1. 获取句柄
QQ 游戏连连看的游戏区图像水平方向有 19 列,竖直方向有 11 行。确定连连看图像的坐标进行划分建立矩阵,通过获取游戏窗口句柄来实现,相关代码如下:
window_title = 'QQ游戏 - 连连看角色版'
num_grid_per_row = 19
num_grid_per_col = 11
screen_width = win32api.GetSystemMetrics(0)
screen_height = win32api.GetSystemMetrics(1)
hwnd = win32gui.FindWindow(win32con.NULL,window_title)
#获取游戏窗口句柄
if hwnd == 0 :
    error_exit('%s not found' % window_title)
window_left,window_top,window_right,window_bottom = win32gui.GetWindowRect(hwnd)
print(window_left,window_top,window_right,window_bottom)
if min(window_left,window_top) < 0\
    or window_right > screen_width\
    or window_bottom > screen_height:
    error_exit('window is at wrong position')
window_width = window_right - window_left
window_height = window_bottom - window_top
game_area_left = window_left + 14.0 / 800.0 * window_width
game_area_top = window_top + 181.0 / 600.0 * window_height
game_area_right = window_left + 603 / 800.0 * window_width
game_area_bottom = window_top + 566 / 600.0 * window_height
#确定游戏区图像坐标
game_area_width = game_area_right - game_area_left
game_area_height = game_area_bottom - game_area_top
grid_width = game_area_width / num_grid_per_row
grid_height = game_area_height / num_grid_per_col
2. 图像划分
获得游戏图像坐标,可准确地捕捉图像信息,将游戏图像进行区分处理。
import cv2
import numpy as np
from matplotlib import pyplot as plt
    #最简单的以灰度直方图作为相似比较的实现
def classify_gray_hist(image1,image2,size = (256,256)):
    #先计算直方图
    #几个参数必须用方括号括起来
    #直接用灰度图计算直方图,使用第一个通道
    #进行通道分离后,得到多个通道的直方图
    #bins 取为16
    image1 = cv2.resize(image1,size)
    image2 = cv2.resize(image2,size)
    hist1 = cv2.calcHist([image1],[0],None,[256],[0.0,255.0])
    hist2 = cv2.calcHist([image2],[0],None,[256],[0.0,255.0])
    #可以比较直方图
    plt.plot(range(256),hist1,'r')
    plt.plot(range(256),hist2,'b')
    plt.show()
    #计算直方图的重合度
    degree = 0
    for i in range(len(hist1)):
        if hist1[i] != hist2[i]:
            degree = degree + (1 - abs(hist1[i]-hist2[i])/max(hist1[i],hist2[i]))
        else:
            degree = degree + 1
    degree = degree/len(hist1)
    return degree
  #计算单通道直方图的相似值
def calculate(image1,image2):
    hist1 = cv2.calcHist([image1],[0],None,[256],[0.0,255.0])
    hist2 = cv2.calcHist([image2],[0],None,[256],[0.0,255.0])
     #计算直方图的重合度
    degree = 0
    for i in range(len(hist1)):
        if hist1[i] != hist2[i]:
            degree = degree + (1 - abs(hist1[i]-hist2[i])/max(hist1[i],hist2[i]))
        else:
            degree = degree + 1
    degree = degree/len(hist1)
    return degree
  #通过得到每个通道的直方图来计算相似度
def classify_hist_with_split(image1,image2,size = (256,256)):
    #将图像resize后,分离为三个通道,再计算每个通道的相似值
    image1 = cv2.resize(image1,size)
    image2 = cv2.resize(image2,size)
    sub_image1 = cv2.split(image1)
    sub_image2 = cv2.split(image2)
    sub_data = 0
    for im1,im2 in zip(sub_image1,sub_image2):
        sub_data += calculate(im1,im2)
    sub_data = sub_data/3
    return sub_data
  #平均哈希算法计算
def classify_aHash(image1,image2):
    image1 = cv2.resize(image1,(8,8))
    image2 = cv2.resize(image2,(8,8))
    gray1 = cv2.cvtColor(image1,cv2.COLOR_BGR2GRAY)
    gray2 = cv2.cvtColor(image2,cv2.COLOR_BGR2GRAY)
    hash1 = getHash(gray1)
    hash2 = getHash(gray2)
    return Hamming_distance(hash1,hash2)
  def classify_pHash(image1,image2):
    image1 = cv2.resize(image1,(32,32))
    image2 = cv2.resize(image2,(32,32))
    gray1 = cv2.cvtColor(image1,cv2.COLOR_BGR2GRAY)
    gray2 = cv2.cvtColor(image2,cv2.COLOR_BGR2GRAY)
    #将灰度图转为浮点型,再进行dct变换
    dct1 = cv2.dct(np.float32(gray1))
    dct2 = cv2.dct(np.float32(gray2))
    #取左上角的8*8,代表图片的最低频率
    #这个操作等价于C++中利用OpenCV实现的掩码操作
    #在Python中进行掩码操作,可以直接取出图像矩阵的某一部分
    dct1_roi = dct1[0:8,0:8]
    dct2_roi = dct2[0:8,0:8]
    hash1 = getHash(dct1_roi)
    hash2 = getHash(dct2_roi)
    return Hamming_distance(hash1,hash2)
  #输入灰度图,返回hash
def getHash(image):
    avreage = np.mean(image)
    hash = []
    for i in range(image.shape[0]):
        for j in range(image.shape[1]):
            if image[i,j] > avreage:
                hash.append(1)
            else:
                hash.append(0)
    return hash
  #计算汉明距离
def Hamming_distance(hash1,hash2):
    num = 0
    for index in range(len(hash1)):
        if hash1[index] != hash2[index]:
            num += 1
    return num
  if __name__ == '__main__':
    img1 = cv2.imread('row_0-col_16.jpg')
    cv2.imshow('img1',img1)
    img2 = cv2.imread('row_1-col_17.jpg')
    cv2.imshow('img2',img2)
    #degree = classify_gray_hist(img1,img2)
    degree = classify_hist_with_split(img1,img2)
    #degree = classify_aHash(img1,img2)
    #degree = classify_pHash(img1,img2)
    print(degree)
    cv2.waitKey(0)
  #编写compare_image
def same_grid(image_a,image_b): #定义相同网格
    numpy_array_a = numpy.array(image_a)
    numpy_array_b = numpy.array(image_b)
    #足够小,不需要resize
    if 0.95 < compare_image.classify_hist_with_split(numpy_array_a,numpy_array_b,
        size=image_a.size):
        return True
    return False
3. 建立矩阵
对游戏图像信息处理完毕后转化为数字矩阵,相同的图案转化成相同的数字,来帮助计算机进行运算执行。
def game_area_image_to_matrix(image_,grid_width,grid_height):
    #将图片转化为网格
    pos_to_image = {

    }
    for row in range(11):
        pos_to_image[row] = {

    }
        for col in range(19):
            grid_left = col * grid_width
            grid_top = row * grid_height
            grid_right = grid_left + grid_width
            grid_bottom = grid_top + grid_height
            grid_image = copy_part_image(image_,
                                         grid_left,grid_top,
                                         grid_right,grid_bottom)
            pos_to_image[row][col] = grid_image
    #区分网格
    pos_to_type_id = {

    }
    known_type_image = []
    for row in range(11):
        pos_to_type_id[row] = {

    }
        for col in range(19):
            this_image = pos_to_image[row][col]
            if is_empty_grid(this_image):
                pos_to_type_id[row][col] = 0
                continue
            found = False
            for index in range(len(known_type_image)):
                if same_grid(known_type_image[index],this_image):
                    id = index + 1
                    pos_to_type_id[row][col] = id
                    found = True
                    break
      #对网格进行编号
            if not found:
                known_type_image.append(this_image)
                id = len(known_type_image)
                pos_to_type_id[row][col] = id
    return pos_to_type_id
4. 矩阵求解
相关代码如下:
def execute_one_step(one_step,
                     game_area_left,game_area_top,
                     grid_width,grid_height):
    from_row,from_col,to_row,to_col = one_step
    from_x = game_area_left + (from_col + 0.5) * grid_width
    from_y = game_area_top + (from_row + 0.5) * grid_height
    to_x = game_area_left + (to_col + 0.5) * grid_width
    to_y = game_area_top + (to_row + 0.5) * grid_height
    pyautogui.moveTo(from_x,from_y)
    pyautogui.click()
    pyautogui.moveTo(to_x,to_y)
    pyautogui.click()
    #使用pyautogui实现自动化鼠标单击图案
def print_matrix(matrix):
    for row in range(11):
        line = str()
        for col in range(19):
            if matrix[row][col] == 0:
                id = '  '
            else:
                id = '%02d' % matrix[row][col]
            line+='%s  ' % id
        print(line)
while True:
    print('\n\n\n---------')
    game_area_image = grab_screen(game_area_left,game_area_top,
                                  game_area_right,game_area_bottom)
    #捕捉游戏画面
    id_matrix = game_area_image_to_matrix(game_area_image,
                                        grid_width,
                                        grid_height)
    #get matrix of grid_type_id
    print_matrix(id_matrix)
    #打印矩阵
def solve_matrix_one_step(matrix):
    matrix_row = len(matrix)
    matrix_col = len(matrix[0])
    for row in range(matrix_row):
        for col in range(matrix_col):
            if matrix[row][col] == 0:
                continue
            target_row,target_col = DFS(row,col,
                                        target_number=matrix[row][col],
                                        empty_number=0,
                                        matrix=matrix,
                                        matrix_row=matrix_row,matrix_col=matrix_col,
                                        path=str(),
                                        first_step=True)
            if target_row:
                return row,col,target_row,target_col
    #判断求解成功,否则无解
    for row in range(matrix_row):
        for col in range(matrix_col):
            if matrix[row][col] != 0:
                #无解
                error_exit('no solution??')
    #全空则求解完毕
    return None
while True:
     print('---one step---')
     print_matrix(id_matrix)
     one_step = solve_matrix_one_step(id_matrix)
#找出相同的一组进行相连求解
     if not one_step:
        print('solved')
        exit(0)
print(one_step)
     execute_one_step(one_step,
                      game_area_left,game_area_top,
                      grid_width,grid_height)
     from_row,from_col,to_row,to_col = one_step
     id_matrix[from_row][from_col] = 0
     id_matrix[to_row][to_col] = 0
     time.sleep(args.interval)
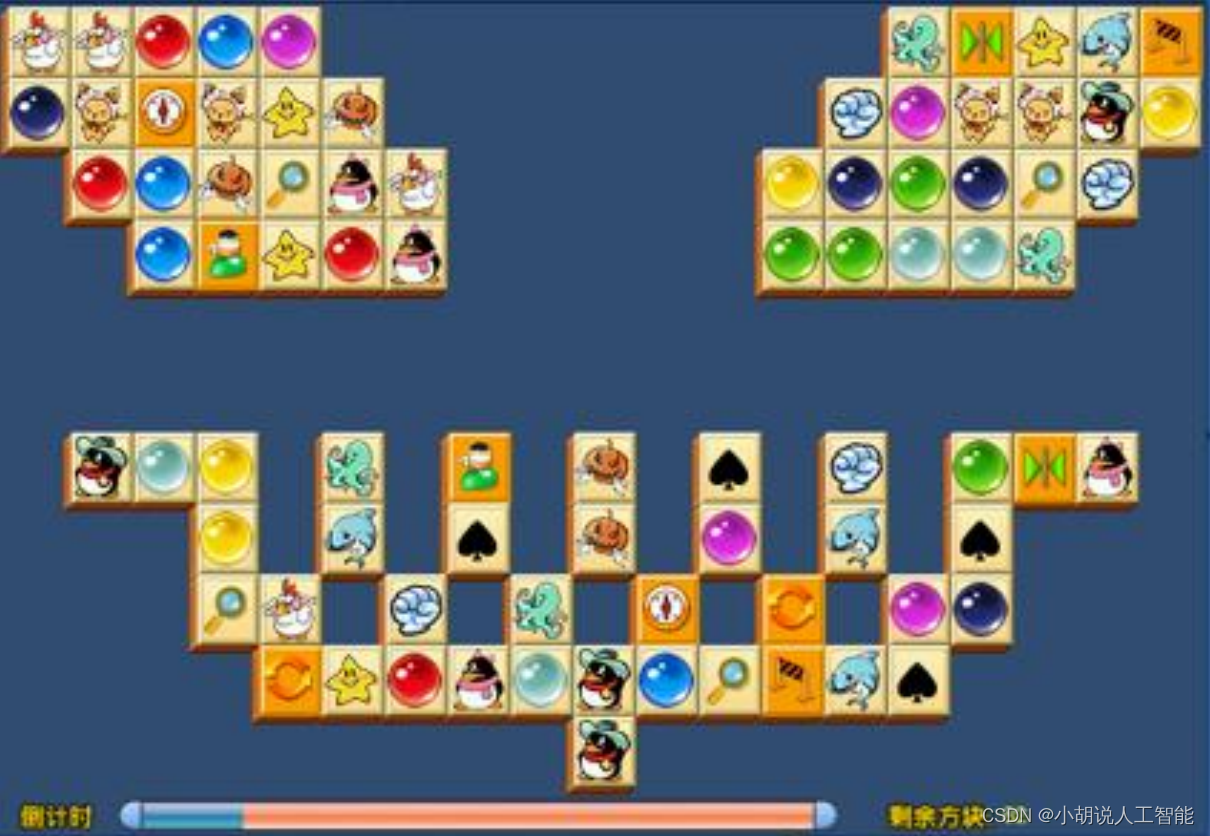
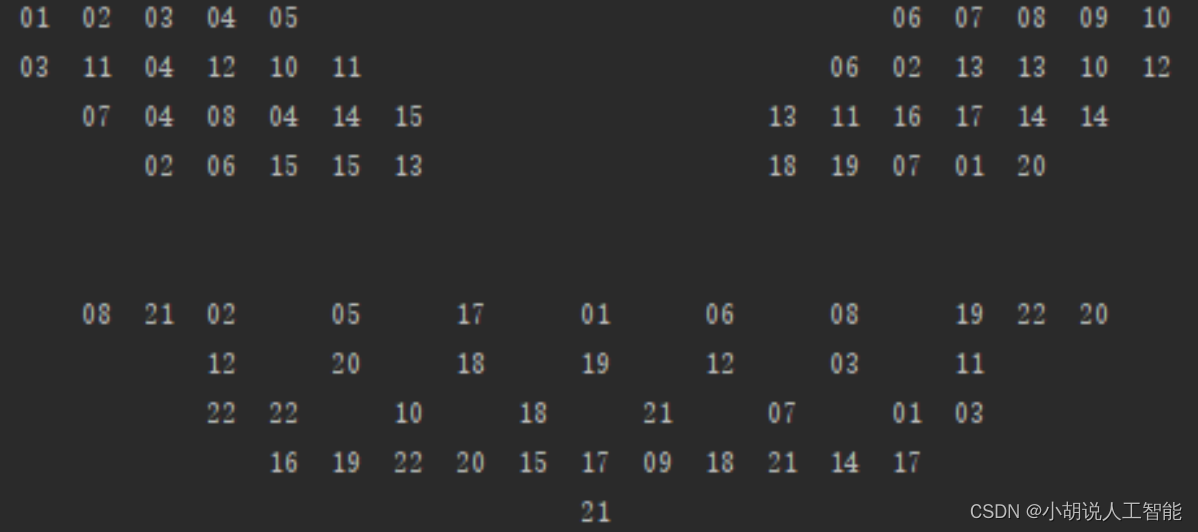
系统测试
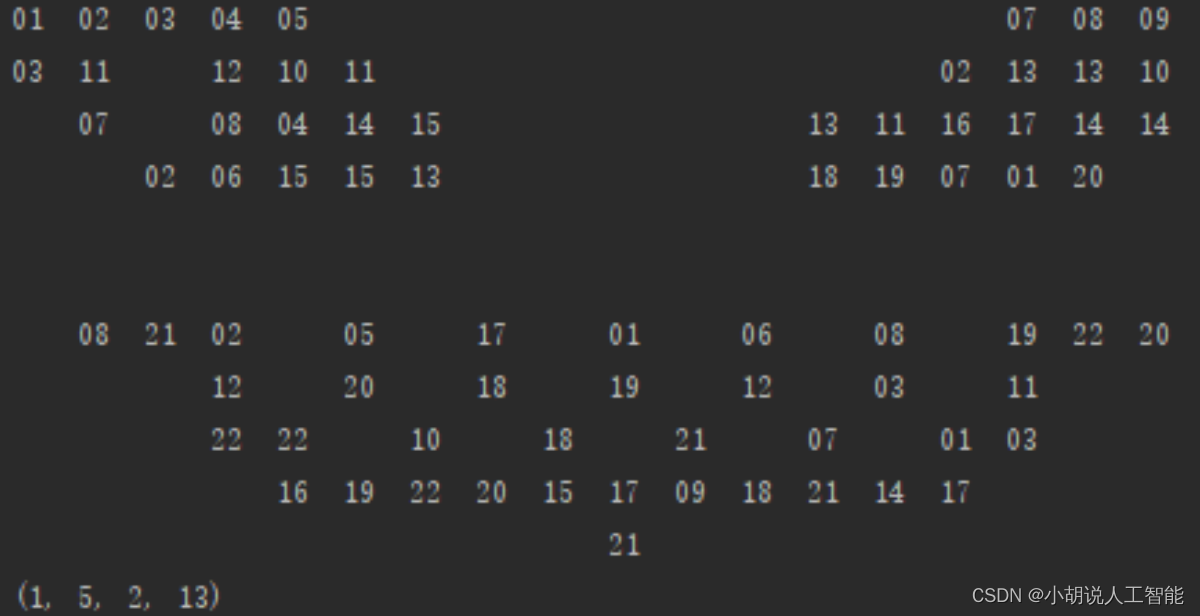
将截取获得的游戏图像转化成数字矩阵,如图 1 和图 2 所示,数字矩阵如图 3 所示,测试效果如图 4 所示。
工程源代码下载
其它资料下载
如果大家想继续了解人工智能相关学习路线和知识体系,欢迎大家翻阅我的另外一篇博客《重磅 | 完备的人工智能AI 学习——基础知识学习路线,所有资料免关注免套路直接网盘下载》
这篇博客参考了Github知名开源平台,AI技术平台以及相关领域专家:Datawhale,ApacheCN,AI有道和黄海广博士等约有近100G相关资料,希望能帮助到所有小伙伴们。