概述
本文章描述如何搭建 ASP.NET Core 2.0 WebAPI 依赖注入三层架构,为什么要加入依赖,并不是为了提供程序性能,而是为了项目间解耦,项目之间能够更加独立。
步骤
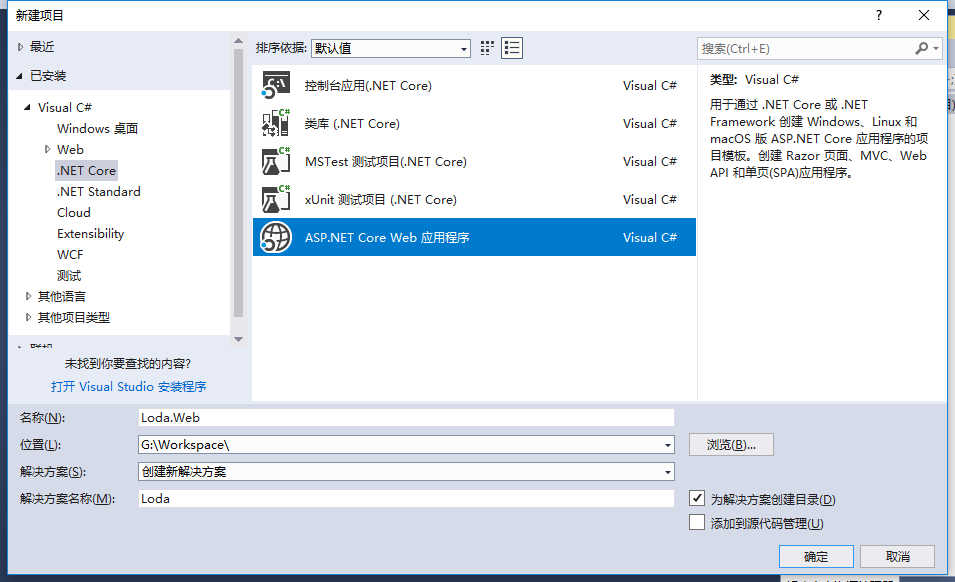
1. 新建解决方案,添加一个ASP.NET Core WebApi应用

2. 添加四个.Net Core类库:Entity、BLL、DAL、Common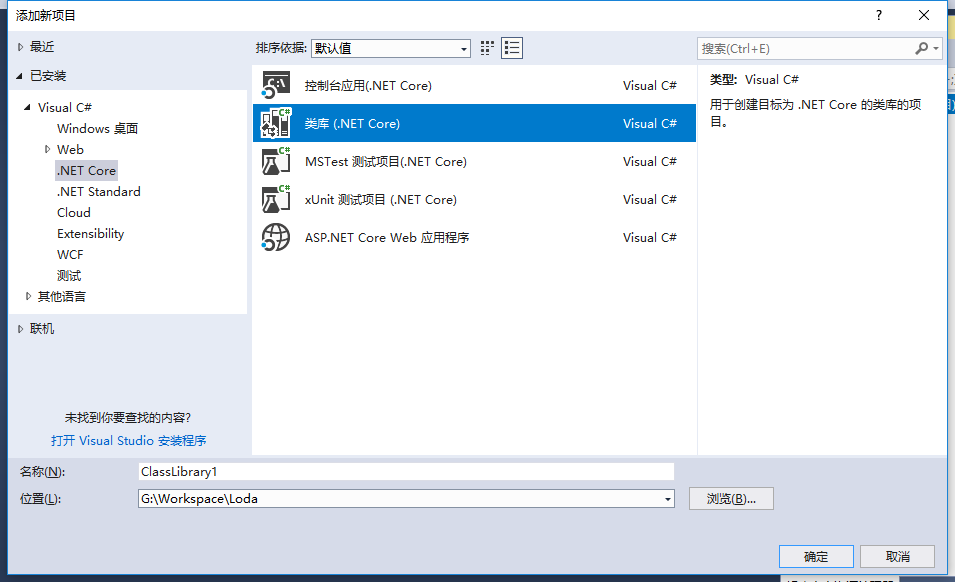
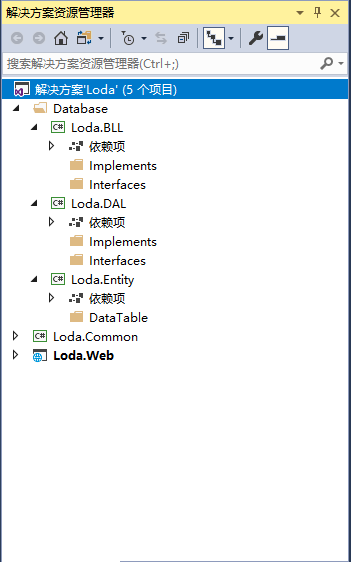
3. 按照以下截图进行解决方案布局
4. 添加DAL层文件
- 在 DAL -> Interfaces 文件夹下,添加接口 IDalService.cs 。这里的数据库上下文依赖注入是为目录作准备的,先添加上。


    public interface IDalService<T> where T : class, new()
    {
        /// <summary>
        /// 新增实体
        /// </summary>
        /// <param name="entity">实体</param>
        /// <returns></returns>
        T AddEntity(T entity);

        /// <summary>
        /// 获取集合
        /// </summary>
        /// <param name="where">linq语句</param>
        /// <returns></returns>
        IQueryable<T> GetEntities(Expression<Func<T, bool>> where);

        /// <summary>
        /// 保存数据
        /// </summary>
        /// <returns></returns>
        int SaveChanges();
    }
- 在 Dal -> Implements 文件夹下,添加基类 DalService.cs。
public class DalService<T> : IDisposable, IDalService<T> where T : class, new()
    {
        private readonly MyContext _context;

        /// <summary>
        /// 获得数据库上下文
        /// </summary>
        /// <param name="context">依赖注入的数据库上下文</param>
        public DalService(MyContext context)
        {
            _context = context;
        }

        public T AddEntity(T entity)
        {
            _context.Set<T>().Add(entity);
            return entity;
        }

        public IQueryable<T> GetEntities(Expression<Func<T, bool>> where)
        {
            return _context.Set<T>().Where(where);
        }

        public int SaveChanges()
        {
            return _context.SaveChanges();
        }

        public void Dispose()
        {
            _context.Dispose();
        }
    }
注意,这里只是简单的三个方法:添加、查找、保存数据库,这三个已经足够做演示,如有需要,请另外添加,如删除、更新等。
- 在 Entity 下添加数据库上下文 MyContext.cs
    public class MyContext : DbContext
    {
        public MyContext() : base()
        {

        }

        public MyContext(DbContextOptions<MyContext> options)
                    : base(options)
        {

        }

        override protected void OnConfiguring(DbContextOptionsBuilder optionsBuilder)
        {
            base.OnConfiguring(optionsBuilder);
        }
    }
5. 添加BLL层文件
- 在 BLL -> Interfaces 文件夹下,添加接口 IBllService.cs
    public interface IBllService<T> where T : class, new()
    {
        T AddEntity(T entity, bool isSave);

        IQueryable<T> GetEntities(Expression<Func<T, bool>> where);

        int SaveChanges();
    }
- 在 BLL -> Implements 文件夹下,添加基类 BllService.cs
    /// <summary>
    /// 数据逻辑层:BLL
    /// </summary>
    /// <typeparam name="T"></typeparam>
    public class BllService<T> : IBllService<T> where T : class, new()
    {

        /// <summary>
        /// 数据库服务
        /// </summary>
        protected IDalService<T> _dal;

        public BllService(IDalService<T> dal)
        {
            _dal = dal;
        }


        public T AddEntity(T entity, bool isSave)
        {
            entity = _dal.AddEntity(entity);
            if (isSave)
            {
                if (SaveChanges() > 0)
                    return null;
            }
            return entity;
        }

        public IQueryable<T> GetEntities(Expression<Func<T, bool>> where)
        {
            return _dal.GetEntities(where);
        }

        public int SaveChanges()
        {
            return _dal.SaveChanges();
        }
    }
6. 最后,在 Startup.cs 中,添加依赖映射。
        public void ConfigureServices(IServiceCollection services)
        {
            DIRegister(services);

            services.AddMvc();
        }

        // 配置依赖注入映射关系
        public void DIRegister(IServiceCollection services)
        {
            services.AddTransient(typeof(IDalService<>), typeof(DalService<>));
        }
所有步骤完成后,解决方案目录如下

到此为止,三层架构已经全部完成,是不是觉得很简单呢。下一章,我们将基于这个三层框架,使用MySQL数据库,进行基于EF Core的DbFirst开发。