1、创建一个自动旋转的地球地图
实现功能:地球仪和camera动画结合在一起,创建旋转行星效果。
实现思路:通过在动画结束时调用easeTo,旋转动画将无限期地继续。旋转在用户交互时暂停,并且在高缩放级别时减慢到停止。
首先在dom中添加一个button:
<button id="btn-spin">Pause rotation</button>
实现代码:
map.on('style.load', () => {


					map.setFog({

    }); // Set the default atmosphere style
				});

				// The following values can be changed to control rotation speed:

				// At low zooms, complete a revolution every two minutes.
				const secondsPerRevolution = 120;
				// Above zoom level 5, do not rotate.
				const maxSpinZoom = 5;
				// Rotate at intermediate speeds between zoom levels 3 and 5.
				const slowSpinZoom = 3;

				let userInteracting = false;
				let spinEnabled = true;

				function spinGlobe() {


					const zoom = map.getZoom();
					if (spinEnabled && !userInteracting && zoom < maxSpinZoom) {


						let distancePerSecond = 360 / secondsPerRevolution;
						if (zoom >
							slowSpinZoom) {


							// Slow spinning at higher zooms
							const zoomDif =
								(maxSpinZoom - zoom) / (maxSpinZoom - slowSpinZoom);
							distancePerSecond *= zoomDif;
						}
						const center = map.getCenter();
						center.lng -= distancePerSecond;
						// Smoothly animate the map over one second.
						// When this animation is complete, it calls a 'moveend' event.
						map.easeTo({


							center,
							duration: 1000,
							easing: (n) => n
						});
					}
				}

				// Pause spinning on interaction
				map.on('mousedown', () => {


					userInteracting = true;
				});

				// Restart spinning the globe when interaction is complete
				map.on('mouseup', () => {


					userInteracting = false;
					spinGlobe();
				});

				// These events account for cases where the mouse has moved
				// off the map, so 'mouseup' will not be fired.
				map.on('dragend', () => {


					userInteracting = false;
					spinGlobe();
				});
				map.on('pitchend', () => {


					userInteracting = false;
					spinGlobe();
				});
				map.on('rotateend', () => {


					userInteracting = false;
					spinGlobe();
				});

				// When animation is complete, start spinning if there is no ongoing interaction
				map.on('moveend', () => {


					spinGlobe();
				});

				document.getElementById('btn-spin').addEventListener('click', (e) => {


					spinEnabled = !spinEnabled;
					if (spinEnabled) {


						spinGlobe();
						e.target.innerHTML = 'Pause rotation';
					} else {


						map.stop(); // Immediately end ongoing animation
						e.target.innerHTML = 'Start rotation';
					}
				});

				spinGlobe();
效果展示:
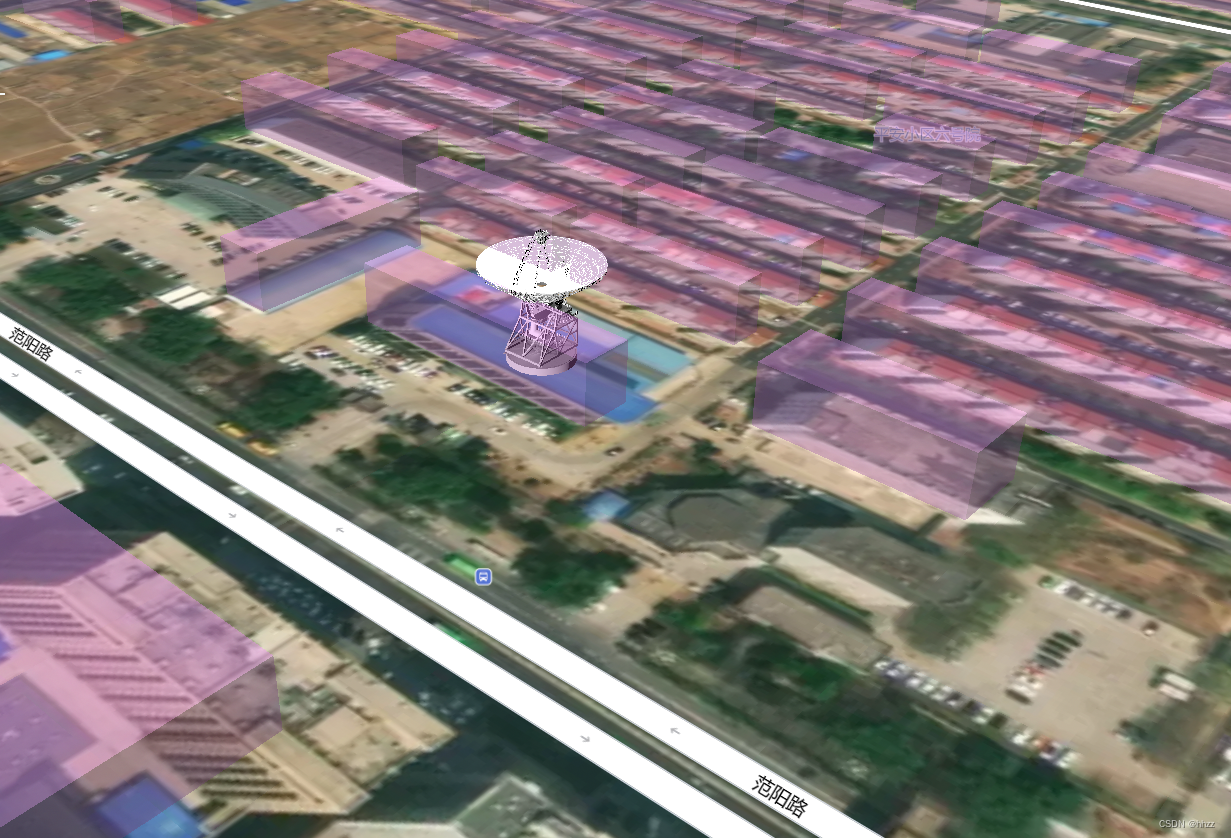
2、添加一个3D模型
使用three.js,首先three.js安装到项目中:
# three.js
npm install --save three
在项目中引入:
	import * as THREE from 'three';
	import {


		GLTFLoader
	} from 'three/examples/jsm/loaders/GLTFLoader.js';
使用带有three.js的自定义样式层将三维模型添加到地图中:
// parameters to ensure the model is georeferenced correctly on the map
				const modelOrigin = [104.9819, 37.39847];
				const modelAltitude = 0;
				const modelRotate = [Math.PI / 2, 0, 0];

				const modelAsMercatorCoordinate = this.$mapboxgl.MercatorCoordinate.fromLngLat(
					modelOrigin,
					modelAltitude
				);

				// transformation parameters to position, rotate and scale the 3D model onto the map
				const modelTransform = {


					translateX: modelAsMercatorCoordinate.x,
					translateY: modelAsMercatorCoordinate.y,
					translateZ: modelAsMercatorCoordinate.z,
					rotateX: modelRotate[0],
					rotateY: modelRotate[1],
					rotateZ: modelRotate[2],
					/* Since the 3D model is in real world meters, a scale transform needs to be
					 * applied since the CustomLayerInterface expects units in MercatorCoordinates.
					 */
					scale: modelAsMercatorCoordinate.meterInMercatorCoordinateUnits()
				};

				// const THREE = window.THREE;

				// configuration of the custom layer for a 3D model per the CustomLayerInterface
				const customLayer = {


					id: '3d-model',
					type: 'custom',
					renderingMode: '3d',
					onAdd: function (map, gl) {


						this.camera = new THREE.Camera();
						this.scene = new THREE.Scene();

						// create two three.js lights to illuminate the model
						const directionalLight = new THREE.DirectionalLight(0xffffff);
						directionalLight.position.set(0, -70, 100).normalize();
						this.scene.add(directionalLight);

						const directionalLight2 = new THREE.DirectionalLight(0xffffff);
						directionalLight2.position.set(0, 70, 100).normalize();
						this.scene.add(directionalLight2);

						// use the three.js GLTF loader to add the 3D model to the three.js scene
						const loader = new GLTFLoader();
						loader.load(
							'https://docs.mapbox.com/mapbox-gl-js/assets/34M_17/34M_17.gltf',
							(gltf) => {


								this.scene.add(gltf.scene);
							}
						);
						this.map = map;

						// use the Mapbox GL JS map canvas for three.js
						this.renderer = new THREE.WebGLRenderer({


							canvas: map.getCanvas(),
							context: gl,
							antialias: true
						});

						this.renderer.autoClear = false;
					},
					render: function (gl, matrix) {


						const rotationX = new THREE.Matrix4().makeRotationAxis(
							new THREE.Vector3(1, 0, 0),
							modelTransform.rotateX
						);
						const rotationY = new THREE.Matrix4().makeRotationAxis(
							new THREE.Vector3(0, 1, 0),
							modelTransform.rotateY
						);
						const rotationZ = new THREE.Matrix4().makeRotationAxis(
							new THREE.Vector3(0, 0, 1),
							modelTransform.rotateZ
						);

						const m = new THREE.Matrix4().fromArray(matrix);
						const l = new THREE.Matrix4()
							.makeTranslation(
								modelTransform.translateX,
								modelTransform.translateY,
								modelTransform.translateZ
							)
							.scale(
								new THREE.Vector3(
									modelTransform.scale,
									-modelTransform.scale,
									modelTransform.scale
								)
							)
							.multiply(rotationX)
							.multiply(rotationY)
							.multiply(rotationZ);

						this.camera.projectionMatrix = m.multiply(l);
						// this.renderer.resetState();
						this.renderer.render(this.scene, this.camera);
						this.map.triggerRepaint();
					}
				};

				map.on('style.load', () => {


					map.addLayer(customLayer, 'waterway-label');
				});
上效果:
3、一个页面创建两个底图之间滑动
以通过左右滑动来比较两个地图
使用mapbox插件 mapbox-gl-compare
安装
npm i mapbox-gl-compare -D
npm i mapbox-gl-sync-move -D
导入
import mapboxgl from ‘mapbox-gl’
import Compare from ‘mapbox-gl-compare’
创建两个div:
<div id="comparison-container">
    <div id="before" class="map"></div>
    <div id="after" class="map"></div>
</div>
核心代码:
	mapboxgl.accessToken = 'xxxxxxx';
    const beforeMap = new mapboxgl.Map({


        container: 'before',
        // Choose from Mapbox's core styles, or make your own style with Mapbox Studio
        style: 'mapbox://styles/mapbox/streets-v12',
        center: [0, 0],
        zoom: 0
    });

    const afterMap = new mapboxgl.Map({


        container: 'after',
        style: 'mapbox://styles/mapbox/satellite-streets-v12',
        center: [0, 0],
        zoom: 0
    });

    // A selector or reference to HTML element
    const container = '#comparison-container';

    const map = new mapboxgl.Compare(beforeMap, afterMap, container, {


        // Set this to enable comparing two maps by mouse movement:
        // mousemove: true
    });
效果如下: