1.概述
1.1 IO流的引入
IO流在很多语言已有体现,诸如C语言的stdio.h,C++中的iostream。Java中的IO流大抵是用于在控制台、磁盘、内存上进行数据的读写操作,完成数据的传递。
我们可以对它进行如下分类:
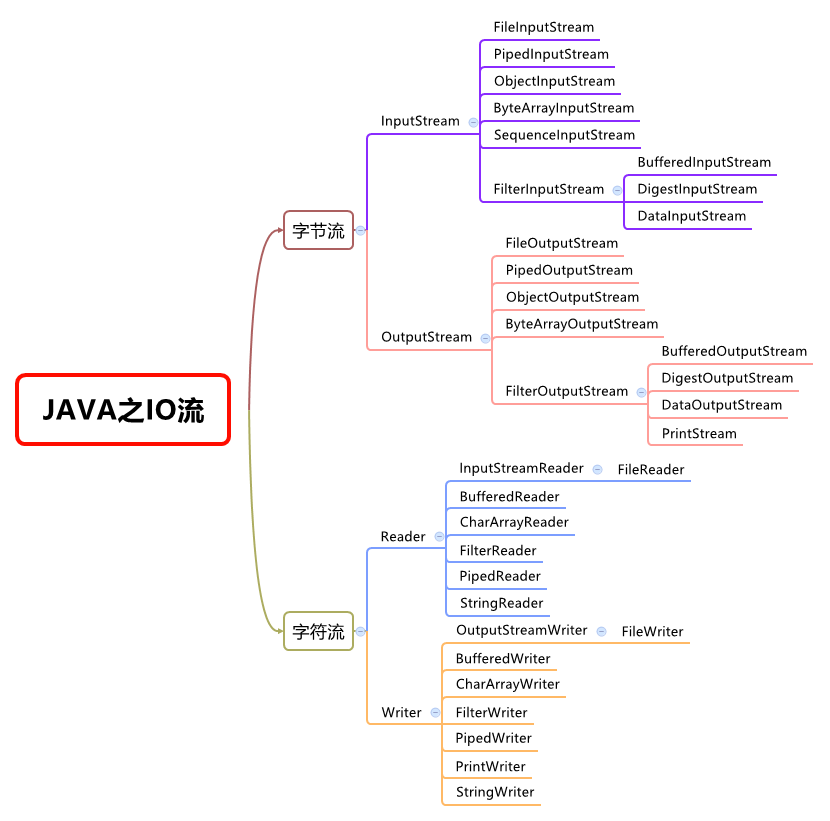
- 按处理的数据类型可分为字节流(byte)与字符流(char)
- 按流的流向可分为输入流(in)与输出流(out)
- 按流的功能可分为节点流(Node)和过滤流(Filter)
本篇侧重于梳理字节流相关的知识,毕竟作为字符流的前辈,它还是非常重要的。下篇继续梳理字符流。
1.2 IO流的继承体系图
大概描述了流的两部分与他们的继承关系。本来想从网上copy一张图的,最后还是决定自己画一张,加深理解!
2.字节流
在Java中,字节流一般适用于处理字节数据(诸如图片、视频),字符流适用于处理字符数据(诸如文本文件),但二者并没有严格的功能划分,因为有转换流的存在,使得对于数据的处理变得更加灵活。
InputStream和OutputStream分别是字节输入流与字节输出流的基类,它们的子类都是字节流,主要用在按字节来处理二进制数据。
下面会从 InputStream和OutputStream这两个基类来说起,毕竟先有父再有子。它们的子类既有共性,也有各自的出彩之处,此所谓龙生九子,各有千秋。
2.1 InputStream
此抽象类是表示字节输入流的所有类的超类。
需要定义 InputStream 子类的应用程序必须总是提供返回下一个输入字节的方法(read()方法)。
2.11方法摘要
大概定义了读写等操作,供所有子类来实现这些共性操作。实现了此类的子类必须实现read() 方法 (从下面就可以看出,此方法是抽象方法)
 int available()
          返回此输入流下一个方法调用可以不受阻塞地从此输入流读取(或跳过)的估计字节数。
 void close()
          关闭此输入流并释放与该流关联的所有系统资源。
 void mark(int readlimit)
          在此输入流中标记当前的位置。
 boolean markSupported()
          测试此输入流是否支持 mark 和 reset 方法。
 abstract  int read()
          从输入流中读取数据的下一个字节。
 int read(byte[] b)
          从输入流中读取一定数量的字节,并将其存储在缓冲区数组 b 中。
 int read(byte[] b, int off, int len)
          将输入流中最多 len 个数据字节读入 byte 数组。
 void reset()
          将此流重新定位到最后一次对此输入流调用 mark 方法时的位置。
 long skip(long n)
          跳过和丢弃此输入流中数据的 n 个字节。
- 1
- 2
- 3
- 4
- 5
- 6
- 7
- 8
- 9
- 10
- 11
- 12
- 13
- 14
- 15
- 16
- 17
- 18
- 19
从下面开始梳理InputStream的子类的用法。
2.12 FileInputStream
用于读取文件系统的文件的输入流。
- FileInputStream 从文件系统中的某个文件中获得输入字节。哪些文件可用取决于主机环境。
- FileInputStream 用于读取诸如图像数据之类的原始字节流。要读取字符流,请考虑使用 FileReader。
2.12.1 构造方法摘要
FileInputStream(File file)
          通过打开一个到实际文件的连接来创建一个 FileInputStream,该文件通过文件系统中的 File 对象 file 指定。
FileInputStream(FileDescriptor fdObj)
          通过使用文件描述符 fdObj 创建一个 FileInputStream,该文件描述符表示到文件系统中某个实际文件的现有连接。
FileInputStream(String name)
通过打开一个到实际文件的连接来创建一个 FileInputStream,该文件通过文件系统中的路径名 name 指定。 - 1
- 2
- 3
- 4
- 5
- 6
2.12.2方法摘要
仅列出了区别于基类的方法
 FileChannel getChannel()
          返回与此文件输入流有关的唯一 FileChannel 对象。
 FileDescriptor getFD()
返回表示到文件系统中实际文件的连接的 FileDescriptor 对象,该文件系统正被此 FileInputStream 使用。 - 1
- 2
- 3
- 4
2.12.3 使用示例
1.使用步骤:
- ①关联一个文件以得到一个输入流
- ②进行读取操作
- ③关闭流
2.下面代码主要内容是创建文件输入流的几种方式以及几种read方法的使用,后面会讲解通过BufferedInputStream的read方法来高效读取
注意:用字节流读取中文显示到控制台会出现乱码的情况,是因为汉字占两个字节,而此流每次只能读一个字节,就把它转为了字符。写入文本文件不会出现此情况
public class FileInputStreamReview {
    public static void main(String[] args) {
        //test1();
        test2();

    }

    /**
     * 文件输入流的创建方式以及字节缓冲流
     */
        private static void test2() throws IOException {
//      FileInputStream fis=new FileInputStream(new File("jar.txt")); // 1
        FileInputStream fis=new FileInputStream("jar.txt");  // 2
        BufferedInputStream bis=new BufferedInputStream(fis);
        // ① 读一个字节数组
//          byte[] buff =new byte[2*1024];
//          int len=-1;
//          while ((len=bis.read(buff))!=-1) {
//              System.out.println(new String(buff,0 , len));
//          }

        // ② 读一个字节, 汉字为2个字节,读取汉字时出现乱码
        int b=0;
        StringBuilder sb=new StringBuilder();
        while ((b=bis.read())!=-1) {
            sb.append((char)b);

        }
        System.out.println(sb.toString());
        bis.close();
    }

    /**
     * 读取的常见三种方式
     */
    private static void test() throws IOException {
        FileInputStream fis = fis=new FileInputStream("jar.txt");
        // ①每次读取一个字符数组,效率高
//          byte[] buff = new byte[1024];
//          int len=0;
//          while((len=fis.read(buff))!=-1){
//              System.out.print(new String(buff,0,len));
//          }

        // ② 每次读取一个字符 , 效率低
        int ch;
        while((ch=fis.read())!=-1){
            System.out.print((char)ch);
        }

        // ③ 创建的byte数组与流等大小,慎用,以防流过大,使创建字节数组失败
//          byte[] buf = new byte[fis.available()]; // 创建一个和流等大小的字节数组
//          fis.read(buf);
//          System.out.println(new String(buf));
            fis.close();
    }
}
- 1
- 2
- 3
- 4
- 5
- 6
- 7
- 8
- 9
- 10
- 11
- 12
- 13
- 14
- 15
- 16
- 17
- 18
- 19
- 20
- 21
- 22
- 23
- 24
- 25
- 26
- 27
- 28
- 29
- 30
- 31
- 32
- 33
- 34
- 35
- 36
- 37
- 38
- 39
- 40
- 41
- 42
- 43
- 44
- 45
- 46
- 47
- 48
- 49
- 50
- 51
- 52
- 53
- 54
- 55
- 56
- 57
- 58
2.13 ObjectInputStream
对象输入流,对以前使用 ObjectOutputStream 写入的基本数据和对象进行反序列化。
ObjectOutputStream 和 ObjectInputStream 分别与 FileOutputStream 和 FileInputStream 一起使用时,可以为应用程序提供对对象图形的持久存储。ObjectInputStream 用于恢复那些以前序列化的对象。其他用途包括使用套接字流在主机之间传递对象,或者用于编组和解组远程通信系统中的实参和形参。 只有支持 java.io.Serializable 或 java.io.Externalizable 接口的对象才能从流读取。
注意:
- ①对象要能从流中读取,它必须是可序列化的
- ②读取的顺序应该与写入时的顺序是一致的
2.13.1 构造方法与方法摘要
1.构造方法
  ObjectInputStream(InputStream in)
          创建从指定 InputStream 读取的 ObjectInputStream。
- 1
- 2
- 3
2.方法摘要
由于方法太多,不贴出具体摘要。除了从基类继承的方法,它主要功能是对基本类型与引用类型的读取。
 int readInt()
          读取一个 32 位的 int 值。
 Object readObject()
          从 ObjectInputStream 读取对象。
 String readUTF()
          读取 UTF-8 修改版格式的 String。
 int read()
          读取数据字节。
 int read(byte[] buf, int off, int len)
          读入 byte 数组。
- 1
- 2
- 3
- 4
- 5
- 6
- 7
- 8
- 9
- 10
- 11
2.13.2 使用示例
private static void read() throws FileNotFoundException, IOException,
            ClassNotFoundException {
        FileInputStream fis=new FileInputStream("t.tmp");
        ObjectInputStream ois=new ObjectInputStream(fis);
        // 顺序读取
        int readInt = ois.readInt();
        String string = (String) ois.readObject();
        Date date=(Date) ois.readObject();

        System.out.println("readInt="+readInt);
        System.out.println("string="+string);
        System.out.println("date="+date);

        ois.close();
}- 1
- 2
- 3
- 4
- 5
- 6
- 7
- 8
- 9
- 10
- 11
- 12
- 13
- 14
- 15
2.14 SequenceInputStream
序列流,用于将多个输入流串联起来,形成一个更大的流,以方便对多个文件的同时操作。
从第一个输入流开始读取,直到到达文件末尾,接着从第二个输入流读取,依次类推,直到到达包含的最后一个输入流的文件末尾为止。
2.14.1 构造方法与方法摘要
1.构造方法摘要
SequenceInputStream(Enumeration<? extends InputStream> e)
              通过记住参数来初始化新创建的 SequenceInputStream,该参数必须是生成运行时类型为 InputStream 对象的 Enumeration 型参数。
SequenceInputStream(InputStream s1, InputStream s2)
通过记住这两个参数来初始化新创建的 SequenceInputStream(将按顺序读取这两个参数,先读取 s1,然后读取 s2),以提供从此 SequenceInputStream 读取的字节。 - 1
- 2
- 3
- 4
2.方法摘要
 int available()
          返回不受阻塞地从当前底层输入流读取(或跳过)的字节数的估计值,方法是通过下一次调用当前底层输入流的方法。
 void close()
          关闭此输入流并释放与此流关联的所有系统资源。
 int read()
          从此输入流中读取下一个数据字节。
 int read(byte[] b, int off, int len)
              将最多 len 个数据字节从此输入流读入 byte 数组。
- 1
- 2
- 3
- 4
- 5
- 6
- 7
- 8
- 9
2.14.2 使用示例
1.两个流的情况
需求:把a.java和b.java的内容复制到copy.java中。
使用 SequenceInputStream(InputStream s1, InputStream s2)构造实现
public class SequenceInputStreamDemo {
    public static void main(String[] args) throws IOException {
        InputStream s1 = new FileInputStream("a.java");
        InputStream s2 = new FileInputStream("b.java");
        // SequenceInputStream(InputStream s1, InputStream s2)
        SequenceInputStream sis = new SequenceInputStream(s1, s2);
        BufferedOutputStream bos = new BufferedOutputStream(
                new FileOutputStream("copy.java"));

        byte[] bys = new byte[1024];
        int len = 0;
        while ((len = sis.read(bys)) != -1) {
            bos.write(bys, 0, len);
        }

        bos.close();
        sis.close();
    }
}- 1
- 2
- 3
- 4
- 5
- 6
- 7
- 8
- 9
- 10
- 11
- 12
- 13
- 14
- 15
- 16
- 17
- 18
- 19
2.多个流的情况
需求:把三个文件a.java,b.java,c.java的内容复制到copy.java中
使用SequenceInputStream(Enumeration e)构造方法来实现多个流的串联
public class SequenceInputStreamDemo {
    public static void main(String[] args) throws IOException {
        // 创建Vector用于存储输入流
        Vector<InputStream> v = new Vector<InputStream>();
        InputStream s1 = new FileInputStream("a.java");
        InputStream s2 = new FileInputStream("b.java");
        InputStream s3 = new FileInputStream("c.java");
        v.add(s1);
        v.add(s2);
        v.add(s3);
        // Enumeration是Vector的elements()方法的返回值类型,Enumeration<E> elements()
        Enumeration<InputStream> en = v.elements();
        SequenceInputStream sis = new SequenceInputStream(en);
        BufferedOutputStream bos = new BufferedOutputStream(
                new FileOutputStream("copy.java"));

        byte[] bys = new byte[1024];
        int len = 0;
        while ((len = sis.read(bys)) != -1) {
            bos.write(bys, 0, len);
        }

        bos.close();
        sis.close();
    }
}- 1
- 2
- 3
- 4
- 5
- 6
- 7
- 8
- 9
- 10
- 11
- 12
- 13
- 14
- 15
- 16
- 17
- 18
- 19
- 20
- 21
- 22
- 23
- 24
- 25
- 26
2.15 ByteArrayInputStream
ByteArrayInputStream 包含一个内部缓冲区,该缓冲区包含从流中读取的字节。内部计数器跟踪 read 方法要提供的下一个字节。
关闭 ByteArrayInputStream 无效。此类中的方法在关闭此流后仍可被调用,而不会产生任何 IOException。
2.15.1 构造方法
构造方法摘要
ByteArrayInputStream(byte[] buf)
          创建一个 ByteArrayInputStream,使用 buf 作为其缓冲区数组。
ByteArrayInputStream(byte[] buf, int offset, int length)
          创建 ByteArrayInputStream,使用 buf 作为其缓冲区数组。
- 1
- 2
- 3
- 4
- 5
- 6
此类的方法与父类相同,侧重于读。不贴出了。
2.15.2使用示例
private static void test1() {
        byte[] buf=new byte[]{'h','e','l','l','o'};
        // 用一个字节数组来构造一个ByteArrayInputStream
        ByteArrayInputStream bais=new ByteArrayInputStream(buf,0,3);
        byte[] buff=new byte[bais.available()-1];
        try {
            bais.read(buff);
            System.out.println(new String(buff));
        } catch (IOException e) {
            e.printStackTrace();
        }finally{
            try {
                bais.close(); // 关闭 ByteArrayInputStream 无效,是一个空实现
            } catch (IOException e) {
                e.printStackTrace();
            }
        }

        // 仍然可以继续读
        int read = bais.read();
        System.out.println((char)read);
}- 1
- 2
- 3
- 4
- 5
- 6
- 7
- 8
- 9
- 10
- 11
- 12
- 13
- 14
- 15
- 16
- 17
- 18
- 19
- 20
- 21
- 22
2.16 PipedInputStream
管道输入流应该连接到管道输出流;管道输入流提供要写入管道输出流的所有数据字节。
通常,数据由某个线程从 PipedInputStream 对象读取,并由其他线程将其写入到相应的 PipedOutputStream。
不建议对这两个对象尝试使用单个线程,因为这样可能死锁线程。管道输入流包含一个缓冲区,可在缓冲区限定的范围内将读操作和写操作分离开。如果向连接管道输出流提供数据字节的线程不再存在,则认为该管道已损坏。
管道连接的两种方式:
①在构造时以管道输出流对象做参数来构造,即使用PipedInputStream(PipedOutputStream src) 构造
②使用connect(PipedOutputStream src) 方法来建立连接
- 1
- 2
- 3
2.16.1 构造方法摘要与 方法摘要
构造方法摘要
PipedInputStream()
          创建尚未连接的 PipedInputStream。
PipedInputStream(int pipeSize)
          创建一个尚未连接的 PipedInputStream,并对管道缓冲区使用指定的管道大小。
PipedInputStream(PipedOutputStream src)
          创建 PipedInputStream,使其连接到管道输出流 src。
PipedInputStream(PipedOutputStream src, int pipeSize)
创建一个 PipedInputStream,使其连接到管道输出流 src,并对管道缓冲区使用指定的管道大小。 - 1
- 2
- 3
- 4
- 5
- 6
- 7
- 8
方法摘要
 int available()
          返回可以不受阻塞地从此输入流中读取的字节数。
 void connect(PipedOutputStream src)
          使此管道输入流连接到管道输出流 src。
 int read()
          读取此管道输入流中的下一个数据字节。
 int read(byte[] b, int off, int len)
          将最多 len 个数据字节从此管道输入流读入 byte 数组。
- 1
- 2
- 3
- 4
- 5
- 6
- 7
- 8
- 9
2.16.2 使用示例
public class PipedStream {
    public static void main(String[] args) throws IOException {

        PipedInputStream input = new PipedInputStream();
        PipedOutputStream output = new PipedOutputStream();

        // 使输入管道流与输出管道流联通
        input.connect(output);

        new Thread(new Input(input)).start();
        new Thread(new Output(output)).start();

    }

}

class Input implements Runnable {

    private PipedInputStream in;

    Input(PipedInputStream in) {
        this.in = in;
    }

    public void run() {

        try {
            byte[] buf = new byte[1024];
            int len = -1;
            while ((len = in.read(buf)) != -1) { //read 读取从管道输出流写入的数据,没有读到数据则阻塞
                String s = new String(buf, 0, len);
                System.out.println("s=" + s);
            }
            in.close();
        } catch (Exception e) {
            e.printStackTrace();
        }

    }
}

class Output implements Runnable {
    private PipedOutputStream out;

    Output(PipedOutputStream out) {
        this.out = out;
    }

    public void run() {

        try {
            while (true) {  // 模拟数据写入
                Thread.sleep(3000);
                out.write("Output管道写入的数据!".getBytes());
            }
        } catch (Exception e) {
            e.printStackTrace();
        }finally{
            try {
                out.close();
            } catch (IOException e) {
                e.printStackTrace();
            }
        }
    }
}
- 1
- 2
- 3
- 4
- 5
- 6
- 7
- 8
- 9
- 10
- 11
- 12
- 13
- 14
- 15
- 16
- 17
- 18
- 19
- 20
- 21
- 22
- 23
- 24
- 25
- 26
- 27
- 28
- 29
- 30
- 31
- 32
- 33
- 34
- 35
- 36
- 37
- 38
- 39
- 40
- 41
- 42
- 43
- 44
- 45
- 46
- 47
- 48
- 49
- 50
- 51
- 52
- 53
- 54
- 55
- 56
- 57
- 58
- 59
- 60
- 61
- 62
- 63
- 64
- 65
- 66
- 67
2.17 BufferedInputStream
为另一个输入流添加一些功能,即缓冲输入以及支持 mark 和 reset 方法的能力。在创建 BufferedInputStream 时,会创建一个内部缓冲区数组。缓冲区用以减少频繁的IO操作,提高程序的性能。
在读取或跳过流中的字节时,可根据需要从包含的输入流再次填充该内部缓冲区,一次填充多个字节。mark 操作记录输入流中的某个点,reset 操作使得在从包含的输入流中获取新字节之前,再次读取自最后一次 mark 操作后读取的所有字节。
构造方法摘要
BufferedInputStream(InputStream in)
          创建一个 BufferedInputStream 并保存其参数,即输入流 in,以便将来使用。
BufferedInputStream(InputStream in, int size)
              创建具有指定缓冲区大小的 BufferedInputStream 并保存其参数,即输入流 in,以便将来使用。
- 1
- 2
- 3
- 4
- 5
此类的方法与父类无异,不贴出。 具体使用看下一节的性能测试。
2.18 BufferedInputStream性能测试
/**
 * @author pecu
 *
 *         效率测试
 *
 *         FileInputStream
 *               ①read()    35950毫秒
 *               ②read(buff) 62毫秒
 *
 *         BufferedInputStream
 *               ③read()    295毫秒
 *               ④read(buff) 18毫秒
 *
 */
public class EfficiencyTest {

    public static void main(String[] args) throws IOException {
        //test1();
        //test2();
        //test3();
        test4();
    }

    // BufferedInputStream ④read(buff) 18毫秒
    private static void test4() throws IOException {
        long start = System.currentTimeMillis();
        BufferedInputStream bis = new BufferedInputStream(new FileInputStream(
                "cpp.wmv"));
        BufferedOutputStream bos = new BufferedOutputStream(
                new FileOutputStream("cpp_copy4.wmv"));

        byte[] buff = new byte[1024];
        int len = 1;
        while ((len = bis.read(buff)) != -1) {
            bos.write(buff, 0, len);
        }

        bos.close();
        bis.close();
        System.out.println(System.currentTimeMillis() - start + "毫秒");
    }

    // BufferedInputStream ③read() 295毫秒
    private static void test3() throws IOException {
        long start = System.currentTimeMillis();
        BufferedInputStream bis = new BufferedInputStream(new FileInputStream(
                "cpp.wmv"));
        BufferedOutputStream bos = new BufferedOutputStream(
                new FileOutputStream("cpp_copy3.wmv"));

        int b = 1;
        while ((b = bis.read()) != -1) {
            bos.write(b);
        }

        bos.close();
        bis.close();
        System.out.println(System.currentTimeMillis() - start + "毫秒");
    }

    // FileInputStream ②read(buff) 62毫秒
    private static void test2() throws IOException {
        long start = System.currentTimeMillis();
        FileInputStream fis = new FileInputStream("cpp.wmv");
        FileOutputStream fos = new FileOutputStream("cpp_copy2.wmv");
        int len;
        byte[] buff = new byte[1024];
        while ((len = fis.read(buff)) != -1) {
            fos.write(buff, 0, len);
        }

        fis.close();
        fos.close();
        System.out.println(System.currentTimeMillis() - start + "毫秒");
    }

    // FileInputStream ①read() 35950毫秒
    private static void test1() throws IOException {
        long start = System.currentTimeMillis();
        FileInputStream fis = new FileInputStream("cpp.wmv");
        FileOutputStream fos = new FileOutputStream("cpp_copy1.wmv");
        int b;
        while ((b = fis.read()) != -1) {
            fos.write(b);
        }

        fis.close();
        fos.close();
        System.out.println(System.currentTimeMillis() - start + "毫秒");
    }

}
- 1
- 2
- 3
- 4
- 5
- 6
- 7
- 8
- 9
- 10
- 11
- 12
- 13
- 14
- 15
- 16
- 17
- 18
- 19
- 20
- 21
- 22
- 23
- 24
- 25
- 26
- 27
- 28
- 29
- 30
- 31
- 32
- 33
- 34
- 35
- 36
- 37
- 38
- 39
- 40
- 41
- 42
- 43
- 44
- 45
- 46
- 47
- 48
- 49
- 50
- 51
- 52
- 53
- 54
- 55
- 56
- 57
- 58
- 59
- 60
- 61
- 62
- 63
- 64
- 65
- 66
- 67
- 68
- 69
- 70
- 71
- 72
- 73
- 74
- 75
- 76
- 77
- 78
- 79
- 80
- 81
- 82
- 83
- 84
- 85
- 86
- 87
- 88
- 89
- 90
- 91
- 92
- 93
2.2 OutputStream
此抽象类是表示输出字节流的所有类的超类。输出流接受输出字节并将这些字节发送到某个接收器。
需要定义 OutputStream 子类的应用程序必须始终提供至少一种可写入一个输出字节的方法。
方法摘要
注意:子类必须重写write方法
void close()
          关闭此输出流并释放与此流有关的所有系统资源。
 void flush()
          刷新此输出流并强制写出所有缓冲的输出字节。
 void write(byte[] b)
          将 b.length 个字节从指定的 byte 数组写入此输出流。
 void write(byte[] b, int off, int len)
          将指定 byte 数组中从偏移量 off 开始的 len 个字节写入此输出流。
abstract  void write(int b)
将指定的字节写入此输出流。- 1
- 2
- 3
- 4
- 5
- 6
- 7
- 8
- 9
- 10
2.21 FileOutputStream
文件输出流是用于将数据写入 File 或 FileDescriptor 的输出流。文件是否可用或能否可以被创建取决于基础平台。
FileOutputStream 用于写入诸如图像数据之类的原始字节的流。要写入字符流,请考虑使用 FileWriter。
2.21.1 构造方法与方法摘要
1.构造方法摘要
FileOutputStream(File file)
          创建一个向指定 File 对象表示的文件中写入数据的文件输出流。
FileOutputStream(File file, boolean append)
          创建一个向指定 File 对象表示的文件中写入数据的文件输出流。
FileOutputStream(FileDescriptor fdObj)
          创建一个向指定文件描述符处写入数据的输出文件流,该文件描述符表示一个到文件系统中的某个实际文件的现有连接。
FileOutputStream(String name)
          创建一个向具有指定名称的文件中写入数据的输出文件流。
FileOutputStream(String name, boolean append)
创建一个向具有指定 name 的文件中写入数据的输出文件流。 - 1
- 2
- 3
- 4
- 5
- 6
- 7
- 8
- 9
- 10
2.方法摘要
只列出了与父类相异的方法
 FileChannel getChannel()
          返回与此文件输出流有关的唯一 FileChannel 对象。
 FileDescriptor getFD()
返回与此流有关的文件描述符。 - 1
- 2
- 3
- 4
2.21.2 使用示例
/**
* 从一个文件中读取,并将内容写入另一个文件
 * @throws IOException
 */
private static void test() throws IOException {
        FileInputStream fis = fis = new FileInputStream("jar.txt");
        FileOutputStream fos = fos=new FileOutputStream("fos.txt",true); // true 表示可附加内容
        byte[] buf=new byte[1024];
        int len=-1;
        while((len=fis.read(buf))!=-1){
            fos.write(buf, 0, len);
        }
        fis.close();
        fos.close();
}- 1
- 2
- 3
- 4
- 5
- 6
- 7
- 8
- 9
- 10
- 11
- 12
- 13
- 14
- 15
2.22 ObjectOutputStream
将 Java 对象的基本数据类型和图形写入 OutputStream。可以使用 ObjectInputStream 读取(重构)对象。
通过在流中使用文件可以实现对象的持久存储。如果流是网络套接字流,则可以在另一台主机上或另一个进程中重构对象。
writeObject 方法用于将对象写入流中。所有对象(包括 String 和数组)都可以通过 writeObject 写入。
可将多个对象或基元写入流中。必须使用与写入对象时相同的类型和顺序从相应 ObjectInputstream 中读回对象。
- 1
- 2
- 3
注意事项:
- ①要写入流中的对应必须支持序列化,并且最好指定该对象的序列化UID
- ②反序列化的顺序与写入的顺序要一致
- ③使用transient关键字声明不需要序列化的成员变量
2.22.1 构造方法与方法摘要
1.构造方法摘要
 ObjectOutputStream(OutputStream out)
          创建写入指定 OutputStream 的 ObjectOutputStream。
- 1
- 2
- 3
2.方法摘要
方法较多,主要是写的操作,列出需要注意的几项
void writeBytes(String str)
          以字节序列形式写入一个 String。
void writeObject(Object obj)
          将指定的对象写入 ObjectOutputStream。
void writeUTF(String str)
          以 UTF-8 修改版格式写入此 String 的基本数据。
- 1
- 2
- 3
- 4
- 5
- 6
- 7
2.22.2 使用示例
注意:要进行写入到流中的对象必须支持序列化
public class ObjectStreamDemo {
            public static void main(String[] args) throws IOException,
                    ClassNotFoundException {
                // 由于我们要对对象进行序列化,所以我们先自定义一个类
                // 序列化数据其实就是把对象写到文本文件
                // write();

                read();
            }

            private static void read() throws IOException, ClassNotFoundException {
                // 创建反序列化对象
                ObjectInputStream ois = new ObjectInputStream(new FileInputStream(
                        "oos.txt"));
                // 还原对象
                Object obj = ois.readObject();
                // 释放资源
                ois.close();
                // 输出对象
                System.out.println(obj);
            }

            private static void write() throws IOException {
                // 创建序列化流对象
                ObjectOutputStream oos = new ObjectOutputStream(new FileOutputStream(
                        "oos.txt"));
                // 创建对象
                Person p = new Person("林青霞", 27);
                // 写入对象
                oos.writeObject(p);
                // 释放资源
                oos.close();
            }
        }
- 1
- 2
- 3
- 4
- 5
- 6
- 7
- 8
- 9
- 10
- 11
- 12
- 13
- 14
- 15
- 16
- 17
- 18
- 19
- 20
- 21
- 22
- 23
- 24
- 25
- 26
- 27
- 28
- 29
- 30
- 31
- 32
- 33
- 34
- 35
2.23 ByteArrayOutputStream
此类实现了一个输出流,其中的数据被写入一个 byte 数组。缓冲区会随着数据的不断写入而自动增长。
可使用 toByteArray() 和 toString() 获取数据。
关闭 ByteArrayOutputStream 无效。此类中的方法在关闭此流后仍可被调用,而不会产生任何 IOException。
2.23.1 构造方法摘
1 构造方法摘要
ByteArrayOutputStream()
          创建一个新的 byte 数组输出流。
ByteArrayOutputStream(int size)
创建一个新的 byte 数组输出流,它具有指定大小的缓冲区容量(以字节为单位)。 - 1
- 2
- 3
- 4
2 方法摘要
只列出了特有方法
 int size()
              返回缓冲区的当前大小。
 byte[] toByteArray()
          创建一个新分配的 byte 数组。
 String toString()
          使用平台默认的字符集,通过解码字节将缓冲区内容转换为字符串。
 String toString(String charsetName)
          使用指定的 charsetName,通过解码字节将缓冲区内容转换为字符串。
 void writeTo(OutputStream out)
                  将此 byte 数组输出流的全部内容写入到指定的输出流参数中,这与使用 out.write(buf, 0, count) 调用该输出流的 write 方法效果一样。
- 1
- 2
- 3
- 4
- 5
- 6
- 7
- 8
- 9
- 10
- 11
2.23.2 使用示例
private static void test() throws IOException {
        ByteArrayOutputStream baos=new ByteArrayOutputStream();
        byte[] buf=new byte[]{'h','e','l','l','o','w','o','r','l','d'};
        baos.write(buf, 0, buf.length-5);
        System.out.println(baos.toString());
        baos.close(); // 空实现
        // 继续往流中写入
        baos.write(buf, 5, 5);
        System.out.println(baos.toString());
}- 1
- 2
- 3
- 4
- 5
- 6
- 7
- 8
- 9
- 10
2.24 PipedOutputStream
可以将管道输出流连接到管道输入流来创建通信管道。管道输出流是管道的发送端。通常,数据由某个线程写入 PipedOutputStream 对象,并由其他线程从连接的 PipedInputStream 读取。
不建议对这两个对象尝试使用单个线程,因为这样可能会造成该线程死锁。如果某个线程正从连接的管道输入流中读取数据字节,但该线程不再处于活动状态,则该管道被视为处于 毁坏 状态。
构造方法摘要
PipedOutputStream()
          创建尚未连接到管道输入流的管道输出流。
PipedOutputStream(PipedInputStream snk)
          创建连接到指定管道输入流的管道输出流。
- 1
- 2
- 3
- 4
- 5
方法摘要
 void connect(PipedInputStream snk)
          将此管道输出流连接到接收者。
 void flush()
          刷新此输出流并强制写出所有缓冲的输出字节。
 void write(byte[] b, int off, int len)
          将 len 字节从初始偏移量为 off 的指定 byte 数组写入该管道输出流。
 void write(int b)
          将指定 byte 写入传送的输出流。
- 1
- 2
- 3
- 4
- 5
- 6
- 7
- 8
- 9
此流的使用可以看2.16小节的例子。
2.25 PrintStream
为其他输出流添加了功能,使它们能够方便地打印各种数据值表示形式。它还提供其他两项功能。与其他输出流不同,PrintStream 永远不会抛出 IOException;而是,异常情况仅设置可通过 checkError 方法测试的内部标志。
可以创建一个自动刷新PrintStream;这意味着可在写入 byte 数组之后自动调用 flush 方法,可调用其中一个 println 方法,或写入一个换行符或字节 (‘\n’)来完成。
PrintStream 打印的所有字符都使用平台的默认字符编码转换为字节。在需要写入字符而不是写入字节的情况下,应该使用 PrintWriter 类。
2.25.1 构造方法摘要
从构造方法可以看出,它既可以操作文件,也可以操作字节输出流
PrintStream(File file)
          创建具有指定文件且不带自动行刷新的新打印流。
PrintStream(File file, String csn)
          创建具有指定文件名称和字符集且不带自动行刷新的新打印流。
PrintStream(OutputStream out)
          创建新的打印流。
PrintStream(OutputStream out, boolean autoFlush)
          创建新的打印流。
PrintStream(OutputStream out, boolean autoFlush, String encoding)
          创建新的打印流。
PrintStream(String fileName)
          创建具有指定文件名称且不带自动行刷新的新打印流。
PrintStream(String fileName, String csn)
          创建具有指定文件名称和字符集且不带自动行刷新的新打印流。
- 1
- 2
- 3
- 4
- 5
- 6
- 7
- 8
- 9
- 10
- 11
- 12
- 13
- 14
- 15
方法就不贴了,大多都是打印的方法。
2.25.2 使用示例
我们常见的System.out返回值其实就是PrintStream
public class PrintStreamDemo{
    public static void main(String[] args) throws IOException {
        // 获取标准输入流
         PrintStream ps = System.out;
        // // OutputStream os = ps;
        // OutputStream os = System.out; // 多态
//       ps.println("hello");
//       ps.print(false);

        //BufferedWriter bw = new BufferedWriter(new OutputStreamWriter(System.out)); // 等价于下面两句
        // OutputStreamWriter osw = new OutputStreamWriter(os);
        // BufferedWriter bw = new BufferedWriter(osw);

        OutputStream out=new FileOutputStream("a.txt");
        PrintStream stream=new PrintStream(out, true); // 开启自动刷新
        stream.print(0);
        stream.print("hello");
        stream.println("world");

        stream.close();
        stream.append((char) 0);
        stream.println("world"); // 关闭流打印,仍不会抛出异常。

    }
}- 1
- 2
- 3
- 4
- 5
- 6
- 7
- 8
- 9
- 10
- 11
- 12
- 13
- 14
- 15
- 16
- 17
- 18
- 19
- 20
- 21
- 22
- 23
- 24
- 25
2.26 BufferedOutputStream
为另一个输入流添加一些功能,即缓冲输入以及支持 mark 和 reset 方法的能力。在创建 BufferedInputStream 时,会创建一个内部缓冲区数组。缓冲区减少IO操作以提高性能。
在读取或跳过流中的字节时, 可根据需要从包含的输入流再次填充该内部缓冲区,一次填充多个字节。mark 操作记录输入流中的某个点,reset 操作使得在从包含的输入流中获取新字节之前,再次读取自最后一次 mark 操作后读取的所有字节。
2.26.1构造方法摘要
BufferedInputStream(InputStream in)
          创建一个 BufferedInputStream 并保存其参数,即输入流 in,以便将来使用。
BufferedInputStream(InputStream in, int size)
          创建具有指定缓冲区大小的 BufferedInputStream 并保存其参数,即输入流 in,以便将来使用。
- 1
- 2
- 3
- 4
- 5
2.26.2使用示例
private static void test1() throws IOException {
        BufferedOutputStream bos=new BufferedOutputStream(new FileOutputStream("bos.txt"));
        // 等价于下面两句
        //FileOutputStream fos=new FileOutputStream(new File("bos.txt"));
        //BufferedOutputStream bos=new BufferedOutputStream(fos);

        bos.write(66); // B的ASCII为66
        bos.write(new byte[]{'h','e','l','l','0','~'});
        bos.close();
        // 写入文件内容
        // Bhell0~
}- 1
- 2
- 3
- 4
- 5
- 6
- 7
- 8
- 9
- 10
- 11
- 12
至于它写的性能就不再测试了。
3 案例
复制一个多级文件夹到一个指定的目录下
public class CopyFolder {
            public static void main(String[] args) {
                String srcDir = "D:\\test\\666";
                String destDir = "D:\\test\\999";
                copyFolder(srcDir, destDir);
            }

            /**
             * 复制多级文件夹
             *
             * @param srcDir
             *            要复制的文件目录,必须存在
             * @param destDir
             *            复制到那个目录下,可以不存在
             */
            public static void copyFolder(String srcDir, String destDir) {

                File dir = new File(srcDir);
                if (!dir.exists()) {
                    System.out.println("原目录" + dir.getAbsolutePath() + "不存在!");
                    return;
                }
                if (!dir.isDirectory()) {// 不是目录则返回
                    System.out.println(dir.getAbsolutePath() + "不是目录!");
                    return;
                }
                destDir += File.separator + dir.getName(); // 根据源目录构造目标目录
                File destFile = new File(destDir);
                if (!destFile.exists()) // 若目标目录不存在则创建之
                    destFile.mkdirs();
                File[] listFiles = dir.listFiles();
                if(listFiles == null) return;
                for (File file : listFiles) { // 遍历原文件夹
                    if (file.exists()) {
                        if (file.isDirectory()) { // 若是目录,继续遍历
                            copyFolder(file.getAbsolutePath(), destDir);
                        } else { // 复制文件到目的目录
                            CopyFile(file.getAbsolutePath(), destDir + File.separator
                                    + file.getName());
                        }
                    }
                }
            }

            /**
             * 复制文件
             *
             * @param srcDir
             *            文件的源目录
             * @param destDir
             *            文件的目标目录
             */
            private static void CopyFile(String srcDir, String destDir) {
                File srcFile = new File(srcDir);
                File destFile = new File(destDir);
                if (!srcFile.exists()) // 原文件不存在则返回
                    return;
                BufferedInputStream bis = null;
                BufferedOutputStream bos = null;
                try {
                    bis = new BufferedInputStream(new FileInputStream(srcFile)); // 关联文件输入流
                    bos = new BufferedOutputStream(new FileOutputStream(destFile)); // 关联文件输出流
                    int len = -1;
                    byte[] buff = new byte[2048];
                    while ((len = bis.read(buff)) != -1) { // 读
                        bos.write(buff, 0, len); // 写
                    }
                } catch (FileNotFoundException e) {
                    e.printStackTrace();
                } catch (IOException e) {
                    e.printStackTrace();
                } finally {
                    if (bis != null) {
                        try {
                            bis.close();
                        } catch (IOException e) {
                            e.printStackTrace();
                        }
                    }
                    if (bos != null) {
                        try {
                            bos.close();
                        } catch (IOException e) {
                            e.printStackTrace();
                        }
                    }
                }
            }
        }
- 1
- 2
- 3
- 4
- 5
- 6
- 7
- 8
- 9
- 10
- 11
- 12
- 13
- 14
- 15
- 16
- 17
- 18
- 19
- 20
- 21
- 22
- 23
- 24
- 25
- 26
- 27
- 28
- 29
- 30
- 31
- 32
- 33
- 34
- 35
- 36
- 37
- 38
- 39
- 40
- 41
- 42
- 43
- 44
- 45
- 46
- 47
- 48
- 49
- 50
- 51
- 52
- 53
- 54
- 55
- 56
- 57
- 58
- 59
- 60
- 61
- 62
- 63
- 64
- 65
- 66
- 67
- 68
- 69
- 70
- 71
- 72
- 73
- 74
- 75
- 76
- 77
- 78
- 79
- 80
- 81
- 82
- 83
- 84
- 85
- 86
- 87
- 88
- 89
- 90
- 91
==================字符流======================================
1.概述
上篇Java之IO流—字节流我们详细的讲解了IO体系与字节流的各类用法,本篇继续梳理字符流。
1.1 字符流的由来
在上篇,我提到过用字节流读取中文汉字打印在控制台上,会出现乱码的情况,原因就不赘述了。可见,对于字符的操作,强大如斯的字节流也有失利的时候。这个时候我们本篇的主角—字符流就登上了历史的舞台,展现出它强大的魅力。字符流是建立在字节流之上的,它能够提供字符层次的编码和解码
对于字符的操作,我们当然首选字符流。同时,转换流也为我们建立了字节流到字符流的桥梁,使我们对数据的处理更加灵活。但是也要注意一些细节,对于从转换流获得的字符流,它读取的字符必须在编码表中可以查找的到,否则会造成乱码。对于像图片、视频这样的文件就不适宜用字符流来处理。可以这样形象的理解字符流, 字符流 = 字节流+编码表。
编码将字符数据转化为字节数据,解码将字节数据转化为字符数据。
1.2 编码表
计算机只能识别二进制数据,早期由来是电信号。为了方便应用计算机,让它可以识别各个国家的文字。
就将各个国家的文字用数字来表示,并一一对应,形成一张表。
编码表的定义
编码表由字符及其对应的数值组成的一张表
- 1
- 2
常见编码表
ASCII:美国标准信息交换码。 一种使用7个或8个二进制位进行编码的方案
ISO8859-1:拉丁码表。欧洲码表 用一个字节的8位表示。

GB2312:中国的中文编码表。
GBK:中国的中文编码表升级,融合了更多的中文文字符号。
GB18030:GBK的取代版本
BIG-5码 :通行于台湾、香港地区的一个繁体字编码方案,俗称“大五码”。

Unicode:国际标准码,融合了多种文字。所有文字都用两个字节来表示,Java语言使用的就是unicode

UTF-8:最多用三个字节来表示一个字符。它定义了一种“区间规则”,这种规则可以和ASCII编码保持最大程度的兼容:
        它将Unicode编码为00000000-0000007F的字符,用单个字节来表示
        它将Unicode编码为00000080-000007FF的字符用两个字节表示
        它将Unicode编码为00000800-0000FFFF的字符用3字节表示
- 1
- 2
- 3
- 4
- 5
- 6
- 7
- 8
- 9
- 10
- 11
- 12
- 13
- 14
- 15
2. 字符流
字符流失java的io流的两大分支之一,被设计用来处理字符数据,弥补字节流的短板。
Writer与Reader这两个抽象类是所有字符输出流与字符输入流的基类,研究字符流,先从他们开始。
字符流的继承体系在上篇已经展示了,这里不再赘述。
2.1 Writer
写入字符流的抽象类。子类必须实现的方法仅有 write(char[], int, int)、flush() 和 close()。但是,多数子类将重写此处定义的一些方法,以提供更高的效率和/或其他功能。
2.11 方法摘要
主要定义了写的一些方法规范。在之后讲述中,子类只会给出特有方法以示区别。
 Writer append(char c)
          将指定字符添加到此 writer。
 Writer append(CharSequence csq)
          将指定字符序列添加到此 writer。
 Writer append(CharSequence csq, int start, int end)
          将指定字符序列的子序列添加到此 writer.Appendable。
abstract  void close()
          关闭此流,但要先刷新它。
abstract  void flush()
          刷新该流的缓冲。
 void write(char[] cbuf)
          写入字符数组。
abstract  void write(char[] cbuf, int off, int len)
          写入字符数组的某一部分。
 void write(int c)
          写入单个字符。
 void write(String str)
          写入字符串。
 void write(String str, int off, int len)
          写入字符串的某一部分。
- 1
- 2
- 3
- 4
- 5
- 6
- 7
- 8
- 9
- 10
- 11
- 12
- 13
- 14
- 15
- 16
- 17
- 18
- 19
- 20
- 21
2.12 FileWriter
用来写入字符文件的便捷类。此类的构造方法假定默认字符编码和默认字节缓冲区大小都是可接受的。要自己指定这些值,可以先在 FileOutputStream 上构造一个 OutputStreamWriter。
文件是否可用或是否可以被创建取决于底层平台。特别是某些平台一次只允许一个 FileWriter(或其他文件写入对象)打开文件进行写入。在这种情况下,如果所涉及的文件已经打开,则此类中的构造方法将失败。
FileWriter 用于写入字符流。要写入原始字节流,请考虑使用 FileOutputStream。
2.12.1 构造方法摘要
FileWriter(File file)
          根据给定的 File 对象构造一个 FileWriter 对象。
FileWriter(File file, boolean append)
          根据给定的 File 对象构造一个 FileWriter 对象。
FileWriter(FileDescriptor fd)
          构造与某个文件描述符相关联的 FileWriter 对象。
FileWriter(String fileName)
          根据给定的文件名构造一个 FileWriter 对象。
FileWriter(String fileName, boolean append)
          根据给定的文件名以及指示是否附加写入数据的 boolean 值来构造 FileWriter 对象。
- 1
- 2
- 3
- 4
- 5
- 6
- 7
- 8
- 9
- 10
- 11
此类方法与父类同,就不贴出了。
2.12.2使用示例
public class FileWriterReview {
    public static final String LINE_SEPARATOR = System.getProperty("line.separator");
    public static void main(String[] args) {
        FileWriter fw = null;
        try {
             fw = new FileWriter("fw.txt",true); // 设置true表示附加内容
             char[] cbuf = new char[]{'h','e','l','l','o'};
            fw.write(cbuf);
            fw.write(LINE_SEPARATOR); // 添加换行
            fw.write("写入字符串");
            fw.append("附加内容");
            //Returns the name of the character encoding being used by this stream.
            System.out.println(fw.getEncoding());
        } catch (IOException e) {
            e.printStackTrace();
        }finally{
            if (fw!=null) {
                try {
                    fw.close();
                } catch (IOException e) {
                    e.printStackTrace();
                }
            }
        }
    }
}- 1
- 2
- 3
- 4
- 5
- 6
- 7
- 8
- 9
- 10
- 11
- 12
- 13
- 14
- 15
- 16
- 17
- 18
- 19
- 20
- 21
- 22
- 23
- 24
- 25
- 26
2.13 OutputStreamWriter
OutputStreamWriter 是字符流通向字节流的桥梁:可使用指定的 charset(字符集) 将要写入流中的字符编码成字节。它使用的字符集可以由名称指定或显式给定,否则将接受平台默认的字符集。
每次调用 write() 方法都会导致在给定字符(或字符集)上调用编码转换器。在写入底层输出流之前,得到的这些字节将在缓冲区中累积。可以指定此缓冲区的大小,不过,默认的缓冲区对多数用途来说已足够大。注意,传递给 write() 方法的字符没有缓冲。
为了获得最高效率,可考虑将 OutputStreamWriter 包装进 BufferedWriter 中,以避免频繁调用转换器。例如:
Writer out = new BufferedWriter(new OutputStreamWriter(System.out));
2.13.1 构造方法摘要
OutputStreamWriter(OutputStream out)
          创建使用默认字符编码的 OutputStreamWriter。
OutputStreamWriter(OutputStream out, Charset cs)
          创建使用给定字符集的 OutputStreamWriter。
OutputStreamWriter(OutputStream out, CharsetEncoder enc)
          创建使用给定字符集编码器的 OutputStreamWriter。
OutputStreamWriter(OutputStream out, String charsetName)
          创建使用指定字符集的 OutputStreamWriter。
- 1
- 2
- 3
- 4
- 5
- 6
- 7
- 8
- 9
2.13.2 使用示例
public class OutputStreamWriterReview {
    public static void main(String[] args) throws IOException {
//      test1();
        test2();
    }

    private static void test2() throws IOException {
       // 通过转换流,将字符以gbk编码成字节并写入本地文件
        OutputStreamWriter osw=new OutputStreamWriter(new FileOutputStream("osw.txt"), "gbk"); // 指定字符集
        osw.write('a');
        osw.write("编码为");
        osw.write("gbk");
        osw.write("你解码吧");
        osw.write("告诉你一个秘密", 0, 5); // 写入字符串的一部分
        osw.flush();
        osw.close();
    }

    private static void test1() throws IOException {
        // 往控制台输出
        OutputStreamWriter osw=new OutputStreamWriter(System.out,"utf-8");
        osw.write("你好");  // 写入缓冲区
        osw.flush();
        osw.close();
    }
}
- 1
- 2
- 3
- 4
- 5
- 6
- 7
- 8
- 9
- 10
- 11
- 12
- 13
- 14
- 15
- 16
- 17
- 18
- 19
- 20
- 21
- 22
- 23
- 24
- 25
- 26
- 27
2.14 BufferedWriter
提供缓冲的字符输出流,将文本写入字符输出流,缓冲各个字符,从而提供单个字符、数组和字符串的高效写入。
可以指定缓冲区的大小,或者接受默认的大小。在大多数情况下,默认值就足够大了。
该类提供了 newLine() 方法,它使用平台自己的行分隔符概念,此概念由系统属性 line.separator 定义(通过System.getProperty(“line.separator”)来获取)。并非所有平台都使用新行符 (‘\n’) 来终止各行。
通常 Writer 将其输出立即发送到底层字符或字节流,开销很高。所以可以用BufferedWriter 包装这些Writer(如 FileWriters 和 OutputStreamWriters),来提高效率。例如,
PrintWriter out = new PrintWriter(new BufferedWriter(new FileWriter("foo.out")));
- 1
- 2
2.14.1 构造方法摘要与方法摘要
1.构造方法摘要
BufferedWriter(Writer out)
          创建一个使用默认大小输出缓冲区的缓冲字符输出流。
BufferedWriter(Writer out, int sz)
          创建一个使用给定大小输出缓冲区的新缓冲字符输出流。
- 1
- 2
- 3
- 4
- 5
2. 方法摘要
列举了它的特有方法
void newLine() 写入一个行分隔符。
- 1
- 2
2.14.2 使用示例
注意:BufferedReader的readLine方法返回的字符串不包含换行符。
public class BufferedWriterReview {
    public static void main(String[] args) {
        //writeFile1();
        writeFile2();

    }

    /**
     * readLine读取一行
     * @throws IOException
     */
    private static void writeFile() throws IOException {
        BufferedWriter bw=new BufferedWriter(new FileWriter("bw2.txt"));
        BufferedReader br=new BufferedReader(new FileReader("fw.txt"));

        String buff=null;
        while((buff=br.readLine())!=null){  //读取行,不包含换行符
            //将读取的行内容写入文件,偏移量为0,写入长度为buff的长度
            bw.write(buff, 0,buff.length());
            bw.newLine(); // 添加换行
        }

        br.close();
        bw.close();
    }


    /**
     * read方法
     */
    private static void writeFile0() throws IOException {
        BufferedWriter bw=new BufferedWriter(new FileWriter("bw.txt"));
        BufferedReader br=new BufferedReader(new FileReader("fw.txt"));
        char buff[] = new char[1024];
        int len;
        while((len=br.read(buff))!=-1){
            bw.write(buff, 0, len);
        }

        br.close();
        bw.close();
    }
}
- 1
- 2
- 3
- 4
- 5
- 6
- 7
- 8
- 9
- 10
- 11
- 12
- 13
- 14
- 15
- 16
- 17
- 18
- 19
- 20
- 21
- 22
- 23
- 24
- 25
- 26
- 27
- 28
- 29
- 30
- 31
- 32
- 33
- 34
- 35
- 36
- 37
- 38
- 39
- 40
- 41
- 42
- 43
- 44
2.15 PrintWriter
提供打印功能的字符输出流:向文本输出流打印对象的格式化表示形式。此类实现在 PrintStream 中的所有 print 方法。它不包含用于写入原始字节的方法,对于这些字节,程序应该使用未编码的字节流进行写入。
与 PrintStream 类不同,如果启用了自动刷新,则只有在调用 println、printf 或 format 的其中一个方法时才可能完成此操作,而不是每当正好输出换行符时才完成。这些方法使用平台自有的行分隔符概念,而不是换行符。
此类中的方法不会抛出 I/O 异常,尽管其某些构造方法可能抛出异常。客户端可能会查询调用 checkError() 是否出现错误。
2.15.1 构造方法摘要
通过构造方法可知,它即可操作文件,也可以操作字节输出流与字符输出流
PrintWriter(File file)
          使用指定文件创建不具有自动行刷新的新 PrintWriter。
PrintWriter(File file, String csn)
          创建具有指定文件和字符集且不带自动刷行新的新 PrintWriter。
PrintWriter(OutputStream out)
          根据现有的 OutputStream 创建不带自动行刷新的新 PrintWriter。
PrintWriter(OutputStream out, boolean autoFlush)
          通过现有的 OutputStream 创建新的 PrintWriter。
PrintWriter(String fileName)
          创建具有指定文件名称且不带自动行刷新的新 PrintWriter。
PrintWriter(String fileName, String csn)
          创建具有指定文件名称和字符集且不带自动行刷新的新 PrintWriter。
PrintWriter(Writer out)
          创建不带自动行刷新的新 PrintWriter。
PrintWriter(Writer out, boolean autoFlush)
          创建新 PrintWriter。
- 1
- 2
- 3
- 4
- 5
- 6
- 7
- 8
- 9
- 10
- 11
- 12
- 13
- 14
- 15
- 16
- 17
此类方法大抵都是打印功能。
2.15.2 使用示例
启动自动刷新
 ① PrintWriter pw = new PrintWriter(new FileWriter("pw2.txt"), true);
 ② 还是应该调用println()(printf 或 format)的方法才可以,不仅仅自动刷新了,还实现了数据的换行。
- 1
- 2
- 3
println() 与下面三行等价:
bw.write();
bw.newLine();
bw.flush();
- 1
- 2
- 3
- 4
public class PrintWriterDemo {
    public static void main(String[] args) throws IOException {
        // 创建打印流对象
        // PrintWriter pw = new PrintWriter("pw2.txt");
        PrintWriter pw = new PrintWriter(new FileWriter("pw2.txt"), true); // 设置自动刷新

//       pw.print(666);
//       pw.print("hello"); // 不会自动刷新

        pw.println(666);
        pw.println("hello"); // println()(printf 或 format)致使自动刷新

        pw.close();
    }
} - 1
- 2
- 3
- 4
- 5
- 6
- 7
- 8
- 9
- 10
- 11
- 12
- 13
- 14
- 15
2.2 Reader
用于读取字符流的抽象类。子类必须实现的方法只有 read(char[], int, int) 和 close()。但是,多数子类将重写此处定义的一些方法,以提供更高的效率和/或其他功能。
2.21 方法摘要
abstract  void close()
          关闭该流并释放与之关联的所有资源。
 void mark(int readAheadLimit)
          标记流中的当前位置。
 boolean markSupported()
          判断此流是否支持 mark() 操作。
 int read()
          读取单个字符。
 int read(char[] cbuf)
          将字符读入数组。
abstract  int read(char[] cbuf, int off, int len)
          将字符读入数组的某一部分。
 int read(CharBuffer target)
          试图将字符读入指定的字符缓冲区。
 boolean ready()
          判断是否准备读取此流。
 void reset()
          重置该流。
 long skip(long n)
          跳过字符。
- 1
- 2
- 3
- 4
- 5
- 6
- 7
- 8
- 9
- 10
- 11
- 12
- 13
- 14
- 15
- 16
- 17
- 18
- 19
- 20
- 21
2.22 FileReader
用来读取字符文件的便捷类。此类的构造方法假定默认字符编码和默认字节缓冲区大小都是适当的。要自己指定这些值,可以先在 FileInputStream 上构造一个 InputStreamReader。
FileReader 用于读取字符流。要读取原始字节流,请考虑使用 FileInputStream。
2.22.1 构造方法摘要
FileReader(File file)
          在给定从中读取数据的 File 的情况下创建一个新 FileReader。
FileReader(FileDescriptor fd)
          在给定从中读取数据的 FileDescriptor 的情况下创建一个新 FileReader。
FileReader(String fileName)
          在给定从中读取数据的文件名的情况下创建一个新 FileReader。
- 1
- 2
- 3
- 4
- 5
- 6
- 7
2.22.2 使用示例
public class FileReaderReview {
    public static void main(String[] args) {
        //ReadMethod1();
        ReadMethod2();
    }

    private static void ReadMethod2() {
        FileReader fr = null;
        try {
            fr= new FileReader("fw.txt");
            char[] buff = new char[1024];
            int len=0;
            // 每次将读取的内容放入一个数组缓冲区,读到内容返回读取的字符长度,否则返回-1
            while((len=fr.read(buff))!=-1){
                System.out.print(new String(buff, 0, len));
            }
        } catch (FileNotFoundException e) {
            e.printStackTrace();
        } catch (IOException e) {
            e.printStackTrace();
        }finally{
            if(fr!=null){
                try {
                    fr.close();
                } catch (IOException e) {
                    e.printStackTrace();
                }
            }
        }

    }

    private static void ReadMethod1() {
        FileReader fr = null;
        try {
            fr = new FileReader("fw.txt");
            int ch;
            while((ch=fr.read())!=-1){  // 每次读取一个字符,读完数据返回-1
                System.out.print((char)ch);
            }
        } catch (FileNotFoundException e) {
            e.printStackTrace();
        } catch (IOException e) {
            e.printStackTrace();
        }finally{
            if(fr!=null){
                try {
                    fr.close();
                } catch (IOException e) {
                    e.printStackTrace();
                }
            }
        }
    }
}- 1
- 2
- 3
- 4
- 5
- 6
- 7
- 8
- 9
- 10
- 11
- 12
- 13
- 14
- 15
- 16
- 17
- 18
- 19
- 20
- 21
- 22
- 23
- 24
- 25
- 26
- 27
- 28
- 29
- 30
- 31
- 32
- 33
- 34
- 35
- 36
- 37
- 38
- 39
- 40
- 41
- 42
- 43
- 44
- 45
- 46
- 47
- 48
- 49
- 50
- 51
- 52
- 53
- 54
- 55
2.23 InputStreamReader
InputStreamReader 是字节流通向字符流的桥梁:它使用指定的 charset 读取字节并将其解码为字符。它使用的字符集可以由名称指定或显式给定,或者可以接受平台默认的字符集。
每次调用 InputStreamReader 中的一个 read() 方法都会导致从底层输入流读取一个或多个字节。要启用从字节到字符的有效转换,可以提前从底层流读取更多的字节,使其超过满足当前读取操作所需的字节。
为了达到最高效率,可要考虑在 BufferedReader 内包装 InputStreamReader。例如:
BufferedReader in= new BufferedReader(new InputStreamReader(System.in));
- 1
- 2
2.23.1 构造方法摘要
可以指定字符集来解码字节文件
InputStreamReader(InputStream in)
          创建一个使用默认字符集的 InputStreamReader。
InputStreamReader(InputStream in, Charset cs)
          创建使用给定字符集的 InputStreamReader。
InputStreamReader(InputStream in, CharsetDecoder dec)
          创建使用给定字符集解码器的 InputStreamReader。
InputStreamReader(InputStream in, String charsetName)
          创建使用指定字符集的 InputStreamReader。
- 1
- 2
- 3
- 4
- 5
- 6
- 7
- 8
- 9
特别指出一个特别的方法
String getEncoding() 返回此流使用的字符编码的名称。
- 1
- 2
2.23.2 使用示例
public class InputStreamReaderReview {
    public static void main(String[] args) throws Exception {

        review3();
    }

    private static void review3() throws IOException, FileNotFoundException {
        // 指定按gbk将字节解码为字符读取到输入流中
        InputStreamReader isr=new InputStreamReader(new FileInputStream("osw.txt"), "gbk");
        char[] cbuf=new char[1024];
        int len=-1;
        while ((len=isr.read(cbuf))!=-1) {
            System.out.println(new String(cbuf, 0, len));
        }
        isr.close();
    }

    private static void review1() throws IOException {
        // 使用BufferedReader提高效率
        BufferedReader br=new BufferedReader(new InputStreamReader(System.in));
        String s=null;
        while(!(s=br.readLine()).equals("over"))
        {
            System.out.println(s.toUpperCase());
        }
        br.close();
    }

    private static void review2() throws Exception {
        FileOutputStream fos=new FileOutputStream(new File("D:\\changeio.txt"));
        // 指定以gbk将字符编码成字节写入流中
        OutputStreamWriter osw=new OutputStreamWriter(fos,"GBK");
        osw.write("设为GBK写入");
        osw.close();

        FileInputStream fis = new FileInputStream(new File("D:\\changeio.txt"));
        // 指定按gbk将字节解码为字符读取到输入流中
        InputStreamReader isr = new InputStreamReader(fis,"GBK");
        char[] cbuf = new char[1024];
        int len=0;
        while ((len=isr.read(cbuf))!=-1) {
            System.out.println(new String(cbuf,0,len));
        }
        isr.close();
    }
}
- 1
- 2
- 3
- 4
- 5
- 6
- 7
- 8
- 9
- 10
- 11
- 12
- 13
- 14
- 15
- 16
- 17
- 18
- 19
- 20
- 21
- 22
- 23
- 24
- 25
- 26
- 27
- 28
- 29
- 30
- 31
- 32
- 33
- 34
- 35
- 36
- 37
- 38
- 39
- 40
- 41
- 42
- 43
- 44
- 45
- 46
- 47
2.24 BufferedReader
从字符输入流中读取文本,缓冲各个字符,从而实现字符、数组和行的高效读取。
可以指定缓冲区的大小,或者可使用默认的大小。大多数情况下,默认值就足够大了。
通常,Reader 所作的每个读取请求都会导致对底层字符或字节流进行相应的读取请求。因此,建议用 BufferedReader 包装所有其 read() 操作可能开销很高的 Reader(如 FileReader 和 InputStreamReader)。例如,
BufferedReader in= new BufferedReader(new FileReader("foo.in"));
- 1
- 2
2.24.1 构造方法摘要与方法摘要
1.构造方法
BufferedReader(Reader in)
          创建一个使用默认大小输入缓冲区的缓冲字符输入流。
BufferedReader(Reader in, int sz)
          创建一个使用指定大小输入缓冲区的缓冲字符输入流。
- 1
- 2
- 3
- 4
- 5
2.特殊方法
String readLine() 读取一个文本行。
- 1
- 2
2.24.2 使用示例
注意:使用BufferedReader读取的一行不包含换行符
public class BufferedReaderReview {
    public static void main(String[] args) {
        readFile();
    }

    private static void readFile() {
        FileReader fr=null;
        CustomBufferedReader br=null;
        try {
            fr=new FileReader("jar.txt");
            br = new CustomBufferedReader(fr);
            String line=null;
            while((line=br.readLine())!=null){//不包含 line-termination characters
                System.out.println(br.getLineNumber()+":"+line);
            }
        } catch (FileNotFoundException e) {
            e.printStackTrace();
        } catch (IOException e) {
            e.printStackTrace();
        }finally{
            if(br!=null){
                try {
                    br.close();
                } catch (IOException e) {
                    e.printStackTrace();
                }
            }
        }
    }
}- 1
- 2
- 3
- 4
- 5
- 6
- 7
- 8
- 9
- 10
- 11
- 12
- 13
- 14
- 15
- 16
- 17
- 18
- 19
- 20
- 21
- 22
- 23
- 24
- 25
- 26
- 27
- 28
- 29
- 30
2.24.3 自定义BufferedReader与BufferedWriter
上面用到了CustomBufferedReader,它是一个自定义的BufferedReader。可以戳java学习笔记之BufferedReader与BufferedWriter看看实现
3 RandomAccessFile
RandomAccessFile类不属于流,是Object类的子类。但它融合了InputStream和OutputStream的功能。支持对文件的随机访问读取和写入。
随机访问文件的行为类似存储在文件系统中的一个大型 byte 数组。存在指向该隐含数组的光标或索引,称为文件指针;输入操作从文件指针开始读取字节,并随着对字节的读取而前移此文件指针。如果随机访问文件以读取/写入模式创建,则输出操作也可用;输出操作从文件指针开始写入字节,并随着对字节的写入而前移此文件指针。写入隐含数组的当前末尾之后的输出操作导致该数组扩展。该文件指针可以通过 getFilePointer 方法读取,并通过 seek 方法设置。
通常,如果此类中的所有读取例程在读取所需数量的字节之前已到达文件末尾,则抛出 EOFException(是一种 IOException)。如果由于某些原因无法读取任何字节,而不是在读取所需数量的字节之前已到达文件末尾,则抛出 IOException,而不是 EOFException。需要特别指出的是,如果流已被关闭,则可能抛出 IOException。
3.1 构造方法摘要
RandomAccessFile(String name, String mode)
          创建从中读取和向其中写入(可选)的随机访问文件流,该文件具有指定名称。
RandomAccessFile(File file, String mode)
          创建从中读取和向其中写入(可选)的随机访问文件流,该文件由 File 参数指定。
          将创建一个新的 FileDescriptor 对象来表示此文件的连接。 mode 参数指定用以打开文件的访问模式。
    允许的值及其含意为:

    值       含意
    "r"     以只读方式打开。调用结果对象的任何 write 方法都将导致抛出 IOException。
    "rw"    打开以便读取和写入。如果该文件尚不存在,则尝试创建该文件。
    "rws"   打开以便读取和写入,对于 "rw",还要求对文件的内容或元数据的每个更新都同步写入到底层存储设备。
    "rwd"   打开以便读取和写入,对于 "rw",还要求对文件内容的每个更新都同步写入到底层存储设备。
    "rwd" 模式可用于减少执行的 I/O 操作数量。使用 "rwd" 仅要求更新要写入存储的文件的内容;
    使用 "rws" 要求更新要写入的文件内容及其元数据,这通常要求至少一个以上的低级别 I/O 操作。
- 1
- 2
- 3
- 4
- 5
- 6
- 7
- 8
- 9
- 10
- 11
- 12
- 13
- 14
- 15
3.2 方法摘要
方法大抵都是一些读写操作,下面只列出一些特殊的方法
FileDescriptor getFD()
          返回与此流关联的不透明文件描述符对象。
 long getFilePointer()
          返回此文件中的当前偏移量。
 String readLine()
          从此文件读取文本的下一行。
 String readUTF()
          从此文件读取一个字符串。
 void writeUTF(String str)
          使用 modified UTF-8 编码以与机器无关的方式将一个字符串写入该文件。
 void seek(long pos)
          设置到此文件开头测量到的文件指针偏移量,在该位置发生下一个读取或写入操作。
int skipBytes(int n)
          尝试跳过输入的 n 个字节以丢弃跳过的字节。
- 1
- 2
- 3
- 4
- 5
- 6
- 7
- 8
- 9
- 10
- 11
- 12
- 13
- 14
- 15
3.3 使用示例
public class RandomAccessFileDemo {

    public static void main(String[] args) throws IOException {
        //write();
        read();
    }

    /**
     * 读取数据
     * @throws IOException
     */
    private static void read() throws IOException {
        // 创建随机访问流对象
        RandomAccessFile raf = new RandomAccessFile("raf.txt", "rw");

        String s = raf.readUTF();
        System.out.println(s);
        System.out.println("当前文件指针的位置是:" + raf.getFilePointer());

        int i = raf.readInt();
        System.out.println(i);
        // 该文件指针可以通过 getFilePointer方法读取,并通过 seek 方法设置。
        System.out.println("当前文件指针的位置是:" + raf.getFilePointer());

        char ch = raf.readChar();
        System.out.println(ch);
        System.out.println("当前文件指针的位置是:" + raf.getFilePointer());


        // 使用seek跳转到指定位置
        raf.seek(16);
        ch = raf.readChar();
        System.out.println(ch);
    }
    /**
     * 写入数据到文件
     * @throws IOException
     */
    private static void write() throws IOException {
        // 创建随机访问流对象
        RandomAccessFile raf = new RandomAccessFile("raf.txt", "rw");

        // 写入
        raf.writeUTF("你好啊~");  // utf-8 一个汉字3个字节
        raf.writeInt(66);
        raf.writeChar('u');

        raf.close();
    }

    // output
    //  你好啊~
    //  当前文件指针的位置是:12
    //  66
    //  当前文件指针的位置是:16
    //  u
    //  当前文件指针的位置是:18
    //  u

}- 1
- 2
- 3
- 4
- 5
- 6
- 7
- 8
- 9
- 10
- 11
- 12
- 13
- 14
- 15
- 16
- 17
- 18
- 19
- 20
- 21
- 22
- 23
- 24
- 25
- 26
- 27
- 28
- 29
- 30
- 31
- 32
- 33
- 34
- 35
- 36
- 37
- 38
- 39
- 40
- 41
- 42
- 43
- 44
- 45
- 46
- 47
- 48
- 49
- 50
- 51
- 52
- 53
- 54
- 55
- 56
- 57
- 58
- 59
- 60
=============================File=====================================
1、File类概述
继承体系:public class File extends Object implements Serializable, Comparable<File>
意义:文件和目录路径名的抽象表示形式。即既可以表示为普通文件,也可以表示为目录
特点:File 类的实例是不可变的;也就是说,一旦创建,File 对象表示的抽象路径名将永不改变。
- 1
- 2
- 3
- 4
2、构造方法与对象创建方式
2.1构造方法
构造方法摘要
File(File parent, String child)
          根据 parent 抽象路径名和 child 路径名字符串创建一个新 File 实例。
File(String pathname)
          通过将给定路径名字符串转换为抽象路径名来创建一个新 File 实例。
File(String parent, String child)
          根据 parent 路径名字符串和 child 路径名字符串创建一个新 File 实例。
File(URI uri)
          通过将给定的 file: URI 转换为一个抽象路径名来创建一个新的 File 实例。
- 1
- 2
- 3
- 4
- 5
- 6
- 7
- 8
- 9
2.2使用示例
    /**
     * 几种创建File的方法
     */
    private static void test4() {

        //1 通过路径来创建
        File file=new File("D:\\test");

        //2 通过父路径与子路径来创建
        File file2=new File("D:\\test", "1.c");

        //3 通过父文件对象,子路径来创建
        File file3=new File(file, "test.txt");
        System.out.println(file3.exists());
}- 1
- 2
- 3
- 4
- 5
- 6
- 7
- 8
- 9
- 10
- 11
- 12
- 13
- 14
- 15
3、功能分类与使用示例
3.1、创建功能
3.11常用方法
创建功能:createNewFile、mkdir、mkdirs 、createTempFile
方法摘要
 boolean createNewFile()
          当且仅当不存在具有此抽象路径名指定名称的文件时,不可分地创建一个新的空文件。
static File createTempFile(String prefix, String suffix)
          在默认临时文件目录中创建一个空文件,使用给定前缀和后缀生成其名称。
static File createTempFile(String prefix, String suffix, File directory)
           在指定目录中创建一个新的空文件,使用给定的前缀和后缀字符串生成其名称。
 boolean mkdir()
          创建此抽象路径名指定的目录。
 boolean mkdirs()
          创建此抽象路径名指定的目录,包括所有必需但不存在的父目录。
- 1
- 2
- 3
- 4
- 5
- 6
- 7
- 8
- 9
- 10
- 11
3.12 使用示例
/**
     * 创建功能
     *
     * @throws IOException
     */
    private static void test1() throws IOException {
        File file = new File("D:\\test\\test.txt");

        // 创建文件,成功则返回true,若文件已经存在则不再创建,并返回false
        // 注意:要想在某个目录下创建内容,该目录首先必须存在。
        boolean createNewFile = file.createNewFile();
        System.out.println("createNewFile=" + createNewFile);

        File dir = new File("D:\\test\\aaa\\bbb");
        // 创建文件夹 如果存在这样的文件夹,就不创建了
        boolean mkdir = dir.mkdir(); // 创建目录,但是需注意:父目录必须存在

        File dirs = new File("D:\\test\\666\\bbb\\ccc");
        boolean mkdirs = dirs.mkdirs(); // 创建多级目录,,返回值表示是否创建成功
        System.out.println("mkdir=" + mkdir + " mkdirs=" + mkdirs);

        // 创建零时文件,可以指定前后缀,和目录
        File.createTempFile("prefix", "suffix.txt", new File("D:\\test"));
        // 创建如下文件: prefix4232714334387039759suffix.txt
}- 1
- 2
- 3
- 4
- 5
- 6
- 7
- 8
- 9
- 10
- 11
- 12
- 13
- 14
- 15
- 16
- 17
- 18
- 19
- 20
- 21
- 22
- 23
- 24
- 25
3.2、判断功能与获取功能
3.21常见方法
判断功能:equals、 exists、isAbsolute 、isDirectory、isFile、isHidden、canRead、 canWrite
    boolean canRead()
                 测试应用程序是否可以读取此抽象路径名表示的文件。
    boolean canWrite()
                 测试应用程序是否可以修改此抽象路径名表示的文件。
    boolean equals(Object obj)
                 测试此抽象路径名与给定对象是否相等。
    boolean exists()
                 测试此抽象路径名表示的文件或目录是否存在。
     boolean isAbsolute()
                 测试此抽象路径名是否为绝对路径名。
     boolean isDirectory()
                 测试此抽象路径名表示的文件是否是一个目录。
     boolean isFile()
                 测试此抽象路径名表示的文件是否是一个标准文件。
     boolean isHidden()
测试此抽象路径名指定的文件是否是一个隐藏文件。 - 1
- 2
- 3
- 4
- 5
- 6
- 7
- 8
- 9
- 10
- 11
- 12
- 13
- 14
- 15
- 16
获取功能:list() 、listFiles() 、getAbsoluteFile() 、getAbsolutePath() 、getName()、getParent() 、getPath()、getTotalSpace() 、getUsableSpace()
    String[] list()
                  返回一个字符串数组,这些字符串指定此抽象路径名表示的目录中的文件和目录。
    String[] list(FilenameFilter filter)
                  返回一个字符串数组,这些字符串指定此抽象路径名表示的目录中满足指定过滤器的文件和目录。
    File[] listFiles()
                  返回一个抽象路径名数组,这些路径名表示此抽象路径名表示的目录中的文件。
    File[] listFiles(FileFilter filter)
                  返回抽象路径名数组,这些路径名表示此抽象路径名表示的目录中满足指定过滤器的文件和目录。
    String getName()
                  返回由此抽象路径名表示的文件或目录的名称。
    String getParent()
                  返回此抽象路径名父目录的路径名字符串;如果此路径名没有指定父目录,则返回 null。
    File getParentFile()
                  返回此抽象路径名父目录的抽象路径名;如果此路径名没有指定父目录,则返回 null。
    String getPath()
                  将此抽象路径名转换为一个路径名字符串。
    long getTotalSpace()
                  返回此抽象路径名指定的分区大小。
    long getUsableSpace()
返回此抽象路径名指定的分区上可用于此虚拟机的字节数。 - 1
- 2
- 3
- 4
- 5
- 6
- 7
- 8
- 9
- 10
- 11
- 12
- 13
- 14
- 15
- 16
- 17
- 18
- 19
- 20
3.22 使用示例
/**
 * 判断功能、获取功能
 */
private static void test2() {
    File file = new File("D:\\test");

    // 获取指定文件目录下的所有文件名
    // String[] files = file.list();
    String[] files = file.list(new FilenameFilter() { // 添加文件过滤器

                public boolean accept(File dir, String name) {
                    // 返回true则会被添加到文件列表,false则被过滤掉
                    return new File(dir, name).isFile()
                            && name.endsWith(".txt");
                }
            });
    // 输出文件名
    for (String fileName : files) {
        System.out.println(fileName);
    }

    // 判断file是存在的目录,并且不是隐藏的
    if (file.exists() && file.isDirectory() && !file.isHidden()) {
        // 返回当前目录的文件对象数组
        File[] listFiles = file.listFiles();
        for (File f : listFiles) {
            // 获取文件的绝对路径
            // System.out.println(f.getAbsolutePath());

            // 获取父目录, 还有getParentFile(返回父目录文件对象)
            // System.out.println(f.getParent());

            // 文件路径(此抽象路径名的字符串形式) + 文件名
            // System.out.println(f.getPath()+"---------- "+f.getName());

            // 如果此抽象路径名是绝对路径名,则返回true
            // System.out.println(f.isAbsolute());

            // 获取磁盘的可用内存,还有其他如 getTotalSpace(总)、getFreeSpace(空闲,未分配的字节数)
            // System.out.println(new Formatter().format("可用内存%dG",
            // f.getUsableSpace()/1024/1024/1024));

            if (f.isFile()) { // 判断是否为正常文件
                System.out.println(f.getAbsolutePath());
                // f.lastModified() 获取上次修改时间,用SimpleDateFormat进行了格式化
                System.out.println("lastModified="
                        + new SimpleDateFormat("yyyy-MM-dd HH:ss:mm")
                                .format(new Date(f.lastModified())));
            }
        }
    }
}
- 1
- 2
- 3
- 4
- 5
- 6
- 7
- 8
- 9
- 10
- 11
- 12
- 13
- 14
- 15
- 16
- 17
- 18
- 19
- 20
- 21
- 22
- 23
- 24
- 25
- 26
- 27
- 28
- 29
- 30
- 31
- 32
- 33
- 34
- 35
- 36
- 37
- 38
- 39
- 40
- 41
- 42
- 43
- 44
- 45
- 46
- 47
- 48
- 49
- 50
- 51
- 52
- 53
3.3重命名与删除功能:
3.31方法摘要
boolean delete()
              删除此抽象路径名表示的文件或目录。
boolean renameTo(File dest)
              重新命名此抽象路径名表示的文件。
- 1
- 2
- 3
- 4
- 5
3.32 使用示例
1、重命名与删除文件
/**
     * 重命名与删除文件功能
     */
    private static void test3() {
        File dir = new File("D:\\test");
        File[] listFiles = dir.listFiles();
        for (File file : listFiles) {
            if (file.getName().equals("1.c")) {
                boolean delete = file.delete();
                System.out.println("delete=" + delete); // 删除文件,成功则返回true
            }

            if (file.getName().equals("1.txt")) {
                File newFile = new File(file.getParent(), "mystrstr.c");
                boolean renameTo = file.renameTo(newFile);
                System.out.println("renameTo=" + renameTo); // 重命名文件,成功则返回true
            }
        }

}- 1
- 2
- 3
- 4
- 5
- 6
- 7
- 8
- 9
- 10
- 11
- 12
- 13
- 14
- 15
- 16
- 17
- 18
- 19
- 20
2 、 删除文件夹
注意:若为非空目录,无法直接删除,须将内部文件删除后才能删除该文件夹
/**
     * 删除文件夹 删除的文件夹必须为空的,否则必须从内往外删除
     */
    private static void deleteDir(String dir) {
        // 通过dir路径创建file对象
        File dirs = new File(dir);
        if (!dirs.exists()) return;  // 文件目录不存在则返回

        // boolean delete = dirs.delete(); // 删除的文件夹必须为空的,否则必须从内往外删除
        File[] listFiles = dirs.listFiles();
        for (File file : listFiles) {
            if (file.isDirectory() && !file.delete()) { // 如果是目录且不可以被删除(即目录不为空)
                    // 如果目录不为空,递归删除
                    deleteDir(file.getAbsolutePath());
            } else {
                file.delete();  // 删除文件
            }
        }

        if(dirs.exists())  dirs.delete(); // 删除空目录
    }
- 1
- 2
- 3
- 4
- 5
- 6
- 7
- 8
- 9
- 10
- 11
- 12
- 13
- 14
- 15
- 16
- 17
- 18
- 19
- 20
- 21
- 22
4、小案例
扫描文件夹,并对文件进行批量修改文件名
- 1
- 2
import java.io.File;

public class RenameFile {
    public static void main(String[] args) {

        String dir = "D:\\test\\dir";
        renameFile(dir);
    }

    private static void renameFile(String dir) {
        File dirF = new File(dir);
        // 得到文件列表
        File[] listFiles = dirF.listFiles();
        if(listFiles == null) return;
        for (File file : listFiles) {
            if (file.isDirectory()) {  // 若是目录,则继续遍历
                renameFile(file.getAbsolutePath());
            }else{
                String newFileName=getNewFileName(file.getName());
                // 根据路径与新名字创建File对象
                File newFile=new File(file.getParent(),newFileName);
                file.renameTo(newFile); // 重命名
                System.out.println(file.getParent()+"---"+newFileName);
            }
        }

    }

    /**
     * 获取需要的文件名
     * @param name
     * @return
     */
    private static String getNewFileName(String name) {
        int startIndex=name.indexOf("-");
        return name.substring(startIndex+1);
    }
}
======================BufferedReader与BufferedWriter===========================
1. 使用缘由
为了提高字符流读写的效率,引入了缓冲机制,进行字符批量的读写,提高了单个字符读写的效率。BufferedReader用于加快读取字符的速度,BufferedWriter用于加快写入的速度
- 1
- 2
2. BufferedWriter
2.1 继承体系与方法
java.lang.Object
    ----java.io.Writer
    ------java.io.BufferedWriter
- 1
- 2
- 3
- 4
构造方法
BufferedWriter(Writer out)
    Creates a buffered character-output stream that uses a default-sized output buffer.
BufferedWriter(Writer out,  int sz)//sz可以指定缓冲区的大小
    Creates a new buffered character-output stream that uses an output buffer of the given size
- 1
- 2
- 3
- 4
- 5
常见方法
void close() Closes the stream, flushing it first.
void flush() Flushes the stream. //刷新缓存区
void newLine() Writes a line separator. //添加换行符
void write(char[] cbuf, int off, int len) Writes a portion of an array of characters. //写入指定的字符数组,off起始偏移量,len要写入的字符长度
void write(int c) Writes a single character.
void write(String s, int off, int len) Writes a portion of a String. //写入指定的字符串,off偏移量,len要 入的字符串长度
- 1
- 2
- 3
- 4
- 5
- 6
- 7
2.2实例代码
package ReaderWriter;

import java.io.BufferedReader;
import java.io.BufferedWriter;
import java.io.FileReader;
import java.io.FileWriter;
import java.io.IOException;
/*
 * @author pecu
 *
 */
public class BufferedWriterReview {
    public static void main(String[] args) {
        //writeFile1();
        writeFile2();

    }

    private static void writeFile2() {
        BufferedWriter bw=null;
        BufferedReader br=null;
        try {
            br = new BufferedReader(new FileReader("fw.txt"));
            bw = new BufferedWriter(new FileWriter("bw2.txt"));
            String buff=null;
            while((buff=br.readLine())!=null){  //读取行,不包含换行符
                //将读取的行内容写入文件,偏移量为0,写入长度为buff的长度
                bw.write(buff, 0,buff.length());
                bw.newLine(); // 添加换行
            }
        } catch (IOException e) {
            e.printStackTrace();
        }finally{
            if(br!=null){
                try {
                    br.close();
                } catch (IOException e) {
                    e.printStackTrace();
                }
            }
            if(bw!=null){
                try {
                    bw.close();
                } catch (IOException e) {
                    e.printStackTrace();
                }
            }
        }

    }

    private static void writeFile1() {
        BufferedWriter bw=null;
        BufferedReader br=null;
        try {
            br = new BufferedReader(new FileReader("fw.txt"));
            bw = new BufferedWriter(new FileWriter("bw.txt"));
            char buff[] = new char[1024];
            int len;
            while((len=br.read(buff))!=-1){
                bw.write(buff, 0, len);
            }
        } catch (IOException e) {
            e.printStackTrace();
        }finally{
            if(br!=null){
                try {
                    br.close();
                } catch (IOException e) {
                    e.printStackTrace();
                }
            }
            if(bw!=null){
                try {
                    bw.close()`

                } catch (IOException e) {
                    e.printStackTrace();
                }
            }
        }

    }
}
- 1
- 2
- 3
- 4
- 5
- 6
- 7
- 8
- 9
- 10
- 11
- 12
- 13
- 14
- 15
- 16
- 17
- 18
- 19
- 20
- 21
- 22
- 23
- 24
- 25
- 26
- 27
- 28
- 29
- 30
- 31
- 32
- 33
- 34
- 35
- 36
- 37
- 38
- 39
- 40
- 41
- 42
- 43
- 44
- 45
- 46
- 47
- 48
- 49
- 50
- 51
- 52
- 53
- 54
- 55
- 56
- 57
- 58
- 59
- 60
- 61
- 62
- 63
- 64
- 65
- 66
- 67
- 68
- 69
- 70
- 71
- 72
- 73
- 74
- 75
- 76
- 77
- 78
- 79
- 80
- 81
- 82
- 83
- 84
- 85
3. BufferedReader
3.2 继承体系与方法
1、继承体系
 java.lang.Object
     ----java.io.Reader
        ----java.io.BufferedReader
- 1
- 2
- 3
- 4
2、构造方法
1、BufferedReader(Reader in)
    Creates a buffering character-input stream that uses a default-sized input buffer.
2、BufferedReader(Reader in, int sz)//sz可以指定缓冲区的大小
    Creates a buffering character-input stream that uses an input buffer of the specified size.
- 1
- 2
- 3
- 4
- 5
3、常见方法
void close() Closes the stream and releases any system resources associated with it.
int read() Reads a single character. //读取单个字符
int read(char[] cbuf, int off, int len) Reads characters into a portion of an array. //读取到cbuf,off开始存储的偏移量,len读取的长度
String readLine() Reads a line of text. //读取一行,不包含换行符
long skip(long n) Skips characters.//n为跳过的字符个数
boolean ready() Tells whether this stream is ready to be read.
void reset() Resets the stream to the most recent mark.
- 1
- 2
- 3
- 4
- 5
- 6
- 7
- 8
3.2 实例代码
package ReaderWriter;

import java.io.BufferedReader;
import java.io.FileNotFoundException;
import java.io.FileReader;
import java.io.IOException;
 *
 * @author pecu
 *
 */
public class BufferedReaderReview {
    public static void main(String[] args) {
        readFile();
    }

    private static void readFile() {
        FileReader fr=null;
        BufferedReader br=null;
        try {
            fr=new FileReader("fw.txt");
            br = new BufferedReader(fr);
            String line=null;
            while((line=br.readLine())!=null){//不包含 line-termination characters
                System.out.println(line);
            }
        } catch (FileNotFoundException e) {
            e.printStackTrace();
        } catch (IOException e) {
            e.printStackTrace();
        }finally{
            if(br!=null){
                try {
                    br.close();
                } catch (IOException e) {
                    e.printStackTrace();
                }
            }
        }
    }
}
- 1
- 2
- 3
- 4
- 5
- 6
- 7
- 8
- 9
- 10
- 11
- 12
- 13
- 14
- 15
- 16
- 17
- 18
- 19
- 20
- 21
- 22
- 23
- 24
- 25
- 26
- 27
- 28
- 29
- 30
- 31
- 32
- 33
- 34
- 35
- 36
- 37
- 38
- 39
- 40
- 41
4 自定义BufferedReader与BufferedWriter
自定义BufferedReader
/**
 *
 * @author pecu
 *
 */
public class CustomBufferedReader extends Reader{
    Reader r;
    private char[] buff; // 字符缓冲区
    private int lineNumber=0; // 行号
    public CustomBufferedReader(Reader r) {
        super();
        this.r = r;
        buff = new char[8192];
    }

    public int readInt() throws IOException{
        return r.read();
    }

    public String readLine2() throws IOException {
        int ch = 0;
        StringBuffer sb = new StringBuffer();
        synchronized (lock) {
            while((ch=readInt()) != -1){
                if(ch == '\r'){
                    continue;
                }
                if(ch == '\n'){
                    ++lineNumber;
                    return sb.toString();
                }
                sb.append((char)ch);
            }
        }
        if(sb.length()==0) return null;
        ++lineNumber;
        return sb.toString();
    }

    public String readLine() throws IOException {
        int ch = 0;
        int count = 0;
        synchronized (lock) {
            while((ch=readInt()) != -1){  // 不到文件结尾
                if(ch == '\r'){  // '\r'不存
                    continue;
                }
                if(ch == '\n' ){
                    ++lineNumber;
                    return new String(buff,0,count);
                }

                buff[count++]= (char) ch;
            }
        }
        if(count==0) return null;  //如果读取为空
        ++lineNumber;
        return new String(buff,0,count);
    }

    public void close() throws IOException {
        if (r!=null) {
            r.close();
        }
    }

    public int getLineNumber() {
        return lineNumber;
    }

    @Override
    public int read(char[] cbuf, int off, int len) throws IOException {
        checkBounds(cbuf, off, len);
        return r.read(cbuf, off, len);
    }


    /**
     * 检查边界
     *
     * @param cbuf
     * @param off
     * @param len
     */
    private void checkBounds(char[] cbuf, int off, int len) {
        if (cbuf == null) {
            throw new NullPointerException("cbuf is null");
        }

        if ((off < 0 || off > cbuf.length) || (len < 0 || len > cbuf.length)
                || (off + len) < 0 || (off + len) > cbuf.length) {
            throw new ArrayIndexOutOfBoundsException();
        }

        if (0==len) {
            return;
        }
    }
}
- 1
- 2
- 3
- 4
- 5
- 6
- 7
- 8
- 9
- 10
- 11
- 12
- 13
- 14
- 15
- 16
- 17
- 18
- 19
- 20
- 21
- 22
- 23
- 24
- 25
- 26
- 27
- 28
- 29
- 30
- 31
- 32
- 33
- 34
- 35
- 36
- 37
- 38
- 39
- 40
- 41
- 42
- 43
- 44
- 45
- 46
- 47
- 48
- 49
- 50
- 51
- 52
- 53
- 54
- 55
- 56
- 57
- 58
- 59
- 60
- 61
- 62
- 63
- 64
- 65
- 66
- 67
- 68
- 69
- 70
- 71
- 72
- 73
- 74
- 75
- 76
- 77
- 78
- 79
- 80
- 81
- 82
- 83
- 84
- 85
- 86
- 87
- 88
- 89
- 90
- 91
- 92
- 93
- 94
- 95
- 96
- 97
- 98
- 99
- 100
- 101
自定义BufferedWriter
/**
 * @author pecu
 */
public class CustomBufferedWriter extends Writer {
    private static final String LINE_SEPARATOR = System
            .getProperty("line.separator");
    private Writer writer;
    private static final int cacheSize = 8192; // 默认缓冲
    private char buff[]; // 缓冲区
    private int nChars, charIndex; //

    public CustomBufferedWriter(Writer writer) {
        this(writer, cacheSize);
    }

    public CustomBufferedWriter(Writer writer, int sz) {
        super();
        if (sz <= 0) {
            throw new IllegalArgumentException("Buffered sz<=0");
        }
        this.writer = writer;
        nChars = sz;
        charIndex = 0;
        buff = new char[sz];
    }

    public void newLine() throws IOException {
        write(LINE_SEPARATOR);
        // write(LINE_SEPARATOR,0,LINE_SEPARATOR.length());
    }

    public void write(int c) throws IOException {
        if (charIndex >= nChars) {
            flushBuffer();
        }
        buff[charIndex++] = (char) c;
    }

    public void write(String str) throws IOException{
        write(str, 0, str.length());
    }

    @Override
    public void write(String str, int off, int len) throws IOException {
        securityCheck();
        // 1
//      char[] charArray = str.toCharArray();
//      write(charArray, off, len);

        // 2
        while (len>0) {
            int lenght=Math.min(nChars-charIndex, len);
            str.getChars(off, off+lenght, buff, charIndex);
            len-=lenght;
            charIndex+=lenght;
            if (charIndex>=nChars) {
                flushBuffer();
            }
        }
    }

    @Override
    public void write(char[] cbuf, int off, int len) throws IOException {
        synchronized (lock) {
            checkBounds(cbuf, off, len);
            if (len>=nChars) {
                flushBuffer();
                writer.write(cbuf, 0, len);
                return;
            }

            while (len>0) {
                int length=Math.min(nChars-charIndex, len);
                System.arraycopy(cbuf, off, buff, charIndex, length);
                len-=length;
                charIndex+=length;
                if (charIndex>=nChars) {
                    flushBuffer();
                }
            }
        }
    }

    /**
     * 检查边界
     *
     * @param cbuf
     * @param off
     * @param len
     */
    private void checkBounds(char[] cbuf, int off, int len) {
        if (cbuf == null) {
            throw new NullPointerException("cbuf is null");
        }

        if ((off < 0 || off > cbuf.length) || (len < 0 || len > cbuf.length)
                || (off + len) < 0 || (off + len) > cbuf.length) {
            throw new ArrayIndexOutOfBoundsException();
        }

        if (0==len) {
            return;
        }
    }

    @Override
    public void flush() throws IOException {
        synchronized (lock) {
            securityCheck();
            flushBuffer();
            writer.flush();
        }
    }

    @Override
    public void close() throws IOException {
        synchronized (lock) {
            securityCheck();
            flush();
            writer = null;
            buff = null;
        }
    }

    /**
     * 刷新到字符流
     *
     * @throws IOException
     */
    public void flushBuffer() throws IOException {
        synchronized (lock) {
            securityCheck();
            if (charIndex == 0)
                return;
            writer.write(buff, 0, charIndex);
            charIndex = 0;
        }

    }

    /**
     * 检查流是否关闭
     *
     * @throws IOException
     */
    public void securityCheck() throws IOException {
        if (writer == null) {
            throw new IOException("stream closed");
        }
    }

}