一. 环境准备
查看Drozer项目说明发现环境要求
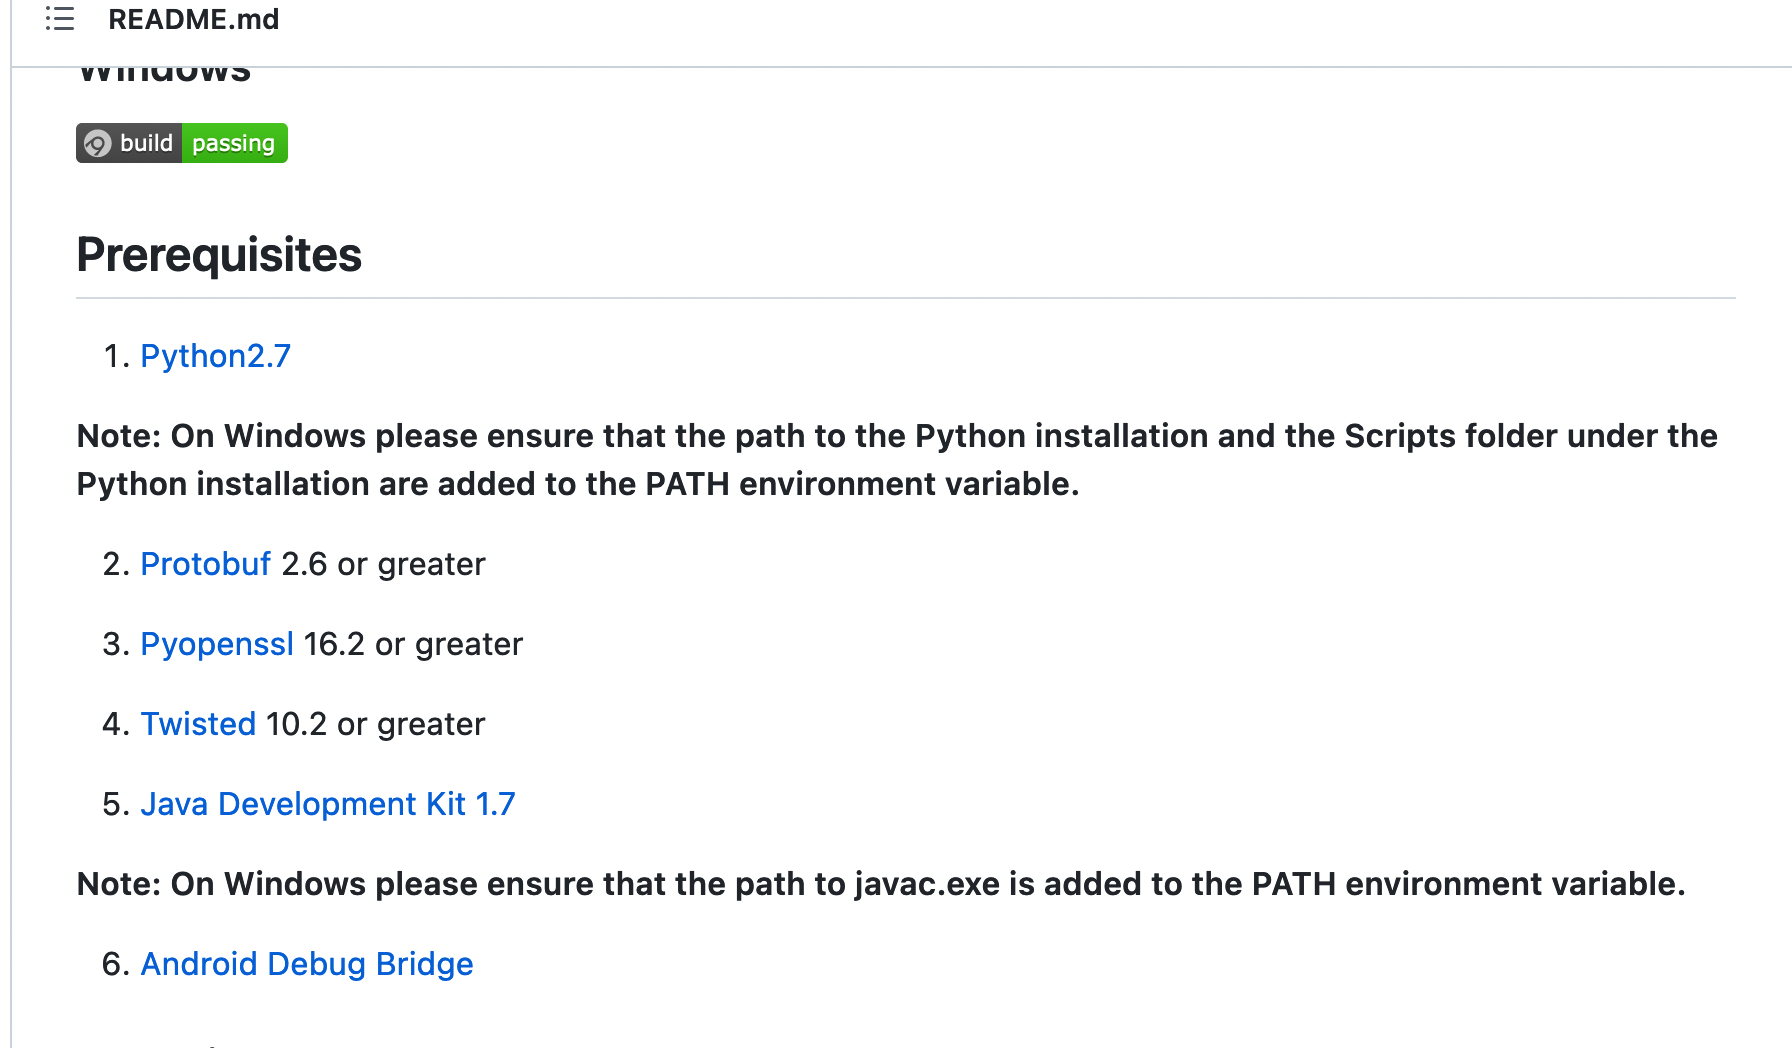 大致就是:
大致就是:
- jdk1.7+
- python2.7和pip 2不支持python3和pip3
- Protobuf 2.6 +
- Pyopenssl 16.2 +
- Twisted 10.2 +
- android sdk
- 安装adb
- 模拟器也要安装drozer agent
- 确保配置了adb、java环境变量
1.1 mac通过brew安装python2
从MacOS 12.4 Beta版(21F5048e) 开始,可以通过pyenv在intel和Apple芯片中安装python2
例如在M1中安装 2.7.18 版本的 python2。
brew install pyenv
pyenv install 2.7.18
export PATH="$(pyenv root)/shims:${

     PATH}"
pyenv global 2.7.18
python --version
如果一切顺利,将可以看到Python 2.7.18的输出。
需要将上述路径添加到环境变量里面,例如:
echo 'PATH=$(pyenv root)/shims:$PATH' >> ~/.zshrc
1.2. 安装pyOpenSSL
安装pyOpenSSL 是最坑的一步,没有之一, 执行 pip install -v pyOpenSSL==0.14 出现下面的错误
 clang -fno-strict-aliasing -I/Library/Developer/CommandLineTools/SDKs/MacOSX.sdk/usr/include -DNDEBUG -g -fwrapv -O3 -Wall -Wstrict-prototypes -I/Users/liam/.pyenv/versions/2.7.18/include/python2.7 -c build/temp.macosx-12.6-arm64-2.7/_openssl.c -o build/temp.macosx-12.6-arm64-2.7/build/temp.macosx-12.6-arm64-2.7/_openssl.o -Wconversion -Wno-error=sign-conversion
  build/temp.macosx-12.6-arm64-2.7/_openssl.c:575:10: fatal error: 'openssl/opensslv.h' file not found
  #include <openssl/opensslv.h>
           ^~~~~~~~~~~~~~~~~~~~
  1 error generated.

      =============================DEBUG ASSISTANCE=============================
      If you are seeing a compilation error please try the following steps to
      successfully install cryptography:
      1) Upgrade to the latest pip and try again. This will fix errors for most
         users. See: https://pip.pypa.io/en/stable/installing/#upgrading-pip
      2) Read https://cryptography.io/en/latest/installation.html for specific
         instructions for your platform.
      3) Check our frequently asked questions for more information:
         https://cryptography.io/en/latest/faq.html
      =============================DEBUG ASSISTANCE=============================

  error: command 'clang' failed with exit status 1
  ----------------------------------------
  ERROR: Failed building wheel for cryptography
Failed to build cryptography
ERROR: Could not build wheels for cryptography which use PEP 517 and cannot be installed directly
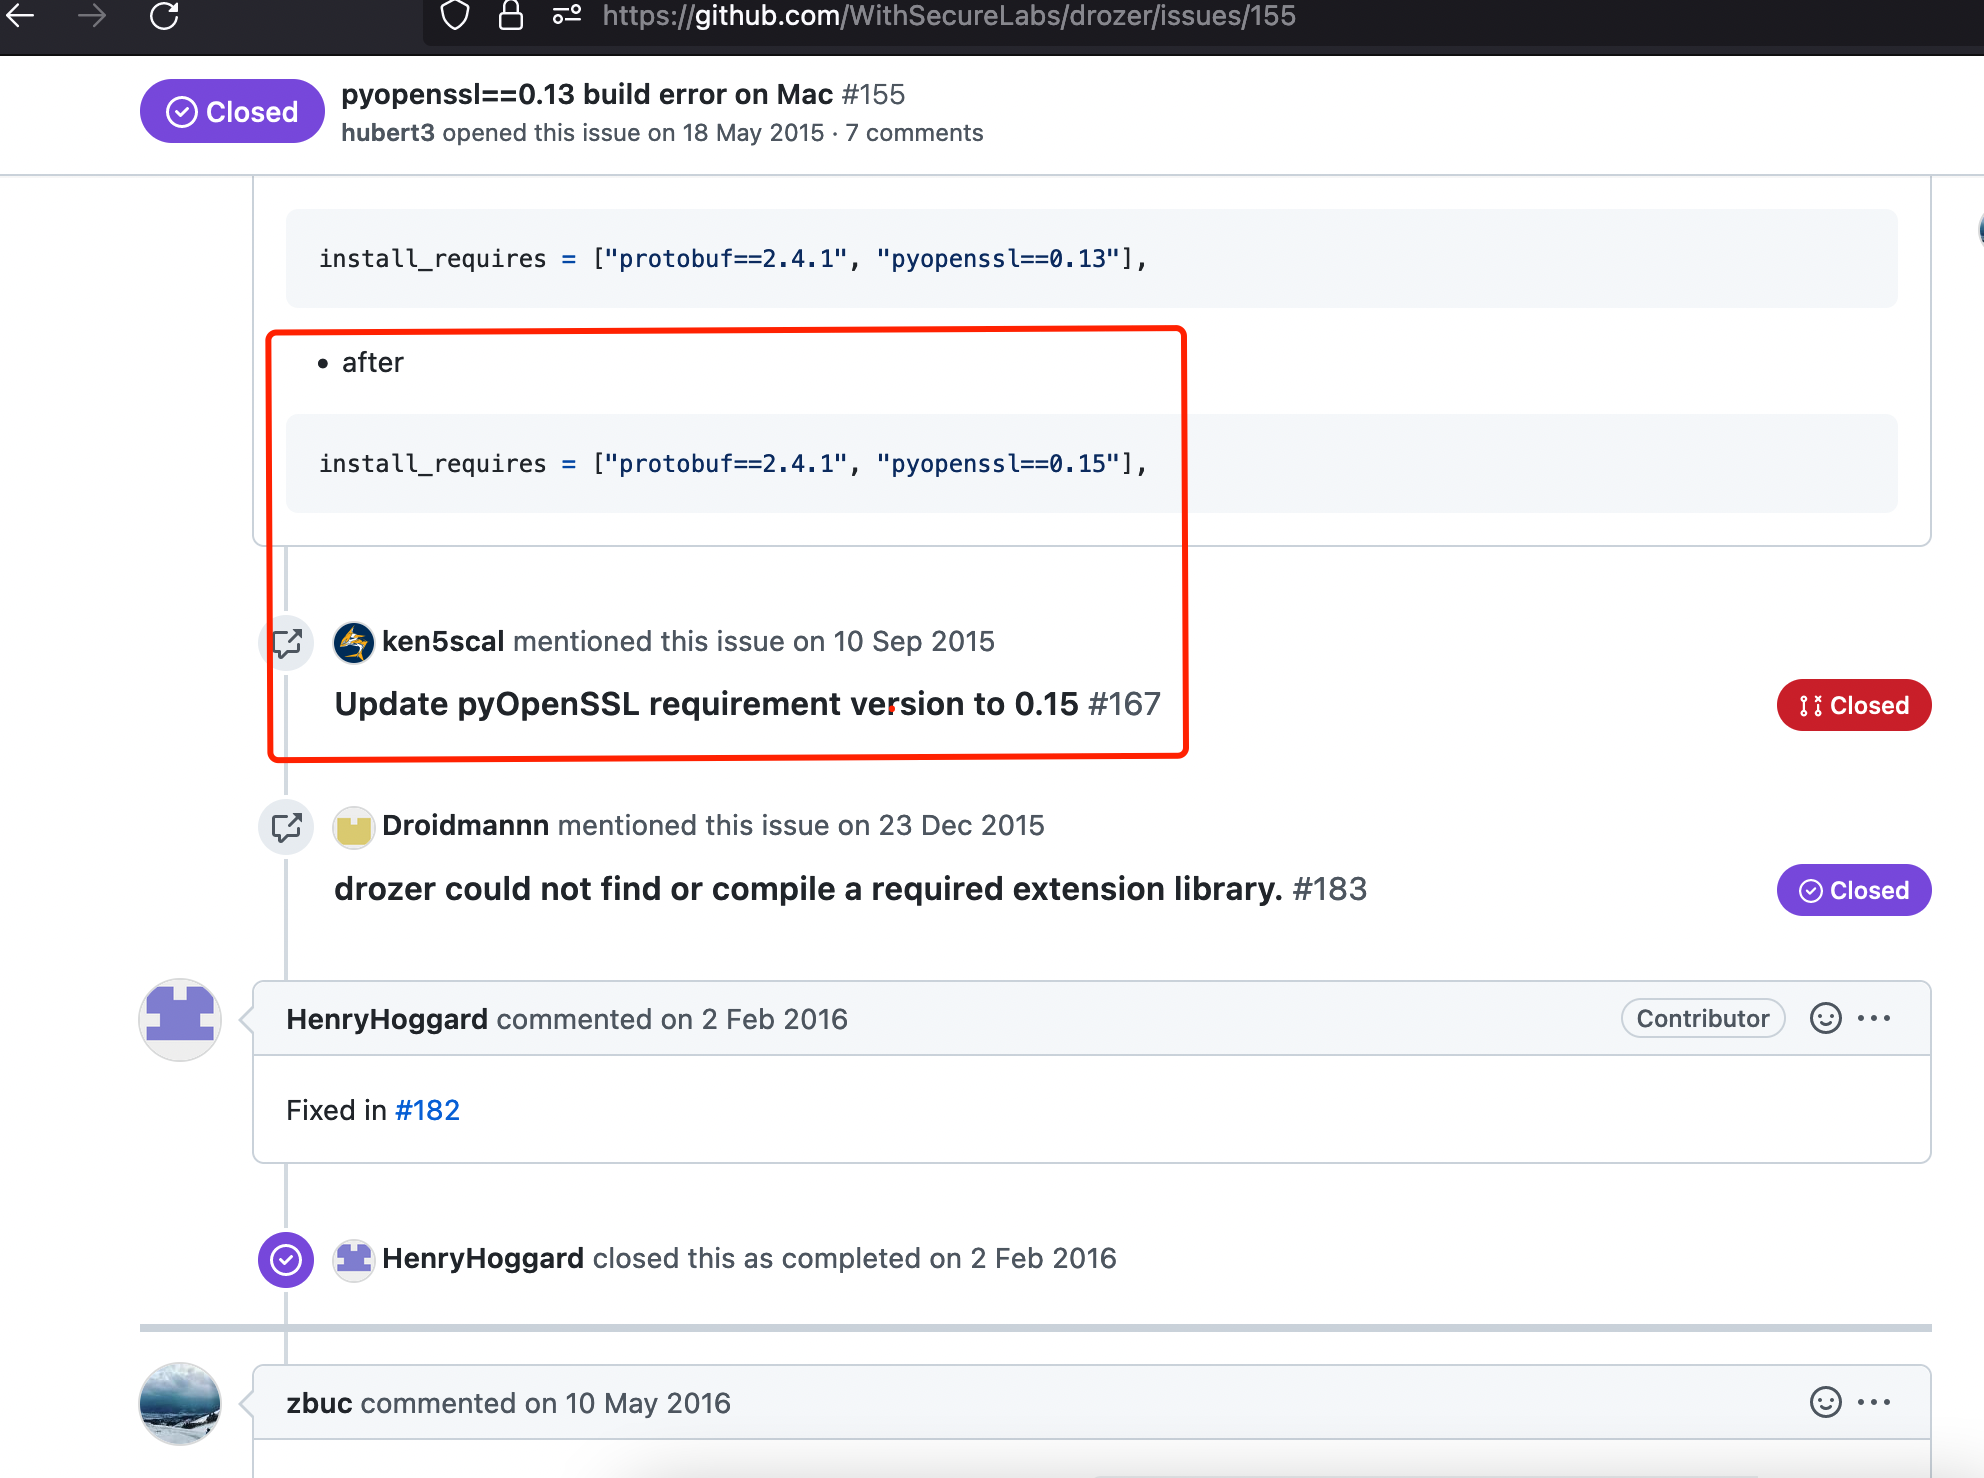
去 https://github.com/WithSecureLabs/drozer/issues/155 找到相似问题, 要求pyOpenSSL的版本大于0.15, 但是啊, 安装0.15版本仍然会出现相同问题
其实仔细分析日志可以发现问题大概出现在cryptography加密解密模块的openssl引用
继续通过搜索引擎大法发现了cryptography一个不能说毫不相干简直就是一模一样的问题
‘openssl/opensslv.h’ file not found ; OSX 10.11.6 #3367

最后通过该问题找到cryptography的官方安装文档 https://cryptography.io/en/latest/installation/

1.3. 安装openssl和rust工具链
通过cryptography的官方安装文档其实能解决大部分问题了, 原来是需要openssl 3的版本
执行下面的命令安装openssl和rust
brew install openssl@3 rust
但是啊但是, 它一个clang不讲武德,来, 骗!来, 偷袭!我69岁的老同志
继续执行下面的命令
env LDFLAGS="-L$(brew --prefix openssl@3)/lib" CFLAGS="-I$(brew --prefix openssl@3)/include" pip install cryptography
直接就破了个大防, 来个隐式声明的报错后直接装死, 而且走的很安详
build/temp.macosx-12.6-arm64-2.7/_openssl.c:18674:10: error: implicit declaration of function 'ERR_GET_FUNC' is invalid in C99 [-Werror,-Wimplicit-function-declaration]
    return ERR_GET_FUNC(x0);
           ^
  build/temp.macosx-12.6-arm64-2.7/_openssl.c:18674:10: note: did you mean 'ERR_GET_LIB'?
  /opt/homebrew/opt/openssl@3/include/openssl/err.h:241:36: note: 'ERR_GET_LIB' declared here
  static ossl_unused ossl_inline int ERR_GET_LIB(unsigned long errcode)
                                     ^
  build/temp.macosx-12.6-arm64-2.7/_openssl.c:18690:14: error: implicit declaration of function 'ERR_GET_FUNC' is invalid in C99 [-Werror,-Wimplicit-function-declaration]
    {

     result = ERR_GET_FUNC(x0); }
               ^
  build/temp.macosx-12.6-arm64-2.7/_openssl.c:23389:10: error: implicit declaration of function 'FIPS_mode' is invalid in C99 [-Werror,-Wimplicit-function-declaration]
    return FIPS_mode();
           ^
  build/temp.macosx-12.6-arm64-2.7/_openssl.c:23400:14: error: implicit declaration of function 'FIPS_mode' is invalid in C99 [-Werror,-Wimplicit-function-declaration]
    {

     result = FIPS_mode(); }
               ^
  build/temp.macosx-12.6-arm64-2.7/_openssl.c:23415:10: error: implicit declaration of function 'FIPS_mode_set' is invalid in C99 [-Werror,-Wimplicit-function-declaration]
    return FIPS_mode_set(x0);
           ^
  build/temp.macosx-12.6-arm64-2.7/_openssl.c:23431:14: error: implicit declaration of function 'FIPS_mode_set' is invalid in C99 [-Werror,-Wimplicit-function-declaration]
    {

     result = FIPS_mode_set(x0); }
大致瞅了瞅原因, implicit declaration of function 'ERR_GET_FUNC' is invalid in C99
即 函数 ERR_GET_FUNC 的隐式声明在C99中无效
C语言是过程化的编程语言,程序执行顺序是从上到下。函数调用需要先声明后调用。 C99 默认不允许隐式声明(1999年推出的c语言标准)。
在之前的版本中,在C语言函数在调用前不声明,编译器会自动按照一种隐式声明的规则,为调用函数的C代码产生汇编代码。
解决办法:
这部分和主要问题毫不相干, 没兴趣的可以直接跳过
在 main 函数调用前声明一下该函数。
(1)直接放到 main 函数前。
(2)或者定义在 .h 头文件中,在main函数前 引入该头文件。
(3)使用老版本编译。 【不推荐】
使用 -std 参数指定c语言版本:
-
如果是使用 clang 编译:
# 使用 C89 <-- 不报错 $ clang test.c -std=c89 # 使用 C99 <-- 提示不允许隐式声明,报错 $ clang test.c -std=c99 -
如果是使用 gcc 编译:
# 使用 C89 <-- 不报错
$ gcc test.c -std=c89

# 使用 C99 <-- 提示不允许隐式声明,报错
$ gcc test.c -std=c99
1.4. 修改CFLAGS
之前的解决办法其实没法用,因为我是通过pip方式来安装cryptography的, 于是继续面向搜索引擎编程 找到了一个类似问题的解决办法
CFLAGS=-Wno-error=implicit-function-declaration pip3 install scipy
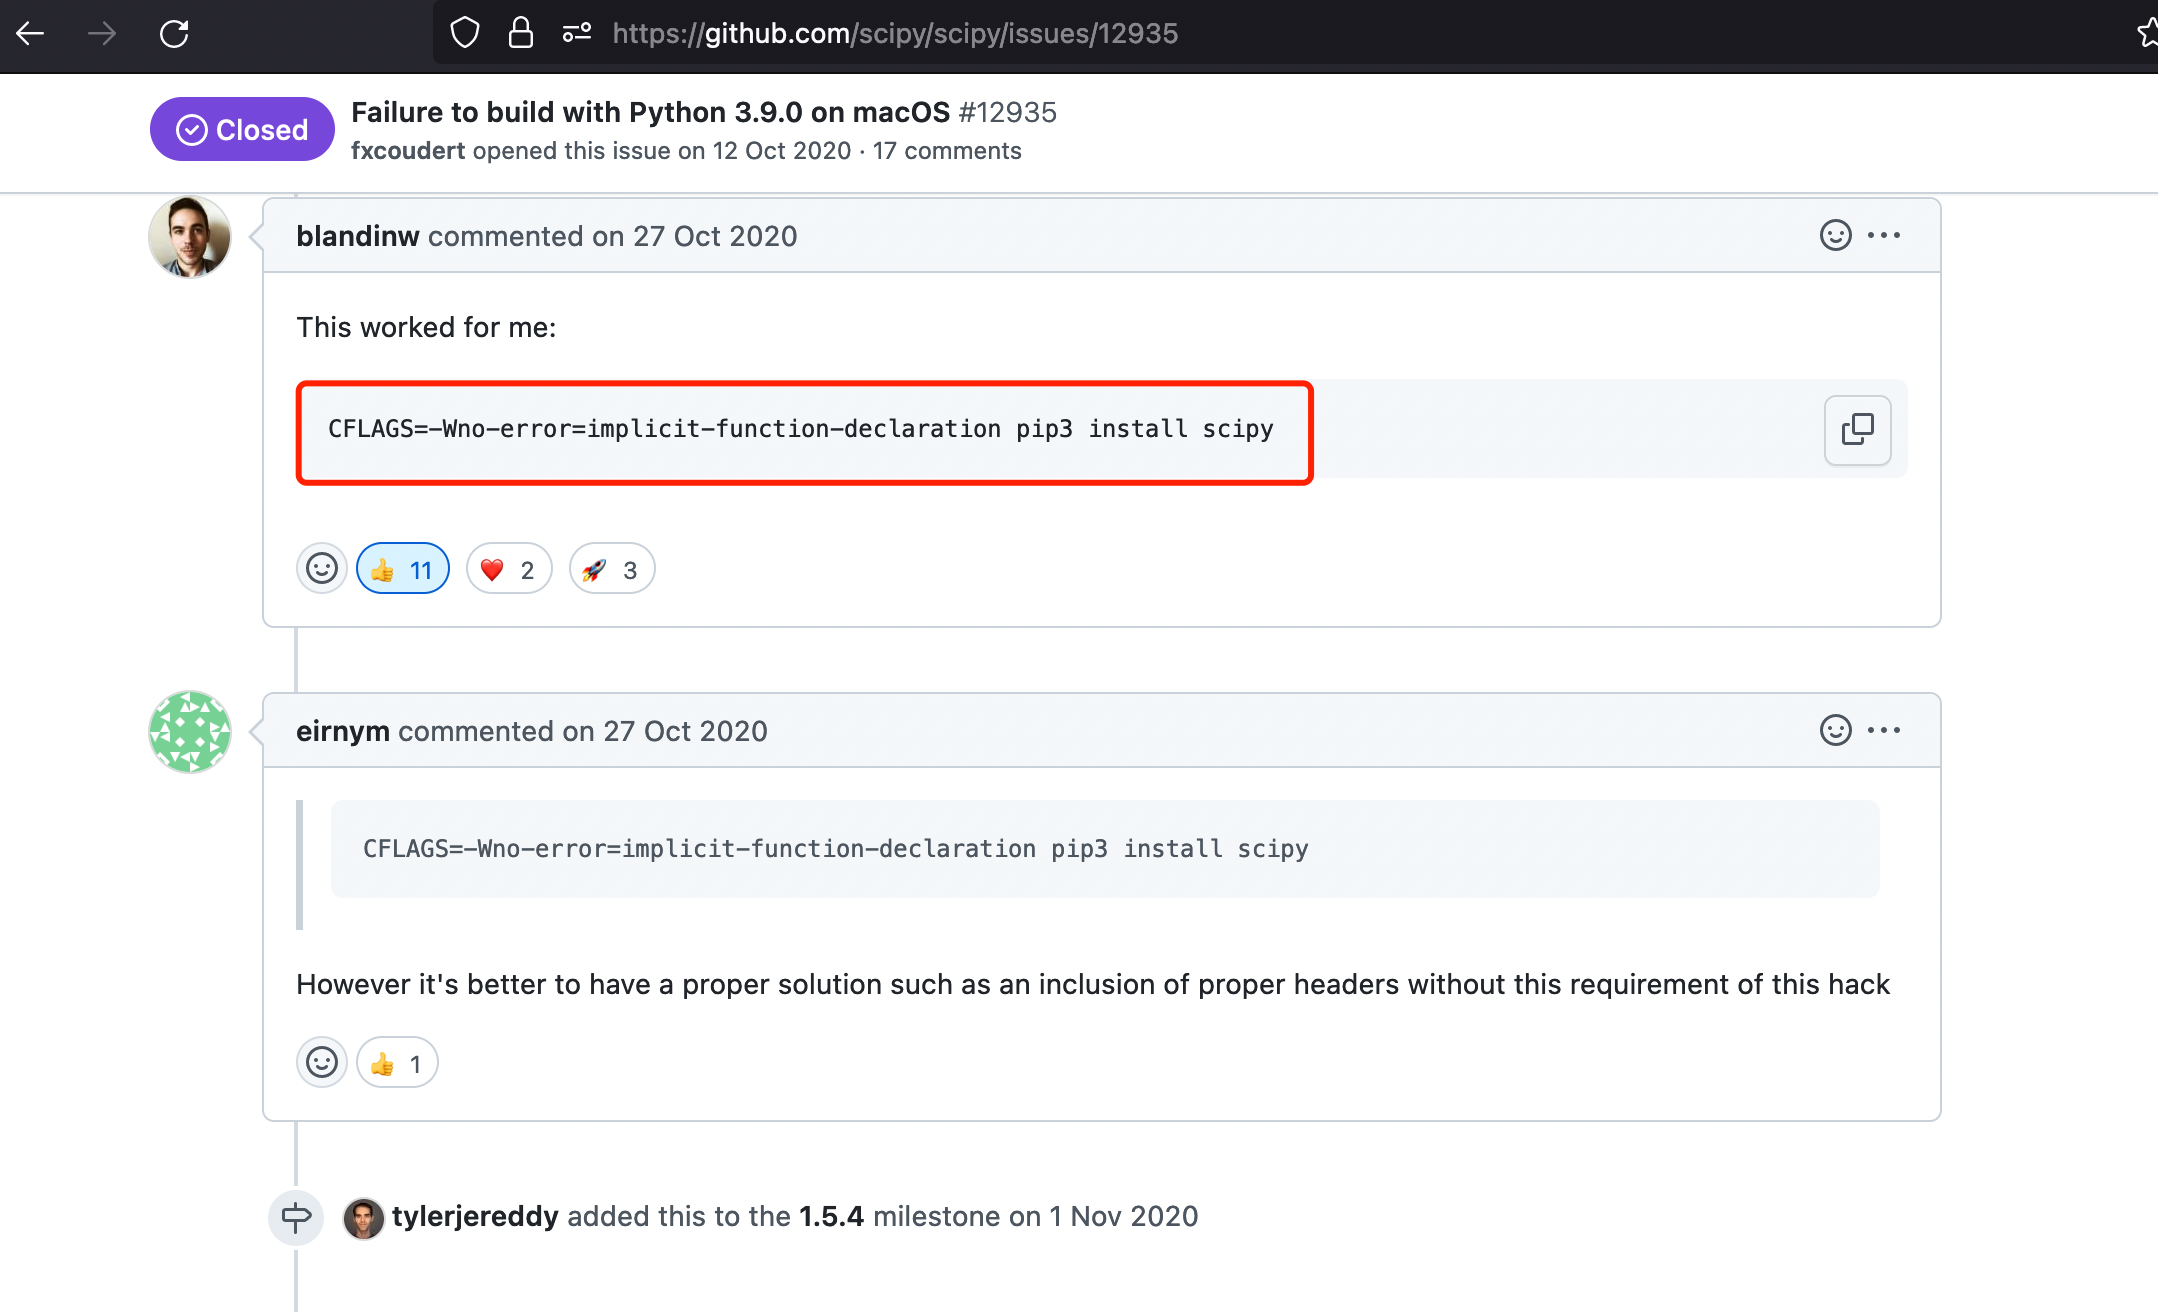
于是格局放大, 想着是不是能抄袭, 哦不对是模仿,模仿一下, 改造后的CFLAGS如下
env LDFLAGS="-L$(brew --prefix openssl@3)/lib" CFLAGS="-Wno-error=implicit-function-declaration -I$(brew --prefix openssl@3)/include" pip install cryptography
执行pip list |grep cryptography可以查看安装包
pip list |grep cryptography

Package            Version
------------------ -----------
cryptography       3.3.2
1. 5. 安装drozer
wget https://github.com/mwrlabs/drozer/releases/download/2.4.4/drozer-2.4.4-py2-none-any.whl
pip install drozer-2.4.4-py2-none-any.whl --ignore-installed pyOpenSSL
1.6. drozer的安装命令初步总结
注意这部分命令可能有问题,如果遇到
openssl版本的问题可以看后面的章节, 我遇到的是[email protected]和openssl@3的问题
# 安装python
brew install pyenv
pyenv install 2.7.18
export PATH="$(pyenv root)/shims:${

     PATH}"
pyenv global 2.7.18

#安装cryptography
brew install openssl@3 rust
env LDFLAGS="-L$(brew --prefix openssl@3)/lib" CFLAGS="-Wno-error=implicit-function-declaration -I$(brew --prefix openssl@3)/include" pip install cryptography

#安装 protobuf Twisted和pyOpenSSL
pip install protobuf
pip install Twisted
pip install pyOpenSSL

# 安装drozer
wget https://github.com/mwrlabs/drozer/releases/download/2.4.4/drozer-2.4.4-py2-none-any.whl
pip install drozer-2.4.4-py2-none-any.whl --ignore-installed pyOpenSSL
二. 继续drozer的APK踩坑之旅
当我把 drozer官网 的Agent .apk 和 sieve.apk拖进模拟器 安装的时候出现下面的报错
The APK failed to install.
Error: INSTALL_FAILED_NO_MATCHING_ABIS: Failed to extract native libraries, res=-113
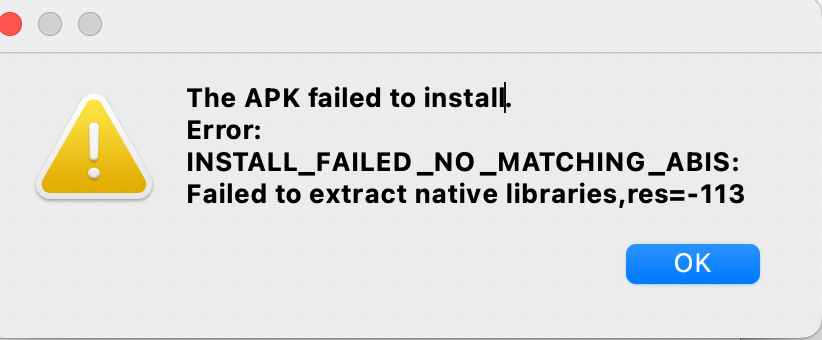
瞅了瞅大概就是手机CPU架构不一致导致的
早期的Android系统几乎只支持ARMv5的CPU架构,后面发展到支持七种不同的CPU架构:ARMv5,ARMv7 (从2010年起),x86 (从2011年起),MIPS (从2012年起),ARMv8,MIPS64和x86_64 (从2014年起),每一种都关联着一个相应的ABI。
应用程序二进制接口(Application Binary Interface)定义了二进制文件(尤其是.so文件)如何运行在相应的系统平台上,从使用的指令集,内存对齐到可用的系统函数库。在Android 系统上,每一个CPU架构对应一个ABI:armeabi,armeabi-v7a,x86,mips,arm64- v8a,mips64,x86_64。
但是最新的谷歌官方文档已经把mips和armv5移除了,如图所示:

2.1 查询手机cpu命令行
执行adb shell getprop ro.product.cpu.abi 查询发现是arm64-v8a架构的
adb shell getprop ro.product.cpu.abi
arm64-v8a
再把drozer的sieve.apk解压看下支持的CPU架构果然发现了华点, 从lib/armeabi/ 就能发现sieve.apk大概只能支持armeabi的架构了
user@local 下载 % unzip sieve.apk
Archive:  sieve.apk
  inflating: res/layout/activity_add_entry.xml
  inflating: res/layout/activity_file_select.xml
  inflating: res/layout/activity_main_login.xml
  inflating: res/layout/activity_pin.xml
  inflating: res/layout/activity_pwlist.xml
  inflating: res/layout/activity_settings.xml
  inflating: res/layout/activity_short_login.xml
  inflating: res/layout/activity_welcome.xml
  inflating: res/layout/format_pwlist.xml
  inflating: res/menu/activity_add_entry_add.xml
  inflating: res/menu/activity_add_entry_edit.xml
  inflating: res/menu/activity_file_select.xml
  inflating: res/menu/activity_main_login.xml
  inflating: res/menu/activity_pin.xml
  inflating: res/menu/activity_pwlist.xml
  inflating: res/menu/activity_settings.xml
  inflating: res/menu/activity_short_login.xml
  inflating: res/menu/activity_welcome.xml
  inflating: res/xml/prefrences.xml
  inflating: AndroidManifest.xml
 extracting: resources.arsc
 extracting: res/drawable-hdpi/ic_launcher.png
 extracting: res/drawable-ldpi/ic_launcher.png
 extracting: res/drawable-mdpi/ic_launcher.png
 extracting: res/drawable-xhdpi/ic_launcher.png
  inflating: classes.dex
  inflating: lib/armeabi/gdbserver
  inflating: lib/armeabi/libencrypt.so
  inflating: lib/armeabi/libdecrypt.so
  inflating: META-INF/MANIFEST.MF
  inflating: META-INF/CERT.SF
  inflating: META-INF/CERT.RSA
有两种解决方式, 一种是自己重新打apk添加其他的架构支持, 修改 build.gradle
splits {


    abi {


        enable true
        reset()
        include 'x86', 'x86_64', 'armeabi', 'armeabi-v7a', 'mips', 'mips64', 'arm64-v8a'
        universalApk false
    }
}
或者:
defaultConfig {


   ndk {


         abiFilters 'x86', 'x86_64', 'armeabi', 'armeabi-v7a', 'mips', 'mips64', 'arm64-v8a'
        }
}
但是我是从官网下的apk没法自己编译, 最终决定下个Android Studio创建个32位的模拟器试下, 注意镜像需要选择armeabi-v7a这种架构的,因为 armeabi-v7a兼容armeabi
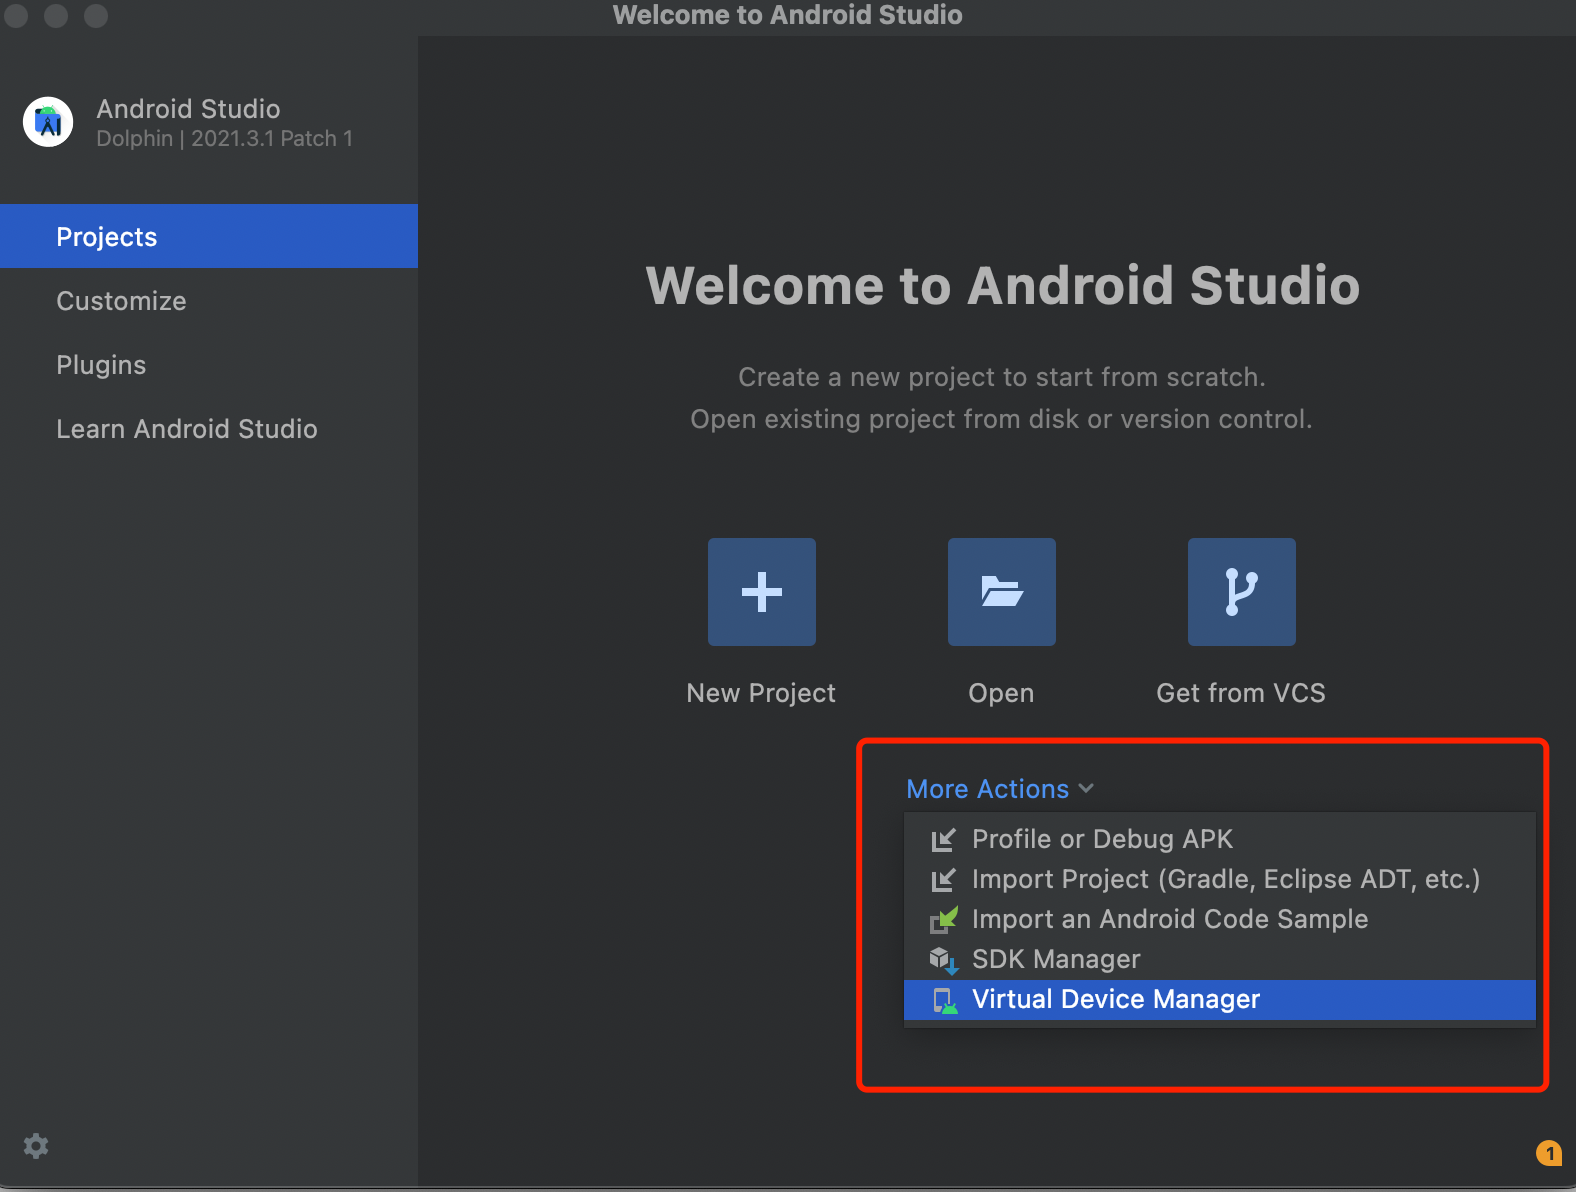
- 点击
More Actions下面的Virtual Device Manager创建模拟器
- 点击
Create device选择手机后点击Next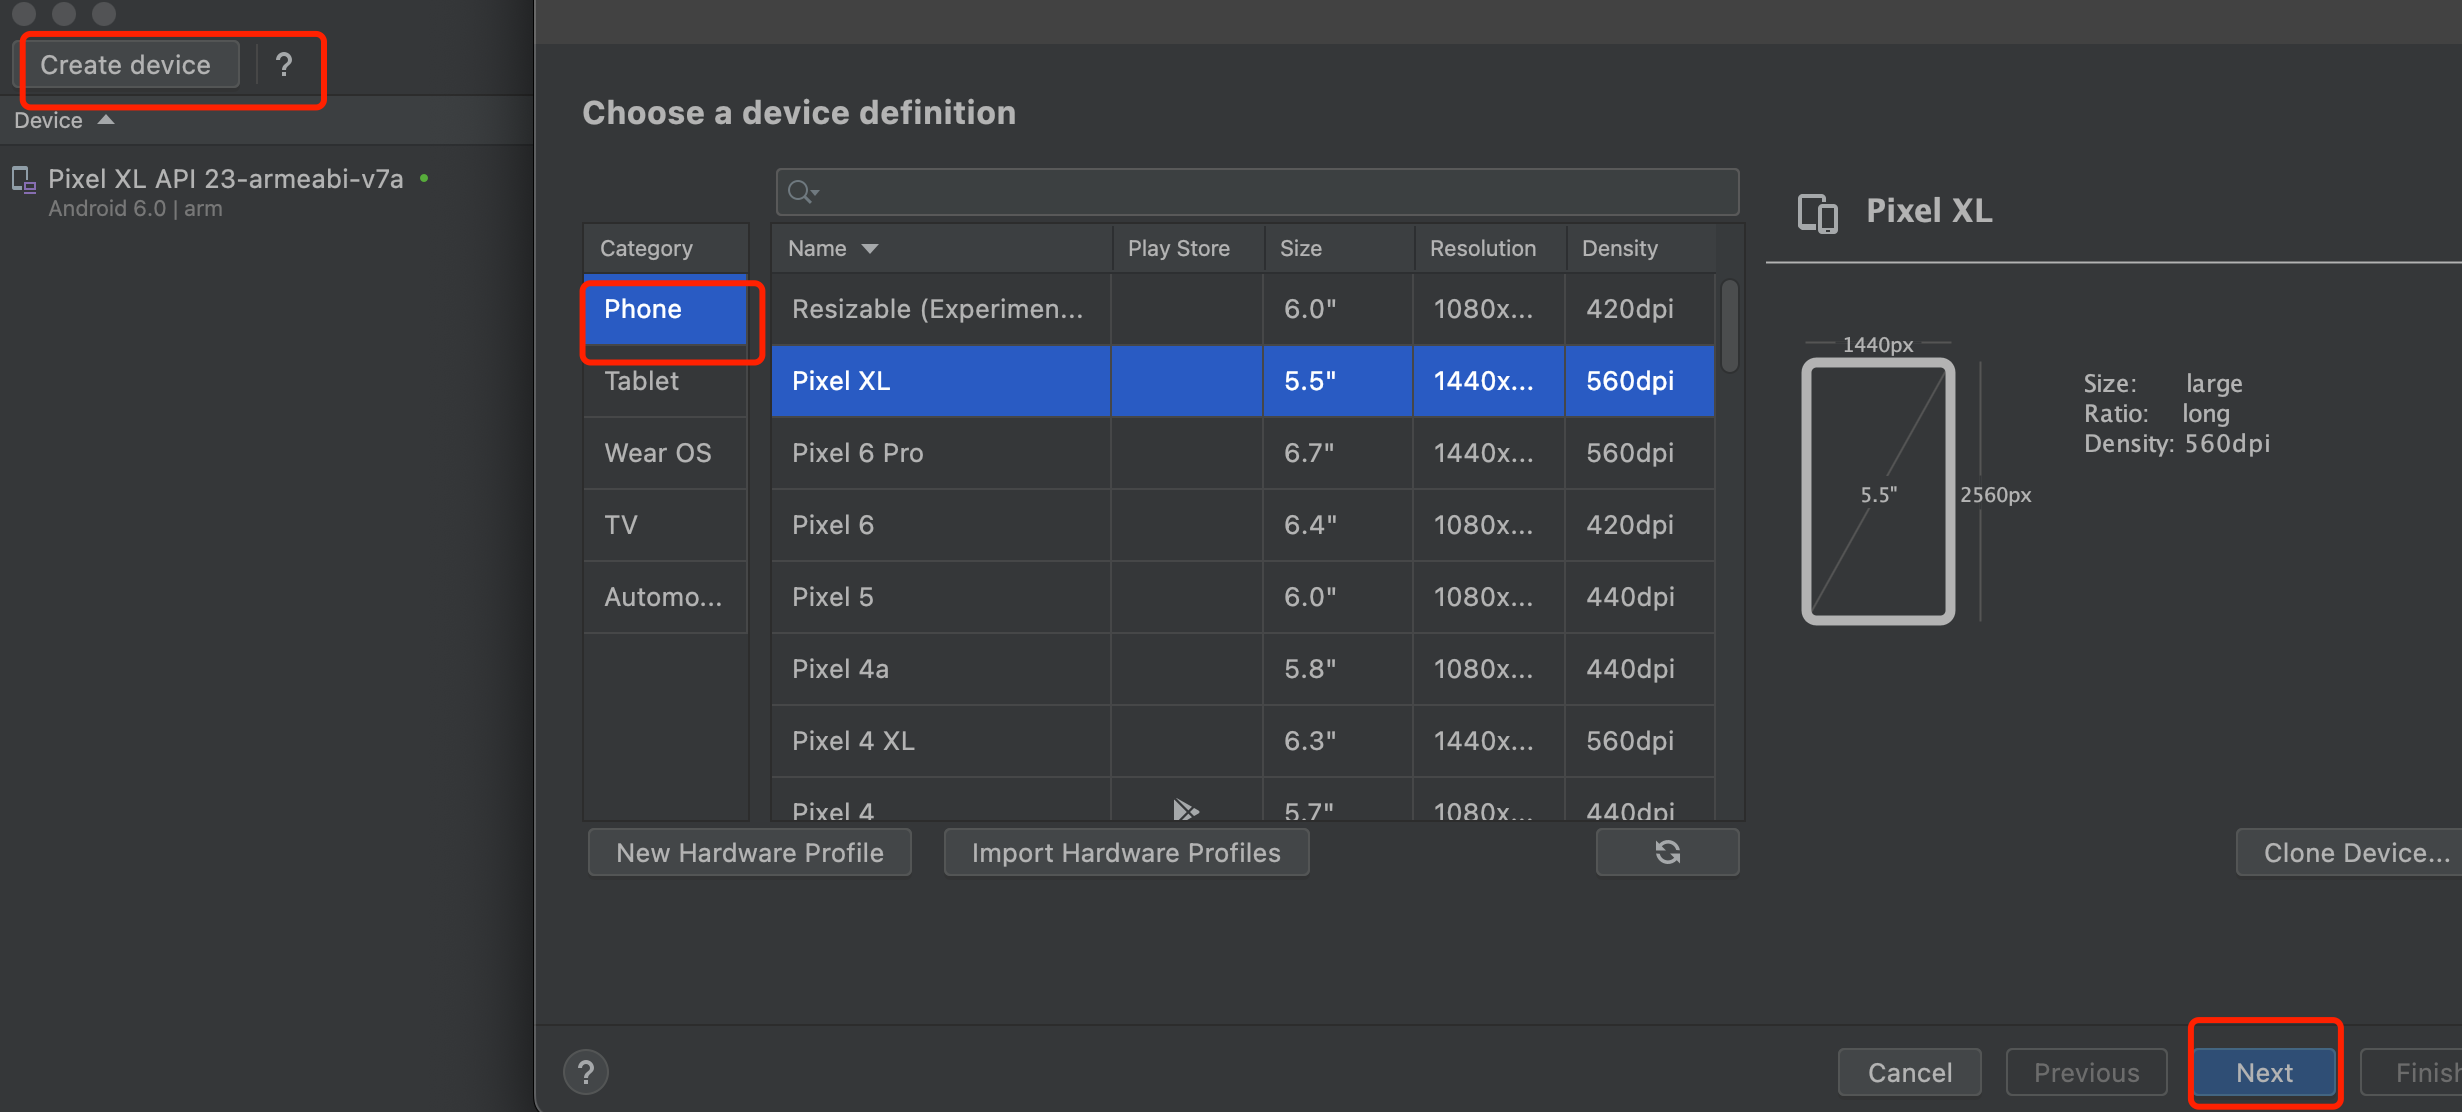
- 选择
Other Images找到armeabi-v7a的镜像点击下载后再Next进行下一步, 最后点Finish完成创建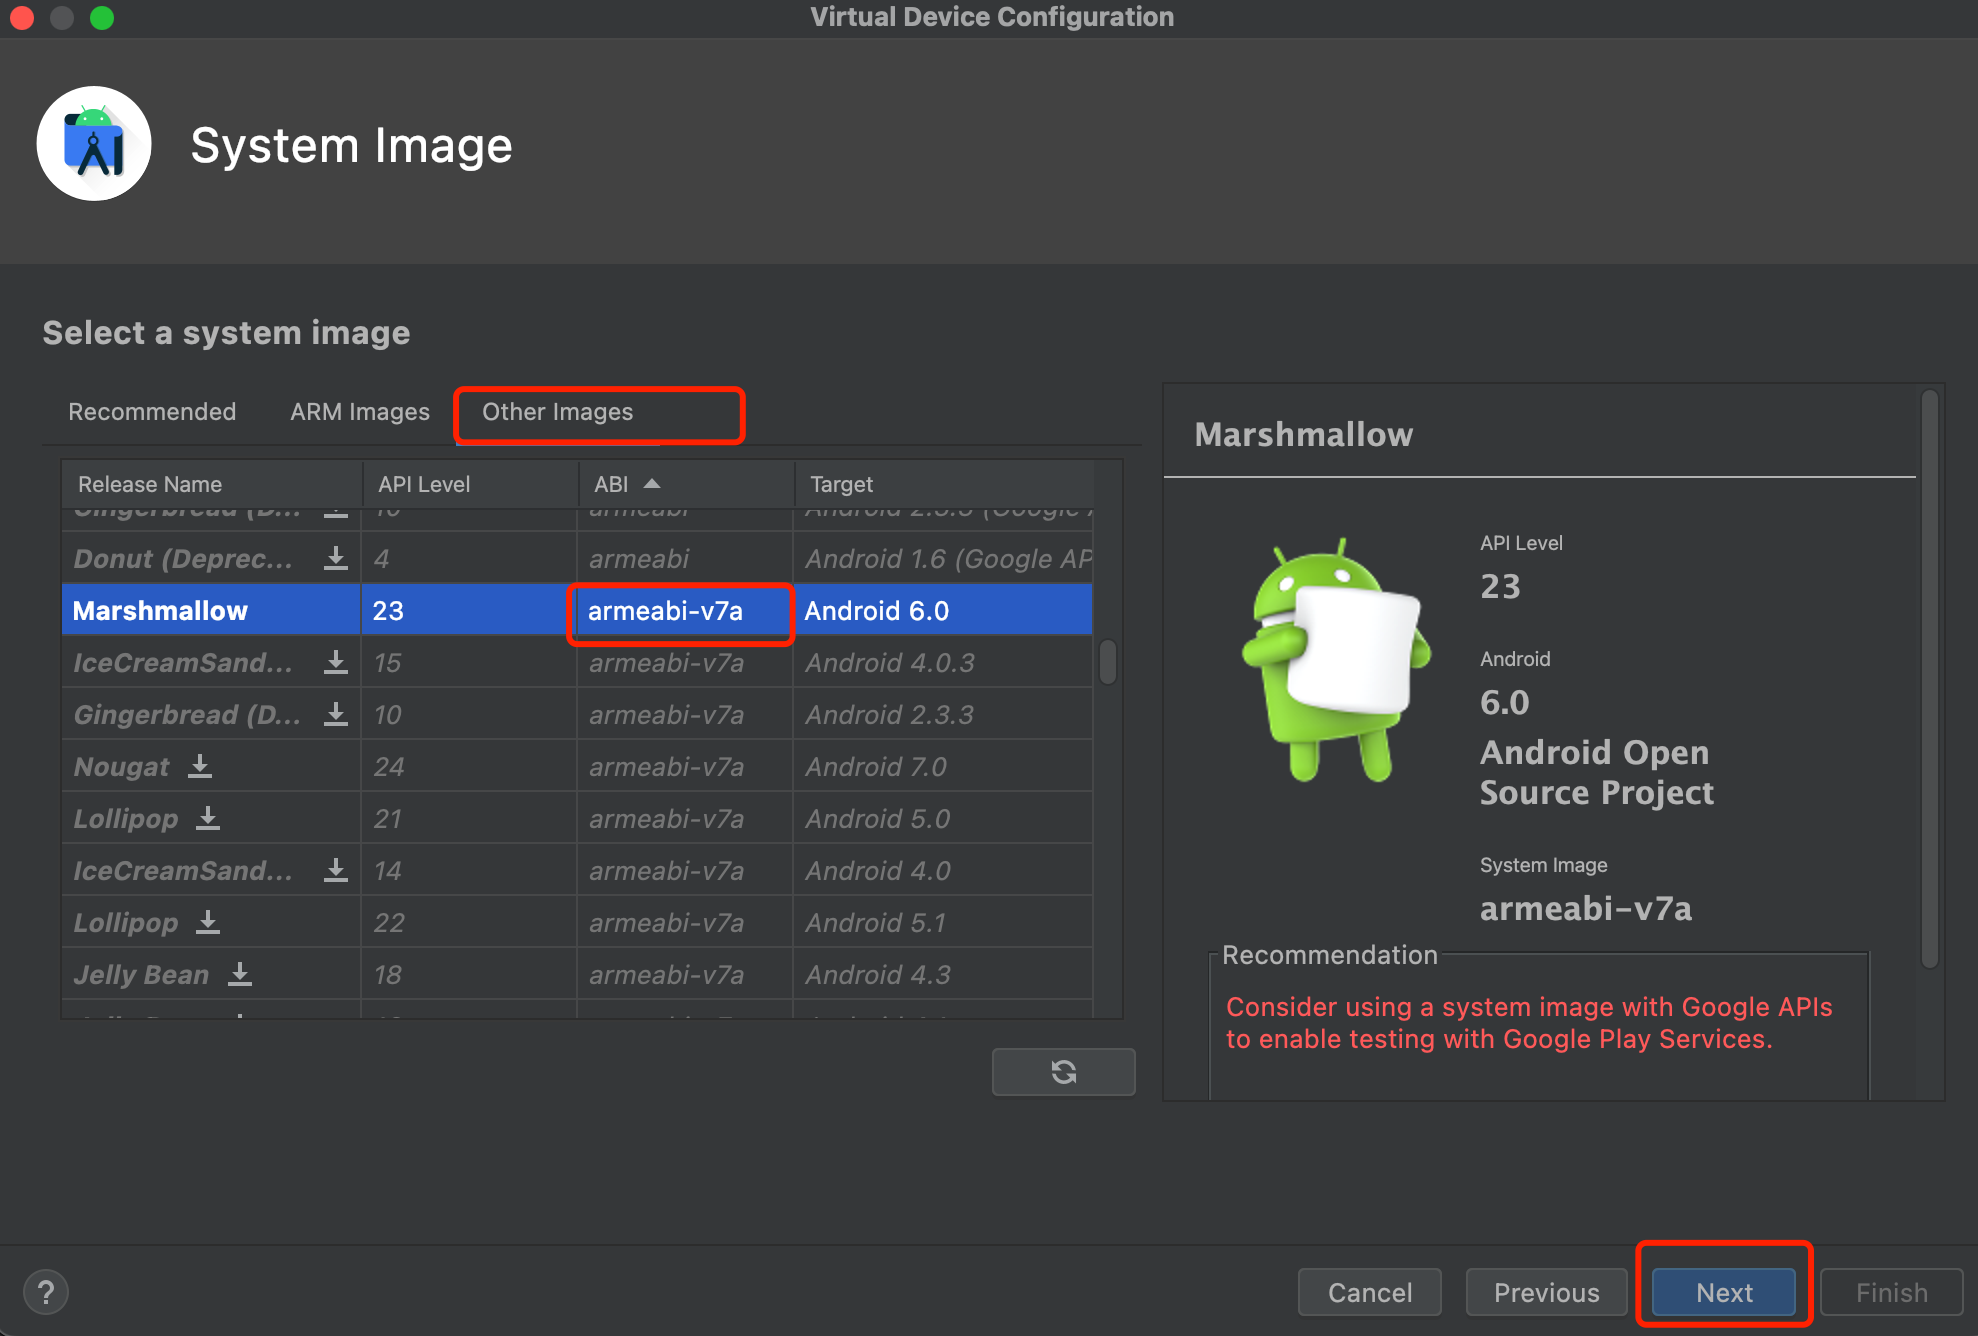
- 最后点击三角符号启动
 5. 直接安装drozer的sieve.apk 会报错
这种情况下直接通过命令指定The APK failed to install. Error:Could not parse error string.abi就行, 例如adb install --abi armeabi sieve.apkuser@local 下载 % adb install --abi armeabi sieve.apk Performing Push Install sieve.apk: 1 file pushed, 0 skipped. 1490.6 MB/s (367886 bytes in 0.000s) pkg: /data/local/tmp/sieve.apkdrozer-agent-2.3.4.apk也可以通过同样的方式安装user@local 下载 % adb install --abi armeabi drozer-agent-2.3.4.apk Performing Push Install drozer-agent-2.3.4.apk: 1 file pushed, 0 skipped. 269.4 MB/s (633111 bytes in 0.002s) pkg: /data/local/tmp/drozer-agent-2.3.4.apk Success
2.2 题外话, x86支持ARM架构APP
- x86 平台可以通过
Houdini来支持arm架构的app, 安装方法可以参考 How to install libhoudini on a custom Android x86 rig 或者 x86模拟器集成houdini - Genymotion模拟器可以直接通过暗转Genymotion_ARM_Translation 来支持ARM
Windows 11 将会支持在微软商店中直接下载和安装 Android 应用,无需安装额外的模拟器.这次兼容 Android 应用,微软是跟英特尔合作,采用了英特尔名为Bridge的新技术. “英特尔 Bridge 技术是一种运行时后期编译器(runtime post-compiler),能够让移动应用在基于 x86 的设备上以‘原生应用’形态运行.
说白了,这个 Bridge 就是起到了“安卓模拟器”或“虚拟机”的作用,但因为原生运行的缘故,效率会更高。而且摄像头、网络、传感器等都可以直接调用本机硬件,避免卡顿或者兼容性问题。
英特尔 Bridge 与华为“方舟编译器”以及苹果为 M1 芯片准备的“Rosetta 2”性质相同,但与 Rosetta 2 的编译方向相反,后者是从 x86 编译到 ARM 架构
Bridge 并非从天而降,诸多开发者一看到就觉得十分眼熟。这让他们想起了英特尔 Houdini 技术,那是将原本基于 ARM 架构开发的 Android 操作系统移植到 x86 架构的关键部件。
更值得一提的是,Houdini 是英特尔中国团队独立开发的。它从项目发起,概念验证,原型到最后的产品化,都由英特尔位于上海的研发团队完成。
引领 Houdini 项目开发的灵魂人物是李剑慧博士,他是英特尔架构、图形和软件事业部的首席工程师,负责领导深度学习框架集成和工作负载优化工作。
2.3 openssl 踩坑
当我继续执行drozer console connect想看下效果时, 果然不出意外的又出意外了
/Users/user/.pyenv/versions/2.7.18/lib/python2.7/site-packages/OpenSSL/crypto.py:14: CryptographyDeprecationWarning: Python 2 is no longer supported by the Python core team. Support for it is now deprecated in cryptography, and will be removed in the next release.
  from cryptography import utils, x509
Traceback (most recent call last):
  File "/Users/user/.pyenv/versions/2.7.18/bin/drozer", line 30, in <module>
    __import__("drozer.cli.%s" % (sys.argv[1]))
  File "/Users/user/.pyenv/versions/2.7.18/lib/python2.7/site-packages/drozer/cli/console.py", line 8, in <module>
    from drozer.console import Console
  File "/Users/user/.pyenv/versions/2.7.18/lib/python2.7/site-packages/drozer/console/__init__.py", line 4, in <module>
    from drozer.console.console import Console
  File "/Users/user/.pyenv/versions/2.7.18/lib/python2.7/site-packages/drozer/console/console.py", line 6, in <module>
    from pydiesel.api.transport.exceptions import ConnectionError
  File "/Users/user/.pyenv/versions/2.7.18/lib/python2.7/site-packages/pydiesel/api/transport/__init__.py", line 5, in <module>
    from socket_transport import SocketTransport
  File "/Users/user/.pyenv/versions/2.7.18/lib/python2.7/site-packages/pydiesel/api/transport/socket_transport.py", line 8, in <module>
    from drozer.ssl.provider import Provider # TODO: eugh
  File "/Users/user/.pyenv/versions/2.7.18/lib/python2.7/site-packages/drozer/ssl/__init__.py", line 1, in <module>
    from drozer.ssl.ssl_manager import SSLManager
  File "/Users/user/.pyenv/versions/2.7.18/lib/python2.7/site-packages/drozer/ssl/ssl_manager.py", line 6, in <module>
    from drozer.ssl.provider import Provider
  File "/Users/user/.pyenv/versions/2.7.18/lib/python2.7/site-packages/drozer/ssl/provider.py", line 2, in <module>
    import OpenSSL
  File "/Users/user/.pyenv/versions/2.7.18/lib/python2.7/site-packages/OpenSSL/__init__.py", line 8, in <module>
    from OpenSSL import crypto, SSL
  File "/Users/user/.pyenv/versions/2.7.18/lib/python2.7/site-packages/OpenSSL/crypto.py", line 17, in <module>
    from OpenSSL._util import (
  File "/Users/user/.pyenv/versions/2.7.18/lib/python2.7/site-packages/OpenSSL/_util.py", line 6, in <module>
    from cryptography.hazmat.bindings.openssl.binding import Binding
  File "/Users/user/.pyenv/versions/2.7.18/lib/python2.7/site-packages/cryptography/hazmat/bindings/openssl/binding.py", line 14, in <module>
    from cryptography.hazmat.bindings._openssl import ffi, lib
ImportError: dlopen(/Users/user/.pyenv/versions/2.7.18/lib/python2.7/site-packages/cryptography/hazmat/bindings/_openssl.so, 0x0002): symbol not found in flat namespace (_ERR_GET_FUNC)
其实大致还是openssl的问题, 咨询大佬后给了个回复说我编译的时候用的是OpenSSL 1.1.1但是链接的时候用了OpenSSL 3.0, 看了下openssl版本和报错信息基本上确定就是版本问题问题, 可以通过重新链接到OpenSSL 1.1.1然后重新安装pyenv和 cryptography来解决
user@user ~ % brew list |grep openssl
[email protected]
openssl@3
解决办法如下:
#卸载pyenv
user@user ~ % pyenv uninstall 2.7.18
pyenv: remove /Users/user/.pyenv/versions/2.7.18? [y|N] y

#卸载openssl@3
user@user ~ % brew  uninstall openssl@3
Uninstalling /opt/homebrew/Cellar/openssl@3/3.0.5... (6,444 files, 27.9MB)

#强制链接到[email protected]
user@user ~ % brew link openssl --force [email protected]
Warning: Already linked: /opt/homebrew/Cellar/openssl@3/3.0.5
To relink, run:
  brew unlink openssl@3 && brew link --force openssl@3
Unlinking /opt/homebrew/Cellar/openssl@3/3.0.5... 5508 symlinks removed.
Linking /opt/homebrew/Cellar/[email protected]/1.1.1q... 3997 symlinks created.

If you need to have this software first in your PATH instead consider running:
  echo 'export PATH="/opt/homebrew/opt/[email protected]/bin:$PATH"' >> ~/.zshrc

#修改环境变量
user@user bin % echo 'export PATH="/opt/homebrew/opt/[email protected]/bin:$PATH"' >> ~/.zshrc
user@user bin % source  ~/.zshrc
user@user ~ % openssl version
OpenSSL 1.1.1q  5 Jul 2022

#重新安装pyenv
user@user ~ % pyenv install 2.7.18
python-build: use [email protected] from homebrew
python-build: use readline from homebrew
Downloading Python-2.7.18.tar.xz...

#安装cryptography
user@user ~ % env LDFLAGS="-L$(brew --prefix [email protected])/lib" CFLAGS="-I$(brew --prefix [email protected])/include" PKG_CONFIG_PATH="$(brew --prefix [email protected])/lib/pkgconfig" pip install cryptography

#验证cryptography
user@user ~ % python
Python 2.7.18 (default, Nov  7 2022, 09:51:47)
[GCC Apple LLVM 14.0.0 (clang-1400.0.29.102)] on darwin
Type "help", "copyright", "credits" or "license" for more information.
>>> from cryptography.hazmat.bindings._openssl import ffi
__main__:1: CryptographyDeprecationWarning: Python 2 is no longer supported by the Python core team. Support for it is now deprecated in cryptography, and will be removed in the next release.
2.4 drozer安装命令完整版总结
注意不要升级
pip版本,pip升级后有可能变成了pip3对应的路径了, 可以通过pip --version确认版本
#安装rust工具链和openssl
brew install [email protected] rust

#强制链接到[email protected]
brew link openssl --force [email protected]

#写入环境变量
echo 'export PATH="/opt/homebrew/opt/[email protected]/bin:$PATH"' >> ~/.zshrc
source  ~/.zshrc

# 安装python
brew install pyenv
pyenv install 2.7.18
export PATH="$(pyenv root)/shims:${

     PATH}"
pyenv global 2.7.18

#安装cryptography
env LDFLAGS="-L$(brew --prefix [email protected])/lib" CFLAGS="-I$(brew --prefix [email protected])/include" PKG_CONFIG_PATH="$(brew --prefix [email protected])/lib/pkgconfig" pip install drozer-2.4.4-py2-none-any.whl --ignore-installed pyOpenSSL

#安装 protobuf Twisted和pyOpenSSL
pip install protobuf
pip install Twisted
pip install pyOpenSSL

# 安装drozer
wget https://github.com/mwrlabs/drozer/releases/download/2.4.4/drozer-2.4.4-py2-none-any.whl
pip install drozer-2.4.4-py2-none-any.whl --ignore-installed pyOpenSSL
三. drozer使用
3.1 给模拟器安装agent.apk 和 sieve.apk
去官网 https://labs.withsecure.com/tools/drozer 下载Agent .apk 和 sieve.apk
在电脑端执行下面的命令安装apk, --abi armeabi指定cpu架构
adb install --abi armeabi sieve.apk
adb install --abi armeabi drozer-agent-2.3.4.apk
3.2 电脑端开启转发
adb forward tcp:31415 tcp:31415
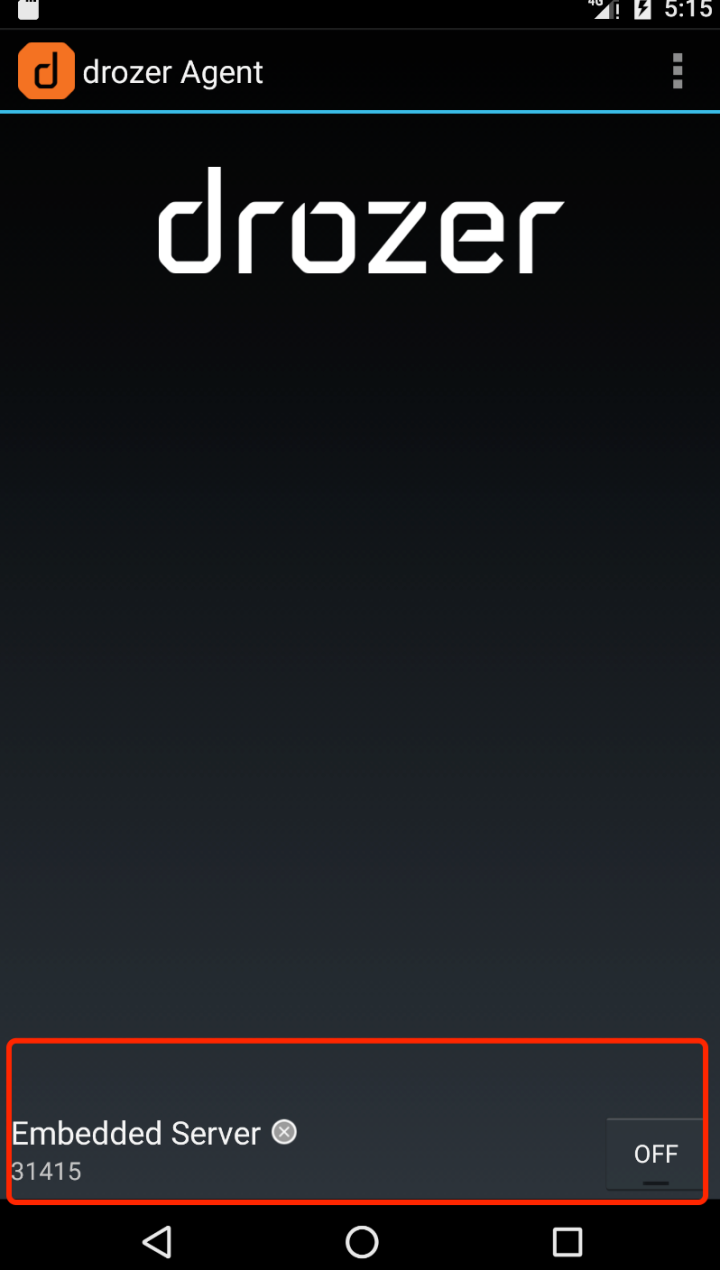
3.3 手机端启动Embedded Server
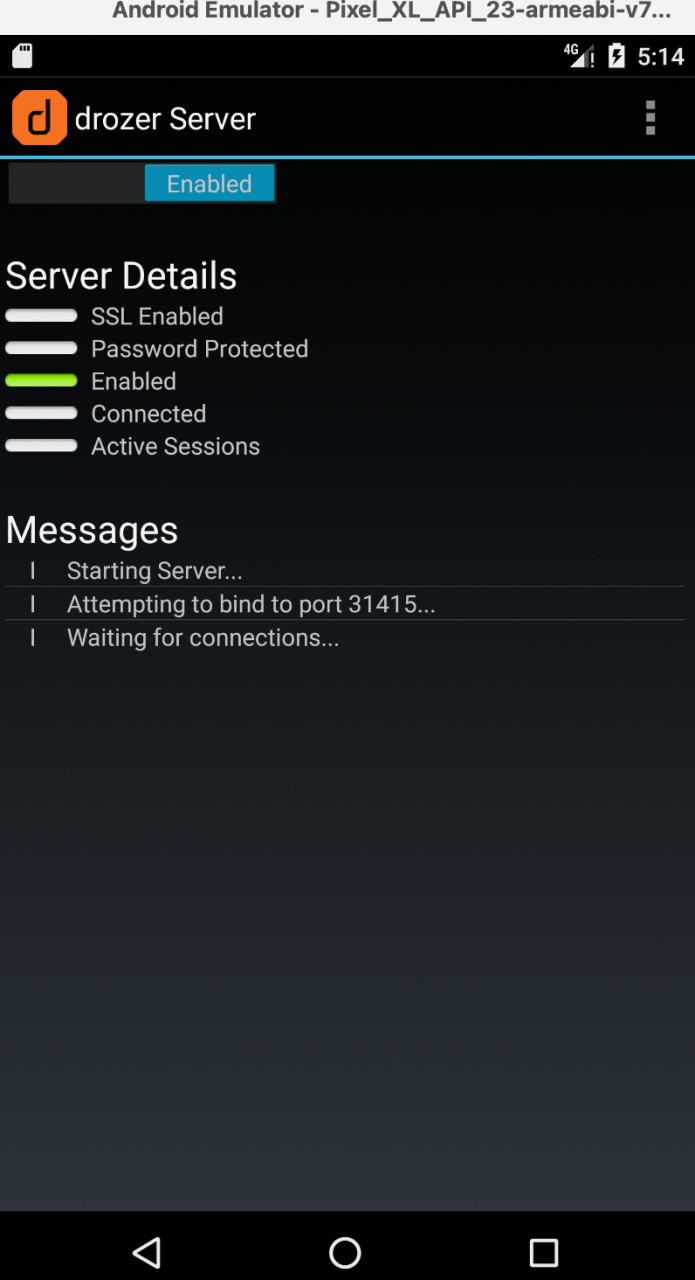
模拟器里面点击drozer agent的那个app然后点击 OFF那个按钮打开Embedded Server
3.4 启动drozer console
执行drozer console connect 启动drozer console
user@user tmp %  drozer console connect
/Users/user/.pyenv/versions/2.7.18/lib/python2.7/site-packages/OpenSSL/crypto.py:14: CryptographyDeprecationWarning: Python 2 is no longer supported by the Python core team. Support for it is now deprecated in cryptography, and will be removed in the next release.
  from cryptography import utils, x509
Selecting 6fc8ab31aaf41650 (unknown sdk_phone_armv7 6.0)

            ..                    ..:.
           ..o..                  .r..
            ..a..  . ....... .  ..nd
              ro..idsnemesisand..pr
              .otectorandroidsneme.
           .,sisandprotectorandroids+.
         ..nemesisandprotectorandroidsn:.
        .emesisandprotectorandroidsnemes..
      ..isandp,..,rotectorandro,..,idsnem.
      .isisandp..rotectorandroid..snemisis.
      ,andprotectorandroidsnemisisandprotec.
     .torandroidsnemesisandprotectorandroid.
     .snemisisandprotectorandroidsnemesisan:
     .dprotectorandroidsnemesisandprotector.

drozer Console (v2.4.4)
dz>
3.5 drozer could not find or compile a required extension library.
执行 drozer console connect --debug 可以显示debug信息

需要把class_loader.py的apk_path 改成自己真实的ZipUtil.apk路径
例如:
    def __get_source(self, source_or_relative_path, relative_to=None):
        """
        Get source, either from an apk file or passed directly.
        """

        source = None

        if source_or_relative_path.endswith(".apk"):
           ...
            #apk_path = os.path.join(relative_to, *source_or_relative_path.split("/"))
            apk_path = "/Users/user/.pyenv/versions/2.7.18/lib/python2.7/site-packages/drozer-2.4.2-py2.7.egg/drozer/modules/common/ZipUtil.apk"
            java_path = apk_path.replace(".apk", ".java")

        ....
        return source
参考
- https://github.com/WithSecureLabs/drozer
- brew安装python2
- https://github.com/WithSecureLabs/drozer/issues/155
- ‘openssl/opensslv.h’ file not found ; OSX 10.11.6 #3367
- https://cryptography.io/en/latest/installation/
- C编译报错: implicit declaration of function xxx is invalid in C99 [-Wimplicit-function-declaration]
- https://github.com/scipy/scipy/issues/12935
- 如何查看Android手机CPU类型是armeabi,armeabi-v7a,还是arm64-v8a
- [INSTALL_FAILED_NO_MATCHING_ABIS: Failed to extract native libraries, res=-113]
- 在电脑上装安卓摸鱼,你要感谢一位中国工程
- How to install libhoudini on a custom Android x86 rig
- x86模拟器集成houdini
- Genymotion_ARM_Translation
- Android ABI
- “ssl module in Python is not available” when installing package with pip3
- drozer could not find or compile a required extension library.